Lary,
(oops, wrote this yesterday, forgot to post. Some thoughts. Maybe you already have it figured out.)
When a student or visitor in my shop does something they regret, I get out my Box-‘O-Shame and show them some of my goofs. Doesn’t help their problem but maybe makes them feel a bit better! Ain’t a turner/woodworker/metalworker/painter/potter alive or previously alive who didn’t make or do something by mistake. Since I mostly turn small things, my mistakes are often unfixable and go into the shame box.
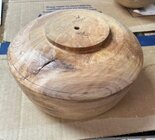
In the case of the hole, I’d absolutely try a fix. I have plug cutters but they often don’t cut cleanly. Instead I’d try to find a small piece with the same color, grain, look, and turn a small face-grain plug to fit. Perhaps there is an offcut or another small chunk of the same or similar log/blank. Turn a small filler piece, (glue to a tiny waste block if needed) paying attention to the rings/figure/grain orientation. I’d make it gently tapered. If the hole is not tapered, it could easily be tapered on the lathe or with a reamer - I keep a box of reamers of different sizes and tapers for wood and metal work.
If the wood is wet, I’d wait until it was well dried. If the hole went out of round or the sides were rough, a long, gently tapered reamer could prep. A bit of shellac-based or cellulose sanding sealer in the hole could help stiffen the fibers. If the piece will be final turned after drying and the tenon removed and the inside thinned, I’d wait until that was done, leaving a whisper of extra wood to smooth down after the plug is glued in. If the final base is thick enough, two plugs might be appropriate. If thin, a single smoothly tapered hole and a single turned plug might be easier. Might have to sneak up on the taper to get a good fit. I don’t think I’d use thin CA glue since it could soak into the grain and stain the wood.
If appropriate, some turned decoration on the bottom could hide the joint.
If that tenon will be turned away, another possibility is to remove a few appropriate chips of wood from the tenon before turning it away, glue in ashort plug of almost any wood, then cut the a chip with a scalpel or something to exactly fit the hole, then sand it flat.
One trick John Lucas taught me might work here to hide any small visual discontinuity at the glue line. I’ve used it to fill tiny defects such as a small chip missing: apply a drop of thin CA to a medium fine strip of sandpaper (maybe 400 or coarser) and wet sand the area. The sandpaper picks picks up sawdust from that area, mixes with the film of CA from the sandpaper, then forces it into any small defect. Try this on scrap first - it can make barely visible seams invisible.
Don’t know if appropriate for this piece, but a brute force fix might work - we last used it on a student’s box where the bottom was cut deeper than the wood! Cut out a larger hole and glued in a larger plug from a completely dissimilar wood. In the box case, we added the same wood to the center of the lid to create a visual balance. This wouldn’t work on a bowl, but perhaps a ring glued to the rim would work?
How about making it into a pedestal bowl? With the right wood that might look good inside and on the bottom. Hard to imagine without seeing more of the shape of the piece or the shape in your’ mind’s eye.
I’m doing a lot of guessing here based on nothing but one picture. But that’s all I can think of just now

")


 I have some mad inflation going on down here


