• July 2025 Turning Challenge: Turn a Multi-axis Weed Pot! (click here for details)
  • Congratulations to James Seyfried for "NE Red Oak II" being selected as Turning of the Week for July 21, 2025 (click here for details)
  • Welcome new registering member. Your username must be your real First and Last name (for example: John Doe). "Screen names" and "handles" are not allowed and your registration will be deleted if you don't use your real name. Also, do not use all caps nor all lower case.

Options for managing multiples and glue blocks

Joined
Jan 8, 2021
Messages
368
Likes
478
Location
Wrentham, MA
I'm working on a set of a dozen smallish staved vessels. These are approximately 6" tall, 5.25" diameter at top, and 4" at bottom. I'd like to set up a half dozen glue blocks to facilitate working in sets. (completing the same step on multiples, then moving to next step) To this end, glue blocks will be employed to hold the bases. Initially to true them up, but then to turn the rabbets, and ultimately glue the top to the base for the final turning. I don't have but 2 spare face plates, so I'm thinking about other options.

The glue blocks are cut from dry 8/4 cherry. The options available are to turn a tenon or recess on the glue block and use a chuck. Swapping glueblocks as needed. The second option would be drilling each glue block and tapping for 3/4 x 10 threads and use the robust drive center. Is one of these options better than the other? By better I'd be looking for consistency in remounting and ensuring the vessels run true. I'd like to avoid buying more face plates.
 
I would use option #1 - tenon on glue block with chuck. Be sure to put a mark on each glue block for accurate re-mounting. I have a mark on the center of jaw #1 and a Sharpie mark (small line) on the glue block (not the tenon or shoulder) that is always visible.
 
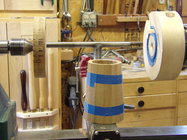
In 2016 I made a run of tankards modeled off one retrieved from the wreck of the Mary Rose. The body is about 4 1/2" bottom and 3 1/2" on the top made from 15 staves.
101_1077.JPG
This is the dry assembly ready to be mounted.
101_1081.JPG
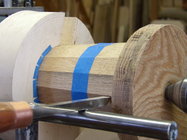
This is the dry assembly mounted to cut an area on the large end for a hose clamp to hold it together for grooving the base.
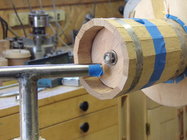
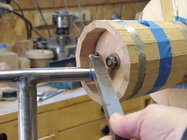
101_1083.JPGThis is the tailstock removed and the assembly held in place for grooving the base similar to the method used for fitting the tops and bottoms on barrels. The diameter of the groove is measured and used in sizing the bottom. The next step is to prepare the bottom, disassemble the dry stave assembly, roll the 15 staves out flat, apply glue between staves and in the groove, roll it back together with the bottom in place and clamp with 2 hose clamps.
I started an article for American Woodturner but then the article was rejected as being to complex.
 
Another alternative is to thread the glue blocks to the headstock directly (e.g. 1-1/4 x 8) for stronger connection than the 3/4 x10. Beall (Now Lee Valley) had nice taps in the common sizes.

Don, what is the advantage of turning the staves before glue up? We have a similar process for Staved Urns, but are turning a glued up blank. Wood love to see your article if you'd like to share.
 
Don, that is a great idea - one of the things I've been pondering is how to cut a groove for the bottom in staves prior to gluing them up. What tool do you use to cut the actual groove? Given that it is at an angle, I'm wondering if you adapted a tool for that job. Also - what is the purpose of the cut out on the jam chuck at the headstock end? It does not appear that the opposite side has any cut - does that block move at all?

Lance - yes threading glue blocks to the spindle would be an option - still would need to purchase the tap, but worth considering, and would be useful in the future too. Thanks.
 
I would create glue blocks with a tenon on each. If you make the diameter just above the minimum size that your jaws will clamp onto, the gap between jaws will be very small. This will give you very consistent mounting and remounting because the jaw/wood contact is very round with maximum surface area. You can mark the spot between the #1 and 4 jaws so you mount in the exact same position for even greater accuracy.

I would also use something other than 8/4 cherry. You really don't need that much thickness. I use whatever scrap I can find and if it's not thick enough, I glue pieces together.
 
A spindle tap or tenon would be my choice. My chucks are marked and all pieces get a mark to return them to the same spot, and, For a project like this, I would use tenon and jaw size and jaw type that will leave significant indents in the tenon for relocation - its a bit like engine rods where the big end is broken in 1/2 and the cap locates on the jagged surface.
 
Don, what is the advantage of turning the staves before glue up? We have a similar process for Staved Urns, but are turning a glued up blank. Wood love to see your article if you'd like to share.
Like I said the bottom is installed when gluing so it is captive just like a barrel rather then a rabbit joint when installing after the glue up.
LcutBot.JPG
This is the tool I made to cut the groove, the cutter is made from a 3/8" shank end mill and is set into the steel bar at an angle.
NCuttingBot.JPG
This is another tool I made to quickly true up the edge on the bottom. The blank for the bottom is against a sand paper platen so there are no marks on it.
Also - what is the purpose of the cut out on the jam chuck at the headstock end? It does not appear that the opposite side has any cut - does that block move at all?
The jam chuck is made of basswood which is soft enough to force the staves together so the cutout is to pry the assembly out.
 
Back
Top