I was going to put this in "What's on your lathe?" but I just took it off the lathe. Maybe someone would be interested in the project.
Eastern Red Cedar, 1st coat of oil finish.

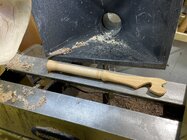
This is not an odd looking weapon, but a tool to use in the kitchen to assist pulling and pushing the oven rack while keeping the hands away. There's a hook to pull and a notch on the end to push the rack.

I made this one for a person we met in the local Low Vision Club, a group of people with, well, low vision! Some have no vision. They meet to help each other with resources, support, and ideas for coping. My wife and I discovered the group a few months ago (she has low vision, legally blind) and some of the resources and ideas have been a big help.
Going around the room, one woman said she could see a little but told about a problem she had using bulky oven mitts at the oven, sometimes had problems grasping and moving the oven rack, had gotten burns. I told her about oven sticks and said I'd make one for her. Plan to take it to the next meeting in a few days. People with dexterity problems in their hands might also like these. People who like custom-made wooden things might also like one!
Years ago a kind gentleman sent me one - he makes them from flat wood. I liked the idea so I devised a way to prepare blanks and turn them. I also made a plexiglass template people can trace the shape onto paper.
These are VERY POPULAR with people who bake! We keep one on the shelf above the oven.
It does take a bit of effort to prepare the blank, drill, turn, cut the notches, then do some smoothing by hand. I mostly do them in one piece but have done some with a handle made with a different piece of wood with a hole drilled to accept a tenon turned on the flat working end. For a one piece oven stick I start with a 1.5" square blank about 16" long.
I make these from various woods and often add texture. The one I used yesterday (while making our special granola for my morning yogurt!) is persimmon and I made stippled textured bands on the handle. The only thing missing on my design is some way to hang them up - a screw-eye or a drilled hole with a strip of leather could fix this.
I've only taken photos of a few of these, for example these two made from cherry.

Tools used: bandsaw, drill, lathe (skew, spindle gouge), chuck, live center, Sharpie, files, sandpaper, maybe a rotary tool, perhaps a texturing tool.
Below is sort of what a prepared blank might look like before turning. I made this demonstration blank to explain the process. I drew a handle outline just to give people the idea but don't bother when making one since those marks are cut away immediately when rounding. I sometimes mark and drill the holes to define the bottoms of the notches before mounting on the lathe and after bandsawing the working end to about 5/8" thickness. 5/8" thick will fit nicely with all oven racks I've checked. I didn't drill the holes on this demo blank. 5/16" is a good hole diameter.
The 1.5" square blank is bigger than needed for the handle, but gives more space for a larger notched end.

It REALLY helps to outline the working end shape with a Sharpie so I can see to turn to the line while the wood is spinning. I also flare the left end of the flat with bandsaw cuts just in front of the transition to the handle. I put the dimensions I use in the drawings in the the instructions.
It's "turning air", but in a spindle orientation. I think it's important to hold one end in a chuck since turning between centers might be more challenging. I use a 1/2" Steb live center on the tailstock end.
Note there is no need to bandsaw the outline of the narrowed end of the blank before turning. In fact, cutting the shape to the line on the lathe nicely rounds the top and bottom edges. Sharp tools are helpful.
Once mounting on the lathe it's probably best to turn the whole thing in one go without removing it from the chuck. It's hard to remount a wooden square with precision.
After turning, I use a stationary belt sander to smooth the sides of the narrowed section but other ways would work - sanding disks, hand scrapers.
I'll post instructions in case anyone is interested. This might a nice gift for someone who already has enough bowls.
If anyone wants to make one and doesn't yet have spindle-turning skills, come visit and we'll fix that!
JKJ
Eastern Red Cedar, 1st coat of oil finish.
This is not an odd looking weapon, but a tool to use in the kitchen to assist pulling and pushing the oven rack while keeping the hands away. There's a hook to pull and a notch on the end to push the rack.
I made this one for a person we met in the local Low Vision Club, a group of people with, well, low vision! Some have no vision. They meet to help each other with resources, support, and ideas for coping. My wife and I discovered the group a few months ago (she has low vision, legally blind) and some of the resources and ideas have been a big help.
Going around the room, one woman said she could see a little but told about a problem she had using bulky oven mitts at the oven, sometimes had problems grasping and moving the oven rack, had gotten burns. I told her about oven sticks and said I'd make one for her. Plan to take it to the next meeting in a few days. People with dexterity problems in their hands might also like these. People who like custom-made wooden things might also like one!
Years ago a kind gentleman sent me one - he makes them from flat wood. I liked the idea so I devised a way to prepare blanks and turn them. I also made a plexiglass template people can trace the shape onto paper.
These are VERY POPULAR with people who bake! We keep one on the shelf above the oven.
It does take a bit of effort to prepare the blank, drill, turn, cut the notches, then do some smoothing by hand. I mostly do them in one piece but have done some with a handle made with a different piece of wood with a hole drilled to accept a tenon turned on the flat working end. For a one piece oven stick I start with a 1.5" square blank about 16" long.
I make these from various woods and often add texture. The one I used yesterday (while making our special granola for my morning yogurt!) is persimmon and I made stippled textured bands on the handle. The only thing missing on my design is some way to hang them up - a screw-eye or a drilled hole with a strip of leather could fix this.
I've only taken photos of a few of these, for example these two made from cherry.
Tools used: bandsaw, drill, lathe (skew, spindle gouge), chuck, live center, Sharpie, files, sandpaper, maybe a rotary tool, perhaps a texturing tool.
Below is sort of what a prepared blank might look like before turning. I made this demonstration blank to explain the process. I drew a handle outline just to give people the idea but don't bother when making one since those marks are cut away immediately when rounding. I sometimes mark and drill the holes to define the bottoms of the notches before mounting on the lathe and after bandsawing the working end to about 5/8" thickness. 5/8" thick will fit nicely with all oven racks I've checked. I didn't drill the holes on this demo blank. 5/16" is a good hole diameter.
The 1.5" square blank is bigger than needed for the handle, but gives more space for a larger notched end.
It REALLY helps to outline the working end shape with a Sharpie so I can see to turn to the line while the wood is spinning. I also flare the left end of the flat with bandsaw cuts just in front of the transition to the handle. I put the dimensions I use in the drawings in the the instructions.
It's "turning air", but in a spindle orientation. I think it's important to hold one end in a chuck since turning between centers might be more challenging. I use a 1/2" Steb live center on the tailstock end.
Note there is no need to bandsaw the outline of the narrowed end of the blank before turning. In fact, cutting the shape to the line on the lathe nicely rounds the top and bottom edges. Sharp tools are helpful.
Once mounting on the lathe it's probably best to turn the whole thing in one go without removing it from the chuck. It's hard to remount a wooden square with precision.
After turning, I use a stationary belt sander to smooth the sides of the narrowed section but other ways would work - sanding disks, hand scrapers.
I'll post instructions in case anyone is interested. This might a nice gift for someone who already has enough bowls.
If anyone wants to make one and doesn't yet have spindle-turning skills, come visit and we'll fix that!
JKJ
Last edited:


")


 )
)