• Congratulations to Phil Hamel winner of the April 2025 Turning Challenge (click here for details)
  • Congratulations to Paul Hedman and Donna Banfield for "Fire and Ice" being selected as Turning of the Week for 5 May, 2025 (click here for details)
  • Welcome new registering member. Your username must be your real First and Last name (for example: John Doe). "Screen names" and "handles" are not allowed and your registration will be deleted if you don't use your real name. Also, do not use all caps nor all lower case.

Pattern for Shaker Knobs

Joined
Jul 19, 2017
Messages
492
Likes
468
Location
Roscoe, Illinois
Any suggestions for cutting a pattern to use in turning Shaker knobs? I have a sample to match, but would like to get a pattern (of half the knob) to get the 10 knobs I'm turning for a dresser to match as closely as possible. They are just typical Shaker knobs; nothing unusual.

Because the knobs are realatively small, it's hard to cut a pattern precisely from almost any material (rigid cardboard, thin plywood, "chipboard").

Since the number of knobs is only 10 I want to keep initial setup to a minimum.
 
Can you protect the wood with plastic wrap or something then push it into stiff clay, a bit of plaster of paris or some type of modeling paste, let it set, then cut the mold in half and trace that half?

I once wanted to trace a small shape so I mounted an extremely tiny LED point light source on the shop ceiling, then stuck the object in the desired orientation to a piece of thin, white cardstock so it wouldn't move, then traced the shadow in the darkened room. Cut that out and it made a near. perfect pattern. The greater the distance from the light to the object, of course, the better.

Could also work buy putting the point light across the room, set the knob on a table, and put a vertical card (stuck to a block of wood?) behind it. Might even be easier and could get the light further away.

I've also stuck an object down to cardstock to keep it from moving, then used the 90-deg corner of a 3x5 card to work around the object and mark the outline in a bunch of places, then connected the dots and cut out a pattern.

JKJ
 
Sort of like JKJ - I'd just take a photo with my cell phone , making sure to get square on to the profile I wanted, then print a copy and use scissors to cut out the exact shape. Glue it to a scrap of wood or cardboard maybe if you wanted something more durable or to create your story stick from.
 
Sort of like JKJ - I'd just take a photo with my cell phone , making sure to get square on to the profile I wanted, then print a copy and use scissors to cut out the exact shape. Glue it to a scrap of wood or cardboard maybe if you wanted something more durable or to create your story stick from.

Hey, that's exactly what I do when making "profile" turnings, like these mugs I made for my son and wife:

profile_comp.jpg profile_PC244147es.jpg

I put the photos in Photoshop and use the edge selection tools to isolate the subject from the background.

BTW, it's best to use a long lens (telephoto) and get back away from the object to minimize distortion from a wide angle lens. Might not be as important with a knob but wouldn't hurt. A long lens is great when trying to get sneaky profile photos without the person knowing.

And use a contrasting background!

JKJ
 
hard to cut a pattern precisely from almost any material (rigid cardboard
might be over thinking it.
Most shaker knobs are a 1/2 bead and a cove, and maybe a flat.

I’d try a story stick. Parting cut to the deepest part of the cove with callipers.
Keep the bead cove line sharp and on the story lines

After turning 3
The next 20 will be darn close.

They just have to look identical. If a cove is a 1/16 deeper on some they still look identical
 
might be over thinking it.
Most shaker knobs are a 1/2 bead and a cove, and maybe a flat.
I’d try a story stick. Parting cut to the deepest part of the cove with callipers.
Keep the bead cove line sharp and on the story lines
After turning 3
The next 20 will be darn close.
They just have to look identical. If a cove is a 1/16 deeper on some they still look identical
Absolutely. They don't have to look identical, just similar. Probably the most important dimension to match is the overall diameter of the knob. Then the height, especially where the maximum diameter is. Make several extra, then discard the ones which are least similar. They may well be among the first few you turn,
 
One of my first projects were drawer pulls for some furniture I was making. Here is a link to that video. Steve Jones, I think, aka Woodturner 21 also has a video up on You Tube about making them. If I need 10, I will turn 12 to 15 and pick the ones I like best. I have seen some which have a tapered dowel/tenon on them, or even a straight tenon for inserting into a drilled hole, and those work too.

View: https://www.youtube.com/watch?v=RoA1dMimSN8


robo hippy
 
Google "contour gauge". Dirt cheap and effective. They come in plastic and metal wire styles.

I've got this one, works just fine.
 
Google "contour gauge". Dirt cheap and effective. They come in plastic and metal wire styles.

I was going to say that but it was said first.
But then I looked on amazon and saw this, hardly worth making yourself.

 
Google "contour gauge". Dirt cheap and effective. They come in plastic and metal wire styles.
I've got this one, works just fine.
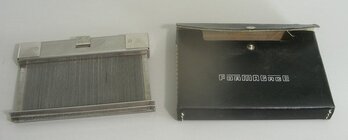
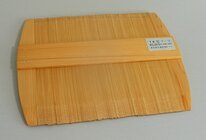
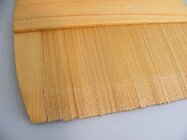
Decent, but like most these days, the pins are rather large in diameter and blunt. I have two which are really nice, but neither are available any longer. I've been using a Form-a-Gage for almost 50 years. Fine pins (maybe 30/inch), secure lock. I used one in my archaeological career to do almost 5000 measured pottery drawings. All the dust and grit had no effect on it. They haven't been made for decades. Also during my archaeological career in Turkey some 20 years ago, I was given a Japanese one made of bamboo, after I shared a lot of pottery data with the Japanese project staff. The 'fingers' are very thin slivers of bamboo -- probably about 60 / inch! That is such a beautiful tool that I haven't used it.

t.2 DSCF2071 sm.JPG1 DSCF2073 sm.JPG3 DSCF2066 sm.JPG4 DSCF2069 sm.JPG
 
Google "contour gauge". Dirt cheap and effective. They come in plastic and metal wire styles.

I was going to say that but it was said first.
But then I looked on amazon and saw this, hardly worth making yourself.

I'd be tempted to buy those over making them. It probably took the machine 5 seconds to make that knob.
 
For a simple pattern, a piece of paper will work for a little while. You can sketch at full scale, then cut out the pattern with embroidery scissors. Extra thick or stiff paper would be extra good.

You can also sketch a full item at larger than full size, color it black to make a silhouette, and then hold it up behind the piece you're working on to see how your contour compares.

For something as straightforward as Shaker knobs, I'd agree a pattern is probably not needed. Reed says he'd make a few extra, and I'd probably need twice that many extra, but it's a whole 15 minutes more turning to get them.
 
Back
Top