• Beware of Counterfeit Woodturning Tools (click here for details)
  • Johnathan Silwones is starting a new AAW chapter, Southern Alleghenies Woodturners, in Johnstown, PA. (click here for details)
  • Congratulations to Paul May for "Checkerboard (ver 3.0)" being selected as Turning of the Week for March 25, 2024 (click here for details)
  • Welcome new registering member. Your username must be your real First and Last name (for example: John Doe). "Screen names" and "handles" are not allowed and your registration will be deleted if you don't use your real name. Also, do not use all caps nor all lower case.

problem with Osmo Topoil finish

Joined
Aug 28, 2021
Messages
13
Likes
3
Location
Half Moon Bay, CA
After I apply a coat of Topoil and it cures, the surface is rough. Has anybody else experienced this and if so, how did you solve this problem?

I apply my first coat with a white, non woven pad. I wipe off any excess with a paper towel since Osmo recommends that the first coat should be thin.
I let it cure for about 12 hours. When I feel the surface, it's rough, even though I sanded to 320. I then apply a slightly thicker second coat with a another white,
non-woven pad and let it cure. The surface is still rough. Anybody have any ideas how to solve this problem?
 
Joined
Oct 6, 2022
Messages
352
Likes
937
Location
Brenham, Texas
Did you sand again after the finish dried. Sounds like the finish raised the grain.
 
Joined
Aug 28, 2021
Messages
13
Likes
3
Location
Half Moon Bay, CA
Did you sand again after the finish dried. Sounds like the finish raised the grain.
No, but I applied the finish after the bowl was taken off the lathe. Perhaps I need to do the finishing while it's on the lathe. But this does seem to happen
with all woods I've tried, oak, hard maple, cherry, etc. But the degree of roughness is the same for all woods. I wouldn't expect that grain would rise on
hard maple the same way it does on a soft wood, such as soft maple. Am I wrong here?
 
Joined
Nov 13, 2019
Messages
117
Likes
105
Location
IL.
After I apply a coat of Topoil and it cures, the surface is rough. Has anybody else experienced this and if so, how did you solve this problem?

I apply my first coat with a white, non woven pad. I wipe off any excess with a paper towel since Osmo recommends that the first coat should be thin.
I let it cure for about 12 hours. When I feel the surface, it's rough, even though I sanded to 320. I then apply a slightly thicker second coat with a another white,
non-woven pad and let it cure. The surface is still rough. Anybody have any ideas how to solve this problem?

When putting on multiple coats of any finish I typically Lightly sand in between coats with something between 800 and 1500 grit sandpaper. Just lightly sand enough to get rid of the dust nibs. Once you feel it's smooth, add another coat. Have not used Osmo yet, but should work.

Also - in my experience a soft cotton cloth will leave a smoother finish than a paper towel.
 
Joined
Aug 6, 2009
Messages
694
Likes
498
Location
Lummi Island, WA
I have used Osmo Top Oil a bit on soft maple (good old NW Big Leaf Maple, Alder and even on Madrone) and haven’t had it raise the grain. In all the info and videos I’ve seen, when they say a thin coat - they mean an extremely thin coat - we’re talking drops (less than 1/2 teaspoon for a 16” bowl 5” deep - we’ll rubbed into the surface. If you’ve got anything to wipe off with a paper towel I’d suggest that you’re using way too much.
Its been a while (couple of years) since I experimented with it; for those pieces I’ve used it on, I sanded to 400, I put on three very thin coats, well rubbed in and let each coat cure overnight. None of those pieces required sanding between coats. In all cases, darkening of the wood was minimal and the Top Oil brought a medium luster surface that I like and the finish holds up well to repeated handling. I did appreciate that the pint or so quantity I bought lasted a very long time. It wasn’t cheap.
 
Joined
Aug 10, 2021
Messages
178
Likes
119
Location
Benton, AR
Try this, wet the wood with water and then let iy dry, after it is dry, sand the wood with fine sandpaper.

That should do away with most of the raised grain you are getting and after you are done finishing you could polish it after the finish has hardened up.
Leo, I've been 'dying' to ask, "is that Pinot Noir"?
 
Joined
Feb 26, 2019
Messages
1,814
Likes
1,416
Location
Lebanon, Missouri
An oil type finish does not raise the grain, like water will, but…the “whiskers” left from not reverse sanding can stand up when the finish dries. For flat work these are removed by sanding back and forth with the grain. For turning, reverse sanding, with the last one or 2 grits, will do it. White scotchbrite doesnt cut to remove them, it very lightly abrades.

Without seeing/feeling the surface its about impossible to say, but could it be bleed out? A common problem with low viscosity long open time finishes, not sure it can happen with Osmo. Ive played with Rubio and it didnt seem likely bleed out would happen.
 
Joined
Oct 13, 2016
Messages
1,053
Likes
1,463
Location
Rainy River District Ontario Canada
An oil type finish does not raise the grain, like water will, but…the “whiskers” left from not reverse sanding can stand up when the finish dries. For flat work these are removed by sanding back and forth with the grain. For turning, reverse sanding, with the last one or 2 grits, will do it. White scotchbrite doesnt cut to remove them, it very lightly abrades.

Without seeing/feeling the surface its about impossible to say, but could it be bleed out? A common problem with low viscosity long open time finishes, not sure it can happen with Osmo. Ive played with Rubio and it didnt seem likely bleed out would happen.
I find that it does swell the grain some, not as much as water, but taking care of it first will give you a better finish, just IMO
 
Joined
Aug 28, 2021
Messages
13
Likes
3
Location
Half Moon Bay, CA
When putting on multiple coats of any finish I typically Lightly sand in between coats with something between 800 and 1500 grit sandpaper. Just lightly sand enough to get rid of the dust nibs. Once you feel it's smooth, add another coat. Have not used Osmo yet, but should work.

Also - in my experience a soft cotton cloth will leave a smoother finish than a paper towel.
I think you may have hit the nail on the head with your cloth vs. paper towel comment. I think the paper towel may be leaving rough paper particles when I rub it against the wood vigorously. I will also try sanding between coats and see if that works.
 
Joined
Jul 19, 2018
Messages
1,686
Likes
2,077
Location
Ponsford, MN
I find that it does swell the grain some, not as much as water, but taking care of it first will give you a better finish, just IMO
I was thinking of replying to Doug F with the exact same comment as Leo's. I have gone thru several gallons of Watco Danish Oil in my current home which has 100% custom woodwork in northern red oak and I have also used it on turnings. The grain always raises on the first application, some on the 2nd application and a smaller amount on the 3rd application. The trick is to wet sand or steel wool or Scotch Brite when the surface is still wet then wipe down with cloth or paper towels then recoat after 2 days. The surface should be dry worked with one of the above mentioned abrasives before recoating and waxed after the final application.
 
Joined
Jul 5, 2015
Messages
312
Likes
2,763
Location
Strongsville, Ohio
I use Osmo Polyx quite a bit. I always raise the grain with water prior to my final sanding step of 400 grit, no matter what finish I use. I apply the Osmo with a white Scotchbrite pad, wait a few minutes, and wipe off the excess with a cotton rag. I wait 24 hrs, then repeat. I then wait a week or so. If the oil was not wiped off sufficiently with the cotton rag, it can leave some rough spots. I remove the rough spots with steel wool, it comes off rather easily. I then use Beall buffing with Beall's white diamond or with Vonax. This results in a glossy sheen, but not quite as glossy as what I can get with solvent lacquer or oil base poly.
 
Joined
Aug 28, 2021
Messages
13
Likes
3
Location
Half Moon Bay, CA
I use Osmo Polyx quite a bit. I always raise the grain with water prior to my final sanding step of 400 grit, no matter what finish I use. I apply the Osmo with a white Scotchbrite pad, wait a few minutes, and wipe off the excess with a cotton rag. I wait 24 hrs, then repeat. I then wait a week or so. If the oil was not wiped off sufficiently with the cotton rag, it can leave some rough spots. I remove the rough spots with steel wool, it comes off rather easily. I then use Beall buffing with Beall's white diamond or with Vonax. This results in a glossy sheen, but not quite as glossy as what I can get with solvent lacquer or oil base poly.
Thanks for your thorough description of how you apply Osmo. I've been told by Osmo tech support that TopOil is virtually the same as Polyx, but TopOil is certified food safe.

I found the major reason for the rough surfaces was I was wiping off the excess with a paper towel instead of cloth. Apparently, paper towels leave a lot of lint that creates a rough surface.
The grain does get raised a little when using a cloth, but not enough to worry about since I'm making small production utensils that will be used in a kitchen.
However, I'll use your technique with bowls from now on.
 
Joined
Aug 14, 2007
Messages
5,435
Likes
2,792
Location
Eugene, OR
Just started experimenting with this stuff. I do apply it with the grey synthetic steel wool pads. Will apply several coats on my drawer pulls I am making.

robo hippy
 
Joined
Nov 24, 2019
Messages
27
Likes
324
Location
Dresher, Pennsylvania
Website
www.rareearthbowls.com
I've used Osmo top oil on bowls made from different woods (cherry, oak, maple, walnut) and my best results came from applying a thin coat of Osmo using a paper towel, followed by sanding paste (Ack's) while the oil is still fresh. Then a day or two of drying followed by another thin coat of Osmo. Sometimes I would go to a third coat, if I felt it needed it. No sanding between coats.
 
Joined
Aug 28, 2021
Messages
13
Likes
3
Location
Half Moon Bay, CA
Just started experimenting with this stuff. I do apply it with the grey synthetic steel wool pads. Will apply several coats on my drawer pulls I am making.

robo hippy
Grey synthetic pads may be too coarse. I (and a number of people I know) use white synthetic pads, which contain no abrasive. But I'd like to hear the results of your experiments.
 
Joined
Jan 20, 2011
Messages
382
Likes
461
Location
Traverse City, MI
Does a partial can of it stay pretty decent? Probably doesn't "skin over" like poly, but for infrequent use, should I putting it in a zero-loss bag? I just bought a pack of them on Amazon for my poly finishes. I don't like the tiny cans, but partway thru a larger can, the poly will skin over or start to gel. (hoping the bags put the brakes on that)
 
Joined
Feb 28, 2021
Messages
1,207
Likes
1,047
Location
Roulette, PA
Website
www.reallyruralwoodworks.com
Does a partial can of it stay pretty decent? Probably doesn't "skin over" like poly, but for infrequent use, should I putting it in a zero-loss bag? I just bought a pack of them on Amazon for my poly finishes. I don't like the tiny cans, but partway thru a larger can, the poly will skin over or start to gel. (hoping the bags put the brakes on that)
I would think the stop loss bags would put the brakes on that as long as you take care to squeeze out the air before putting the cap back on after dispensing. Most finishes, the skin develops due to exposure to oxygen, so stop loss bags let you dispense just a small amount and the squeeze the air out of the bag (except maybe a bit of bubble at the top) which puts a stop to most finishes developing that skin of cured material... I actually put ALL of my finishes in stop loss bags (except for tried & true original, which I store the partial can with lid on and upside down, until I need to put some more in my little T&T finish jars) - Even my Bullseye Shellac (which I bought almost a year ago, and it is still good, though I have to re-mix it if it sits for too long and the solids settle out to the bottom) I have had little to no loss of finishes after going to stop loss bags , which can add up to quite a savings when you're on a tight budget.
 
Joined
Aug 28, 2021
Messages
13
Likes
3
Location
Half Moon Bay, CA
Does a partial can of it stay pretty decent? Probably doesn't "skin over" like poly, but for infrequent use, should I putting it in a zero-loss bag? I just bought a pack of them on Amazon for my poly finishes. I don't like the tiny cans, but partway thru a larger can, the poly will skin over or start to gel. (hoping the bags put the brakes on that)
It does develop bits of congealed material and I would bet the zero loss bags will probably work. The other thing I've found that worked is to wipe all congealed TopOil from the cap and the area that the cap screws onto every time I open the can. This helps a lot and seems to stop the spread of the congealing. Although why this works, I can't say.
 
Joined
Aug 14, 2007
Messages
5,435
Likes
2,792
Location
Eugene, OR
Can't remember, but I think the 'Stop Loss' bags were patented. I did have a friend who put his finish in the plastic bags that are inside the cardboard wine boxes. Same thing. Not sure if they make them in quart sizes or not.

robo hippy
 
Joined
May 26, 2018
Messages
54
Likes
47
Location
Houston, TX
It does develop bits of congealed material and I would bet the zero loss bags will probably work. The other thing I've found that worked is to wipe all congealed TopOil from the cap and the area that the cap screws onto every time I open the can. This helps a lot and seems to stop the spread of the congealing. Although why this works, I can't say.
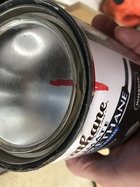
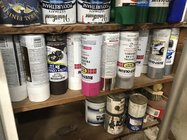
I store pretty much all my finishes upside down and it prevents the “congealed” material in the can. I’ve been storing latex paints and my turning finishes this way for years and it works! I’ve even started storing my spray cans upside down — how many times have you reached for a spray finish, shake it up, go to spray and nothing comes out? The finish is still in there but the propellant has gone. Storing all these things upside down puts the liquid at the ‘interface’ with the ‘world’, and the air or propellant behind it, where it can’t escape. There are no air exchanges, so nothing congeals or dissipate. I take a marker and mark the lid and the side of the can with a continuous line to help me put the lid on the same way every time. Works with screw-top containers too. Most of the time, I’ll put the lid on and then turn the can over in a paper plate for a little while to monitor it. If I did it right, there’s no leaks, and it goes back on the shelf until next time.
 

Attachments

  • D58A5A83-2256-4333-8767-76F27FFD701A.jpeg
    D58A5A83-2256-4333-8767-76F27FFD701A.jpeg
    344.2 KB · Views: 5
  • 26D4F8FA-D671-4E4C-9A52-DF487936437D.jpeg
    26D4F8FA-D671-4E4C-9A52-DF487936437D.jpeg
    423.9 KB · Views: 5
  • B06FCBA8-AE41-4A84-8F8D-58D042242E52.jpeg
    B06FCBA8-AE41-4A84-8F8D-58D042242E52.jpeg
    614.5 KB · Views: 4
  • 9E7493C8-2F5B-4CEE-AD7F-81ED7D253082.jpeg
    9E7493C8-2F5B-4CEE-AD7F-81ED7D253082.jpeg
    553 KB · Views: 5
Back
Top