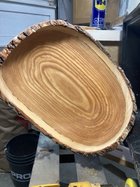
Wondering if anyone has suggestions on the process they use to finish once turned Natural Edge Bowl. This is only the second one I every turned, honey locust from neighbour who was trimming tree in front yard. Measures 14"x12"x 6.5". Very wet, should I let it dry? for how long, want to use tried and true original for finish. Any suggestion greatly appreciated.

-
It's time to cast your vote in the March 2026 Turning Challenge. (click here for details) -
Congratulations to Chris Lawrence for "Dragon's Grip" being selected as Turning of the Week for March 30, 2026 (click here for details) -
Welcome new registering member. Your username must be your real First and Last name (for example: John Doe). "Screen names" and "handles" are not allowed and your registration will be deleted if you don't use your real name. Also, do not use all caps nor all lower case.
You are using an out of date browser. It may not display this or other websites correctly.
You should upgrade or use an alternative browser.
You should upgrade or use an alternative browser.
Process to finish once turned Natural Edge Bowl
- Thread starter Norm Marentette
- Start date
I only turn green to final thickness/once turn. The problem is sanding them. I prefer to let them dry, which in my rainy North Wet area of the world takes at most a week to be totally dry and warping has stopped. You need a lathe that will go down to 10 to 15 rpm for power sanding. Much easier to sand out that way.... I did try wet sanding with finish once or twice, but didn't like it. Mostly the slurry can fill in 'defects' that I want to sand out and that includes 80 grit scratches when I have to go that low. Look up my video on articulated arm for sanding. It lets me rest my arm on the rest, which takes all the load off of your drill holding arm and hand, and your other arm is free to spin the bowl by hand. That is really helpful in the lower grits of sanding. My Vicmark 240 goes that slow anyway. My Robust had to be reprogrammed to go that slow. The first 3520 models would go that slow, but when they stepped up to the B model, shut off was at 50 rpm, which is way too fast to be able to keep the abrasives on the wood for the full revolution.
robo hippy
robo hippy
I hardly ever sand bowls on the lathe, especially natural edges. It's way to easy to round over the interrupted edges. So no issue for me to use the same electric random orbit sanders on all styles of dry bowls.
My approach is to bag the bowl in a paper bag, similar to how first turnings are done. The difference is that the once turned bowls will dry much faster. After a week or two, I remove from the bag, and sit it on a shelf. Then will go back to sanding in about a month. Your local climate and shop conditions will vary from mine and others, of course. This sort of bowl will be sanded with a drill press, so no concerns about lathe speed apply here.
Already 3 different answers!
Already 3 different answers!
- Joined
- Apr 27, 2004
- Messages
- 9,333
- Likes
- 6,159
- Location
- Lakeland, Florida
- Website
- www.hockenberywoodturning.com
If I’m keeping the bark I run thin CA around the bark - this increase the hold to the wood and keeps the bark from shrinking.
Without CA bark will shrink more than the wood making it hard to sand the wood and bark surfaces even.
CA keeps the bark proud easy to sand bark smooth to the wood.
I dry my NE bowls 2—3 days.
Sand off the lathe to 320, apply a coat of Waterlox wipe off after a few minutes, let dry over night, sand with 400.
Apply Waterlox, wipe off, let dry overnight, repeat until the finish looks good sanding with grey scotchbrite between finish coat.
I may do a Beal buff.
And another answer. If you like a textured finish, sand before drying. As the grain dries and shrinks it can leave a surface with a leathery feel, which would be lost if you sand after drying. You can dry the surface enough to allow sanding while it is still on the lathe. I use a hot air gun.
But if you want a smooth finish, let the bowl dry before sanding. That needs a lathe with very low speed, as Robo says. Or do it off the lathe. Either way the wings are a problem, and you will need to do a bit more work on the foot.
But if you want a smooth finish, let the bowl dry before sanding. That needs a lathe with very low speed, as Robo says. Or do it off the lathe. Either way the wings are a problem, and you will need to do a bit more work on the foot.
Norm I have turned Honey Locust quite a bit, but I always twice turn it, I do like the look of the grain and color of Honey Locust just take your time and the right way.
There are a few things you should know about Honey Locust wood, yes it is hard, aside of that, the sap wood shrinks more than the heart wood and it will split if you don't take care of preventing the wood from drying fast (DAMHIKT)
Also Honey Locust is a open grain wood, just as much or more than Red Oak, we have still one of my first Honey Locust bowls with an oil finish that would not dry and kept bleeding the oil, still is sticky now, seal the grain if you want to use an Oil finish and don't saturate the grain with oil, or add a second coat before the first one is dry.
So I suggest you dry it slowly in a brown paper bag and then use something that will seal the grain before adding a finish.
Sanding it is not a problem as the wood does not warp a lot, the bark stays on with every Honey Locust I have turned, with the bark still on you can power sand if you hold the bowl still (I block the lathe and sand that way.)
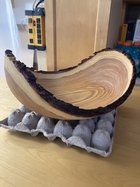
Here is my. last finished natural edge Honey Locust bowl


There are a few things you should know about Honey Locust wood, yes it is hard, aside of that, the sap wood shrinks more than the heart wood and it will split if you don't take care of preventing the wood from drying fast (DAMHIKT)
Also Honey Locust is a open grain wood, just as much or more than Red Oak, we have still one of my first Honey Locust bowls with an oil finish that would not dry and kept bleeding the oil, still is sticky now, seal the grain if you want to use an Oil finish and don't saturate the grain with oil, or add a second coat before the first one is dry.
So I suggest you dry it slowly in a brown paper bag and then use something that will seal the grain before adding a finish.
Sanding it is not a problem as the wood does not warp a lot, the bark stays on with every Honey Locust I have turned, with the bark still on you can power sand if you hold the bowl still (I block the lathe and sand that way.)
Here is my. last finished natural edge Honey Locust bowl
Leo what kind of sealer do you recommend? I know you like the PTO is that what you use for NEB? I went ahead and saturated it with Tried and True Original. Couldn't wait, (Live and Learn). I new better not to but anyhow I think maybe will try cutting another and let it dry in a bag for how long? You say you turn twice, do you follow the same process as a regular bowl. 10% diameter, etc...? Thanks for the info everyone! Just striving and hoping to make that perfect bowl someday.
Even for open grain like red oak or this locust, I follow the same process, poly thinned 1:1, saturate the wood, keep wet 20-30 min, wipe down. Use an air nozzle to blow air across the surface, fairly slow ~25 psi and not fully open. Wipe off bleed out. Check for bleed out after an hour or 2.
I dry mine in double paper bags. When dry, put between centers with a friction chuck, round the tenon and dress the bottom rim where the bowl will sit. Mount in a chuck to sand with a dril and ros, 2” pads. The chuck is just to hold the bowl, I rotate it by hand slowly to sand.
I dont like ca on the bark. It bledds into the sap wood and then doesn't absorb finish, and its easy to see the boundary. It takes some practice to learn how to sand nat edge with bark.
Shellac would work, but I use PTO, I wipe a light coat of PTO on and let it cure, just making sure that the bleed out is wiped off, after a few days another coat goes on and again let cure, the grain should be closed by then.Leo what kind of sealer do you recommend? I know you like the PTO is that what you use for NEB? I went ahead and saturated it with Tried and True Original. Couldn't wait, (Live and Learn). I new better not to but anyhow I think maybe will try cutting another and let it dry in a bag for how long? You say you turn twice, do you follow the same process as a regular bowl. 10% diameter, etc...? Thanks for the info everyone! Just striving and hoping to make that perfect bowl someday.
You can then sand and polish.
Yes I use the thicker wall (about 8% with Honey Locust as it does not shrink a lot) I hope you will not get any splitting, it will be OK if turned thin like this one.

Oh I just made 2 pictures of the old sticky bowl, made in 2001 and yes still a bit sticky after 22 years, don't remember what oil I used on that one, not PTO.
As we did not have a digital camera I never made a picture of it.


Thanks Leo for the great info! Just to summarize;
1. Rough cut 8% wall thickness, 16x12 inch blank, wall thickness 1.25 inch wall thickness; if once turned turn thin and let dry first (2wks) and go to step 3.
2. Dry in paper bag (I use Canadian Tire lawn bags) let dry for ? (year) Leave bag open on one end? or seal completely or seal and check after 2wks?
3. Sand
4. Seal wood with sealer use PTO or shellac (if using oil);
5 Let dry and give another thin coat of PTO or use oil of choice.
6. Lightly sand and polish.
7. Perfect bowl!
PS Amazed at your experience and inventory of knowledge and stock! Thanks again.
Richard, how do you prevent the sanding from creating flat spots? I've tried sanding off the lathe as you suggest, and I can't seem to keep the curves.I hardly ever sand bowls on the lathe, especially natural edges. It's way to easy to round over the interrupted edges. So no issue for me to use the same electric random orbit sanders on all styles of dry bowls.