I have been engaged to turn 10 legs for a custom daybed. The first one/prototype has been completed. It is pretty elaborate, with both large and small beads and coves of varying profiles. (These are about 12" x 5" forms). I am realizing that this is a little more ambitious than any other spindle project I have done. I am aware of storyboards, multiple calipers, etc. But if anyone has any suggestions re: process, workflow, hitting all the marks efficiently, I'm all ears. Any recommended videos or articles, too? Thanks, folks.

-
Congratulations to Chris Lawrence for "Dragon's Grip" being selected as Turning of the Week for March 30, 2026 (click here for details) -
Welcome new registering member. Your username must be your real First and Last name (for example: John Doe). "Screen names" and "handles" are not allowed and your registration will be deleted if you don't use your real name. Also, do not use all caps nor all lower case.
You are using an out of date browser. It may not display this or other websites correctly.
You should upgrade or use an alternative browser.
You should upgrade or use an alternative browser.
Production Spindle Turning
- Thread starter Steven Forrest
- Start date
My first thought is, If it were me, I'd plan to make 20 in order to get 10 that would work. ") YMMV
YMMV
More usefully, the 10th one will be immensely easier than the first, so maybe don't judge on your experience to this point.
There may be a couple forum participants with experience as production/architectural turners, but there are some well known ones who don't chime in here. Keith Gottschall is the only one who pops into my senior brain at this moment. He's a wonderful guy and might be willing to share his thoughts.
YMMVMore usefully, the 10th one will be immensely easier than the first, so maybe don't judge on your experience to this point.
There may be a couple forum participants with experience as production/architectural turners, but there are some well known ones who don't chime in here. Keith Gottschall is the only one who pops into my senior brain at this moment. He's a wonderful guy and might be willing to share his thoughts.
- Joined
- Apr 27, 2004
- Messages
- 9,334
- Likes
- 6,159
- Location
- Lakeland, Florida
- Website
- www.hockenberywoodturning.com
Be sure to copy the same one. Not the last one you turned.I have been engaged to turn 10 legs for a custom daybed. The first one/prototype has been completed. It is pretty elaborate, with both large and small beads and coves of varying profiles. (These are about 12" x 5" forms). I am realizing that this is a little more ambitious than any other spindle project I have done. I am aware of storyboards, multiple calipers, etc. But if anyone has any suggestions re: process, workflow, hitting all the marks efficiently, I'm all ears. Any recommended videos or articles, too? Thanks, folks.
Steve,
I have a 36" Vega duplicator.
Got it used when I bought my General 260. I have never used it.
You can try it if you like. Not sure ....but think you would have to make some blocks to fit your lathe. Like I said......never used it.
I have a 36" Vega duplicator.
Got it used when I bought my General 260. I have never used it.
You can try it if you like. Not sure ....but think you would have to make some blocks to fit your lathe. Like I said......never used it.
If it were me I would tell the owner to order them from someone with a CNC copy lathe and have more fun turning something else.
I do not understand the term varying profiles! The best looking bead or cove has a consistent radius otherwise they just look like a mistake. If you were to post a photo of the item then I/we could better understand the project and be able the offer suggestions.The first one/prototype has been completed. It is pretty elaborate, with both large and small beads and coves of varying profiles
In order:
Dean Center, thanks for the referral to Keith G. I'll try to contact him. I saw him in Portland and yes, he struck me as imminently approachable.
Al Hockenberry, that's exactly the sort of subtle clue I was looking for - thanks!
Hugh, I'll contact you privately - thanks for the offer. I've never even really seen one of those - I'd like to explore whether it will suit my needs.
Richard Coers, there's a little more of the story here, and the guy I am working with is super nice and good to collaborate with. It's worth it to try something new and stretch. It's not 100 units - it's just 10. You're right, a big run wouldn't be fun at that point.
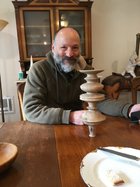
Don Wattenhofer, by "varying profiles" I meant that there aren't regular, repeating beads/coves. Each is a different shape. Attaching a photo (sorry it includes me).
Thanks, you guys.
Dean Center, thanks for the referral to Keith G. I'll try to contact him. I saw him in Portland and yes, he struck me as imminently approachable.
Al Hockenberry, that's exactly the sort of subtle clue I was looking for - thanks!
Hugh, I'll contact you privately - thanks for the offer. I've never even really seen one of those - I'd like to explore whether it will suit my needs.
Richard Coers, there's a little more of the story here, and the guy I am working with is super nice and good to collaborate with. It's worth it to try something new and stretch. It's not 100 units - it's just 10. You're right, a big run wouldn't be fun at that point.
Don Wattenhofer, by "varying profiles" I meant that there aren't regular, repeating beads/coves. Each is a different shape. Attaching a photo (sorry it includes me).
Thanks, you guys.
Attachments
I learned duplicating from Myron Curtis, He used a system he called point to point turning, As I recall there are some articles in the AAW mag. The basic concept is marking out with a story stick, then calipering major and minor diameters. Then connect the dots (point to point) . Things to think about is you cannot always caliper your smallest diameters early on as that would weaken the spindle and cause chatter when tooling the larger diameter elements. The one element I see that might give grief down the road is the top element, it is all "short grain" and any flex may cause pieces to crack off. Not sure of the fix, but something to consider.
Then there is placement, the first ones you turn go in the back") .
.
One thing I've found is that after turning multiples, all other aspects of turning seem to improve, from bowls to boxes to platters, things just seem to turn easier or maybe they are just more fun...
These were turned point to point, not a big run, but always learning.

Then there is placement, the first ones you turn go in the back
.One thing I've found is that after turning multiples, all other aspects of turning seem to improve, from bowls to boxes to platters, things just seem to turn easier or maybe they are just more fun...
These were turned point to point, not a big run, but always learning.
Roger Wiegand
Beta Tester
Story stick (with notches for your pencil or skew point) for the distances, on a small project like this multiple calipers (maybe 4-5 for a table leg) for key dimensions. There are more elaborate devices for setting the diameters but it's not worth setting up for just 10. Having a good drawing, or the actual spindle, hanging right behind the lathe so you can see it while you work, can be very helpful for replicating shapes.
The key thing to remember is that, especially for table legs that aren't all lined up right next to each other, is that they don't need to be identical, they only need to look identical.
Unless you really love sanding and don't much care about fine detail I'd avoid using a copy lathe. Your skew is your friend on this kind of project.
After you've done 4-5 they will get a lot easier and quicker.
- Joined
- Apr 27, 2004
- Messages
- 9,334
- Likes
- 6,159
- Location
- Lakeland, Florida
- Website
- www.hockenberywoodturning.com
The key thing to remember is that, especially for table legs that aren't all lined up right next to each other, is that they don't need to be identical, they only need to look identical.
This is THE fundamental for multiples.
One key to accomplishing this is to get all the hard lines on the spindle at the same height.
People won’t see different diameters even a 1/4 inch.
Looking down a line of posts a 1/16” difference in height of a line can stand out.
Hi,
I don't post often but do look in from time to time. On my Instagram account a while back I did a kind of turn-along project of an acorn finial which you (and others) might find helpful. If you search #acronfinialchallenge on Instagram it should come up. YOu can download the storyboard for free from my website here if you wanted to have a go. I did a snowman version of the challenge at Christmas (#snowmanchallenge) and the storyboard for that is on the same page.
I hope people find it helpful.
Richard
Look up Woodturner 21. Production spindle turner from England. Best I have seen, and as he says to start the videos, they are not intended to teach, just to show how he does it. I can learn a lot from him...
robo hippy
robo hippy
I would second this suggestion. Pragmatic and experienced.Look up Woodturner 21. Production spindle turner from England. Best I have seen, and as he says to start the videos, they are not intended to teach, just to show how he does it. I can learn a lot from him...
robo hippy
Thanks, guys. Will do.
The guy is called Steve Jones, and if you use Insragram, you'll find a lot of videos there, too.
A joy to watch!
A joy to watch!
Great point worth repeating!One thing I've found is that after turning multiples, all other aspects of turning seem to improve, from bowls to boxes to platters, things just seem to turn easier or maybe they are just more
I would not overthink this project nor buy any additional aids. Photograph your model, make your life size drawing on graph paper, calculate and mark down your key parting tool depths, buy your blanks. If your having trouble at a particular cove or bead section, increase the number of parting tool cuts in the range until your happy with the results. Participate in the old woodturning tradition that you already mentioned and know: Storyboarding.
As others said, you will gain your experience as you go forward. Enjoy the journey and it’s rewards.
Wood species make a big difference in enjoying the process. 10 pieces in red oak can have you pulling your hair out. It takes someone with great skills with shearing tools to produce the transition from the square to profiles. Often called a smile on the spindle.
You could turn a couple of spindles out of Pine to get the process and techniques mastered before you start turning on the wood blanks you need to turn them from. After you turn a couple of the same spindles you will have the process nailed down mentally and the other ones will go much smoother without stressing out over the first couple that you practice on.
Richard -Hi,
I don't post often but do look in from time to time. On my Instagram account a while back I did a kind of turn-along project of an acorn finial which you (and others) might find helpful. If you search #acronfinialchallenge on Instagram it should come up. YOu can download the storyboard for free from my website here if you wanted to have a go. I did a snowman version of the challenge at Christmas (#snowmanchallenge) and the storyboard for that is on the same page.
I hope people find it helpful.
Richard
Great videos! Well done, and much appreciated.
John Kelsey did an interview with Nick Cook this week at the Lancaster Coffee Hour. John asked some excellent questions and Nick gave his approach to projects. It can be accessed at http://www.lancasterareawoodturners.org/coffee-hours-101-110/ and is No 103, currently at the bottom of the list.
There doesn't seem to be an active link to the interview itselfJohn Kelsey did an interview with Nick Cook this week at the Lancaster Coffee Hour. John asked some excellent questions and Nick gave his approach to projects. It can be accessed at http://www.lancasterareawoodturners.org/coffee-hours-101-110/ and is No 103, currently at the bottom of the list.
Dave Landers
Beta Tester
Poke the little triangle a the beginning of the blurb, and the video will show upThere doesn't seem to be an active link to the interview itself
Glad you found them useful!Richard -
Great videos! Well done, and much appreciated.
Correction, the snowman is a skew chisel based challenge and is in the hashtag #snowmanskewchallenge
Richard
I don't see a triangle anywhere on the page -- and moving the cursor over the entire entry does not reveal any active area. Failed with Firefox, Edge, and Chrome.Poke the little triangle a the beginning of the blurb, and the video will show up
I don't see a triangle anywhere on the page -- and moving the cursor over the entire entry does not reveal any active area. Failed with Firefox, Edge, and Chrome.
Did a search on youtube and found it.