• Congratulations to Phil Hamel winner of the April 2025 Turning Challenge (click here for details)
  • Congratulations to Steve Bonny for "A Book Holds What Time Lets Go" being selected as Turning of the Week for 28 April, 2025 (click here for details)
  • Welcome new registering member. Your username must be your real First and Last name (for example: John Doe). "Screen names" and "handles" are not allowed and your registration will be deleted if you don't use your real name. Also, do not use all caps nor all lower case.

Richard Raffan's modest shop, with dust collection details

Joined
Oct 25, 2020
Messages
802
Likes
723
Location
Minneapolis, MN
I didn't see this as a previous thread. Here is a video from a couple years ago of Richard Raffan giving a tour through his small shop, now based around a smaller lathe, a Vicmarc VL150 (12" swing). (I'll presume in the years since his old VHS tape videos that he still used the big VL300 lathe.) He shows how a very complete, yet dedicated turning operation can be established in a small space, something resembling a bedroom in an average house.
View: https://youtu.be/twuFE1-6qB0?


If the dust collection catches your attention, here is the same setup in greater detail (with a couple design mods and ideas) from Tomislav Tomasic. I like what I see, and I may implement this setup in my shop.
View: https://youtu.be/SvB6ipyeVlY?


Reminds me of my first turning shop, 9'x11'. It held my lathe, a workbench, 14" bandsaw, a few wall shelves, and some wood on the floor. A box fan and furnace filter served as dust collection behind the lathe. Simpler times... Now I have over twice that space with 3x the stuff jammed in it and I feel unproductive. Time to clean it out.
 
I've always been intrigued by his dust collection setup. The way he has it all set up in nice cabinets, barely visible, is so nice.
 
Reminds me of my first turning shop, 9'x11'. It held my lathe, a workbench, 14" bandsaw, a few wall shelves, and some wood on the floor. A box fan and furnace filter served as dust collection behind the lathe. Simpler times... Now I have over twice that space with 3x the stuff jammed in it and I feel unproductive. Time to clean it out.
My current shop is 8' x 10'. Holds the lathe, a sharpening station and tool racks on the wall. Dust collection is from a greenhouse exhaust fan sucking through a cyclone separator. We do have 4 band saws of various sizes and about any other power equipment you could use on wood at my work. I do have the ability to shape blanks there, but I mostly chainsaw blanks and throw them on the lathe.
 
I've always been intrigued by his dust collection setup. The way he has it all set up in nice cabinets, barely visible, is so nice.
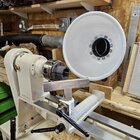
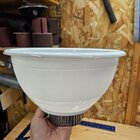
I'm gonna give his collection setup a try for my Oneway 1224, which lives up against a wall. My Vicmarc VL200 shortbed is not against a wall, so I'll keep using my 11" plastic mixing bowl collector hood at that lathe, story about that is here-
Idea conception and follow-through aren't time dependent in my mind sometimes, unfortunately. I'll try for this weekend, but it could be next spring by the time I get to it! I'll update this thread when I do.
 
As to dust collection, minimize the amount created.

Every time I suggest band sawing bowl blanks to round instead of rounding a square on the lathe I get nonsense about it's faster on the lathe. Same with using large drill bits in the drill press or lathe tailstock to eliminate gouge work to waste the inside of bowls (too much trouble to setup a drill chuck in the tailstock, huh??). Besides, think about the extra gouge sharpening needed by all that roughing on the lathe. I much prefer to have small chunks of solid cutoffs than large amounts of shavings to deal with.

Also, by tilting your bandsaw table the tapered outside of bowl can be done lessening the amount of sawdust created too. With a bit of planning maybe half of the quantity of shaving could be eliminated.

I'm not sure Raffan's inlet to his dust collector is efficient . I have a vague memory from engineering school about a more funnel like inlet was far better.

I agree with this. I honestly think its more work to round on the lathe, as not only do you have to remove the wood from the blank...you also have to remove the dust and shavings from everywhere else! That includes dumping the collection bin, blowing off surfaces (which, at least in my case, still get dusty despite dust colleciton), cleaning or replacing air filters, sweeping and all the rest.

Further, turning the wood away effectively makes it just pure waste! If you cut it on a bandsaw, then you have chunks of wood left that you could do something else with. Depending on the exact size of the bowl and the nature of the blank, you could potentially get a set of small items...boxes, small bowls (say endgrain bowls), pen blanks, bottle stopper blanks, who knows! If you just destroy the wood on the lathe, there is no option, if you cut the wood, then there are options. Waste less!

I really wish bowl coring systems were more cost effective. I think the cheapest I've found is around $500, but they can be more expensive than that. I have some big logs I'm going to be chopping up in the new year, and I don't have a way to preserve the cores. It bums me out, because I could potentially get two, three, maybe even four bowls out of some of the blanks I intend to cut from some of these logs. Sadly, for bigger things (salad bowls, etc.) its going to be a lot of wasted wood, and a lot more effort. 😢

There was an interesting discussion on a pen turning forum I'm a member of. I guess it was a couple of years ago now. Lot of people chimed in, and in the end a number of people commented about how efficient a certain kind of bellmouth hood was at collecting dust. This was more for smaller turnings (not sure how efficient it is with a large inlet), but the nature of the bellmouth is that its a smooth, low-resistance inlet that can actually capture dust from a pretty wide area. The distance to the work piece also mattered. Its easy to be too far, but you can also be too close. I suspect Raffan's collection system may be too far at the back end of his taper...and the direction of collection may be off as well. Still, I like the idea of having all that kind of hidden behind cabinetry. It LOOKS NICE. I bet a bellmouth design could be integrated into a panel so that it looked nice, but was still efficient, at least for smaller turning stuff. Not quite sure what teh most efficient inlet is for larger turnings...sometimes I do bigger stuff, and I simply don't have an inlet for turnings that large (nor ducting, really.)
 
Jon, Doug, I don't disagree with any of that.

If I look at Raffan's collection hood, I think it's key idea is that 5 sides of a box are situated right behind the source of the dust. As dust comes off it's source, a majority of it is naturally thrown in the general direction of that box, which at its back side has the source of suction. It makes some sense in my mind, the box tending to contain the initial dust cloud, and the general airflow in through the open side of the box pulls the dust along with it.

I can see how a bell mouth velocity stack opening may be superior when drawing in air from a generally open space, but the 5 sides of his enclosure create a defined space right at the source of the dust.

Maybe I'll incorporate my plastic bowl intake into the box design, it will give me a chance to adjust the height of the intake as well, as it is a little high right now. Hmmm...
1000007928.jpg
 
Every time I suggest band sawing bowl blanks to round instead of rounding a square on the lathe I get nonsense about it's faster on the lathe.

Not sure who disagrees with you on bowls. Just about every turner who does lots of bowls rounds on the bandsaw.
Really small bowls are faster. Trade off is around 5” diameter.
But bowl turners rarely do functional bowls smaller than 8”

Plenty would disagree on spindles. Most spindle turners find it faster to round on the lathe rather than use a saw to make an octagon.
Further, with spindles, the small triangular pieces you usually get if you rip em off on a bandsaw don't seme to have all that much use. Its possible you could find a way to incorporate those triangular cutoffs into a custom blank (maybe even mixed woods), but they don't seem as useful or waste-less as you could be with pre-cutting bowls blanks and using the cutoffs from those for other things. Bowls seem to have a lot more waste than spindles, I think.
 
Jon, Doug, I don't disagree with any of that.

If I look at Raffan's collection hood, I think it's key idea is that 5 sides of a box are situated right behind the source of the dust. As dust comes off it's source, a majority of it is naturally thrown in the general direction of that box, which at its back side has the source of suction. It makes some sense in my mind, the box tending to contain the initial dust cloud, and the general airflow in through the open side of the box pulls the dust along with it.

I can see how a bell mouth velocity stack opening may be superior when drawing in air from a generally open space, but the 5 sides of his enclosure create a defined space right at the source of the dust.

Maybe I'll incorporate my plastic bowl intake into the box design, it will give me a chance to adjust the height of the intake as well, as it is a little high right now. Hmmm...
View attachment 69395
You make a good point about Raffan's box... Guess that intake would generally suck anything in from within the box.

Your bowl intake is great! :D Guess it won't miss much.

From a physics standpoint, at least as I understand it, the nature of airflow with a bellmouth is pretty optimal. The size of things like the boundry layer, resistances to flow, creation of turbulence, etc. are all fairly optimized with bellmouth inlets/hoods. IIRC elliptical designs are best, including designs with a bit of a curled-over outer edge to the inlet. I wonder if there is something out there that could be used to create a nice, large bellmouth hood for use with a lathe like that. Your bowl is nice and smooth, but the design of it, with the lip pointing at the lathe, is probably limiting the capture potential. If you could find something with that same kind of smooth surface, but where....not sure how to describe it, kind of an inverted shape...instead of curving in towards the hose from a lip at the outer edge that points towards the lathe, you would want a lip that flared away from the lathe, and then curved towards the hose, smoothly. Even more optimally, if the outer lip was actually curved back from the lathe just slightly. That should, at least according to the theory, produce the greatest capture potential for not just things directed right into the area of the inlet, but even things that miss it and fly off out past the rim. It would all be captured, and quite efficiently too.
 
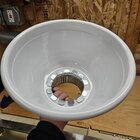
Well, I'm going to hang my hat on my $2 plastic bowl and hope my efforts can deliver 75% of what an engineer practicing aerodynamics could design!

The interior bowl diameter at the top is 10.25", depth to the 4" hole is 5"+ below the rim. All told, it seems like a beneficial, if not optimal, overall shape.

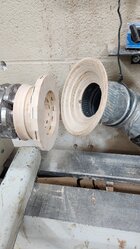
I started cobbling together a shelf and surround system similar to Raffan's this afternoon. Rather that his angle-cut pipe visible inside the box, I'm going to incorporate the bowl into the sidewall. A 10.5" hole will be cut in the sidewall, and the bowl rolled rim will be secured to the inner face of the sidewall. And due to space limits, that sidewall with the bowl will oriented about 45 degrees to the lathe bed, rather than either parallel or perpendicular. All assembled with screws, so if something isn't working I can easily rebuild it.
1000007930.jpg

1000007931.jpg
 
I haven't done any definitive testing on dust collection pickup nozzles and don't plan to. I'm quite happy with what I use, bought years ago at Woodcraft.
I've sanded on long spindles and watched dust travel almost 2' down the length of the spindle to be picked up by the nozzle.

Of course, I have a 5hp cyclone moving the air so the air volume moved and the velocity may be higher than some.

lathe_dust_pickup2_mount.jpg

I wonder if there is something out there that could be used to create a nice, large bellmouth hood

If PVC is heated it becomes quite flexible. I've expanded and contracted the ends of PVC large pipes to make various things fit. Perhaps it could be shaped to suit nozzle desires.
 
I'm not sure Raffan's inlet to his dust collector is efficient . I have a vague memory from engineering school about a more funnel like inlet was far better.

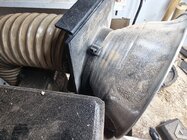
The bell-mouth is the most efficient inlet into ducting. It provides the maximum intake of air with the minimum loss.


Turn your own out of wood... ;)

Bell mouth fitting on dust hose.jpg

 
Last edited:
Alrighty then... Yesterday, in a manic session of amateur engineering and plywood hacking, I was able to build my version of the Raffan dust collection hood system. By the time I was done, and then chucked a small chunk of wood in the lathe to abuse with some sandpapers, and witnessed in dark lighting conditions lit strategically with an LED penlight flashlight, I was able to see the cloud of dust going where we know it goes, to the rear area of the rotating work, now being contained inside the dust box (for the lack of a better name) where it was met by the air stream entering the open side of the box directly behind the lathe, where the airflow into my bowl sucked nearly every bit of dust I saw with the penlight. As a reference point, after a minute or two of sanding, there was scant sanding dust on the bed ways. Proof of concept? Well, evidence, anyway. Better than before? To that I am convinced, yes, simply knowing where the source of air entering the exhaust duct comes from, a defined space (a plenum), rather than the entirety of the open shop area behind the lathe hoping the dust somehow finds its way into air stream entering the exhaust duct, bell mouth or not. (The lathe sends the dust into the box, the box has a big air suck in it, the contained dust has nowhere else to go once inside the box.) Paul, Neil, and John, I think all of your bell mouth inlets would benefit by having some version of box built around them acting as a containment target for the dust stream and then determining where the air stream feeding it originates (from the same direction the dust comes from). I took a bunch of photos of the project, and later I'll start a separate thread concentrating on the build and general design, to separate it from the breadth of conversation in this thread. Stay tuned.
(Here is that update post showing my final project result- https://www.aawforum.org/community/threads/raffans-dust-hood-part-2-my-version.23338/)
 
Last edited:
I honestly think its more work to round on the lathe, as not only do you have to remove the wood from the blank...you also have to remove the dust and shavings from everywhere else! That includes dumping the collection bin, blowing off surfaces (which, at least in my case, still get dusty despite dust colleciton), cleaning or replacing air filters, sweeping and all the rest.

When I make bowl blanks for myself (or others) I ALWAYS cut them round on the bandsaw first. (I often even smooth the circumference with a disk sander and mark the centers.) Rounding helps in several ways - besides eliminating the extra shavings from the corners (not a primary issue for me), it allows the a larger blank to fit inboard on the lathe, important to some people with smaller lathes. Even more important, it is less intimidating to a beginner or student to start shaping a round edge rather than start by fighting with corners. And some don’t have the right tool and the experience that makes removing the corners easy.

I don’t often turn bowls myself, but I often make blanks for others, for example for students/visitors or to donate to our wood auction. I can testify that a flat, thick circle of mahogany will catch bidders attention and bring higher prices than the identical piece with the corners left on. (I also run such round blanks through my drum sander to let them see the true wood color, that there are no surface defects, and make the top and bottom flat and parallel.)

Note that when I cut large rectangular or square blanks that might be useful for bowls, I usually don’t cut them round until ready for use. That retains the option to decide to cut the big square up into smaller blanks, even for [gasp] spindles. (I have some thick planks of sapele and walnut over 30” wide - keeping them rectangular saves the decision for a future user - who knows, they might want to make a bunch of pens or bottle stoppers :)

Further, turning the wood away effectively makes it just pure waste! If you cut it on a bandsaw, then you have chunks of wood left that you could do something else with. Depending on the exact size of the bowl and the nature of the blank, you could potentially get a set of small items..

That one never occurred me. I might save corners if I had a shortage of small wood blanks but I pity the person who has to dispose of my wood when I kick off. Besides, big wood is not always completely dry so any corners saved for making things such as lidded boxes might need to be dried before use.

One minor benefit to cutting blanks round is it give me a supply of wedges good for stabilizing log sections when processing on the bandsaw. Also, for me, carrying a small trash can of offcuts out to the burn barrel is easier than dealing with the extra chips and emptying the big dust/chip collection drum under the cyclone DC.

All this depends, of course, on having a bandsaw. I don’t know how some work without one. A jigsaw could work if the wood isn’t too thick. A chainsaw can help with a secure way to hold the blank.

As for two other things mentioned in this thread:
1) I have never once cut the long corners off a spindle blank, regardless off the size - I see no advantage since it’s so quick to turn to round with a sharp skew.
2) I always drill a hole in middle of a blank, say a 1/4 or 3/8” dia. Since I plan the bowl shape and depth (often with sketches) before removing the first shaving, the hole is not to remove any wood but to define the depth. I drill a little less than my planned depth. Since I turn the outside first, the hole lets me know when I reach the planned depth without using calipers, depth gages, or other measuring things. My fingers and eyes let me know when the inside shape and wall thickness is “right”. Just the way I do things …

Also, related to the sketching and pre-planning, I’m not in the camp of letting the wood “speak to me” as I develop the form, When wood speaks to me it usually says “You moron, why’d you do THAT!”

JKJ
 
Last edited:
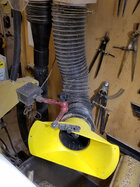
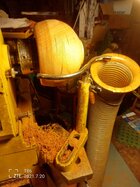
I got the idea for a bell-mouth type collector from @Neil S on another forum. Mine isn't quite a nice lol. I had an old plastic blast gate that I glued to the hacked light fixture thing-a-ma-bob and zip tied it to the comparator (it used to be by the ways).

It's important not to forget the source of collection though. A little portable collector under optimal conditions still performs poorly against something like jkj's 5hp cyclone under the worst conditions.

1000026632.jpg

1000026633.jpg
 
It's important not to forget the source of collection though. A little portable collector under optimal conditions still performs poorly against something like jkj's 5hp cyclone under the worst conditions.
Hi John- I did your setup once, using an old broken spring clamp shop light shade. My efforts of the metalwork were pretty bad in the end, so I trashed it. With yours, find a 18" cube box (UHaul, Home Depot, etc.) and mount your hood in thru a side and have the box sit on your self, I think you'll collect more dust.

The collection source, thanks for saying that. My dust collector is a 1hp, 650cfm Jet 2-bag (re-wired for 240 volt) I bought over 20 years ago. Pre-filtering of large, non airborne debris is with a bought cyclone-like lid on a 30-gal steel trash can. The 2 filter bags are 5-micron felt, emptied and mostly de-caked this past summer. (I did not thoroughly clean the fabric, just removed the thick crusty cake layer that caused pretty severe asthma to the system, any embedded dust was left in the fabric to increase the micron rating, as popular duct collection lore/research leads us to believe. The after effect is greatly improved suction performance.)

For a small shop setup with limited branches, short duct runs (smooth sheet metal when possible, and seal all joints and seams), blast gates, and long sweeps instead of tight 90 degree elbows, a small collector like mine can work effectively. "Shop vacs" won't ever serve this function. But regardless of the CFM capacity of the blower pulling the air, I'm learning here that building an effective intake plenum design to get that dirty air into the duct is every bit as important, maybe moreso. I'm now convinced to not let dust go into the immediate open environment where a suction duct opening is present hoping dust finds it, I'm convinced that having the dust stream be aimed inside an enclosure containing the suction duct is the better way to go, such as Raffan's system and similar.
 
I got the idea for a bell-mouth type collector from @Neil S on another forum. Mine isn't quite a nice lol. I had an old plastic blast gate that I glued to the hacked light fixture thing-a-ma-bob and zip tied it to the comparator (it used to be by the ways).
I know what a zip tie is (:)) but what is a "comparator"?

It's important not to forget the source of collection though. A little portable collector under optimal conditions still performs poorly against something like jkj's 5hp cyclone under the worst conditions.
In my three previous shops I used a big shop vac which sorta worked.

About the cyclone:

The ClearVue cyclone is amazing. It's so loud I can't go into it's sound-insulated closet without hearing protection or my brain would implode. I saw a demo video where a guy held a 30' measuring tape a few inches below an open 6" duct and it pulled the tape up through the ducts, across the room, and dropped it into the collection drum. Keep a good grip on sandpaper and small turnings at the lathe. Don't let your cat or pet rat get near a pickup.

In case anyone is interested:
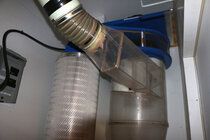
To make the cyclone and big air compressor fit into a tight closet (4'x8') I first assembled the thing upside down in one corner of the shop and mocked up the walls and such to get the dimensions and compound angles for the input duct right and avoid unpleasant surprises during installation. Best photo I can get of the final installation without using a fisheye lens.

Cyclone_inlet_IMG_2915.jpg

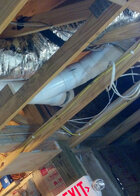
I ran all my ducts between the trusses above the plywood shop ceiling.

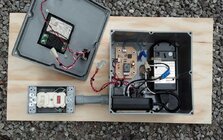
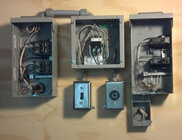
I combined the normal jumble of wiring and electronics into one compact box with power supply, controller, bin-full alarm, and remote on/off receiver. (The switch box has a disconnect and ready light.) This is mounted in the main shop where I can see it easily.

I ran 220v and 110v to the closet for the compressor, DC and misc. and contained it to pass inspection if ever needed (I'm the electrician - by county regulation, no out-building inspections or permits allowed on ag property here). I sized wiring so both 5hp motors could come on at the same time without a significant voltage drop.

DC_control_box.jpg DC_elect_IMG_20130726_135457.jpg

I monitor particulates with a Dylos Air Quality Monitor. Surprisingly, it's the same price now as when I bought mine 12 years ago.

dylos_particulate_monitor.jpg
I mounted wireless remotes in three places around the shop so I can turn the cyclone on and off easily. The separator is so good that almost no fine dust makes it to the filter stack - the fine dust makes my 30-gal drum so heavy I have to use a dolly to get it to where I dump it in the woods.

I started out hoping for something that worked well but it exceeded my expectations. If I move to a smaller shop some day when I get too old and feeble to keep up with the farm, I'm going to really miss the thing.

If building a new shop from scratch, maybe consider designing it around one of these or a similar cyclone.

(BTW, to avoid overheating keep in mind that 5hp motors like these use are designed for no more that 6 on-cycles per hour.)

JKJ
 
Hi @Steve Tiedman , I wouldn't mind trying out the cabinet method but at the same time, I can't give up the surface area of the table for that purpose (I use it a lot). I'm sure I'll revamp the entire turning area at some point though and I'll see what I can do about creatively rearranging things to accommodate.
 
@John K Jordan the comparator is a part of your lathe. Its cast iron (usually) - one piece is mounted to your headstock and another to the tailstock. Its used when copying a design (like stair spindles for instance).
 
Well, the more enclosed the piece you are sanding it, the more dust you can keep from getting into the air and into your lungs. Do look up my sanding hood for bowls on You Tube. I did take it to extremes, but after sanding black walnut for 6 hours, no, and I mean absolutely NO dust on my glasses or in my nose. The 55 gallon food grade drum/barrel cut off and with plexiglass on one end does the trick, but it isn't very mobile and I can't turn with it on my lathe. Maybe for version 2, which I have been putting off for years.... Even a 5 gallon bucket will work, or one of the bowls where you go through the bottom.

For coring systems, if you sell your work, they are a necessity. They save wood and labor. I know they are not cheap, but they do pay for themselves. The first ones I saw were just a straight cone cutter on an arm brace. Then I saw Robin Wood who made his own curved bar cutters.

I did another video about "band saw dust ports do not suck". For sure, the band saws are set up for cabinet shops where all the wood is dry. There is just too much open space around the table and by the blade, and inside the cabinet for dust and shaving collection to be efficient. Another "round-2-it" project...

robo hippy
 
and long sweeps instead of tight 90 degree elbows,

A series of 22.5-deg couplings can make a nice, long sweep.

ducr_sweep_20141228_194845_465.jpg
(DC, HVAC, and wiring in progress in this picture - may look like a mess but it's all under control!

Another thing for long straight runs (my longest is 40'), consider adding a inspection/cleanout cap to the end of each straight extension just past the last split. I made removable plywood panels to access the duct caps above above the ceiling. So far with heavy use I've seen nothing but clear, clean ducts. I used 6" pvc (I bought from an industrial piping supplier who let me pick through and haul off pieces, with sometimes minor damage, from a big pile headed to the dump. What a deal.)

I know people who advocate monitoring the internal duct pressure with a perhaps home-made manometer to detect perhaps gradual degregation of the system. (including clogging filters)

But I haven't done this.

JKJ
 
@John K Jordan the comparator is a part of your lathe. Its cast iron (usually) - one piece is mounted to your headstock and another to the tailstock. Its used when copying a design (like stair spindles for instance).

Oh yes, I remember now. I kept the support arm on the PM3520b since it was a good place to mount an adjustable light (and the magnetic base for the dust pickup nozzle).

When I turn duplicates, I make a story stick.

JKJ
 
For sure, the band saws are set up for cabinet shops where all the wood is dry. There is just too much open space around the table and by the blade, and inside the cabinet for dust and shaving collection to be efficient. Another "round-2-it" project..

If regularly sawing both dry and wet wood, some modifications may help. There is almost never any sawdust on the floor or inside the cabinet of my 18" Rikon.

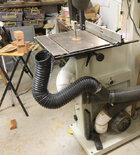
I run three dust and shaving pickups to my bandsaw, two to the inside of the saw, and one flexible pickup with a magnet I position on the table when needed. I also devised a little box under the table to take care of what is carried beneath the table in the gullets of the blade, probably the biggest dust-spreader in the saw.

Two 4" ports are built in at the factory, one is angled below the table and one is at the very bottom of the lower cabinet, I devised the third, the flexible one I can position as needed. Also, inside the upper cabinet a small brush dislodges any dust in the gullets that makes it that far.

When not using the flexible duct on top of the table, to keep from robbing suction from the other ducts I cover it with a little piece of flat plastic (not shown here) which the magnet holds in place.
dust_collection_bandsaw_IMG_7604.jpg

After using the saw for a while as it came from the factory, a light bulb suddently went off in my head. This resulted in what I consider my most important enhancment to the saw, a small dust-pickup-assistant under the table.

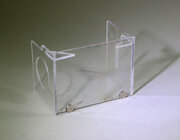
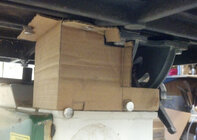
This is plexiglas version of my little dust-pickup-assist box I mount under the table, held in place with magnets. It surrounds the blade and the lower guides. My prototype from cardboard worked so well I used it for years before I broke down and made the plastic one.

dust_shroud_2e_IMG_7598.jpg bandsaw_shroud1_IMG_20161101_102828_050.jpg

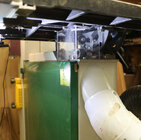
The photo below shows the plastic box in place. The biggest advantage: sawdust carried below the table in the blade gullets gets blown into the angled duct built into the lathe below the table. This box has an open back and a hole in the left that allows air to be pulled across the blade gullets by the angled pickup at the top of the lower cabinet.

Since using these boxes the floor around the bandsaw immediately ceased being covered with the usual sawdust sprayed from below the table. Imagine that!

dust_shroud_1_IMG_7603.jpg

BTW, the angled pickup did come with a welded internal crossbar for some reason. I cut it out since cutting green wood in the direction of the grain often makes long stranded shavings that would sometimes ball up and choke the airflow suction from the angled pickup. I have not discovered any downside from removing that crossbar - any globs of long wet strands simply get pulled down the line and dumped into the cyclone bin 45' away. Yay!

When in place, the box does prevent tilting the table but that hasn't affected me. In the rare event I want to make an angled cut, I make a temorary plywood tilted piece for the top of the table.

I occasionally open the cabinet to clean out any sawdust that makes it past all these but so far there hasn't been any.
BTW, I cut a lot of both dry and sopping wet wood.

After using this setup for years, I'd hate to be without it.

JKJ
 
Last edited:
I monitor particulates with a Dylos Air Quality Monitor. Surprisingly, it's the same price now as when I bought mine 12 years ago.

View attachment 69428


JKJ

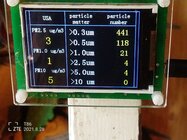
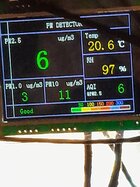
I have worked on the design and installation of dust extraction systems for quite a few workshops now and have come to the opinion that a PM2.5 particle counter is an essential piece of equipment in any woodturning workshop.

I have had many of those particle counters along the way and the ones that are intended for OH&S personnel are quite expensive, but there are economy models now available that are more than adequate for our purposes. For example, one of these that is available from your nearest IKEA store...


Keep in mind that it is not the dust that you can see that is the most damaging to your health, but the very fine dust that is measured in the PM2.5 particle range that can be detected by these particle counters. Place it near to head height where you are working at the lathe and know what your actual exposure is.

I don't just think that my DE is adequate, I know what my actual exposure is by observing the particle counter readings. If the PM2.5 is not reading below 10/m² it's not adequate, IMO. My personal benchmark is to keep it in that range. Your health, your life, so your benchmark may be different.

And , here are some PM2.5 readings that show how efficient my bell-mouth hood is that dangles from my lathe tool rest close to the piece while turning and sanding it...

IMG_20210828_131011.jpg


20240411_170011.jpg

Post slicing cuts with HSS.jpg


You may be getting similar results with your box arrangements, so please share with us your PM2.5 numbers?
.
 
I also have the inexpensive small one shown in your first picture - I keep it in my shop office. I forget the conversion factor with the Dylos, but when I checked it at one time it reported levels essentially the same as the dylos. (With no turning or sanding for several days now and just some bandsawing over a day ago, it's setting on zero.) It's similar to this one: https://www.amazon.com/HOTKREM-Quality-Monitor-Detector-Indoor/dp/B0B9S7857S

JKJ
 
The biggest problems with shavings on my big bandsaw come from cutting wet big blanks and I stand them on end. It really packs the lower cabinet, and the dust collector, 3 hp Oneida, just can't suck it all out. I need to do another up grade.

robo hippy
 
The biggest problems with shavings on my big bandsaw come from cutting wet big blanks and I stand them on end. It really packs the lower cabinet, and the dust collector, 3 hp Oneida, just can't suck it all out. I need to do another up grade.

robo hippy

I mentioned "the angled pickup [on the 18" Rikon] did come with a welded internal crossbar for some reason. I cut it out since cutting green wood in the direction of the grain often makes long stranded shavings that would sometimes ball up and choke the airflow suction from the angled pickup."

Cutting away that metal crossbar let the dust port below the table suck these long, wet strands away before they build up. Before I cut it away, the strands would first clog the angle port then proceed to pack , up in the lower cabinet.

With my little "sawdust containment and air redirection" box, after cutting away the crossbar these wet strands never again made it to the cabinet. (This is with the 5hp clearvue cyclone but the same thing might work for the 3hp Oneida)

On another forum, someone showed pictures of something he made to function somewhat similar to my little box. It was a long time ago, but as I recall it was made from piece of PVC pipe (Maybe a foot long?) open on the far (left) end, and cut away in the middle to fit around the blade and guides beneath the table. He connected a vacuum source to the open right end.

Looked like it might work but I didn't try it since I knew my box worked well.

Seems like smart bandsaw makers could build in a solution like this (if they haven't by now), perhaps with a little door to access the lower guides and to clean any clogs. The reason I built mine from clear plexiglas was so I could keep an eye on the guides and how well the dust pickup was working.

One factor in dust/shaving pickup might be the diameter and internal smoothness of the ducts. Bill Pence discussed this. Too small is inefficient. From the cyclone I ran 6" PVC in the ceiling then down the walls to the tools. There I split the 6" into several 4". I remember it was recommended to run 6" directly to the tool but that wasn't practical on a bandsaw with multiple 4" ports. Should work with a tablesaw or jointer.
 
On another forum, someone showed pictures of something he made to function somewhat similar to my little box. It was a long time ago, but as I recall it was made from piece of PVC pipe (Maybe a foot long?) open on the far (left) end, and cut away in the middle to fit around the blade and guides beneath the table. He connected a vacuum source to the open right end.
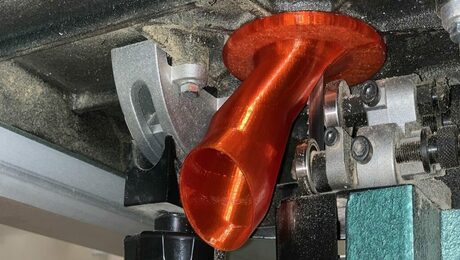
Someone posted this a while back. 3D printing makes many many things possible.
 
I also have the inexpensive small one shown in your first picture - I keep it in my shop office. I forget the conversion factor with the Dylos, but when I checked it at one time it reported levels essentially the same as the dylos. (With no turning or sanding for several days now and just some bandsawing over a day ago, it's setting on zero.) It's similar to this one: https://www.amazon.com/HOTKREM-Quality-Monitor-Detector-Indoor/dp/B0B9S7857S

JKJ

The first thing I do whenever I buy another one of these low cost particle counters is put it side by side with some of my others to see how well it calibrates. Invariably they give very similar readings. This is not surprising given that at the heart of most is the Plantower PMS5003 laser particle reader.

They will never be as accurate as a professional particle counter, which can cost thousands of $s, but they still give far more accurate readings than any 'snot meter' or observation of airborne dust under a narrow beam spot light in a dark workshop can provide. And, they are instantly responsive to any changes to the levels of fine airborne dust, which is invaluable for our purposes in knowing if our attempts to improve the fine dust extraction in our workshops is working, making no difference or exacerbating the problem.
 
On another forum, someone showed pictures of something he made to function somewhat similar to my little box. It was a long time ago, but as I recall it was made from piece of PVC pipe (Maybe a foot long?) open on the far (left) end, and cut away in the middle to fit around the blade and guides beneath the table. He connected a vacuum source to the open right end.

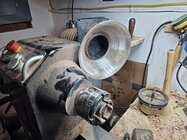
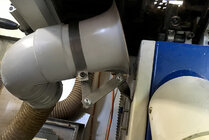
Test readings show that a bell mouth positioned like the following (attached to the lower cabinet door) is the most effective method of fine DE for a bandsaw. The extraction port that comes with the bandsaw (shown in the bottom right of photo) provides very little extra vale if the bell mouth arrangement is used.

Bandsaw - under table DE.jpg
 
The 55 gallon food grade drum/barrel cut off and with plexiglass on one end does the trick, but it isn't very mobile and I can't turn with it on my lathe.
I adapted Robo's drum so that I can both do my sanding and do my turning. Because I usually use the tailstock, I do not have a sheet of pexiglass at the tailstock end. I also insert the 4" hose into the drum and then attach a bell mouth. In addition to turning and sanding, I also use it to apply finishes on my turned pieces. I am very happy with the hood.
 
I've been playing around with the idea of collecting dust from between the ways but I need to pick up some pvc to experiment and I haven't made it a priority.
 
@John Kananis , when I had my Laguna 12” lathe, I had it set up to collect dust between the ways. All I did was tape a piece of cardboard on the bottom and attached the 4” hose. It worked surprisingly well. I had a small piece of plywood to cover the gap past the tail stock. I have not tried it on my 3520, but keep thinking about it. I suspect it will not work as good on the larger lathe. The cavity under the ways is bigger, so it might not suck up the chips as well, and the ways are almost twice as far from the work.

I’m not happy with the way my dust collection is now. I’m going to try the RR setup.
Interesting and than you for passing that along. Was it not effective enough to carry forward?
 
Back
Top