
-
Congratulations to Rick Moreton, People's Choice in the July 2025 Turning Challenge (click here for details) -
Congratulations to Jaramiah Severns for "Stacked Forms II" being selected as Turning of the Week for August 4, 2025 (click here for details) -
Welcome new registering member. Your username must be your real First and Last name (for example: John Doe). "Screen names" and "handles" are not allowed and your registration will be deleted if you don't use your real name. Also, do not use all caps nor all lower case.
You are using an out of date browser. It may not display this or other websites correctly.
You should upgrade or use an alternative browser.
You should upgrade or use an alternative browser.
Ripple with skew
- Thread starter Gevan Marrs
- Start date
My remote diagnosis is that you were trying to do a planing cut and you came off the bevel. In my opinion, a definitive diagnosis is only possible seeing you make the cut. Alan Lacer and many others have instructional videos on the various cuts made with a skew.
Last edited:
If the stock is long, and the diameter relatively small, and you're pressing a bit too hard causing the wood to flex off of the center axis, and maybe toss in a wee bit of a dulled edge, things like this can happen. I agree, watch some good lessons- Lacer is a skew king. And Richard Raffan, and Tomislav Tomasic.
Last edited:
Are you using a flat or oval skew?
Here's a video on the skew that may help. I believe Allan was one of the finest turners.
View: https://youtu.be/KfeLAHQSbqk
john lucas
AAW Forum Expert
You are pushing too hard on the bevel and also forcing the cut. Relax and get the tool cut at the speed it needs to cut. Chatter can also be because the spindle is too long or thin.
- Joined
- Feb 28, 2021
- Messages
- 1,675
- Likes
- 1,461
- Location
- Roulette, PA
- Website
- www.reallyruralwoodworks.com
Yup what others said - you're coming off the bevel and/or with a dull tool - skews need to be razor sharp and no pressure - let the edge cut at its own pace - if you have to apply ANY pressure to get it to cut, your skew is dull , and once you get one of those "waves" started, it's gonna continue even if you sharpen up - you'll have to back way off and pick up a smooth cut until you hit that "spot" then back up and cut again until the low spot of the wave is cut away. It helps to practice with a piece of relatively soft wood, turned to smooth round, and then shut off lathe - put tool on the rest (anchor) lightly rest bevel on the wood, and turn the wood by hand and gently lift handle (rolling edge into cut) until it starts to cut, and then you should be able to turn it by hand and make a nice long shaving as you rotate the wood and just *let the tool cut* without applying any pressure at all - when you get it "just right" the tool will almost naturally follow the wood as it peels off, continuing your shaving the whole length - at least that's how I finally managed to refine my tool control techniques... YMMV
OvalAre you using a flat or oval skew?
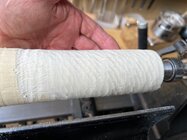
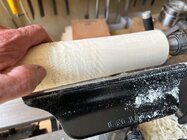
wow! Good advice. I would have never thought turning it by hand could cut, but it does. I think I had the tool rest too far out and too low. Now I’m just skimming it from up higher on the piece. Compare the right side below to the former.Yup what others said - you're coming off the bevel and/or with a dull tool - skews need to be razor sharp and no pressure - let the edge cut at its own pace - if you have to apply ANY pressure to get it to cut, your skew is dull , and once you get one of those "waves" started, it's gonna continue even if you sharpen up - you'll have to back way off and pick up a smooth cut until you hit that "spot" then back up and cut again until the low spot of the wave is cut away. It helps to practice with a piece of relatively soft wood, turned to smooth round, and then shut off lathe - put tool on the rest (anchor) lightly rest bevel on the wood, and turn the wood by hand and gently lift handle (rolling edge into cut) until it starts to cut, and then you should be able to turn it by hand and make a nice long shaving as you rotate the wood and just *let the tool cut* without applying any pressure at all - when you get it "just right" the tool will almost naturally follow the wood as it peels off, continuing your shaving the whole length - at least that's how I finally managed to refine my tool control techniques... YMMV
Attachments
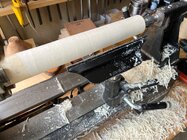
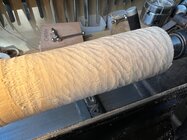
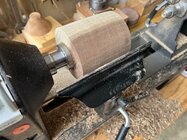
My first ever successful, turning with a skew! Thanks to all!
Feels good, eh?
wow! Good advice. I would have never thought turning it by hand could cut, but it does. I think I had the tool rest too far out and too low. Now I’m just skimming it from up higher on the piece. Compare the right side below to the former.
Gevan, looking good! Turning the lathe by hand is exactly how I teach the skew. Even if someone has never even seen a lathe before the skew is the first tool I put in their hands. I usually start with a blank of fairly soft wood like maple, 2” or so squares, at least 12” long, usually a bit longer. A skew at least 1” wide.
- I first turn the practice piece round and smooth for them then turn the lathe off, hand them a fairly wide skew appropriate for the diameter.
- Show how to place the skew, the angle, position, how to hold with the hand and arm.
- Have them put the bevel on the wood then with me turning the lathe by hand, let them feel the wood with the edge and try to make a shaving, me watching and advising, correcting angle and position as needed.
- When they can make a reliable fine shaving, we talk about feet, legs, and arms and have them make spiral shavings down the blank.
- After a bit of that, I turn on the lathe and round the blank again so they have a smooth cylinder and don’t have to deal with a “bumpy” surface.
- More pealing practice until it feels natural to them.
- Then I put the lathe belt on the lowest speed pulley and turn it on at the minimum speed, By this time they are able to make reliable peeling cuts. While they practice I gradually sneak up the speed until they find them selves making good cuts at about 1/2 speed.
- Then I smooth the blank again and they practice at higher and higher speeds. I’m constantly watching the tool placement, foot, leg, and arms motions and correct as needed.
- After a few planing passes, we go to the spindle gouge and learn to make coves. (Can be more difficult than the skew since it requires multiple coordinated motions, first from one side, then the other.) I demonstrate the motions while turning a cove, then turn the lathe off and describe and show the motions, then let them practice just the motions with the lathe off.
- With the lathe on again, they work on coves, starting small. Then beads, again with a spindle gouge.
- Once coves are conquered, or at least understood, we go back to the skew and work on shallow V cuts then deeper Vs. Then on to more coves and beads until the blank has shapes all the way down.
- THEN I finally demonstrate the roughing gouge and they make some squares round. I don’t start out with this for several reasons.
- If their first practice piece is not getting too thin, I’ll have them smooth it down and repeat with the planing, coves, and beads. Otherwise I grab a new turning square and they continue, as time allows. We may start on beads too.
Some things about the skew.
- One with the included angle a little larger than usual is a bit more “forgiving” for a beginner.
- The straight edge is preferred, although I have used skews with a curved edge.
- We avoid using a narrow (say 1/2”) skew on larger diameter blanks since the long point is so close to the wood - better for starting is a 1” or 1-1/4” skew.
- Oval or flat skew doesn’t seem to matter (except when time to learn to sharpen!)
- Of utmost importance: the tools must be sharp, sharp, sharp, shaving sharp!
Note that I’ve had very experienced instructors tell me I couldn’t start beginners like that. I disagree.
I’ve turned into a true believer for what several expert turners have told me, in books and a couple in person: If you learn spindle turning 1st it will teach you the fine tool control that will let you turn anything. (I can provide references.) If you start with bowls, the path can be different. I know some bowl turners who say they aren’t interested in turning spindles - a few might not be able to turn a thin spindle if they wanted.
JKJ
The best advice I was given was to relax your hands. When you expect something bad is going to happen, you tense up. Relaxing makes that ripple go away.
I’m sure that 5 minutes in person would move me a long way toward better use of a skew. Ironically, I’ve pretty much only turned bowls so far, so never figured out the skew. Even after watching many youtube videos, I still didn’t get it until the hand-turning tip. I do think I could have controlled a straight skew better than oval, but I’m not quite as afraid of it now…Gevan, looking good! Turning the lathe by hand is exactly how I teach the skew. Even if someone has never even seen a lathe before the skew is the first tool I put in their hands. I usually start with a blank of fairly soft wood like maple, 2” or so squares, at least 12” long, usually a bit longer. A skew at least 1” wide.
This whole process usually only takes 10-15 minutes, less for some people. Having started dozens of people with this method, I’ve never once had someone get a catch. (Knock on Bubinga)
- I first turn the practice piece round and smooth for them then turn the lathe off, hand them a fairly wide skew appropriate for the diameter.
- Show how to place the skew, the angle, position, how to hold with the hand and arm.
- Have them put the bevel on the wood then with me turning the lathe by hand, let them feel the wood with the edge and try to make a shaving, me watching and advising, correcting angle and position as needed.
- When they can make a reliable fine shaving, we talk about feet, legs, and arms and have them make spiral shavings down the blank.
- After a bit of that, I turn on the lathe and round the blank again so they have a smooth cylinder and don’t have to deal with a “bumpy” surface.
- More pealing practice until it feels natural to them.
- Then I put the lathe belt on the lowest speed pulley and turn it on at the minimum speed, By this time they are able to make reliable peeling cuts. While they practice I gradually sneak up the speed until they find them selves making good cuts at about 1/2 speed.
- Then I smooth the blank again and they practice at higher and higher speeds. I’m constantly watching the tool placement, foot, leg, and arms motions and correct as needed.
There is usually time to practice everything on a second practice blank. If they have a lathe at home I send some practice blanks from soft maple, cherry or something with them. If they don’t have a lathe, I invite them to come for more lessons. I’ve had a couple of people start from scratch who since acquired a lathe and turn often. Makes me feel useful!
- After a few planing passes, we go to the spindle gouge and learn to make coves. (Can be more difficult than the skew since it requires multiple coordinated motions, first from one side, then the other.) I demonstrate the motions while turning a cove, then turn the lathe off and describe and show the motions, then let them practice just the motions with the lathe off.
- With the lathe on again, they work on coves, starting small. Then beads, again with a spindle gouge.
- Once coves are conquered, or at least understood, we go back to the skew and work on shallow V cuts then deeper Vs. Then on to more coves and beads until the blank has shapes all the way down.
- THEN I finally demonstrate the roughing gouge and they make some squares round. I don’t start out with this for several reasons.
- If their first practice piece is not getting too thin, I’ll have them smooth it down and repeat with the planing, coves, and beads. Otherwise I grab a new turning square and they continue, as time allows. We may start on beads too.
Some things about the skew.
Some older, long-time turners are afraid of the skew after some bad experiences. I’ve heard otherwise excellent symposium demonstrators say the skew was only good for opening cans of finish, or occasionally as a negative rake scraper. I once had an older gentleman from our club come for a “remedial” skew lesson. I didn’t see him for several years after that since I dropped everything while I finished building my shop. When I finally started coming to club meetings again the guy jumped up from the back of the room and ran up and said “I want to shake your hand!” He said after that one lesson he started practicing and using the skew a lot. Said it was now one of his favorite tools. Made me smile!
- One with the included angle a little larger than usual is a bit more “forgiving” for a beginner.
- The straight edge is preferred, although I have used skews with a curved edge.
- We avoid using a narrow (say 1/2”) skew on larger diameter blanks since the long point is so close to the wood - better for starting is a 1” or 1-1/4” skew.
- Oval or flat skew doesn’t seem to matter (except when time to learn to sharpen!)
- Of utmost importance: the tools must be sharp, sharp, sharp, shaving sharp!
Note that I’ve had very experienced instructors tell me I couldn’t start beginners like that. I disagree.
I’ve turned into a true believer for what several expert turners have told me, in books and a couple in person: If you learn spindle turning 1st it will teach you the fine tool control that will let you turn anything. (I can provide references.) If you start with bowls, the path can be different. I know some bowl turners who say they aren’t interested in turning spindles - a few might not be able to turn a thin spindle if they wanted.
JKJ

I certainly was tense!The best advice I was given was to relax your hands. When you expect something bad is going to happen, you tense up. Relaxing makes that ripple go away.
Gevan, you've obviously figured something very important out. Great work!
One other suggestion is to check your angle, as a great many early users have too blunt a tool.
There is a great range of opinion on the angle a skew should be sharpened. Pointier makes for smoother surfaces, but catches come more easily. Blunter makes for less excitement, with the loss of some of what the skew is best at. One easy, reasonable angle is for the width of the bevel (from tool edge to flat of the tool) to be roughly 1 1/2 times the thickness of the tool. (And Oval Skews are evil, IMHO )
)
One other suggestion is to check your angle, as a great many early users have too blunt a tool.
There is a great range of opinion on the angle a skew should be sharpened. Pointier makes for smoother surfaces, but catches come more easily. Blunter makes for less excitement, with the loss of some of what the skew is best at. One easy, reasonable angle is for the width of the bevel (from tool edge to flat of the tool) to be roughly 1 1/2 times the thickness of the tool. (And Oval Skews are evil, IMHO
)I like that texture! In a video Johatman did something similar with a gouge by first intentionally denting the wood. I tried to replicate it with poor results.
I can see now how an oval skew makes it very hard to control the “twist” of the tool against the wood. Thanks.Gevan, you've obviously figured something very important out. Great work!
One other suggestion is to check your angle, as a great many early users have too blunt a tool.
There is a great range of opinion on the angle a skew should be sharpened. Pointier makes for smoother surfaces, but catches come more easily. Blunter makes for less excitement, with the loss of some of what the skew is best at. One easy, reasonable angle is for the width of the bevel (from tool edge to flat of the tool) to be roughly 1 1/2 times the thickness of the tool. (And Oval Skews are evil, IMHO
Follow-up question. I presumed that one factor with “catches” was that I was turning too slow (say, 800 rpm for 2” spindle), but given the catches was fearful of going higher. Since now I see that it can cut even with hand turning, maybe LOWER RPM is a way to learn the precise control? Thoughts?
I actually like it too, but it is hard to replicate and rife with “catches”. Very tense turning. In hindsight, if you want to try, I’d say try lowering the tool rest and attacking lower on the workpiece, quite a bit of tool pressure and move right along. Also seems much more readily done on green wood. FWIW, it also seems that moderately dense, uniform grain hardwoods do it (hornbeam, eucalyptus).I like that texture! In a video Johatman did something similar with a gouge by first intentionally denting the wood. I tried to replicate it with poor results.
The fulcrum changes on an oval skew which increases the chance of a catch. It does not on a flat skew. I’m guessing the oval skew is part of a set. If you don’t have a flat skew, let that be your next tool purchase.
You are correct - it was in the first tool set I bought. I’m visiting the woodworking store todayThe fulcrum changes on an oval skew which increases the chance of a catch. It does not on a flat skew. I’m guessing the oval skew is part of a set. If you don’t have a flat skew, let that be your next tool purchase.

The fulcrum changes on an oval skew which increases the chance of a catch. It does not on a flat skew. I’m guessing the oval skew is part of a set. If you don’t have a flat skew, let that be your next tool purchase.
I don't agree.
I have a variety of skew shaft shapes: Thompson skews that have a 180-deg radius on the bottom edge, a couple of oval skews, and skews with rectangular shapes. (these have very slightly radiused corners so they won't catch on the rest, especially cast iron rests with unrepaired scratches or dents. (BTW, JB Weld epoxy will nicely fill porosity or dents on a cast iron tool rest that can't easily be filed away. Never a problem with Robust rests with a hardened steel rod on top.)
I don't notice any difference between the control or function of any cross section shape for straight or tapered planing cuts. Once I set the bevel correctly on the wood to make a shaving, the shape of shaft of the skew doesn't matter since the clearance angle varies SO little.
I wrote about this briefly in message #12 in this thread:
Are you referring to designs like Robert Sorby’s? https://robert-sorby.co.uk/product/oval-skew-chisel-809/
I had that one and didn’t like it.
For a contrarian opinion
") : I have two of those and find them great for turning. I find them easy to control for planing cuts and shallow curves, not my 1st choice for deep "v" grooves or facing cuts, and definitely not peeling.
: I have two of those and find them great for turning. I find them easy to control for planing cuts and shallow curves, not my 1st choice for deep "v" grooves or facing cuts, and definitely not peeling.What I DON'T like is sharpening them, especially at a small included angle - it's a pain to get both sides even enough that it won't annoy me! It would be better if I used a skew jig such as for the...
Twisting a skew during the cut will change the fulcrum, sometimes quickly! However, the ONLY reason I know to twist the skew during a planing cut in progress is to adjust the point of cut on the edge - if it's getting too high on the edge (a little too close to the long point), twist the skew handle a tiny bit conterclockwise if planing from R to L (adjusting the clearance angle a tiny bit at the same time to keep the shaving depth the same), clockwise if planing from L to R. I've never seen this taught - most people do it without thinking) but I use it in lessons with beginners as a way to explain how they can adjust the cutting spot on edge.
This assumes planing the the long point up - using the long point down is also usefult at times. This video explains. It looks useful for other reasons as well.
As mentioned, I do find the oval skews more difficult to sharpen. I almost always sharpen skews by hand on a tool rest set to the angle I want, using an 8" 600 grit CBN wheel (wide wheels with "square" edges, not the radius-edged wheels.) The cutting edge of the skew must be kept precisely horizontal or there will be areas of discontinuity in the bevel. The oval skew is difficult to keep the the edge oriented properly when sharpening by hand since it it too easy to roll a bit on the rest and too hard to keep the orientation perfect when moving the edge a bit horizontaly to a new spot on the wheel. One of the Tormek jigs is perfect for holding the oval skew for sharpening, here using it with a Tormek bar but should work with the tool rest too:
Message #49 in this thread:
I like my ... oval skews. Tormek revised the fixture so it no longer works as well with the diamond parting tool.
I've sharpened the oval skews on the Tormek but never the diamond parting tools. For that I use the platform on the Wolverine. When I get a moment I plan to machine a jig to hold the tool perpendicular to the wheel. Sometimes I accidentally introduce a slight angle on the cutting edge and have to regrind.
But since I bought all the original jigs that Tormek had (back at the birth of Tormek, I think) and later bought a second (used) Tormek that came with more jigs...
Follow-up question. I presumed that one factor with “catches” was that I was turning too slow (say, 800 rpm for 2” spindle), but given the catches was fearful of goinghigher. Since now I see that it can cut even with hand turning, maybe LOWER RPM is a way to learn the precise control? Thoughts?
The low speed is great for learning control. As I mentioned, after the new student gets to the point where I turn on the lathe, I run it at the slowest possible speed at first, then very gradually increase it as they gain confidence. Once you have the tool control under control
)), the faster the speed the easier and smoother the cut. (For a given lateral motion, a faster speed removes tinier shavings since it's making more revolutions for the same distance the cutting edge moves.) I typically turn thin spindes wide open, close to 3000 rpm on my lathe. A high speed makes it easier to control the vibration of the thin spindle. Larger spindles (3" in dia or so) or very long spindles (shovel handle size, etc) I use a slower speed.
BTW, another thing that helps with a smooth skew planing cut is to find the optimum edge angle. (What I'm calling the "edge angle" is the angle between the edge and the long axis if the skew, NOT the clearance angle of the bevel with the wood!) I start students with the edge angle at about 45 degrees. After some experience, experiment with everything between a horizontal edge (which will give a peeling cut) to a vertical edge (which won't cut at all!) I adjust the angle a lot to see what works the best with specific wood diameters and blanks.
Finally, one natural but problematic thing to do is change the edge angle unintentionally DURING the planing cut down the spindle. Until a student learns to always move the body and legs (keeping the skew firmly at the same angle), the tendency is to stand rigidly at the starting position and sweep the cut with the arms. This tends to move skew so in a way that changes the edge angle - it's almost like an arc but with the gyrations needed to keep the skew cutting! This can change the edge angle from the desired starting angle to nearly vertical at the end of the cut. I've seen this over and over - it can cause several problems.
The easiest way to avoid this is to use a variation of the "woodturners dance." Most people learn the woodturner's skew dance quickly, but I had one person who just couldn't get it, even with constant reminders.

I first demonstrate the movement with the lathe off then have them try. To set up the cut, I have the student hold the skew on the rest at the starting position of the cut (with the lathe off at first), then, for a R to L cut, without changing the grip, step to the left until the intended ending position is comfortable, then keeping the feet in place on the floor and the skew in place in the hands, bend the legs and body to move the arms and skew back to the starting position of the cut. During the cut, bend the legs and body smoothly to move the skew down the spindle without changing the skew angle on the wood. This prevents the sweeping arc which can cause problems at the end of the cut!
All this is FAR easier to show than write about! Most people "get it" in about 10 seconds. And only need a few reminders after that. I think this is important for planing with a skew, coves with the spindle gouge, and outside cuts on a vessel or bowl.
(Oops, this was far more than I intended to write!)
JKJ
- Joined
- Feb 28, 2021
- Messages
- 1,675
- Likes
- 1,461
- Location
- Roulette, PA
- Website
- www.reallyruralwoodworks.com
In a nutshell, "Catches" happen when you come off the bevel (which keeps the edge from following grain) for the most part so the trick is learning to keep the bevel nice and flat just barely "kissing" the wood - Basically the bevel rides on the wood, but the wood doesn't know it. Part of achieving that is learning to lightly grip the tool (instead of a death grip and clamping other hand down on the tool (to hold it in place in the rest) - both cause you to have to put more effort into the cut than is needed.) Once you get that mastered, the rest is a matter of learning how to "steer" (to create your beads, coves and tapers) and every part of it is so much easier when tool is properly sharp (and finding the best position to have your cutting edge making contact - Some like it a little above "9 o'clock", while others may like to have their skew cutting almost near the top (11 o'clock) of the spindle - tool rest height controls that to a large extent - having it "high" makes it easier for straight across but when you are doing deep coves , v-cuts or making spin tops , you end up hunching your shoulder way up in order to steer the cutting edge closer to center.. which is where I most often got "catches" or run-outs because that unnatural hunching was also changing my stance and bevel contact. So yeah lower speed can be helpful at learning mastery as it slows you down until your body gains "muscle memory" (Even the pros will often spend some time practicing with the skew for a little while before starting their project, if they have been away from it for even a little while, but once learned that muscle memory comes back fairly quickly)I actually like it too, but it is hard to replicate and rife with “catches”. Very tense turning. In hindsight, if you want to try, I’d say try lowering the tool rest and attacking lower on the workpiece, quite a bit of tool pressure and move right along. Also seems much more readily done on green wood. FWIW, it also seems that moderately dense, uniform grain hardwoods do it (hornbeam, eucalyptus).
The fulcrum changes on an oval skew which increases the chance of a catch. It does not on a flat skew. I’m guessing the oval skew is part of a set. If you don’t have a flat skew, let that be your next tool purchase.
I have a variety of skew shaft shapes: Thompson skews that have a 180-deg radius on the bottom edge, a couple of oval skews, and skews with rectangular shapes. (these have very slightly radiused corners so they won't catch on the rest, especially cast iron rests with unrepaired scratches or dents. (BTW, JB Weld epoxy will nicely fill porosity or dents on a cast iron tool rest that can't easily be filed away. Never a problem with Robust rests with a hardened steel rod on top.)
I don't notice any difference between the control or function of any cross section shape for straight or tapered planing cuts. Once I set the bevel correctly on the wood to make a shaving, the shape of shaft of the skew doesn't matter since the clearance angle varies SO little.
I wrote about this briefly in message #12 in this thread:
Are you referring to designs like Robert Sorby’s? https://robert-sorby.co.uk/product/oval-skew-chisel-809/
I had that one and didn’t like it.
For a contrarian opinion
: I have two of those and find them great for turning. I find them easy to control for planing cuts and shallow curves, not my 1st choice for deep "v" grooves or facing cuts, and definitely not peeling.What I DON'T like is sharpening them, especially at a small included angle - it's a pain to get both sides even enough that it won't annoy me! It would be better if I used a skew jig such as for the...
Twisting a skew during the cut will change the fulcrum, sometimes quickly! However, the ONLY reason I know to twist the skew during a planing cut in progress is to adjust the point of cut on the edge - if it's getting too high on the edge (a little too close to the long point), twist the skew handle a tiny bit conterclockwise if planing from R to L (adjusting the clearance angle a tiny bit at the same time to keep the shaving depth the same), clockwise if planing from L to R. I've never seen this taught - most people do it without thinking) but I use it in lessons with beginners as a way to explain how they can adjust the cutting spot on edge.
This assumes planing the the long point up - using the long point down is also usefult at times. This video explains. It looks useful for other reasons as well.
As mentioned, I do find the oval skews more difficult to sharpen. I almost always sharpen skews by hand on a tool rest set to the angle I want, using an 8" 600 grit CBN wheel (wide wheels with "square" edges, not the radius-edged wheels.) The cutting edge of the skew must be kept precisely horizontal or there will be areas of discontinuity in the bevel. The oval skew is difficult to keep the the edge oriented properly when sharpening by hand since it it too easy to roll a bit on the rest and too hard to keep the orientation perfect when moving the edge a bit horizontaly to a new spot on the wheel. One of the Tormek jigs is perfect for holding the oval skew for sharpening, here using it with a Tormek bar but should work with the tool rest too:
Message #49 in this thread:
I like my ... oval skews. Tormek revised the fixture so it no longer works as well with the diamond parting tool.
I've sharpened the oval skews on the Tormek but never the diamond parting tools. For that I use the platform on the Wolverine. When I get a moment I plan to machine a jig to hold the tool perpendicular to the wheel. Sometimes I accidentally introduce a slight angle on the cutting edge and have to regrind.
But since I bought all the original jigs that Tormek had (back at the birth of Tormek, I think) and later bought a second (used) Tormek that came with more jigs...
Follow-up question. I presumed that one factor with “catches” was that I was turning too slow (say, 800 rpm for 2” spindle), but given the catches was fearful of goinghigher. Since now I see that it can cut even with hand turning, maybe LOWER RPM is a way to learn the precise control? Thoughts?
The low speed is great for learning control. As I mentioned, after the new student gets to the point where I turn on the lathe, I run it at the slowest possible speed at first, then very gradually increase it as they gain confidence. Once you have the tool control under control
)), the faster the speed the easier and smoother the cut. (For a given lateral motion, a faster speed removes tinier shavings since it's making more revolutions for the same distance the cutting edge moves.) I typically turn thin spindes wide open, close to 3000 rpm on my lathe. A high speed makes it easier to control the vibration of the thin spindle. Larger spindles (3" in dia or so) or very long spindles (shovel handle size, etc) I use a slower speed.
BTW, another thing that helps with a smooth skew planing cut is to find the optimum edge angle. (What I'm calling the "edge angle" is the angle between the edge and the long axis if the skew, NOT the clearance angle of the bevel with the wood!) I start students with the edge angle at about 45 degrees. After some experience, experiment with everything between a horizontal edge (which will give a peeling cut) to a vertical edge (which won't cut at all!) I adjust the angle a lot to see what works the best with specific wood diameters and blanks.
Finally, one natural but problematic thing to do is change the edge angle unintentionally DURING the planing cut down the spindle. Until a student learns to always move the body and legs (keeping the skew firmly at the same angle), the tendency is to stand rigidly at the starting position and sweep the cut with the arms. This tends to move skew so in a way that changes the edge angle - it's almost like an arc but with the gyrations needed to keep the skew cutting! This can change the edge angle from the desired starting angle to nearly vertical at the end of the cut. I've seen this over and over - it can cause several problems.
The easiest way to avoid this is to use a variation of the "woodturners dance." Most people learn the woodturner's skew dance quickly, but I had one person who just couldn't get it, even with constant reminders.
I first demonstrate the movement with the lathe off then have them try. To set up the cut, I have the student hold the skew on the rest at the starting position of the cut (with the lathe off at first), then, for a R to L cut, without changing the grip, step to the left until the intended ending position is comfortable, then keeping the feet in place on the floor and the skew in place in the hands, bend the legs and body to move the arms and skew back to the starting position of the cut. During the cut, bend the legs and body smoothly to move the skew down the spindle without changing the skew angle on the wood. This prevents the sweeping arc which can cause problems at the end of the cut!
All this is FAR easier to show than write about! Most people "get it" in about 10 seconds. And only need a few reminders after that. I think this is important for planing with a skew, coves with the spindle gouge, and outside cuts on a vessel or bowl.
(Oops, this was far more than I intended to write!)
JKJ
I bravely tackled a 4” chunk of Myrtle. After rounding it up, I used my skew at lowest speed my lathe would turn….worked great! No catches and I am gaining confidence. Sure glad I asked for help on this forum! Thanks to all.
Incredibly and superbly fastastic!
At this rate you'll be teaching skew lessons soon! BTW, don't forget to practice planing cuts from both R to L and L to R. It's good to practice switching hands too, but cuts can be made without switching, although it a little awkward.
And after a bit more practice, try cranking up the lathe speed. (Speed doesn't cause catches.)
Have you tried facing cuts and deep v-grooves yet? Start with a small v-groove, then move the point of the skew over a tiny bit to widen it with cuts on either side.
The idea is to cut with the long point in a continuous cut from the surface to the bottom of the V, making sure to tilt the skew "just a hair" for clearance so the edge doesn't catch on the wood at the top of the V. If you sight down the edge it's easy to see. To illustrate this to students I made a large diameter spindle and a wooden "skew" from about 3" wide, at the arrow in this pic. The oversized sample spindle is on the mini lathe, easy to show the clearance needed in the cut.

Spindle turning practice happening on the two larger lathes. I had four lathes in the shop that day.
After 3 and 4" diameter blanks, maybe try some thinner blanks, say 1.5" to 1" square. If interested in trying thin spindles sometime, I posted a document in the Tutorials and Tips section on this forum. It's in the thread Turning Thin Spindles posted Oct 7, '24. I used wands as an example but the techniques for turning and stabilizing apply to any thin spindle - conductors batons, drop spindles, hair sticks, ornament finials...
Also, have you tried roughing a square blank with the skew? A wide skew is easier. I usually rough with the skew unless the grain is at a slight angle to the axis and the wood is a type that splits easily. Start a little away from and make cuts towards one end, then work on the other end, then in the middle. It can be quicker than the roughing gouge.
JKJ
Oh, @Gevan Marrs, I don't know whether you watch turning videos (I don't watch many) but I noticed this one describing several edge shapes. Might be interesting. Notice he often planes with the long point down. I think it's helpful to practice both ways.
View: https://youtu.be/yhuEVVSkDtE?si=f6RhJG6L09Snb1Pj
BTW, Brian Havens also has a video on the controversial subject of skew cross sections: rectangular, oval, and [gasp] round! (which I quite like, especially in smaller sizes like 1/4" and 1/2".
View: https://youtu.be/ARCH_J7ypPk?si=DofGY3GehjB9XdNn
And if hungry for more info, there are a couple of great books I highly recommend.
JKJ
BTW, Brian Havens also has a video on the controversial subject of skew cross sections: rectangular, oval, and [gasp] round! (which I quite like, especially in smaller sizes like 1/4" and 1/2".
And if hungry for more info, there are a couple of great books I highly recommend.
JKJ