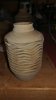
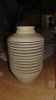
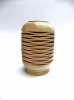
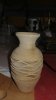
This article outlines the procedure I used to obtain the rippled surface effect shown in the examples shown below. Basically, it exploits the tendency of most green woods to shrink across the grain when they dry--the same phenomenon that causes logs of most woods to crack as they dry. My best success has been with madrone, well known for its high shrinkage, but other woods may work well also.
I begin with a small green log a bit larger than the maximum diameter of the turning and having a well-centered pith. I start between centers with the axis of rotation running through the center of the pith. I turn a chucking tenon at the base and rough out the piece. I then remount the piece in a chuck and finish-turn the sides. Next, I form the fins by parting straight in at regular intervals using a parting tool marked to indicate the desired depth. It is important to keep the cuts at a 90-degree angle to the spin axis; otherwise, some of the resulting vanes will be thin at the bottom and will tend to break loose during the drying phase. I keep the wood wet throughout this process.
After the vanes have been cut, I wet sand the outside of the piece and between the vanes with sandpaper dipped in a bowl of water occasionally to clean off the slurry. A piece of paper folded around a thin putty knife helps while sanding the sides of the vanes. Sanding the vanes after drying is very difficult.
Next, I hollow the piece to a constant wall thickness using a captured boring bar with laser guidance. (It is possible to see the laser light dot between the fins.) I plan the depth of the hollowing to end up with about 0.25-inch of thickness at the bottom to reduce the chance of cracking. I then reverse the piece and turn the bottom.
In order to get the vanes to buckle, it is necessary for the walls of the piece to dry faster than vanes. One way to encourage this is to mist the vanes with water regularly, leaving the opening clear to allow drying from inside. Another is to wrap the outside of the piece in plastic until buckling is underway. In any case the drying needs to be slow or the body of the piece will pull away from the fins before the fins begin to buckle.
My yield of satisfactory pieces is probably not more than 50%. The remainder had cracked fins, did not warp sufficiently, or failed to warp on all sides. Clearly more experimentation is needed. Among the key parameters to be considered are the width of the fins, the width and depth of the notches, and the wall thickness of the body of the piece. In the case of the 8.24-inches tall vase shown below, after shrinkage, the width of the vanes was about 0.1-inches, the spacing was 0.125-inches, the depth of the notches was about 0.7- inches, and the wall thickness was about 0.25-inches. In the case of the 14-inches tall djinni bottle, the corresponding approximate values were 0.16-inches, 0.2-inches, 1.1-inches, and 0.4-inches.
I would be pleased hear about successes from others who try this technique and any promising innovations that they uncover.
.jpg")
.jpg")


")