I have been sealing the full inside and outside with Pva glue. I know it’s not necessary so I would like to know what I really need to do. Do I just seal the end grain on the outside of bowl and not put any seal in the inside?

-
February 2026 Turning Challenge: Cookie Jar! (click here for details) -
Congratulations to Chad Eames for "Red Tines" being selected as Turning of the Week for February 23, 2026 (click here for details) -
AAW Symposium demonstrators announced - If the 2026 AAW International Woodturning Symposium is not on your calendar, now is the time to register. And there are discounts available if you sign up early, by Feb. 28. Early Bird pricing gives you the best rate for our 40th Anniversary Symposium in Raleigh, North Carolina, June 4–7, 2026. (There are discounts for AAW chapter members too) For more information vist the discussion thread here or the AAW registration page
-
Welcome new registering member. Your username must be your real First and Last name (for example: John Doe). "Screen names" and "handles" are not allowed and your registration will be deleted if you don't use your real name. Also, do not use all caps nor all lower case.
You are using an out of date browser. It may not display this or other websites correctly.
You should upgrade or use an alternative browser.
You should upgrade or use an alternative browser.
Sealing first turned bowls
- Thread starter Barry Holman
- Start date
If you want to use a sealer, yes the inside end grain needs to be sealed. PVA glue is a good choice, as is PVA based primer, usually a bit cheaper.
I prefer using paper bags. It’s a lot less time and mess, and the bags can be reused many times
I prefer using paper bags. It’s a lot less time and mess, and the bags can be reused many times
Okay, so, are these twice turned bowl blanks and you have removed most of the bulk? There are hosts of sealers out there for rough turned bowl blanks. PVA glue actually works really well since it breathes, and water can escape. If you are twice turning your bowls, do make sure to round over the rim, both inside and outside since a sharp edge can cut you, and a sharp rim is far more likely to crack since there are limits to how tall of a bowl you can make. You want even wall thickness, but when you come to the rim, there is no more wall, and rounding over the rim eases the stress that a sharp edge makes. Outside end grain especially needs to be sealed, and inside grain doesn't hurt to seal that either.
robo hippy
robo hippy
Man! I got a response from Robo Hippy! I am honored! I will start sealing end grain on the inside and outside.
Wait one. There are many different 'systems' used by turners to dry rough turned bowl blanks. It's kind of like witchcraft.
There are a number of variables that affect the rate of drying and chance of cracking. Important to me, as I live in an arid place, is the ambient humidity. Yours will be different than mine, or Reed's, or Doug's. Where will these be sitting while they dry? (Attics are hot and dry, basements are cool and wet. Shops are all over the place. Garages have a variable climate due to seasons, presence of heat or not.) What wood are we talking about? (Aspen, and mesquite from what I hear, move very little and are less likely to crack. Fruit wood cracks before the toppled tree hits the ground.) ETC.
I don't want to make this vastly more complicated than it needs to be. Talk with local turners in your area and see what methods work for them. Try some of those methods. Eventually, you will figure out what will work for you.
Personally, I coat the outside, but not the inside, of the roughed blank, put in a paper sack, and place on a wire rack (which allows air circulation), with the open end of the bowl down, in my basement where the temperature year round is most stable. Your mileage WILL vary.
Odie
Panning for Montana gold, with Betsy, the mule!
Okay, so, are these twice turned bowl blanks and you have removed most of the bulk? There are hosts of sealers out there for rough turned bowl blanks. PVA glue actually works really well since it breathes, and water can escape. If you are twice turning your bowls, do make sure to round over the rim, both inside and outside since a sharp edge can cut you, and a sharp rim is far more likely to crack since there are limits to how tall of a bowl you can make. You want even wall thickness, but when you come to the rim, there is no more wall, and rounding over the rim eases the stress that a sharp edge makes. Outside end grain especially needs to be sealed, and inside grain doesn't hurt to seal that either.
robo hippy
I have a question concerning the notion that rounding over the edge prevents cracking that originates with a sharp corner.
For years, I've followed this practice of rounding the corner, but sometimes I forget to do this. In all this time, I've never noticed a crack that originated from a sharp edge intersection of two planes.
So....has this particular issue been problematic for other turners?
Note: I will continue the practice of rounding over the corner because it's so easy and quick to do, and besides, it does eliminate a sharp edge that can be dangerous......but, are we concerned about a problem that may be nonexistent?
=o=
Last edited:
Odie
Panning for Montana gold, with Betsy, the mule!
As for sealing roughed bowls, I'm a believer in sealing the entire bowl with a wax emulsion sealer I've sourced from CSUSA for the past 40 years. It does breathe, so it successfully slows down the rate of moisture loss.....and, that's exactly what you want. The slower the seasoning process, the fewer stress cracks you will have.....it's that simple! ")
When it comes to seasoning a roughed bowl......time is your friend! With that in mind, the best way to have as few problems as possible, a turner needs to have many bowls drying at a time. When the monthly weights stabilize.....the MC has stabilized to it's own environment. (This is an important consideration, as @Dean Center appropriately suggests above in post #5.)
With many bowls in the seasoning process at any given time, along with monthly logged weights, the choice of which bowl to 2nd turn next becomes much less problematic for a bowl turner.
=o=
Odie, the concept of trying to keep an even wall thickness is pretty well understood. But, what happens when you get to the rim? I round over the rims for safety sake so I don't slice myself, which I have done a few times, as well as on boards that have been hand planed run through the drum sander. Those edges can be very sharp. Also, and I have had this happen a number of times, with sloppy wet wood especially, if you leave that sharp edge, you get uneven drying at that point which creates stress, and as we all know, wood relieves stress by cracking. Hope that makes sense.
robo hippy
robo hippy
I seal the outside of the bowls with an end sealer sold by Lee Valley. My limited experience with fresh-cut oak however, means that I'll never turn the damn stuff again!
I’ve always sealed the inside and outside completely (I use anchorseal) then store on a shelf in my cool basement. I’ve never had a bowl crack, though I’ve only just started twice-turning and coring the last couple years and have only done around 50-75 bowls. That may also have to do with the type of wood available to me - mostly cottonwood and elm with some maple and sycamore too.
I’m curious how many people only seal the end grain with success as this would save anchorseal which isn’t cheap (I buy 5 gallons at a time for around $100 and it lasts me several years).
Thanks, tom
I’m curious how many people only seal the end grain with success as this would save anchorseal which isn’t cheap (I buy 5 gallons at a time for around $100 and it lasts me several years).
Thanks, tom
- Joined
- Apr 27, 2004
- Messages
- 9,324
- Likes
- 6,130
- Location
- Lakeland, Florida
- Website
- www.hockenberywoodturning.com
I have been sealing the full inside and outside with Pva glue. I know it’s not necessary so I would like to know what I really need to do. Do I just seal the end grain on the outside of bowl and not put any seal in the inside?
Successful drying begins with even wall thickness and nice curves followed with slow drying in an appropriate environment.
Pva or anchor seal will slow the drying nicely
I switched to paper bags less mess and bowls dry a few months faster.
I use bags in pairs with one over the open end of the other.
Every day for about 5 days I swap the damp bags for dry ones. The damp bags will dry overnight.
If I see any mold on a bowl during the damp bag stage I wipe the bowl with Clorox and discard the bags it came out of.
After a few days usually less than 5 the bags won’t feel damp and I put the bagged bowl on a shelf
In about 8 months take the bowl out of the bag and let dry on a shelf.
My drying room has a dehumidifier set at 50%. My wood will dry to about 9% and the returned bowl will not warp because that environment is similar to most homes with controlled environments. Air dry a bowl in a humid environment to 20%MC it will loose another 10%MC and warp in the average home.
This is an air drying chart from the forestry service. The drying environment determines how dry a bowl will be at equilibrium.
My bowls will be a little over 9%.

A slide from a demo I do

I use a similar product and seal the entire bowl also. I keep a minimum of 150 bowls drying so I always have bowls ready to second turn. I’d hate to go to my shop and not have a bowl to turnAs for sealing roughed bowls, I'm a believer in sealing the entire bowl with a wax emulsion sealer I've sourced from CSUSA for the past 40 years. It does breathe, so it successfully slows down the rate of moisture loss.....and, that's exactly what you want. The slower the seasoning process, the fewer stress cracks you will have.....it's that simple!
When it comes to seasoning a roughed bowl......time is your friend! With that in mind, the best way to have as few problems as possible, a turner needs to have many bowls drying at a time. When the monthly weights stabilize.....the MC has stabilized to it's own environment. (This is an important consideration, as @Dean Center appropriately suggests above in post #5.)
With many bowls in the seasoning process at any given time, along with monthly logged weights, the choice of which bowl to 2nd turn next becomes much less problematic for a bowl turner.
=o=
View attachment 81283 View attachment 81284
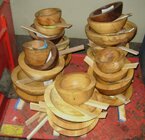
 . Every time I second turn 4-8 bowls I will replace them with green bowls. This is one of 3 shelves, plus several stacks in the floor.
I use pva glue on inside and out but am also interested to hear from someone who uses glue on only the end grain
I sealed several rough turned green bowls today and thought it worth passing this tip on.
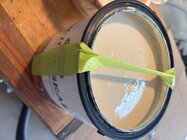
To keep Anchorseal much less messy than pouring it out into a smaller container or using the side of the rim to take the excess off a brush, fold a piece of painters tape in half and tape over the can top. I do this because a pet peace I have is cleaning up the rim so a paint can will reseal properly.
To keep Anchorseal much less messy than pouring it out into a smaller container or using the side of the rim to take the excess off a brush, fold a piece of painters tape in half and tape over the can top. I do this because a pet peace I have is cleaning up the rim so a paint can will reseal properly.
Attachments
Good idea - thanks!I sealed several rough turned green bowls today and thought it worth passing this tip on.
To keep Anchorseal much less messy than pouring it out into a smaller container or using the side of the rim to take the excess off a brush, fold a piece of painters tape in half and tape over the can top. I do this because a pet peace I have is cleaning up the rim so a paint can will reseal properly.
I never seal rough turned bowls. The important part is to turn the bowls so they can change shape as they dry. If they cannot change shape, they will only take longer to crack. If they have a shape that I think may crack if dried too quickly, I just put it in a paper bag for the first week or so.
How do you determine which bowls are more likely to crack?I never seal rough turned bowls. The important part is to turn the bowls so they can change shape as they dry. If they cannot change shape, they will only take longer to crack. If they have a shape that I think may crack if dried too quickly, I just put it in a paper bag for the first week or so.
As a “newby” to woodturning there seems to be many ways to “skin that cat”. I for one appreciate all of the various methods proposed by experienced turners - thanks to all of you that are willing to share your years of expertise!
Pith present, fruit woods . . . other ways I’m sure.How do you determine which bowls are more likely to crack?
Nice storage racks - like how you’ve placed the “stickers” to provide even airflow around the bowls - will incorporate these ideas into my shop - thanks!I use a similar product and seal the entire bowl also. I keep a minimum of 150 bowls drying so I always have bowls ready to second turn. I’d hate to go to my shop and not have a bowl to turn
View attachment 81314
I just seal the end grain inside and outside with tree saver, and then bag or box them. Maybe over kill but it has worked for me.
I know others who swear by always sealing the entire outside and leaving the inside unsealed.
Of course, many variables: temperature, humidity, air circulation, wood species, figure/grain orientation, location cut from the tree.
I don't do many things from green wood anymore but when I did I sealed and/or covered the outside with plastic wrap. I've used the plastic bay drying method too: put in bag, the next day remove, reverse bag, and put back in bag. Repeat.
JKJ
Do most of you dry in a controlled envionment?
I have been rough turning, sealing and putting in my garage (fluctuating temperatures and moisture) using cedar shimms ever since my first bowl. Then at some point before final turn I will move to the basement to acclamate to their new environment for a few more weeks.
However, even when I feel they are adequately dry, (weight loss and moisture content below 6%) they can still warp some, and continue to move out of shape.
I seal the entire roughed out bowl , inside and out with anchor seal 1 or 2.
Attachments
After I rough turn a bowl to as uniform thickness as I can get I weigh it and record the weight on the bowl along with its species. I tend to lose track if I do not. Then each bowl is placed in a grocery bag with dry shavings and stored in my 50-60 degree basement. I check the bag and shavings in 7-10 days for dampness and record the weight. If needed I use a fresh bag and shavings. This process is repeated every couple of weeks until the weight levels out. I am amazed how fast the weight drops the first few weighing. SFSG and I have had little cracking. Most pieces level off in 8-10 weeks or so.
Edit: When I say uniform thickness I mean the walls are left at about 10% of the bowl diameter which gives me room to round out the ID and OD when finish turning. I just took a ~12 inch cherry bowl out after 8 weeks in a bag for finish turning and the cross grain was 11.5 inches and the with grain dimeter was 12 inches
Edit: When I say uniform thickness I mean the walls are left at about 10% of the bowl diameter which gives me room to round out the ID and OD when finish turning. I just took a ~12 inch cherry bowl out after 8 weeks in a bag for finish turning and the cross grain was 11.5 inches and the with grain dimeter was 12 inches
Last edited:
I suspect the roughs are not as dry as you think. A moisture meter really does not tell if the wood is fully acclimated. Weighing the piece, and weight changing very little over the last 2-3 weeks, is a much better indicator. Fully sealed blanks will take a long time to acclimate. Also, even really dry wood will move some due to stress relief as it is rounded and then reduced in thickness. This is why I 90% round the OD, then ~90% round the ID, then go back and finish the OD.Do most of you dry in a controlled envionment?
I have been rough turning, sealing and putting in my garage (fluctuating temperatures and moisture) using cedar shimms ever since my first bowl. Then at some point before final turn I will move to the basement to acclamate to their new environment for a few more weeks.
However, even when I feel they are adequately dry, (weight loss and moisture content below 6%) they can still warp some, and continue to move out of shape.
I seal the entire roughed out bowl , inside and out with anchor seal 1 or 2.
I dry mine in double grocery kraft bags inside the house. I use a humidifier for the house to keep humidity >40% in winter, which keeps the house “tighter”, higher humidity air feels warmer, keeps skin from drying out as much, helps sinuses, and other benefits, not just for turning wood.
My friend Gerald Lawrence gave me a nice chunk of pecan several months ago. I finally got around to roughing it out today. Turns out (pun intended) it had some really nice color in it. It got a coating of Anchorseal. Got to say I really like that stuff because cleanup is so easy.
Attachments
I seal the whole bowl inside and out except for the face of the tenon. That is where I write the date and type of wood.
Roger Wiegand
Beta Tester
I'm very slowly learning not to turn wood that already has cracks in it. It's hard not to. Here's today's example of a piece of box elder with terrible ring shakes. I'm hoping against hope that turning away 75% of the log got me past the existing cracks, but I'm not confident. I anchorseal the end grain, not sure it does much good. With paper bags I have a lot of trouble with mold and consequently discolored wood.


Wow, that's incredible color, I've never seen it quite that intense. Was it from near the roots?
Sure would be great if the box elder stayed red and didn't turn brown.
Sure would be great if the box elder stayed red and didn't turn brown.
Roger Wiegand
Beta Tester
It was a whole tree

I'm certainly no expert on color in wood, but I can describe some experiences.
In 2008 I visted Lisi Oland who lived near John C Campbell. (Sadly, she's no longer with us) She loaded up my vehicle with wood, including some box elder cut from a big stump. The color was incredible - I made several things, including this small hollowed vessel:

I kept it in a fairly dark room, the windows have thick curtains. Some years later all the red had changed entirely to brown. It's still a nice little piece, but brown and beige. (I should take another photo of it today but it might depress me.)
About 15 years ago I got some wonderful (and rare) Pink Flamewood from the now late Jim King in Iqutos Peru.
I made lots of things, for example these:

I still have these, use the coffee scoop every day, the ornaments on the tree. While they all have held their figure, especially the contrast between the black and lighter figure, the pink colors have gone to brown. The same with things I've turned from Pink Ivory (wonderful to turn!) - over the years they are fading to light brown.
Also, I have some large pieces of very old Cocobolo. Things I've made are turning darker by the year.- when I cut a chunk from one 4" thick slab the wood is almost black for maybe 3/8" in from all outer surfaces. With that hint, I suspect oxygen is a primary culprit instead of UV light. Also, pieces I made 20 years ago and used a sealing finish have retained their figure and much of their color.
If anyone hasn't seen it, here's an article on preserving color in wood:
 www.wood-database.com
I've heard it said "Form is king"; never heard that about color. I hate to repeat this, but the bottom line seems to be if you want to keep the color, apply a dye such as TransTint. Keeping away from uv light and using a good protective finish helps for a while. I read once that 100 years from now wood will be black, or at least colorless! (Except for color from spalting - just read and look at the photos in Siri Robinson's big book!) I'll check some of these things and update this thread on my 175th birthday.
All this said, almost 30 years ago I bought a small quantity of purpleheart blanks and boards from a gentleman who was selling everything after his father passed away. Unlike other purple heart I have, that stuff, for some reason, REFUSES to turn brown. The guy I got it from said his dad brought it from somewhere in Mexico, didn't know where. Is there a special place in Mexico where wood keeps it's color? Could it be something in the soil, perhaps from something (or someone) the Aztexcs buried?
So far, I can't tell if the color on this has change a bit. (Not the best photo) I'll check back in 5-10 years.

JKJ
In 2008 I visted Lisi Oland who lived near John C Campbell. (Sadly, she's no longer with us) She loaded up my vehicle with wood, including some box elder cut from a big stump. The color was incredible - I made several things, including this small hollowed vessel:
I kept it in a fairly dark room, the windows have thick curtains. Some years later all the red had changed entirely to brown. It's still a nice little piece, but brown and beige. (I should take another photo of it today but it might depress me.)
About 15 years ago I got some wonderful (and rare) Pink Flamewood from the now late Jim King in Iqutos Peru.
I made lots of things, for example these:
I still have these, use the coffee scoop every day, the ornaments on the tree. While they all have held their figure, especially the contrast between the black and lighter figure, the pink colors have gone to brown. The same with things I've turned from Pink Ivory (wonderful to turn!) - over the years they are fading to light brown.
Also, I have some large pieces of very old Cocobolo. Things I've made are turning darker by the year.- when I cut a chunk from one 4" thick slab the wood is almost black for maybe 3/8" in from all outer surfaces. With that hint, I suspect oxygen is a primary culprit instead of UV light. Also, pieces I made 20 years ago and used a sealing finish have retained their figure and much of their color.
If anyone hasn't seen it, here's an article on preserving color in wood:
Preventing Color Changes in Exotic Woods | The Wood Database
I've heard it said "Form is king"; never heard that about color. I hate to repeat this, but the bottom line seems to be if you want to keep the color, apply a dye such as TransTint. Keeping away from uv light and using a good protective finish helps for a while. I read once that 100 years from now wood will be black, or at least colorless! (Except for color from spalting - just read and look at the photos in Siri Robinson's big book!) I'll check some of these things and update this thread on my 175th birthday.
All this said, almost 30 years ago I bought a small quantity of purpleheart blanks and boards from a gentleman who was selling everything after his father passed away. Unlike other purple heart I have, that stuff, for some reason, REFUSES to turn brown. The guy I got it from said his dad brought it from somewhere in Mexico, didn't know where. Is there a special place in Mexico where wood keeps it's color? Could it be something in the soil, perhaps from something (or someone) the Aztexcs buried?
So far, I can't tell if the color on this has change a bit. (Not the best photo) I'll check back in 5-10 years.
JKJ
Odie, is that stuff similar to anchor seal in consistency? Been using anchorseal to end coat logs, was planning on painting my blanks with it as well, storing similar to what you have going on, recently dug out a couple pretty decent sized koa trees in my yard and want to blank out everything that cant be sawn into lumber on my band mill so have a lot of rough stuff to turn. Trying to be methodical with this so researching the best way to go about it.As for sealing roughed bowls, I'm a believer in sealing the entire bowl with a wax emulsion sealer I've sourced from CSUSA for the past 40 years. It does breathe, so it successfully slows down the rate of moisture loss.....and, that's exactly what you want. The slower the seasoning process, the fewer stress cracks you will have.....it's that simple!
When it comes to seasoning a roughed bowl......time is your friend! With that in mind, the best way to have as few problems as possible, a turner needs to have many bowls drying at a time. When the monthly weights stabilize.....the MC has stabilized to it's own environment. (This is an important consideration, as @Dean Center appropriately suggests above in post #5.)
With many bowls in the seasoning process at any given time, along with monthly logged weights, the choice of which bowl to 2nd turn next becomes much less problematic for a bowl turner.
=o=
View attachment 81283 View attachment 81284
Roger Wiegand
Beta Tester
I rough turned both of these bowls the same day last week from the same log. I anchor sealed the end grain on one and forgot to do the other. You can guess which is which.

Odie, is that stuff similar to anchor seal in consistency? Been using anchorseal to end coat logs, was planning on painting my blanks with it as well, storing similar to what you have going on, recently dug out a couple pretty decent sized koa trees in my yard and want to blank out everything that cant be sawn into lumber on my band mill so have a lot of rough stuff to turn.
I'm not Odie and haven't used the exact wax emulsion sealer mentioned, but have been using Anchorseal for years. Years ago I bought a 55-gal drum - it was about $6/gallon. I'm running low, think I get 5-gal this time. https://uccoatings.com/pages/anchorseal-homepage
Maybe they have a distributor in your area.
I know several clubs who buy in quantity and sell it to members. Might check with nearby any local clubs or if your club might be interested in doing this.
- Anchorseal is a wax emulsion: paraffin, water, surfactant.
- UC Coatings changed the formula a few years ago and call it AnchorSeal2. I've been happy with the original.
- Anchorseal is thin enough to spray on the ends of logs at the sawmill. I usually brush it onto logs with a cheap 4" wide brush.
- I use it to seal turning blanks I cut from green wood before drying them. Very effective.
- For turning blanks I like a thicker coating so I pour some Anchorseal into plastic coffee cans and leave the lid off until some water evaporates and the stuff gets thicker. (Can't easily apply a second coat over dried wax emulsion) I've dried many hundreds (probably 1000s) of blanks this way, from 1x1 squares to 10x10x14" blocks of a variety of domestic species and have had almost zero failures. I use the weight method to access drying. I don't weigh and mark every blank but just a piece or two of a batch from the same tree. I dry indoors in a climate-controlled shop. Big, solid blanks can take years to dry.
- I coat the end grain of all blanks and the side grain in certain cases with certain species.
- After an initial 2-weeks or so of drying, I examine each blank and if I see a crack developing I immediately cut it away and reseal. If the crack is on a side that wasn't initially sealed, I seal the entire outside of the blank
- Some say they seal just the end grain on rough-turned bowls.
- Some say for rough turned bowls they coat the entire outside so as the inside dries quicker it will tend to contract and pull the outside together. I have no experience with this.
- Kiln literature says aluminum paint also works well. They say roofing tar is great but yikes! Oil-based paint will also work but latex is not recommended.
Note that wood dealers, especially those who sell exotic and unstable species, often dip the entire blank into hot paraffin for a thick, non-emulsion, coating, with no regard to the actual moisture content. One dealer I know keep a hot vat, dips the blank 1/2 way, dips the other half after cooling. This is extremely effective but really slows down the drying significantly. (I also track the drying of those by weight.) After a dipped blank dries for a while I often scrape off some of the paraffin to speed up the drying a little - hasn't caused any problems yet. I'm not sure the hot dip would make sense for rough-turned bowls.
JKJ
Been buying anchor seal through woodcraft, shipped through UPS, is about the only way to get it reasonably fast and not leaking from the box when i get it, going tolook into other sealers and suppliers. Have been trying to find the local club, is virtually non existent, its a strange dynamic out here, from experience people tend to be ridiculously overprotective of info, kinda weird actually, they think someone new will edge them out of their niche, or some other strange thought process, ran into the same thing when i was running my sawmill and shop a couple decades agoI'm not Odie and haven't used the exact wax emulsion sealer mentioned, but have been using Anchorseal for years. Years ago I bought a 55-gal drum - it was about $6/gallon. I'm running low, think I get 5-gal this time. https://uccoatings.com/pages/anchorseal-homepage
Maybe they have a distributor in your area.
I know several clubs who buy in quantity and sell it to members. Might check with nearby any local clubs or if your club might be interested in doing this.
- Anchorseal is a wax emulsion: paraffin, water, surfactant.
- UC Coatings changed the formula a few years ago and call it AnchorSeal2. I've been happy with the original.
- Anchorseal is thin enough to spray on the ends of logs at the sawmill. I usually brush it onto logs with a cheap 4" wide brush.
- I use it to seal turning blanks I cut from green wood before drying them. Very effective.
- For turning blanks I like a thicker coating so I pour some Anchorseal into plastic coffee cans and leave the lid off until some water evaporates and the stuff gets thicker. (Can't easily apply a second coat over dried wax emulsion) I've dried many hundreds (probably 1000s) of blanks this way, from 1x1 squares to 10x10x14" blocks of a variety of domestic species and have had almost zero failures. I use the weight method to access drying. I don't weigh and mark every blank but just a piece or two of a batch from the same tree. I dry indoors in a climate-controlled shop. Big, solid blanks can take years to dry.
- I coat the end grain of all blanks and the side grain in certain cases with certain species.
- After an initial 2-weeks or so of drying, I examine each blank and if I see a crack developing I immediately cut it away and reseal. If the crack is on a side that wasn't initially sealed, I seal the entire outside of the blank
- Some say they seal just the end grain on rough-turned bowls.
- Some say for rough turned bowls they coat the entire outside so as the inside dries quicker it will tend to contract and pull the outside together. I have no experience with this.
- Kiln literature says aluminum paint also works well. They say roofing tar is great but yikes! Oil-based paint will also work but latex is not recommended.
Note that wood dealers, especially those who sell exotic and unstable species, often dip the entire blank into hot paraffin for a thick, non-emulsion, coating, with no regard to the actual moisture content. One dealer I know keep a hot vat, dips the blank 1/2 way, dips the other half after cooling. This is extremely effective but really slows down the drying significantly. (I also track the drying of those by weight.) After a dipped blank dries for a while I often scrape off some of the paraffin to speed up the drying a little - hasn't caused any problems yet. I'm not sure the hot dip would make sense for rough-turned bowls.
JKJ
.

My first buy came in a commercial plastic 55-gal drum - very sturdy.Been buying anchor seal through woodcraft, shipped through UPS, is about the only way to get it reasonably fast and not leaking from the box when i get it, going tolook into other sealers and suppliers. Have been trying to find the local club, is virtually non existent, its a strange dynamic out here, from experience people tend to be ridiculously overprotective of info, kinda weird actually, they think someone new will edge them out of their niche, or some other strange thought process, ran into the same thing when i was running my sawmill and shop a couple decades ago
.
I think they also ship by steel cans/drums. Might call or email and ask. It's widely available here - I found out about one of their distribution centers that's not far from me. I'm going to call them soon, maybe they can tell me about how best to get it in your area.
That IS strange about the dynamic you describe. Around here, woodturners, furniture makers, sawmill operators, machinists always seem willing to help where they can. Maybe the difference is there are so many people and the market so big that no one feels threatened. Woodturners, especially are some of the most giving and sharing people - no end to the free mentoring and teaching and tool/wood sharing. One woman drove from an arid area in the western US and went home with a station wagon with slabs unavailable where she lived. A guy today brought me a avacodo log - never tried that before! Once a guy sent me a piece of Koa - saving it for a special occasion!
People often ask me how much I charge for lessons (turning, welding, etc) and I tell them all the same thing: a good story or a good joke! (Some still owe.
)I have a small Woodmizer mill and have cut up numerous logs for people - they haul the logs, help with the offloading/stacking and there's no charge.
And when I get stuff I don't have the time or energy to saw or even process into blanks, I call the club and they send out an email to the members - people show up with chainsaws. I hold the logs at waist height so they can cut what they want and I load the pieces for them. Keep a pressure washer and wire brush at hand to clean off any chain-destroying dirt/gravel. We are both happy - a win-win!

For a local AAW chapter club, did you check the AAW website chapter locator? I think I saw some in Hawaii but don't remember which island. (Love visiting Maui! Hey, next trip maybe I can bring a suitcase of wood! A guy from Australia did that when he visited me. I brought back a suitcase of Olive from Italy once.)
JKJ
Odie
Panning for Montana gold, with Betsy, the mule!
Although the sealer I mentioned from CSUSA is what I've been using exclusively since the mid-80's, I believe it's essentially the exact same thing as commercial Anchorseal.Odie, is that stuff similar to anchor seal in consistency? Been using anchorseal to end coat logs, was planning on painting my blanks with it as well, storing similar to what you have going on, recently dug out a couple pretty decent sized koa trees in my yard and want to blank out everything that cant be sawn into lumber on my band mill so have a lot of rough stuff to turn. Trying to be methodical with this so researching the best way to go about it.
What you want is for a pathway for moisture to expel, but at a much slower pace. It's exactly this that allows internal stress within the wood to conform to a new altered shape without cracking.
I'd say it's about 98% foolproof, when used in conjunction with monthly weights, time, and at the very least, three months of unchanged monthly weights. I usually add to that 3-month minimum during excessively wet and/or winter months...
=o=
Thank you sir, kinda what i thought from reading the PDS for both and comparing, i was kinda figuring id treat the blanks like lumber, let em set for close to a year, pretty humid out here and a 4/4 board takes close to 14 months to hit equilibrium safely. At least so you can use it and not have it move too much.Although the sealer I mentioned from CSUSA is what I've been using exclusively since the mid-80's, I believe it's essentially the exact same thing as commercial Anchorseal.
What you want is for a pathway for moisture to expel, but at a much slower pace. It's exactly this that allows internal stress within the wood to conform to a new altered shape without cracking.
I'd say it's about 98% foolproof, when used in conjunction with monthly weights, time, and at the very least, three months of unchanged monthly weights. I usually add to that 3-month minimum during excessively wet and/or winter months...
=o=
Last activity on the local Maui chapter website was in 2017, so been a while, know a few turners out here, lots of wood workers, will figure this stuff out, hell, i taught myself how to make boots watching youtube videos and same with rigging up my heat treating/tempering oven, its like playtime for this old fart.My first buy came in a commercial plastic 55-gal drum - very sturdy.
I think they also ship by steel cans/drums. Might call or email and ask. It's widely available here - I found out about one of their distribution centers that's not far from me. I'm going to call them soon, maybe they can tell me about how best to get it in your area.
That IS strange about the dynamic you describe. Around here, woodturners, furniture makers, sawmill operators, machinists always seem willing to help where they can. Maybe the difference is there are so many people and the market so big that no one feels threatened. Woodturners, especially are some of the most giving and sharing people - no end to the free mentoring and teaching and tool/wood sharing. One woman drove from an arid area in the western US and went home with a station wagon with slabs unavailable where she lived. A guy today brought me a avacodo log - never tried that before! Once a guy sent me a piece of Koa - saving it for a special occasion!
People often ask me how much I charge for lessons (turning, welding, etc) and I tell them all the same thing: a good story or a good joke! (Some still owe.
I have a small Woodmizer mill and have cut up numerous logs for people - they haul the logs, help with the offloading/stacking and there's no charge.
And when I get stuff I don't have the time or energy to saw or even process into blanks, I call the club and they send out an email to the members - people show up with chainsaws. I hold the logs at waist height so they can cut what they want and I load the pieces for them. Keep a pressure washer and wire brush at hand to clean off any chain-destroying dirt/gravel. We are both happy - a win-win!
View attachment 84819
For a local AAW chapter club, did you check the AAW website chapter locator? I think I saw some in Hawaii but don't remember which island. (Love visiting Maui! Hey, next trip maybe I can bring a suitcase of wood! A guy from Australia did that when he visited me. I brought back a suitcase of Olive from Italy once.)
JKJ
Used to have an LT30, great mill, sold it a while back, just picked up a nice little Norwood for 3k from a friend, thing has barely been run and purrs like a kitten, ordered up a box of Timberwolf blades and am ready to go, got a pretty decent pile of logs just been lacking time! Almost done with a project i shouldnt have ever taken on so will have time soon, good Lord willing.
Going to be all artsy fartsy!

I am a big fan of Elmers w 10% water added for rough turned bowls and log ends. Cheap, easily available and effective.