• It's time to cast your vote in the April 2025 Turning Challenge. (click here for details)
  • Congratulations to Steve Bonny for "A Book Holds What Time Lets Go" being selected as Turning of the Week for 28 April, 2025 (click here for details)
  • Welcome new registering member. Your username must be your real First and Last name (for example: John Doe). "Screen names" and "handles" are not allowed and your registration will be deleted if you don't use your real name. Also, do not use all caps nor all lower case.

Shop "before and after" photos.....show us how your shop has changed.

Odie

Panning for Montana gold, with Betsy, the mule!
TOTW Team
Joined
Dec 22, 2006
Messages
7,367
Likes
12,166
Location
Missoula, MT
Hoping to get some interest in a new kind of shop thread.

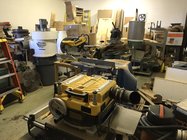
I enjoy shop photos more than just about any other kind of thread.....because they serve to give ideas and inspiration. I am always totally amazed on how my own shop has changed over the years. I just wish I had some of those old processed film snapshots of the rickety old 1950's ShopSmith and the now Defunct 1980's Northwood Reeves drive lathe!

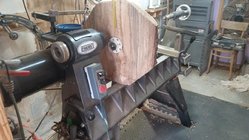
Anyway.....here goes the starter.....my Woodfast lathe about 25 years ago, and now. My, how things have changed! One of the biggest and most useful changes was when I converted to variable speed drive from changing belts.

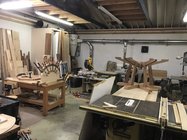
There are now five lamps attached to the headstock.....two incandescent, and three LEDs, plus a hanging LED light and hanging photographic intended natural incandescent light .....I get LOTS of light from every direction now. You can't see it, but in the old photo, there is one adjustable arm lamp on the headstock, and one hanging 4" 2-cell fluorescent lamp. The fluorescent lamp is gonzo, but the adjustable arm lamp is still in use.

Woodfast lathe.jpgIMG_1171.JPG

-----odie-----
 
Last edited:
Jeez, and I was proud of myself today because I'd moved the one, single-bulb fixture near my lathe from the joist behind my head to the one over the lathe itself! Plus, I'm wondering if I should find a wire cage to protect that bulb in case of a major catch or blowout!
 
Jeez, and I was proud of myself today because I'd moved the one, single-bulb fixture near my lathe from the joist behind my head to the one over the lathe itself! Plus, I'm wondering if I should find a wire cage to protect that bulb in case of a major catch or blowout!

It's a quarter past 1am, and after a 7hr shift out in the shop, I'm just now coming in!


Greg.....That doesn't sound like quite enough light....yet. You may not realize what you're missing, until you get some more light on your turnings.

My adjustable arm lamp has a pretty good dent on the other side......happened years ago, but had a super catch and the tool handle went straight up.....hitting that lamp. (It keeps reminding me of my mistake! :))

-----odie-----
 
One of the best things I have done in my workshop is to have the ceiling finished and I painted all the block walls and ceiling white. It made a huge difference in the lighting quality alone. I also added some LED light fixtures which makes it a much better workspace.

workshop-before-2022.jpg

workshop-after-20220418.jpg
 
Moved into current shop about six years ago after a fire took down a big commercial building where I rented 2600 square feet. Flames never came into my shop, but smoke and lots of water did.

First photo is about a month after moving in. Still trying to unpack and clean everything up, but also trying to finish a cabinet job which was midway at the time of the fire.

Second photo taken from the same spot about three years later, building a large dining table and still setting up a few things.
 

Attachments

  • BA1CDA97-6547-4FA7-9594-F0B002FF2371.jpeg
    BA1CDA97-6547-4FA7-9594-F0B002FF2371.jpeg
    458.9 KB · Views: 69
  • 7ED29A4A-D6AD-44B0-ADD4-E314E2FA86CA.jpeg
    7ED29A4A-D6AD-44B0-ADD4-E314E2FA86CA.jpeg
    429.5 KB · Views: 69
I started in a corner of our basement, but bought a pole barn around the corner that had a workshop at one end of it. On paper it seemed perfect, but after measuring my table saw, I realized it was too narrow. Before I got too much in the way, I disconnected the wiring, cut all the nails holding it, and (by myself) moved a nearly 30' long wall back nearly 3' to gain more shop space.


1677337009285.png


1677337342737.png


A pair of hydraulic and steerable machine mover dollies makes moving a lathe an easy one man job.

1677337466346.png


As it is now:

1677337601238.png
 
my shop is large but very full with paths allowing movement through every section to get to the band saw and the finishing table to my lathe in my turning room.
 

Attachments

  • drying racks.jpg
    drying racks.jpg
    133.8 KB · Views: 65
  • lift.jpg
    lift.jpg
    142.8 KB · Views: 64
  • PVC tool holders.jpg
    PVC tool holders.jpg
    95.9 KB · Views: 67
  • my lathe.jpg
    my lathe.jpg
    101.1 KB · Views: 66
Copied from another web site where I shared my journey from move in - useable.

The rubber has hit the road, and the move to the Niagara Peninsula was completed last week. Now the work can begin.
First thing on the plate, clean out all shelving and left overs from the previous owner.
Click image for larger version  Name:    20210530_113642.jpg Views:    0 Size:    2.82 MB ID:    1335101


To this

Click image for larger version  Name:    20210625_142149.jpg Views:    0 Size:    2.24 MB ID:    1335102


Then install tool # 1

Click image for larger version  Name:    20210625_142323.jpg Views:    0 Size:    1.88 MB ID:    1335103


Safety third I always say.

Add some new lighting to avoid the florescent flicker, and prevent stumbling around in the dark. Those three fixtures each draw the same power as a 60 watt bulb and give off significantly more illumination. I am very pleased with them. .

Then power wash the walls and floor in preparation for painting. Mask off some random pattern on the wall, ands get your kids and wife to apply the paint.


Click image for larger version  Name:    20210626_133435.jpg Views:    0 Size:    3.03 MB ID:    1335105


Completed paint on the walls.

Click image for larger version  Name:    20210626_154238.jpg Views:    0 Size:    3.27 MB ID:    1335106
wAAACH5BAEKAAAALAAAAAABAAEAAAICRAEAOw==

Next epoxy on the floors. Then the move in can begin.


Photo on the left was taken about 15 years ago. The one on the right was taken yesterday. All of that junk has a purpose, and is very handy when needed. I spend a lot of effort to make my shop area ultra-convenient, and the flow of activity benefits greatly from that effort.....

-----odie-----
IMG_0440.JPG IMG_1517.JPG
 
This was from 2019, pretty current arrangement (as of a month ago).
IMG_5486.JPG
Not what you were looking for in this thread, but this was Monday:IMG_7565.JPG
And the pile of machines and stuff in the garage in the new house:
IMG_7569.JPG
Till I can get a new shop built, I will be working in an unheated garage with 2 110v outlets (that is, once I find time to rearrange this mess). Should be fun :)
 
Hope the transition goes well, @Dave Landers. I went through the same thing about 2 years ago, and I have to admit it was a vast improvement over what I had.
Planning is the key, with the flexibility to turn on a dime if something is not as well thought out as originally hoped.
 
Hope the transition goes well, @Dave Landers. I went through the same thing about 2 years ago, and I have to admit it was a vast improvement over what I had.
Planning is the key, with the flexibility to turn on a dime if something is not as well thought out as originally hoped.
Thanks. I expect to need plenty of flexibility in the coming months!
 
I was blessed with a 38X45 foot foundation on my house. I carved out a 38X16 section for my woodshop. Once I see if this is an ongoing thing I'm thinking of moving it out to my 30X30 storage building I had built to hold cars a few years ago. Cars are gone now but there is no heat in there.
Here is a pic of my current setup. A new bandsaw will be here next week so I might have to change things around.
woodshop.JPG
 
Phil, it appears that you already have too much floorium in your shop. Moving to a bigger space before you fill this space up with tools and projects is bad luck. ;)
 
How about a during the storm view!
So far the snow hasn't stopped today and it is supposed to last all day.
The woodburner works fine, there is plenty firewood inside, I don't have to go anywhere and I probably couldn't get out if I wanted to.View attachment 50891
Does your shop have a four foot deep frost wall or is it just a floating slab
I can’t decide cause decide which way to go with my shop
 
My 24' X 36' shop has a poured concrete slab, the temperature of the floor year round is 50° +/- a few degrees year round every morning. I have the same model furnace in the shop as we have in the house and during the winter from 8 PM until 5 AM the furnace is set to go on at 45°. At 5 AM it bumps up to 50°, when I go down at 8:30/9 AM I bump it up to 62° and when it shuts off the shop temp is about 66° where it stays comfortable for my normal amount of shop time. On the coldest days it may start up again before I'm done for the day. When done I bump it back down to 50°. When we built it 20 years ago I had an air conditioner built into one outside wall but I never had to use it as that 50° floor keeps the shop comfy all summer. Only once when we had a ten person hands on in August did it start to get really warm in the shop that I set up a fan in the connected flat woodworking area which is in the basement under the garage and family room and it blew in enough cool air to keep it comfortable that day. In 20 years not 1 crack in that floor. If I had to do it again the only thing I would change is the 36' dimension, I would make that 48' (and you know how that goes if it was 48' I'd probably want 60').
 
For those of you with garage doors in your shop, I highly recommend ditching the ceiling mounted garage motor lift for a side mount lift. They’re much quieter and you will gain valuable ceiling space when you take down the long ceiling lift bar/chain.
 
Does your shop have a four foot deep frost wall or is it just a floating slab
I can’t decide cause decide which way to go with my shop
The shop is set up for off peak electric floor heat, which means that the first layer is 2" Styrofoam then the tubing on the foam and 10" sand for thermal storage then 4" reinforced concrete. The outside edges of the slab goes down to the foam and also has 2" foam to isolate the floor from the outside so I guess you could say it is a floating slab.
 
Back
Top