I'm in the midst of turning a batch of Christmas ornaments. The last phase involves turning the tops with a delicate hold in a chuck without jaws, just rubber buttons. I did a number of these yesterday and felt very comfortable with this hold and my fine tool control. This morning, after waking earlier than usual and being a little bit tired, I launched two of the first five I did. After a few bad words I brought the tailstock into play to prevent the ornament from being pulled out of the rubber buttons if my cut was a little more aggressive. The tailstock addition added a few seconds to each piece, but even with that safety I still felt I was forcing the work today and it took me nearly twice as long to complete the pieces this morning than yesterday. I think I'll take a nap after lunch before turning the rest...

-
It's time to cast your vote in the March 2026 Turning Challenge. (click here for details) -
Congratulations to Chris Lawrence for "Dragon's Grip" being selected as Turning of the Week for March 30, 2026 (click here for details) -
Welcome new registering member. Your username must be your real First and Last name (for example: John Doe). "Screen names" and "handles" are not allowed and your registration will be deleted if you don't use your real name. Also, do not use all caps nor all lower case.
You are using an out of date browser. It may not display this or other websites correctly.
You should upgrade or use an alternative browser.
You should upgrade or use an alternative browser.
Some Days I'm Nowhere Near "The Zone"
- Thread starter Ron Solfest
- Start date
I think we all have those days. My passion is turning bowls, and somedays I put the bowls needing finishing cuts aside because I can just feel that all me limited resources are not on tap. At 77, I am just thankful that I am able to enjoy this hobby with just a few restrictions.
john lucas
AAW Forum Expert
How are you turning yor ornaments.. I can't figure out what uour doing. I turn all styles of ornaments.
Did you try putting the lathe in "Forward"?
I’ll bring one to the club meeting next week. After a nap this afternoon the rest were uneventfulHow are you turning yor ornaments.. I can't figure out what uour doing. I turn all styles of ornaments.
")
- Joined
- Apr 27, 2004
- Messages
- 9,334
- Likes
- 6,159
- Location
- Lakeland, Florida
- Website
- www.hockenberywoodturning.com
Some days I can’t do any thing wrong other days i make all the mistakes for the month.
The more I practice the fewer mistakes in a month.
Like @john lucas i’m curious about your ornaments and your holding method.
A few photos would do nicely.
The more I practice the fewer mistakes in a month.
last phase involves turning the tops with a delicate hold in a chuck without jaws, just rubber buttons.
Like @john lucas i’m curious about your ornaments and your holding method.
A few photos would do nicely.
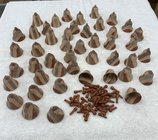
Here’s a pic. The one in the Talon Chuck is one I launched. The bell on the top is a finished one (sans clacker).
I did these in a few stages. The stage just prior to this was held reversed in #1 jaws securely allowing easy hollowing with a Badger, and lower 2/3 exterior with 1/2” spindle gouge.
As y’all know, 90% of turning is getting the waste out of the way for final cuts. You see this final stage still had a fair amount of waste wood to remove with my 3/8” detail gouge. What I found was that I could “bite” just a little over 1/32” (obviously less for finishing cuts) since the cut is pulling out of the rubber buttons since this is ~ spindle turning. Yesterday that didn’t seem to be an issue, this morning was a different story before I brought the tailstock into play.
Couple dozen completed for family, need to glue up and do a couple dozen more for our club before we take off on another 5th wheel trip
Attachments

- Joined
- Apr 27, 2004
- Messages
- 9,334
- Likes
- 6,159
- Location
- Lakeland, Florida
- Website
- www.hockenberywoodturning.com
That is a fine way to turn bells. The one in the Talon Chuck is one I launched
When I’ve done them I turn them like I would a goblet. I would add a 1/2” of waste and turn the whole bell with a 1/4” tenon.
Like you hollow it. Then just turn the outside. The last step would be the ball on the top which I would cut free with the tool I turned the ball with. 3/8 spindle gouge or 1/2” skew.
I prefer this way because all the turning is done on the headstock side. It wastes a bit of wood
It’s all trade offs and style.
@hockenbery - yeah, I considered wasting a little more wood on each for better holding options but got stingy to get an extra few ornaments out of my glue-up…of course after launching a couple it looks like I was “…pound foolish”
- Joined
- Feb 6, 2010
- Messages
- 3,520
- Likes
- 2,597
- Location
- Brandon, MS
- Website
- threeringswoodshop.square.site
I use the same method Al described. Just a little more wood but time savings make it worthwile.
There are some days when I head to the shop, and know that I shouldn't do anything other than sand or clean up. This does come from experience. I think it was Will Rogers who said some thing like, "Good judgement comes from experience, and experience comes from, well bad judgement." Some days are like that.... Just when I think I have made every mistake that can be made, I find a new one....
robo hippy
robo hippy
 I have done these lamp shade ornaments that use a separate "bell" and hanger so there is no need to hold the bell for work on the hanger. The bell is held in place by a bottom finial that has a hole in the end to receive the tenon from the hanger so with a little glue the piece can be assembled. For the bell if nothing is wanted hanging down a small half round with the hole could hold it together.
The bells could be made by first doing the inside, without any of the outside mass removed, and a say a 5/16" hole for the tenon drilled into the scrap then finish sanded. The outside of the bell is then done in stages keeping a uniform wall thickness until you reach about a 1/2" spindle, finish sand, turn off the remainder to the tenon hole and catch the bell as it comes off.
Thanks all for your comments and support. Ended up just engaging the tailstock on the next batch and all went quickly and without incident. Should have been doing that all along, along with not trying fine tool control when tired
Holding the way I did got me about 20% more bells from my glue ups for not much effort once I figured it out. Now to apply finish, and then assembly
Holding the way I did got me about 20% more bells from my glue ups for not much effort once I figured it out. Now to apply finish, and then assembly
Attachments

Odie
Panning for Montana gold, with Betsy, the mule!
Now that the forecast is for nice sunny weather as far as 10 days out, I've been tinkering with the bicycle.....getting it operating smoothly again. Took two short rides the past two days, and enjoying a little break from the shop......
As far as "in the zone" goes.....my total focus has been on other things the past few days.
Also.....got a new phone, and all the frustrations associated with setting it up the way I like it.
-o-
As far as "in the zone" goes.....my total focus has been on other things the past few days.
Also.....got a new phone, and all the frustrations associated with setting it up the way I like it.
-o-
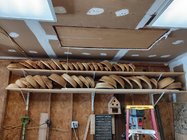
I too go through similiar dry spells. Couple of weeks ago I finished the last of my rough turnings for spring and am purposely taking a break now just to refresh the batteries as well as to complete some projects for the wife. She's great about not interrupting my turning flow and I'm cognizant of when I need a break just to avoid turning burn-out. Finished all of the below just in time for them to dry out for my fall show. Going to work on a 'second' drying area so I can keep turning with fewer interruptions. Anyways...the below is a nice assortment of ash and ambrosia maple.
Attachments
Ron, I don't think I have seen the rubber jaw set ups for a chuck. Do you have any info on them? What brand? Only for certain chucks?
robo hippy
robo hippy
Odie
Panning for Montana gold, with Betsy, the mule!
I'm also getting the itch to ride the Harley lately.....!
-o-
(Same bike, but photos taken about 15 years ago.....)


-o-
(Same bike, but photos taken about 15 years ago.....)
Nice ride Odie!!
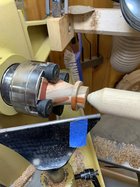
I just used my Oneway buttons from the Megajaws on my Talon chuck. For the next batch I did insert a small flat piece under the bell as the Talon Chuck has a groove in the middle of the slides that could pinch the thin bell rim using the rubber buttonsRon, I don't think I have seen the rubber jaw set ups for a chuck. Do you have any info on them? What brand? Only for certain chucks?
robo hippy
Attachments
Tom Gall
TOTW Team
Odie
Panning for Montana gold, with Betsy, the mule!
@odie ... going to take a while to get used to that new avatar photo. What, no gray hair?!?!")
That avatar photo was taken just this morning. I needed to get a current photo for some correspondence with family. I should have smiled, but I was concentrating on trying to point the camera at myself.....not used to taking selfies! As for gray hair.....I've got plenty, as seen on top of my noggin, and the beard is completely grey these days!....(Just between you and me, I got a little help from "For Men Only" beard coloring!)
I'm going to keep the old avatar for my online sales, though....the old photo looks more like "Eccentric Old Guy" than Mr. Stern face does!!!!! I thought it would be good to update the photo on this forum, though.......The long hair is gone.....the ponytail is gonzo, too.....and these days it's been "high and tight" for awhile now.
I think most everybody here understands about "The times, they are a changin!".....or, as Bob Dylan would say!
-o-
I can't quite get my head around this transformation Odie. What did you do, step into the fountain of youth while panning for gold in the hills?
Didn't recognize you Odie!
robo hippy
robo hippy
>>and the beard is completely grey these days!..>>
Do you know why beards turn gray first?
Stu
Do you know why beards turn gray first?
Stu
I give...
Russ Braun
TOTW Team
Nice mug Odie!!
Being out of the zone is such an interesting thing, albeit frustrating. Sometimes it’s a matter of general health and well being, sometimes it’s because of non-self circumstances, and sometimes it’s just a matter of bad luck (or the universe, or whatever you want to call it). Regardless, it’s important to recognize that it often has nothing to do with your acquired skillsets. A big “shrug”.
When I used to rock climb a lot, there would be those days… We used to joke and say that “today is a high gravity day”.
When I used to rock climb a lot, there would be those days… We used to joke and say that “today is a high gravity day”.
When I used to rock climb a lot, there would be those days… We used to joke and say that “today is a high gravity day”.
>>and the beard is completely grey these days!..>>
Do you know why beards turn gray first?
Stu
For years you shaved, so every time you beard poked out it got cut off. Then after probley 20 or more years you let it grow so Its enough to turn it gray.I give...
Every time I trim my beard, it seems to have far more salt in it than before. Much less pepper....
In my days as a hang glider pilot, there were days when you just knew you should not fly. Attention can not be interrupted! Maybe the same with turning....
robo hippy
In my days as a hang glider pilot, there were days when you just knew you should not fly. Attention can not be interrupted! Maybe the same with turning....
robo hippy
Ron, I don't think I have seen the rubber jaw set ups for a chuck. Do you have any info on them? What brand? Only for certain chucks?
robo hippy
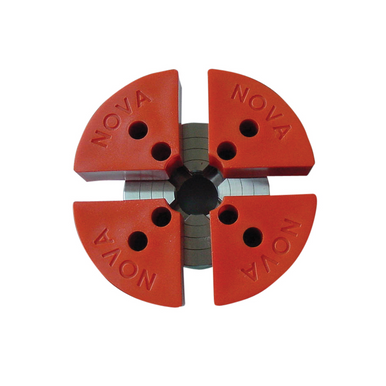
Teknatool Nova Soft Jaw Set
Klingspor's Woodworking Shop is full line distributor of woodworking tools and supplies from respected companies like Klingspor Abrasives.
 www.woodworkingshop.com
These are a unique concept but they do work reasonably well. The nice thing I like about them is the jaws themselves can be turned to fit a unique contour.
I have a set somewhereTeknatool Nova Soft Jaw Set
Klingspor's Woodworking Shop is full line distributor of woodworking tools and supplies from respected companies like Klingspor Abrasives.
These are a unique concept but they do work reasonably well. The nice thing I like about them is the jaws themselves can be turned to fit a unique contour.
Perhaps my biggest problem is not turning, getting dragged away from the lathe for lengthy periods of time, although I take my sketch pad and will be doodling in it most places I go. The breaks play with inspiration not to mention shape and form and a bit of a dint in motor control. So to turn well I must turn and as Picasso said if you're working inspiration will find you this I found to be true in my case. There are other aspects as well I work well in the solitude of the shop with rare visits, so much so my wife calls it the sanctuary.
Odie,
Can you please take another picture? The Stern Vice Principal look is disturbing.
Can you please take another picture? The Stern Vice Principal look is disturbing.
Odie
Panning for Montana gold, with Betsy, the mule!
Odie,
Can you please take another picture? The Stern Vice Principal look is disturbing.
Yeah.....I get it, Dean!
I decided to go back to the congenial original photo......I'm still using this one for "eccentric old guy", too....
I've been riding my bicycle every day for the past couple weeks, and been playing hooky....oh no!
-o-
- Joined
- Jul 18, 2018
- Messages
- 1,386
- Likes
- 3,075
- Location
- Baltimore, MD
- Website
- loujacobswoodturning.com
I once cut school in about 9th grade to go fishing. Didn’t catch a thing, and felt guilty about it for months. Not sure what I would have done with the fish if I had caught any! Also can’t remember how I covered, as I’m sure school would have wanted a parent’s note for the absence.