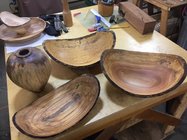
Living in the land of Big Leaf Maple, I've acquired many pieces of spalted wood, a few with sentimental histories. Though several are now "1st-turned bowls", I need some advice on how to get the best surface out of the final turning and finishing. Anyone have a trusted technique to share?

-
Congratulations to Chris Lawrence for "Dragon's Grip" being selected as Turning of the Week for March 30, 2026 (click here for details) -
Welcome new registering member. Your username must be your real First and Last name (for example: John Doe). "Screen names" and "handles" are not allowed and your registration will be deleted if you don't use your real name. Also, do not use all caps nor all lower case.
You are using an out of date browser. It may not display this or other websites correctly.
You should upgrade or use an alternative browser.
You should upgrade or use an alternative browser.
Spalted wood - - your technique?
- Thread starter Jamie Straw
- Start date
- Joined
- Apr 27, 2004
- Messages
- 9,334
- Likes
- 6,159
- Location
- Lakeland, Florida
- Website
- www.hockenberywoodturning.com
I find every piece of softer woods presents a new learning experience to minimize tearout
If it is just a few spots I use thin ca on those letting it penetrate ant that is all that is needed.
For punkyness all over.
1.. i see what I can do to minimize tearout
On the outside pull cuts will usually cut cleaner than push cuts with the bowl gouge.
a spindle gouge may cut cleanly when the bowl gouge won’t
Michelson grind on 3/8 diameter bowl gouge often does the trick
Scraping rarely works with soft wood.
2. Stiffening the fibers binds them together to make. supporting fibers.
Spritzing with water will often be enough to swell the fibers to produce a clean cut
My next step is thinned shellac 2x the alcohol this fills in the gaps between the fibers and May allow a clean cut
A lacquer wash does the same thing.
For sentimental valued wood it may be worth a last resort of Polyall2000 - expensive, a pain to work with, leaves a plasticized look- but it works
On the inside I would use a 3/8 d bowl gouge to cut the first inch maybe two
Last edited:
Odie
Panning for Montana gold, with Betsy, the mule!
If you can't get a decent cut.....
....don't mess with it.....reject it.
-----odie-----
....don't mess with it.....reject it.
-----odie-----
I turn a fair amount of spalted and often punky wood. It can make some great pieces and as Al says, each one can be different on how well it cuts. I try to get a sense of how it's going to turn early on to know which cut type and direction produces the best cut. It can vary. Always keep your tools sharp. Very light cuts. You can create some very nasty tear out while roughing it out and then struggle to clean them up with little room to spare. NR scrapers can sometimes work, sometimes not so test before you get to the final shape and thickness. CA in trouble spots can help but know how it's going to impact your finish first. On punky spalted wood it seldom creates an issue. I sometimes will use JB Weld wood hardener but usually as a last resort. Plan for correction by sneaking up on your shape and wall thickness and leaving room for a bit of aggressive 80 grit sanding. Often I'll count on 80 grit as my finish cut process but be careful, you can create ripples and uneven curves very easily. Don't sweat every pit and spot - it's part of the look. You can ruin a beautiful piece chasing a small pit. When sanding blow the dust away to really know what the surface looks like. Sanding dust will fill and pack into the pits and fool you. It will look great and when you blow away all the dust to put on finish you'll see the craters, and it may be too late to remount and correct. Some black CA is great for filling cracks or voids and will blend in with the dark spalting lines.
Last edited:
Odie
Panning for Montana gold, with Betsy, the mule!
I turn a fair amount of spalted and often punky wood. It can make some great pieces and as Al says, each one can be different on how well it cuts. I try to get a sense of how it's going to turn early on to know which cut type and direction produces the best cut. It can vary. Always keep your tools sharp. Very light cuts. You can create some very nasty tear out while roughing it out and then struggle to clean them up with little room to spare. NR scrapers can sometimes work, sometimes not so test before you get to the final shape and thickness. CA in trouble spots can help but know how it's going to impact your finish first. On punky spalted wood it seldom creates an issue. I sometimes will use JB Weld wood hardener but usually as a last resort. Plan for correction by sneaking up on your shape and wall thickness and leaving room for a bit of aggressive 80 grit sanding. Often I'll count on 80 grit as my finish cut process but be careful, you can create ripples and uneven curves very easily. Don't sweat every pit and spot - it's part of the look. You can ruin a beautiful piece chasing a small pit. When sanding blow the dust away to really know what the surface looks like. Sanding dust will fill and pack into the pits and fool you. It will look great and when you blow away all the dust to put on finish you'll see the craters, and it may be too late to remount and correct. Some black CA is great for filling cracks or voids and will blend in with the dark spalting lines.
Hi Randy......
I went to your website, and can't seem to see any of your works at all! I'm interested in seeing some of your spalted examples. How do I negotiate your site?
Thanks.
-----odie-----
Good/bad timing Odie. For the past year we (my friend and I) had a store and shopping setup on our web site. I downgraded our site earlier this week since sales were in a word - lousy. I'll grab a few recent pics and post in a follow up to this post. The sweet gum trio I posted on the gallery recently was very punky and came out nice I think. I also need to go through our site now and make sure the links still go where they should, etc. GoDaddy did some changes but doubt they are all as they should be. I do need to post some samples of my work on the web as well. Without the store page there aren't any examples to see...not good.
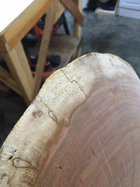
A few pics. Another sweet gum hollow form - heartwood and especially neck opening and bottom area punky. One in back is very punky hickory where JB Weld was a big help, front is elm - good heartwood but sapwood punky and on the right ironwood - odd in that the heartwood was solid as a rock but sapwood was almost crumbly, especially the outer inch. I saw this piece of black cherry on my "to be sanded" shelf. This was about as good an edge on the sapwood as I could get so will count on some good 80 grit work to clean it up but likely will still have a few small pits here and there. I think it comes with the look.
A few pics. Another sweet gum hollow form - heartwood and especially neck opening and bottom area punky. One in back is very punky hickory where JB Weld was a big help, front is elm - good heartwood but sapwood punky and on the right ironwood - odd in that the heartwood was solid as a rock but sapwood was almost crumbly, especially the outer inch. I saw this piece of black cherry on my "to be sanded" shelf. This was about as good an edge on the sapwood as I could get so will count on some good 80 grit work to clean it up but likely will still have a few small pits here and there. I think it comes with the look.
Attachments
Last edited:
Well, other than really sharp tools, not much to add. Softer and more punky wood some times needs the 600 grit wheel, and even honing/polishing the bevel, which can't be properly done other than on a leather strop. Not always the solution. The higher your shear angle is when cutting, most of the time, the cleaner your cut is. So, some times I like a detail type gouge with a ) nose bevel, rolled up on the side, so flutes at 3 and 9. A VERY light touch for the final few passes helps too. The spritzing with water can do wonders for tear out. No real one size fits all here. I recently had some BLM where no matter what I did, 1/4 of the bowl had tear out. First time that ever happened, because if there is tear out on one side, there always is matching tear out on the other side. Not this tree....
Nice to see you back Jamie, haven't heard from you in a while. Hope all is well....
robo hippy
Nice to see you back Jamie, haven't heard from you in a while. Hope all is well....
robo hippy
Yes, welcome back, Jamie. Now explain what BARN is, please.
My best advice is for the finish, anything but oil. Oil can really muddy up the look. If I really like the look on the lathe. I spray on a couple coats of acrylic artist fixative.
?? what does the "Burau of Land Management have to do with bowl turning ??I recently had some BLM where no matter what I did, 1/4 of the bowl had tear out.
Big Leaf Maple perhaps.?? what does the "Burau of Land Management have to do with bowl turning ??
When Stuart Batty first came to Hawaii, he asked for a piece of wood that I was having a hard time cutting clean. I gave him a piece of spalted, punky Cook Pine. Within 10 seconds I knew I had to learn the 40/40!! He left the surface, shiny, glossy, no lines, perfectly cut. You still had softwood, in the punky areas, but it was perfectly cut.
Yup, Big Leaf Maple. Acer Macrophylum, or some thing like that..... Got a log last summer, 10 feet long, maybe 12 inches wide, and almost 24 inches high. It was growing almost dead level horizontal. Wonderful ripple through the whole thing, and lots of little burl blisters. It was going to the burn pile..... Not my favorite wood, but this stuff was much better than normal.
robo hippy
robo hippy
Emiliano, as I said earlier in the thread I deal with a fair amount of punky wood. I've learned to adjust to it and find I can generally get good results but, I'm interested in your comment re the 40/40 grind difference. My skills are not at your or Stuart's level for sure but, how much do you think his results were the grind vs his top notch tool control skills. Perhaps he could have gotten the same finish with just about any tool he had in his hand? Curious. If you think the real difference was the grind then maybe I need to jump into the 40/40 pool and try to swim.
Everything mentioned above can help - sharp tools and a spray bottle of water with a few drops of dishwashing soap are always where I start. Just a little bit of soap in the water helps lube the cut. I also find that I tend to turn spalted woods at slightly higher rpm...seems to help.
- Joined
- Feb 6, 2010
- Messages
- 3,520
- Likes
- 2,597
- Location
- Brandon, MS
- Website
- threeringswoodshop.square.site
Randy like you I have turned my share of punky but curl gives me the most problem. Like you I really think Stuart could get results with any tool it is just that he teaches and prefers the 40/40. Saw him at SWAT and it was amazing . He even did the bottom with a jamb chuck and had to cut away a lot of the jamb chuck to get the bowl off. AMAZINGEmiliano, as I said earlier in the thread I deal with a fair amount of punky wood. I've learned to adjust to it and find I can generally get good results but, I'm interested in your comment re the 40/40 grind difference. My skills are not at your or Stuart's level for sure but, how much do you think his results were the grind vs his top notch tool control skills. Perhaps he could have gotten the same finish with just about any tool he had in his hand? Curious. If you think the real difference was the grind then maybe I need to jump into the 40/40 pool and try to swim.
"Bainbridge Artisan Resource Network." You can see why I don't spell it out each time,Yes, welcome back, Jamie. Now explain what BARN is, please."
") guess I'll add it to my signature. I've been teaching there since fall 2017, coordinate the lathe program (classes, instructors, budget), and am one of eight Studio Managers. Here's a photo of our Wood & Boatbuilding Studio (4500 sq. ft.) Lathe area is against the back wall, not really visible, but we have three Powermatics, one Jet 1642, and two Jet 1221's. Started out with mostly donated tools, but we now have upgraded 90% of them. The Wood Studio is one of 10 facility studios, and we have an active membership of over 100 people, hosting 25-30 people most days. I'll start a new thread sometime and post a couple of photos of the lathe area.
guess I'll add it to my signature. I've been teaching there since fall 2017, coordinate the lathe program (classes, instructors, budget), and am one of eight Studio Managers. Here's a photo of our Wood & Boatbuilding Studio (4500 sq. ft.) Lathe area is against the back wall, not really visible, but we have three Powermatics, one Jet 1642, and two Jet 1221's. Started out with mostly donated tools, but we now have upgraded 90% of them. The Wood Studio is one of 10 facility studios, and we have an active membership of over 100 people, hosting 25-30 people most days. I'll start a new thread sometime and post a couple of photos of the lathe area.We get visitors from around the country and the world. If you're ever in the Seattle area, hop a ferry and come on over. Normally there are tours on Sunday afternoons, but Covid has disrupted that. However, I can generally arrange a visit (for fully vaccinated folks) with a couple days notice.

Last edited:
Thanks for the tips, everyone. Since there are several first-turned specimens available, I can try them all. I didn't do anything special for the rough turning, since drying followed.
Was it still green? The 40/40 on green wood is like green corn thru the new maid-- pretty much the same as an Ellsworth on a dry blank in my opinion, though I do use it quite a bit.When Stuart Batty first came to Hawaii, he asked for a piece of wood that I was having a hard time cutting clean. I gave him a piece of spalted, punky Cook Pine. Within 10 seconds I knew I had to learn the 40/40!! He left the surface, shiny, glossy, no lines, perfectly cut. You still had softwood, in the punky areas, but it was perfectly cut.
And part of that is Batty too. I believe he was conceived on a lathe, as was his dad. He can make it look easy.
We await your finished photos.Thanks for the tips, everyone. Since there are several first-turned specimens available, I can try them all. I didn't do anything special for the rough turning, since drying followed.
Hope you are patient, I find it hard to get to finishing projects these days. "Too much administrating, not enough turning." One reason for getting involved back here -- motivation!!We await your finished photos.
Tom, after a few decades of turning I would take more than someone cutting green wood to impress me, LOL But, you have a very valid question. I asked that same thing myself to David Ellsworth. In his DVD he makes shavings fly, perfect finish right off the tool. David helped me a lot, a owe him a lot. I asked him because I truly did not know if the wood he was using was dry or green. I was trying to cut dry Koa, and I was getting a lot of tearing. He told me, well, with dry wood, do the same as the video, but, slower...Was it still green? The 40/40 on green wood is like corn thru the new maid-- pretty much the same as an Ellsworth on a dry blank in my opinion, though I do use it quite a bit.
And part of that is Batty too. I believe he was conceived on a lathe, as was his dad. He can make it look easy.
To answer you, the piece of Cook Pine, super punky, was super dry. I had set it aside in hopes of I do not know what. In Oahu, Stuart did the same. David Chung had a piece of dry, old, spalted, rotten mango wood. David told me that within 5 seconds he knew his woodturning life had changed. We had discussed Stu coming over and changing our technique, we both said we were happy with what we were doing. David said you have to learn whatever the heck he did! I have found that when someone tells me the 40/40 is the same as other techniques when it comes to finishing, 100% of the time they are not doing the technique right, they do not have the grind right, in short, they are not doing the 40/40, they are trying to do it but are not there yet. In my recent Argentina trio, someone made a comment that I can turn because of my Thomspon tools and my good Stubby lathes. I said, OK, let's have a little competition. With the same homemade bowl gouge, we each had 10 minutes to work a blank, the same size. My results were 200% better than his effort. I then told them, it is not the arrow, it is the Indian. I still have several bowl gouges with the Ellsworth grind. I will not give up using it, it is a great tool, cuts great, it is versatile. The 40/40 is just another weapon in someone's arsenal.
I can't really say why I prefer the 40/40 grind, other than to say I like the way it cuts. I have one of Doug's U flutes that I ground to a ) shape nose, and can get the same surface as I can with the 40/40, at least most of the time. For the sides of the bowl, the 40/40 is just easier to present to the wood than the more blunt angled gouges. If that makes any sense.
robo hippy
robo hippy
I like "It's not the arrow, it's the Indian." I have watched Stuart Batty demonstrating his method half a dozen times, sometimes as close as 3-4 feet away. And I still can't figure out how he does it. Watching, his turning doesn't look terribly unique--it appears to be a fairly ordinary push cut (except when he does it one handed). I've tried replicating the 40/40 grind, and in my hands, it doesn't make me Stuart Batty. As you say, Emiliano, something isn't quite right. I've assumed that Stuart is just miraculously skilled, and I'm not, and never will be. But if it actually IS the arrow, maybe there's hope. Or if there are definable components to his technique, that can be learned without having Allan nagging you for 10 years.To answer you, the piece of Cook Pine, super punky, was super dry. I had set it aside in hopes of I do not know what. In Oahu, Stuart did the same. David Chung had a piece of dry, old, spalted, rotten mango wood. David told me that within 5 seconds he knew his woodturning life had changed. We had discussed Stu coming over and changing our technique, we both said we were happy with what we were doing. David said you have to learn whatever the heck he did! I have found that when someone tells me the 40/40 is the same as other techniques when it comes to finishing, 100% of the time they are not doing the technique right, they do not have the grind right, in short, they are not doing the 40/40, they are trying to do it but are not there yet.
Stuart has spent a couple weeks with you, Emiliano, so you've had plenty of one-on-one time to master the method. Spill the frijoles. Is it the grind or is it the technique of using the tool? It's not possible for 2000 of us to spend a week with him one-on-one. How do the rest of us ordinary blokes go about getting it right?
I am convinced enough that the 40/40 will be of great benefit that I ordered a set of Ashley Harwood tools - which are kind of "up-dated" versions of Stuarts- with some interesting features.. In fact, the bolsters on her tooling fit the SB handles. But...these new "arrows" don't hit the target as well as I was hoping... , so I am going to Ashley's for a class. Looking forward to getting some real instruction on this 40/40 grind.....
, so I am going to Ashley's for a class. Looking forward to getting some real instruction on this 40/40 grind.....When the late Bill Jones was asked how he was so good at the lathe, Bill responded: "but why you just have to stand in front of the lathe" And that is basically it, in order to get good at any technique you have to put the time in. One problem that I see is that the 40/40 definitely has a bit of a learning curve. People want to go into the shop and come out with a finished piece. You need to practice, practice and practice more. Then start practicing again. If you do not want to practice the grind on a Thompson gouge, buy a cheap one.I like "It's not the arrow, it's the Indian." I have watched Stuart Batty demonstrating his method half a dozen times, sometimes as close as 3-4 feet away. And I still can't figure out how he does it. Watching, his turning doesn't look terribly unique--it appears to be a fairly ordinary push cut (except when he does it one handed). I've tried replicating the 40/40 grind, and in my hands, it doesn't make me Stuart Batty. As you say, Emiliano, something isn't quite right. I've assumed that Stuart is just miraculously skilled, and I'm not, and never will be. But if it actually IS the arrow, maybe there's hope. Or if there are definable components to his technique, that can be learned without having Allan nagging you for 10 years.
Stuart has spent a couple weeks with you, Emiliano, so you've had plenty of one-on-one time to master the method. Spill the frijoles. Is it the grind or is it the technique of using the tool? It's not possible for 2000 of us to spend a week with him one-on-one. How do the rest of us ordinary blokes go about getting it right?
Practice, practice, practice is all well and good. But if you don’t realize what you are doing wrong you just ingrain bad habits.
Emiliano-
You are right about the grind - and that is what I have been doing....And I compare my attempts to duplicate the find on the Ashley Harwood tooling as I a go. It is improving....but indeed - there is a learning curve and re-education of the muscle memory for this grind. SO - I am hopeful that the class with Ashley will focus on concentrated practice and correcting my insufficiencies in grinding - as well as the technique with he tool on the wood.
You are right about the grind - and that is what I have been doing....And I compare my attempts to duplicate the find on the Ashley Harwood tooling as I a go. It is improving....but indeed - there is a learning curve and re-education of the muscle memory for this grind. SO - I am hopeful that the class with Ashley will focus on concentrated practice and correcting my insufficiencies in grinding - as well as the technique with he tool on the wood.
To me, the biggest 'secret' to the final finish cuts is letting the tool cut, rather than really pushing it. When roughing, I still try to get smooth even surfaces, but I push as hard as the lathe will let me. For finish cuts, you really need to learn how to 'feel' the wood cutting. Kind of like using negative rake scrapers, "if you have to push at all the tool is dull". With a bowl gouge, as long as it is sharp, you don't push at all. Not easy to teach.
robo hippy
robo hippy
Reed-
You are right that it takes time to develop the "feel " of the tool cutting vs pushing the tool. I likely over-sharpen, but.... for me - the goal is as smooth as possible to avoid any sanding I can. Ellsworth - no problem, but the 40/40 is new to me. So, being impatient is the first bad habit I try to break. And...then I go take a class from someone that is known for the thing I am trying to improve.
You are right that it takes time to develop the "feel " of the tool cutting vs pushing the tool. I likely over-sharpen, but.... for me - the goal is as smooth as possible to avoid any sanding I can. Ellsworth - no problem, but the 40/40 is new to me. So, being impatient is the first bad habit I try to break. And...then I go take a class from someone that is known for the thing I am trying to improve.
I use the 40/40 extensively. But like Emiliano said it is not the only gouge I use. In some conditions/cuts other like the Ellsworth work better.
Keys for the 40/40 to cut well:
Left hand only pulls down to hold the gouge on the rest, do not move the gouge or have any pressure forcing the bevel on the bowl
Left hand should not be on the tool rest at all. The only time to use the left hand on the rest is when starting or finishing the cut
Right hand pushes, lowers/raises handle and rotates gouge open closed
Smooth cuts are hard when there are knots
Vibration is an issue, it is hard to cut clean if there is any vibration
Steve -
I will keep those points in mind - tho being left handed, I have learned to use either hand at the rest or to control the tool. But I understand your point completely. Thanks for those.
T
I will keep those points in mind - tho being left handed, I have learned to use either hand at the rest or to control the tool. But I understand your point completely. Thanks for those.
T
Tim,Steve -
I will keep those points in mind - tho being left handed, I have learned to use either hand at the rest or to control the tool. But I understand your point completely. Thanks for those.
T
I would take a look at Mike Mahoney turning, he is left handed.
Practice, practice, practice is all well and good. But if you don’t realize what you are doing wrong you just ingrain bad habits.
Therein lies the biggest problem - - specifically when a new turner takes maybe one class or workshop and then goes home to turn with no further input from another good turner. This is an even bigger problem for newbies who are very project-driven from the outset. During the 9 hours of our Intro to Woodturning class (3 class sessions x 3 hours) I stress repeatedly that practicinig in Open Studio after "qualifying" on the lathe is very important and will pay off, but that proper technique is essential and takes time to develop. Success can be judged by the quality of the surface ("You're not here because you like to sand wood") and depends not only on understanding how the gouge slices the wood fibers, but upon the development of muscle memory to make the techniques relatively easy and repeatable (consistent).
In the Studio environment, I or one of my assistants is often available to help these turner's tweak their approach and steadily improve. For most turners, though, it's a matter of finding a good mentor they can spend time with and keep headed in the right direction.
Newbies can use short-cuts to get some projects done as they develop their gouge skills, most notably the use of negative rake scrapers to remove tool marks, but a NRS leaves a sub-par surface on non-hard woods, so they still end up sanding more than they will as technique improves.
In teaching tool control to beginners, we emphasize anchoring the handle to the hip/side, and moving the tool with the trunk rather than the arms.Left hand only pulls down to hold the gouge on the rest, do not move the gouge or have any pressure forcing the bevel on the bowl
Left hand should not be on the tool rest at all. The only time to use the left hand on the rest is when starting or finishing the cut
Right hand pushes, lowers/raises handle and rotates gouge open closed
What stance/foot position goes along with this technique?
Is the handle anchored to your side? If not anchored, I can understand why time at the lathe, strength, and muscle memory are critical.
Do you guide the tool with trunk motion or what?
From your description, it sounds like the tool guides itself. Does this produce a particular shape to the cut?
Anchoring to the side is desirable. It is not always achievable for the whole of all cuts. But yes, the tool moves primarily with trunk motion.In teaching tool control to beginners, we emphasize anchoring the handle to the hip/side, and moving the tool with the trunk rather than the arms.
What stance/foot position goes along with this technique?
Is the handle anchored to your side? If not anchored, I can understand why time at the lathe, strength, and muscle memory are critical.
Do you guide the tool with trunk motion or what?
From your description, it sounds like the tool guides itself. Does this produce a particular shape to the cut?
The shape of the cut is determined primarily by how the tool swings. A smooth radius requires a continuously moving smooth swing. With the 40/40 grind it takes a lot of practice to do this well. Swing of the handle primarily determines path and shape. Rotation of the handle primarily determines depth of cut. At the start of the cut typically the handle will be higher, around level, then drop slightly after the cut begins till the tool is cutting well. Key is the bevel floats across the cut surface there is no force pushing the bevel to the wood.
Because a good cut needs to be non-stop, the trunk must move a long ways. If you watch Stuart Batty turn he places tool at the end of his cut then rotates his trunk to the start of the cut. It is better to not have to move feet during the cut. To do this requires some tension and twisting of the trunk to the end position to be able to reach the start position. This is why I said the tool may not always be against the trunk as the arms need to move away from the body some to reach start position on larger bowls. Just because the tool is not held tightly against the side does not mean the primary mover is not the trunk.
It is possible to shift and restart a cut, and when roughing this is more likely as having the tool against the trunk is more important then. For finish cuts, one continuous cut is going to give the best results.
I learned primarily by watching Stuart Batty turn in several videos. There are plenty online, I like this one best:
This video was a real eye opener for me and have probably have watch this it 50 times. There are lots of little details that you can't pick up right away.
These Batty videos have a wealth of other details:

SB Tools
Stuart Batty combines his unique heritage with thirty-five years of experience as a world-class instructor to offer a breakthrough in both tool design and method,…
 vimeo.com
I practiced a lot and blew up a lot of bowls learning how to use the 40/40 and turn thin walled bowls.
I'm not saying this is the only way to turn. The 40/40 grind does not do everything, for example the bottom of bowls it can't cut. It is also not the best grind in certain situations and I still use and Ellsworth and pull cut.
My original mentor in woodturning is Joe Ruminski. Joe was a teacher and High School Principal and is an incredible communicator. He also has a history in martial arts. Balance being key to the martial arts...AND woodturning....His philosophy on body and feet position - much like Stuart Batty's - was encapsulated in an expression: "Start uncomfortable, and finish comfortable".
So, he taught me to place my feet in the place that they would need to be as the cut finishes, and rotate my trunk, shoulders, etc, to the entry point for the cut. The point being that, our foot position influences the rest of the body's abilities to maintain balance and control. I am not sure if this translates into a good visual for anyone reading this....
So, he taught me to place my feet in the place that they would need to be as the cut finishes, and rotate my trunk, shoulders, etc, to the entry point for the cut. The point being that, our foot position influences the rest of the body's abilities to maintain balance and control. I am not sure if this translates into a good visual for anyone reading this....
I was lucky enough to take a class with Stuart and Allen Batty. Stuart's style was really strange to me, and it took a while to figure out why he did things so differently than I do. I figured that his style is an adaptation for turning bowls on a long bed lathe. You either have to hold the tool out away from your body, or brace your hip on the lathe, and lean over the bed. I got a 3520A when they first came out for the purpose of the sliding headstock, slide it down to the end and then you can stand up straight, and keep your arms in by your body.
I started Tai Chi, some years after I started turning. First day in class, it was 'hey, this is just how I move when I am turning'.
robo hippy
I started Tai Chi, some years after I started turning. First day in class, it was 'hey, this is just how I move when I am turning'.
robo hippy
So....while robo hippy is an accepted alias....you could easily be also known as..."Tai-Chi Turner"....?