That's exactly like I make of my scrapers and negative rake scrapers. I always consider a square end scraper a "blank". I buy square end scraper stock (and sometimes use skew, round stock, detail spindle gouges, and other stock and grind to the shape I want, either conventional scrapers or negative rake.
Your own shapes can perform even better than the original tools if you sharpen them well and apply a proper burr with a burnisher.
A few points:
- Shaping big tool stock can take a LONG time. I used to use an 80 grit CBN wheel just for that then later went to a 60-grit CBN which cuts faster
- Grinding away a lot of metal will put a LOT of extremely fine steel dust in the air. I've found magnets 10' away on the back of my bandsaw covered with black ultra fine steel dust. That stuff can't be good to breathe - wear a respirator.
- Heavy grinding makes so much fine steel dust that a lot can accumulate under and around your grinder. Some people put strong magnets below and to the sides of the grinding wheel that can catch a lot of the dust. Some people put the magnets in plastic bags so they can clean off the dust easily. Note that accumulating a big puffy glob of fine steel dust can be a serious fire hazard - I once had a tiny spark from a CBN wheel ignite a big "hairy" glob of steel dust on a magnet - I noticed an orange glow down in the middle which indicated a small glob of growing molten steel - picked up the thing and took it outside. Be aware.
- After I grind the shape on the 60grit CBN wheel I grind the finial edge on a 600 grit CBN wheel, remove the grinder burr on a leather wheel, then burnish a useful burr on the tool.
- I also make a variety of special tools by grabbing one from a box I keep of old tools I bought for cheap or were given to me. Be aware that some tool makers took shortcuts and didn't harden the full shaft of the tool, just the first inch or two. If you grind through this hardened length you will get into the soft unhardened steel which will be almost worthless for turning wood. I test the shafts of ALL old and used tools with a small 3-corner file - if the file skids on the shaft that steel is hardened. But if the file corner cuts into the shaft that section has not been hardened. Be aware.
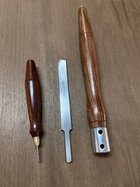
I've posted some of these before, but here are example of some negative rake scrapers I've ground from Thompson scrapers and skews, Thompson round rods, and even a Thompson shallow detail spindle gouge. I hold all of these in the hand without putting them in handles. (If the forces on the tool are not extremely light you are doing something wrong.)
I ground these from square-end Thompson scrapers. The bevel on the bottom is identical to the bevel shown on the top. The only think different between the "left" and "right" versions is how I added the burnished burr.
View attachment 69882
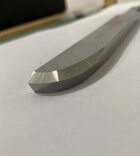
I grind a flat on the ends to let me easily "turn air" on wings on certain designs without risking chipping.
Make sure the scraper and burr are sharp and use a very light touch!
I use the curved part on both the outsides and insides of bowls, platters, etc.
You might be able to see the "whisper" shavings these are capable of removing.
View attachment 69885
This design was different from any I saw made commercially or specially made by pro turners demonstrating at symposiums.
I've describe it often and brought some to symposiums where people met me and made tracings and asked Doug Thompson to duplicate the grind.
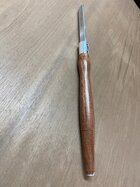
Ground from round stock, a spindle detail gouge, and a piece of bar stock.
Sometimes I grind a different NRS on the other end.
I keep scrapers in a variety of shapes and sizes and find them all useful at one time or another.
View attachment 69883
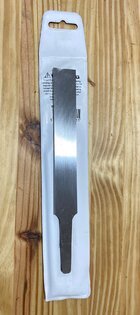
And here's another special scraper (not NRS) I ground from an old tool,
custom made only to turn a recess when the tailstock was in the way so another type of tool wouldn't work.
View attachment 69884
These were all ground on CBN wheels but you can also use conventional grinding wheels or even coarse belt/disk sanders to reshape.
JKJ