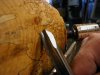
Can someone please provide a better description with photos of the "inverted finish cut" that's depicted in photo 1 on page 36 of the winter Journal? I don't get it. 

I'd like to try to help, but have not recived my winter journal yet, it's in the mail, I hopepencheff said:Can someone please provide a better description with photos of the "inverted finish cut" that's depicted in photo 1 on page 36 of the winter Journal? I don't get it.
dkulze said:Haven't seen the photo (no journal yet) but sounds like you guys are talking about shear scraping with the bowl gouge (AKA- "the Ellsworth Shuffle").
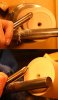
n7bsn said:If I understand correctly, the cut is used by Bill Grumbine in his new video, and the flute is upside down and you are cutting with the wing that is (now) on the left hand side. He did note that people were sometimes cutting with both wings, but that is a big no no
dkulze said:I gotta get my journal. What you're showing, Bill, is a bevel supported cut. What I was talking about was a flute down, angled shear scrape. Very stable, since you're using the bottom wing, and actually not catch prone at all once you have the techinque. I had many catches learning how until that "Ahhhhh, that's what you meant" moment. Pretty much none since.
Dietrich
David Somers said:It will be a while before I could try and photograph this, but lets see if I can describe the cut enough for folks. Its one of my favorites.
I may get more of a giggle from everyone by attempting to describe this, but what the heck!!
Start off with Bills photo.
Assume the lathe is OFF.
Rotate the shaft counterclockwise until both wings are touching the wood. Then, rotate clockwise just a smidgeon so the wing closest to the headstock is off the wood by about 1/16 to 1/8 of an inch. Your cutting will be done with the wing closest to the tail stock. The cutting edge would be angled a bit towards the headstock. The angle is roughly the same angle you see if you look on your computer keyboard at the backslash key, \ , the one just under the backspace key.
I am right handed, so if I were holding the tool in Bill's picture I would have my left thumb pressing the tool shaft against the tool rest to steady it. The finger position I like is a bit hard to describe, but, if you held your left hand with your index finger extended as if you wanted a little bird to land on it... I run the top of my index finger along the bottom of my tool rest as a guide. I trap the tool shaft with my thumb against the toolrest and my index finger.
The pressure used is pretty light. My right hand would be holding the the tool handle against my right thigh, again, very loosely. I move the tool with my body. If the cut is more comfortable free hand (not using my thigh to support the tool handle) I will move my right hand way up the shaft. And of course, as with most exterior cuts, you watch the top of the bowl to see how deep your cut is and adjust the cut based on that.
This is a very light cut, but it gives you a really smooth surface. I usually get my smoothest cut going downslope as you might expect, which would be the opposite of what I just described, but I thought I could describe this best if I used Bill's photo as a starting point. So.....to reverse this cut and go downslope as it is shown in Bill's photo just reverse all this and have the tool face the tailstock instead of the head stock. The toolshaft angle would be close to the angle of your keyboards regular slash key /. The wing that is 1/8 of an inch off the wood would be the wing closest to the tail stock and you are cutting with the wing closest to the headstock. Now you are set to cut from the headstock towards the tailstock and would be going "downslope."
Did this help or hurt?? Or just get a hearty gaffaw from everyone??? <grin>
Hope someone has a camera for the next explanation!!
Dave
Yep! Believe it or not, but that video is how I learned to turn. The Ellsworth gouge was my first tool and all I had was the video to go by. It was great. Clear, easy to follow, the tool quickly became my favorite, even now as my "collection" of tools grows.Mark Mandell said:Dave, if you get hold of Ellsworth's video on his signature gouge, you'll find that cut called a "shear scrape" with the tool's axis held at about 45* from the vertical, the high wing just off the wood, and the left hand putting pressure down onto the tool rest, and the "bottom" wing doing the cutting. The resultant shavings have been call "Angel Hair" because they're so fine. It will cut both left-to-right and right-to left, but it's best (smoothest) performance is right-to-left moving downhill over the grain from the rim to the foot.
[I think]
john lucas said:Hope I can clear up some of the discussion. Below is a photo of the cut Phil is talking about in the article. Flute down rubbing the bevel, a bevel rubbing cut, not a scrape or shear scrape. Leaves a surface similar to that using a skew.