• May 2025 Turning Challenge: Long Neck Hollowform! (click here for details)
  • Congratulations to Phil Hamel winner of the April 2025 Turning Challenge (click here for details)
  • Congratulations to Paul Hedman and Donna Banfield for "Fire and Ice" being selected as Turning of the Week for 5 May, 2025 (click here for details)
  • Welcome new registering member. Your username must be your real First and Last name (for example: John Doe). "Screen names" and "handles" are not allowed and your registration will be deleted if you don't use your real name. Also, do not use all caps nor all lower case.

That’ell learn ya…

Joined
Feb 25, 2025
Messages
34
Likes
37
Location
Jackson, MS
I got a lesson today from Gerald Lawrence today. He kindly came over and demonstrated and had me repeat the process on using a skew which is the one tool that I NEEDED a lesson on. It went well except on turning a bead which will take practice on my part.

We discussed the curve on the skew so my homework is regrind and put a little curve on my skews. After seeing his skews and how easy he turned I will follow his instructions.

He looked over the other turning tools and all was good except my scrapers didn’t have a burr so showed me how to put a burr on a scraper. Ironically, I do that to furniture scrapers and never occurred to me to do that to a turning scraper.

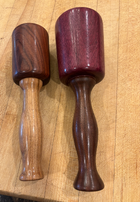
He came over out of the goodness of his heart and love for turning but I couldn’t let him leave empty handed so I gave him a 18oz Purple Heart mallet I had made but not used yet.

Gerald, thank you for today. A new friend and mentor.
 

Attachments

  • IMG_2357.png
    IMG_2357.png
    4.7 MB · Views: 11
I enjoyed the afternoon Webb. Thanks again for the mallet. Keep working on sharp and bevel contact and you will be turning beads like nobody's business. Meant to ask are you the boy in your Avatar you and I hope turning the screw?
 
I got a lesson today from Gerald Lawrence today. He kindly came over and demonstrated and had me repeat the process on using a skew which is the one tool that I NEEDED a lesson on. It went well except on turning a bead which will take practice on my part.

Sounds like you had an incredible session. (Hey, I wondered about the avitar photo too!)

Numerous experts, including Richard Raffan, say spindle turning (with skew, spindle gouge, etc) is key to quickly developing fine tool control. Unfortunately, spindles often take a back seat to bowls and hollow forms.

I think learning the skew is so important it's the first tool I put in the hands of a beginner, even someone who has never seen a lathe before. (also for long-time turners who never used the skew or gave up after a bad experience) I start by turning the lathe by hand until they get the feel for the edge - very quickly are ready to practice planing cuts with the lathe at speed. (I sometimes start with a skew with a slightly larger included angle - a bit more forgiving.) With dozens of people so far, I've not once had someone get a catch! (finger's crossed!)

Raffan said he prefers a curved skew edge and I do that for some skews. However I prefer a straight edge for some things (thin spindles, v-cuts, facing cuts.) Raffan pointed out that making the beginning of the curve nearly horizontal at the long point will make some peeling cuts easier. Beads are difficult but a little easier with the curved edge. Deep v-cuts and facing cuts can also be tricky since the side clearance is critical to cut cleanly without a catch. I made a huge model of a skew with a piece of wood board and made a large-diameter spindle to better show the tool presentation and some of the cuts.

Thin spindles can also be challenging since they can easily flex. If interested, I posted my document on turning thin spindles in the Tutorials and Tips section here.

I sharpen skews on a 600 grit CBN and remove the tiny grinding burr. Years ago I started using these both for initial stropping and to "refresh" the edge of skews a few times before touching up with a diamond hone or going back to the grinder:
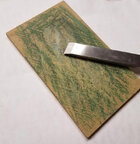
stropping-board.jpg
I resaw a piece of MDF on the bandsaw, leaving the sides rough. Rub a stick of polishing compound (any kind) into the surface, then hold the skew at the slightest angle and draw the tool down while pressing firmly - black marks on the surface show steel is being removed. Leaves a nicely polished edge.

As for putting a burr on scrapers, after using carbide rods in turned handles for a couple of decades, I discovered the French-made Arno burnisher:
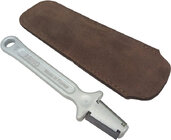
burnisher-arno.jpg
Wow! I like the round carbide rod on one side, the triangular carbide on the other (with a very small polished radius), the angles, and the handle. These were difficult to find for a long time so when Amazon started carrying them I bought a second for "just-in-case", as in just in case I misplace the one I've had for years or give it away in a weak moment! I use this to burnish a burr on all scrapers: conventional cabinet scrapers for flat work, the curved hand scrapers I make to smooth turnings (almost always with the lathe off), and conventional and NRS scrapers for the lathe. Those without a good burnisher might consider an Arno.

Oops, sorry, I got carried away again...

JKJ
 
Avitar is just a stock photo of a kid putting a knife in an electrical outlet and he’s about to get a surprise like me with a skew catch.
I get to practice skew skills today on a couple of projects and I’m hoping for no surprises.

I didn’t know there was such an animal as a tungsten burnisher. It makes my old drill bit stuck in a piece of wood seem a bit outdated. Lol.
 
I didn’t know there was such an animal as a tungsten burnisher. It makes my old drill bit stuck in a piece of wood seem a bit outdated. Lol.

A drill bit works fine. So does a hardened tool shaft in a pinch.

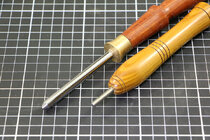
These are the burnishers I used for bunch of years, until I discovered the Arno. The first was a 1/4" carbide rod, way longer than needed. I don't like it but it was the first polished carbide burnishing rod I found. The smaller one is 5/32" diameter I think - I obtained a quantity of these little rods (from an excellent and resourceful woodturner we all know) and made burnishers for woodturning friends.

The smaller the radius, the easier it is to roll the burr. The small, shorter burnisher is a lot easier to handle.

_scrapers_IMG_7784.jpg

BTW, the outlet thing sounds a bit similar to a dumb thing I did as a kid,, maybe 7-8 years old. I was obsessed with magnets and couldn't find enough - the only source available was old loudspeakers. With no knowledge of the type of materials needed but reading that electricity can be used to make a magnet, I tried two different things. One, I coiled insulated wire around a piece of steel and stuck both ends in an electrical socket. Fortunately, the only damage was to a fuse. It probably made an electromagnet for a millisecond.

The second idea was even dumber -- I coiled a lot of wire around another, larger piece of steel, fastened a piece of metal plate to one end and buried that in the ground. Then strung the wire up above our tree house and put up a makeshift lightning rod as high as I could get it. My idea was to attract lightning and perhaps make a magnet. Fortunately for all, no lightning was attracted so I took it down after a few months. And fortunately , none of these failures dampened my passion for experimenting.

Also fortunately, my parents had no idea. When older, I didn't even set the house on fire or kill anyone with my chemical experiments, even after I discovered I could buy potassium nitrate at the drug store. One incident did result in my mother putting my chemistry sets and accumulated chemicals in a closet and forbidding me to touch them.

JKJ
 
Back
Top