-
It's time to cast your vote in the March 2026 Turning Challenge. (click here for details) -
Congratulations to Chris Lawrence for "Dragon's Grip" being selected as Turning of the Week for March 30, 2026 (click here for details) -
Welcome new registering member. Your username must be your real First and Last name (for example: John Doe). "Screen names" and "handles" are not allowed and your registration will be deleted if you don't use your real name. Also, do not use all caps nor all lower case.
You are using an out of date browser. It may not display this or other websites correctly.
You should upgrade or use an alternative browser.
You should upgrade or use an alternative browser.
Too bad
- Thread starter John Kananis
- Start date
Ouch it hurts to see that.
I didn't have the heart to take it off the shelf... tomorrow morning.Ouch it hurts to see that.
john lucas
AAW Forum Expert
No it simply dried too fast. Find a better way to store them away from heat and air movement. Put more sealer on the end grain.
I've always had heat but I just installed AC in the shop over the weekend so summer heat won't be a concern going forward. The room in which my bowls get shelved is a little more humid than the rest of the shop so I guess that's a good thing at least.No it simply dried too fast. Find a better way to store them away from heat and air movement. Put more sealer on the end grain.
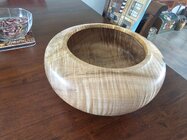
Wall thickness has nothing to do with it? It's sister bowl sits on the shelf above and is intact so far. I turned that one a little thinner.
Type of wood and wall thickness are critical. Thinner is generally better, if you're once turning, but for rough turning, you want uniform. With that shape, getting a uniform thickness would be a challenge. Calipers would be really helpful.
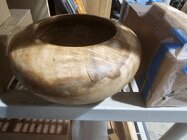
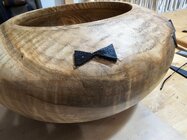
I just rough turned this a couple of weeks ago. I guess i left too much material.
That is depressing. I like the form. What is the wood?
I also wonder if it might have dried too fast - I've dried some pretty large solid blanks of various species without cracks by drying slowly. Sometimes they take years to dry! (I seal with significantly thickened Anchorseal)
Do you have a humidity meter? AC can make the air quite dry. I have heat and air in my shop and in the summer keep the AC set to about 80-deg.
If mine, I might seal the sister bowl a bit more, just in case! Or slow down the drying on that one a bit more. Bag method?
Oh, maybe the first one could still be turned then carved. (turned a bit thinner now, just in case?) I have a spare Foredom rotary carver if you could use one. It's one of the older ones but seems to work fine.
JKJ
The wood is curly ambrosia maple - I'll apply more anchorseal to the other bowl in the morning. I do carve but haven't tried carving a bowl just yet; maybe this is the opportunity to. The bowl would definitely need to be turned thinner though, any chance of it "exploding" at this stage?
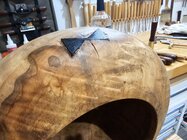
It's temperature, humidity, air flow, type of wood grain, when the wood was harvested, and how long ago the wood was harvested all add to the failure. There is always a chance of explosions. I never twice turn when the grain comes over the top that much. If that was even just slightly thinner on the top and thicker on the bottom, the chances of cracking is very good. Do you not put the rough turned vessel in a paper bag? I put mine in a yard waste bag because they are double thickness. It makes no difference how your method worked in the past, this one is the problem.I've always had heat but I just installed AC in the shop over the weekend so summer heat won't be a concern going forward. The room in which my bowls get shelved is a little more humid than the rest of the shop so I guess that's a good thing at least.
Wall thickness has nothing to do with it? It's sister bowl sits on the shelf above and is intact so far. I turned that one a little thinner.
Richard, I've never used a paper bag, no. Can you tell me how that works? How long does it go into the bag, do you also include shavings? That sort of thing...
It's temperature, humidity, air flow, type of wood grain, when the wood was harvested, and how long ago the wood was harvested all add to the failure. There is always a chance of explosions. I never twice turn when the grain comes over the top that much. If that was even just slightly thinner on the top and thicker on the bottom, the chances of cracking is very good. Do you not put the rough turned vessel in a paper bag? I put mine in a yard waste bag because they are double thickness. It makes no difference how your method worked in the past, this one is the problem.
...The bowl would definitely need to be turned thinner though, any chance of it "exploding" at this stage?
The wall looks thick enough and the crack small enough that it should stay together, even if you want to refine the outside first. I'm guessing from the photo that crack doesn't go all the way to the inside so there may be plenty of good wood beneath. (probe with a fine wire?) Perhaps the crack could be turned away with a bit of compromise on the form. Of course, wear protection as always, stay out of the line of fire.
A friend here has turned large bowls that had so many natural voids they would certainly have self destructed if turned as normal. His method was to turn the outside, then wrap with overlapping layers of strapping tape, the incredibly strong type with embedded fiberglass filaments to give a high tensile strength. The tape would keep the piece together while he turned the inside. to relatively thin walls. The pieces I saw would certainly have self destructed without the outside reinforcement. I've heard of people wrapping the outside with layers the tape that furniture movers use, like tensilized polypropyline that stretches to a limit, then sticks to itself, almost impossible to tear. I use a roll about 3" wide to secure things like bundles of wood.
JKJ
I might try this. Unfortunately though, the crack went all the way through. My initial thought was put it on the lathe and turn it thin but it had split all the way through.
The wall looks thick enough and the crack small enough that it should stay together, even if you want to refine the outside first. I'm guessing from the photo that crack doesn't go all the way to the inside so there may be plenty of good wood beneath. (probe with a fine wire?) Perhaps the crack could be turned away with a bit of compromise on the form. Of course, wear protection as always, stay out of the line of fire.
A friend here has turned large bowls that had so many natural voids they would certainly have self destructed if turned as normal. His method was to turn the outside, then wrap with overlapping layers of strapping tape, the incredibly strong type with embedded fiberglass filaments to give a high tensile strength. The tape would keep the piece together while he turned the inside. to relatively thin walls. The pieces I saw would certainly have self destructed without the outside reinforcement. I've heard of people wrapping the outside with layers the tape that furniture movers use, like tensilized polypropyline that stretches to a limit, then sticks to itself, almost impossible to tear. I use a roll about 3" wide to secure things like bundles of wood.
JKJ
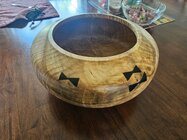
This is a great group for ideas and free help. But if all attempts don't yield acceptable results, pewa practice 
Not the worst idea at all and I've never done a butterfly in a bowl before. I guess I would need to make a jig - any good examples?
This is a great group for ideas and free help. But if all attempts don't yield acceptable results, pewa practice
- Joined
- Apr 27, 2004
- Messages
- 9,332
- Likes
- 6,149
- Location
- Lakeland, Florida
- Website
- www.hockenberywoodturning.com
I might try this. Unfortunately though, the crack went all the way through. My initial thought was put it on the lathe and turn it thin but it had split all the way through.
I seldom try saving a piece with a crack piece like that unless I can work it into a carving or make it appear natural.
The keys for me in preventing cracks are flowing curves, even walls, slow controlled drying.
The wood has to move as it dries or cracks. When one part dries quickly the undried part prevent that fast drying part from moving.
You nailed the curve.
If the walls are even that leaves
Dried too fast, pre- existing crack, or just the rare one where you do everything as planned and it just goes south.
Nice curve
For ideas, these folks are great to work with...https://bigislandengraving.com/
The hourglass requires exact corners...my preference is the "infinity", much quicker and easier.
The hourglass requires exact corners...my preference is the "infinity", much quicker and easier.
Dave Landers
Beta Tester
Check out the Videos andFAQ section of bigislandengraving.comNot the worst idea at all and I've never done a butterfly in a bowl before. I guess I would need to make a jig - any good examples?
I’ve been using the bag method for 8-10 years. Tried various sealers, too time consuming and messy, and not an option for 1 turn items, which I do a lot of.Richard, I've never used a paper bag, no. Can you tell me how that works? How long does it go into the bag, do you also include shavings? That sort of thing...
I use heavy kraft paper bags, and use 2, one inside the other. Nothing but the item goes in the bag (found no advantage to using chips in the bag). Sometimes put 2-3 smaller items in a bag. Fold the top of the bag over, tape it closed with 2” painters tape, write the log #, date, any notes, then weigh the pkg and write that on the pkg.
I store them on a wire shelf rack in the house, where temp and humidity are pretty constant (rarely have the windows open due to allergies, and run a whole house humidifier in winter). I weight the pieces occassionally (usually 1/week, sometimes twice). As a piece gets dry, I may weigh daily to check change, if less than 2-3 tenths of an ounce it can come out of the bag. Bags are recycled - some are years old.
For those that like to rough out and store hundreds of blanks maybe this doesn’t work. I may have up to 20 or so pieces at a time, continually turning over. I don’t like having a lot of 2 turn rough outs in the que - I may forget what I intended for a particular blank, and the basic blank is set.
I like keeping wood stored as full logs or 1/2 split logs (sealed ends) and deciding when I cut up a section what I want or need to make with it.
Good info, Doug. Thank you.
Bag it next time.
Tim
Tim
I will give this a shot. Thanks for the input.Bag it next time.
Tim