What causes the tool marks in bowl turning, specifically in the end grain part of a bowl: the parts that come around twice each rotation. To be clear the face grain is perpendicular to axis of lathe. The tools cause it I know, but ways to avoid? Final Cut is a push cut with a 5/8 bowl gouge, plenty sharp I think but could be wrong.
-
December 2025 Turning Challenge: Single Tree! (click here for details) -
Congratulations to Bob Henrickson, People's Choice in the November 2025 Turning Challenge (click here for details) -
Congratulations to Dave Roberts for "Low Rider" being selected as Turning of the Week for December 1, 2025 (click here for details) -
Welcome new registering member. Your username must be your real First and Last name (for example: John Doe). "Screen names" and "handles" are not allowed and your registration will be deleted if you don't use your real name. Also, do not use all caps nor all lower case.
You are using an out of date browser. It may not display this or other websites correctly.
You should upgrade or use an alternative browser.
You should upgrade or use an alternative browser.
Tool marks on end grain
- Thread starter Paul Durden
- Start date
- Joined
- Feb 28, 2021
- Messages
- 1,760
- Likes
- 1,573
- Location
- Roulette, PA
- Website
- www.reallyruralwoodworks.com
Practice, practice, and more practice is pretty much the solution - You're most likely getting burnishing tool marks which are caused by actually rubbing the bevel as you cut - In reality, one should FLOAT the bevel (Bevel barely touches wood, so softly that the wood doesn't know it) and achieving that does take rather a bit of practice (as well as sharp tools - If you can't start and continue a cut without pushing edge into wood, the tool ain't sharp enough.... should be able to rotate wood by hand and touch edge to wood with other hand, following bevel, and it should slice cleanly with little to no effort involved - that kind of sharp...)What causes the tool marks in bowl turning, specifically in the end grain part of a bowl: the parts that come around twice each rotation. To be clear the face grain is perpendicular to axis of lathe. The tools cause it I know, but ways to avoid? Final Cut is a push cut with a 5/8 bowl gouge, plenty sharp I think but could be wrong.
I’ve ran into something similar to this, but I use carbide tools.
The speed you use and the “touch” you have seems to make all the difference!
The speed you use and the “touch” you have seems to make all the difference!
- Joined
- Apr 27, 2004
- Messages
- 9,301
- Likes
- 6,055
- Location
- Lakeland, Florida
- Website
- www.hockenberywoodturning.com
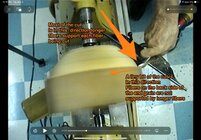
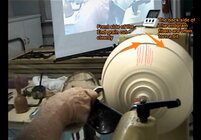
I assume you are referring to the back side of the endgrainWhat causes the tool marks in bowl turning, specifically in the end grain part of a bowl:
This is tearout from a tiny bit of unsupported cut fibers.
Sharp tools, high shear angle, light cuts all help to reduce this.
As the end grain comes around the first 1/2 has long fibers behind supporting a clean cut.
The next part of the endgrain has shorter fibers behind making the area prone to tearout
This may help to show what I described
Last edited:
A very sharp, smaller bowl gouge will help. I use a 3/8" Ellsworth grind for finishing cuts. Sometimes a 1/2", but almost never with my 5/8".
A freshly sharpened bowl gouge and a push cut from the rim to the bottom kissing the bevel. As soon as you lift the bevel off you get tear out. For me size of gouge doesn’t matter.
I had a mentoring day with one of our guild members yesterday. It is indeed tear out from endgrain. it can be resolved with a sharp, really sharp bowl gouge. My bowl gouge was only sharp until I compared it to his. Better if resolved before sanding.
I had a mentoring day with one of our guild members yesterday. It is indeed tear out from endgrain. it can be resolved with a sharp, really sharp bowl gouge. My bowl gouge was only sharp until I compared it to his. Better if resolved before sanding.
I usually use my bowl gouges straight off a 180 grit CBN wheel, but if I'm having trouble with a clean finish cut, I've found that honing the edge can help. I use a small superfine diamond/ceramic hone from Eze-Lap (model CD4).
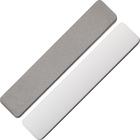
Any time you are cutting against/into unsupported end grain, like on the bowl, you will get tear out. Some woods are better at having less, mostly denser woods, and some woods, mostly softer ones, are horrible like cotton wood. Some times polishing/stropping the flutes after sharpening helps, some times a higher grit CBN wheel helps, some times you just have to resort to the 80 grit gouge/abrasives. I have not yet taken one of my tools and sharpened them to the level of my bench chisels or plane irons. Some day....
robo hippy
robo hippy
Yup ,its kinda horses for courses. Lol, I often suggest that beginners use Pinus Radiata to learn. The promise is if you master this pine you will be a master of not only technique but also of sharpening.Any time you are cutting against/into unsupported end grain, like on the bowl, you will get tear out. Some woods are better at having less, mostly denser woods, and some woods, mostly softer ones, are horrible like cotton wood. Some times polishing/stropping the flutes after sharpening helps, some times a higher grit CBN wheel helps, some times you just have to resort to the 80 grit gouge/abrasives. I have not yet taken one of my tools and sharpened them to the level of my bench chisels or plane irons. Some day....
robo hippy
Dave Landers
Beta Tester
The other thing I do is try different gouges and/or different presentation of a gouge. Sometimes, a piece will respond well to a shear cut, other times not. Sometimes it wants a push cut. Sometimes it's a 40º gouge. Sometimes a negative rake scraper. But always light cuts with a sharp tool.Some times polishing/stropping the flutes after sharpening helps, some times a higher grit CBN wheel helps, some times you just have to resort to the 80 grit gouge/abrasives.
I will go over a problem area with light experimental cuts until I find the gouge/presentation that yields a surface I'm happy with. And especially with problem wood, it's not always the same for the entire piece.
In the meean time, while you work on your “no tool marks” skills, shear scraping with a scraper or long wing bowl gouge can clean them up. Try shear scraping moving in both directions and observe which direction works best for the current wood. Also, hand cabinet scrapers (lathe off) can do a nice cleanup as well.
Tool marks might be caused by the heel of the gauge, especially with 50 degree or more bewel. Please see if the bewel heel touches the wood and leaves the marks.
Easy solutions - add secondary bewel to the gauge, basically grind away the heel. We only need about 2-3mm of the main bewel, the rest can be safely removed. It works especially well on the inside of the bowls. Another solution - use steeper sharpening angle, ie. 40-45 dergee.
PS. - the above comes from videos of Tomislav Tomasic Woodturning, a Chroatian turner who's IMHO great source for begginner turners, and who's mentor is Richard Raffan.

Tomislav Tomasic Woodturning
Easy solutions - add secondary bewel to the gauge, basically grind away the heel. We only need about 2-3mm of the main bewel, the rest can be safely removed. It works especially well on the inside of the bowls. Another solution - use steeper sharpening angle, ie. 40-45 dergee.
PS. - the above comes from videos of Tomislav Tomasic Woodturning, a Chroatian turner who's IMHO great source for begginner turners, and who's mentor is Richard Raffan.
Tomislav Tomasic Woodturning
Last edited:
That's an easy one to try I'm ground at 50 degrees actually, so I can try grinding off the heel. Thanks for the suggestion
BTW, I always follow gouge cuts on face turnings with a curved NRS to remove tool marks and tiny end-grain tearout. Then use hand scrapers before hand sanding.
I've watched a lot of Tomislav's videos, and learned a lot from him. I like his style... explaing rather that just showing off what he can do.Tool marks might be caused by the heel of the gauge, especially with 50 degree or more bewel. Please see if the bewel heel touches the wood and leaves the marks.
Easy solutions - add secondary bewel to the gauge, basically grind away the heel. We only need about 2-3mm of the main bewel, the rest can be safely removed. It works especially well on the inside of the bowls. Another solution - use steeper sharpening angle, ie. 40-45 dergee.
PS. - the above comes from videos of Tomislav Tomasic Woodturning, a Chroatian turner who's IMHO great source for begginner turners, and who's mentor is Richard Raffan.
Tomislav Tomasic Woodturning
Count me another big fan of Tomislav (and of course his mentor Richard Raffan). I also think his accent is cool. His back-hollowing technique is on my agenda to try as soon as I work up the courage. I can just imagine the catch if you get off the bevel!I've watched a lot of Tomislav's videos, and learned a lot from him. I like his style... explaing rather that just showing off what he can do.
Aaron, I did see a video where Richard explained that cut. He commented that most important thing is to not try to cut with the nose. At present, I use a drill in some vice grips, and drill to depth first, then hollow out the rest. I do keep my spindle detail gouge on the tool rest rather than up high. I am getting better at it....
robo hippy
robo hippy
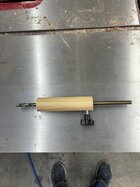
...I use a drill in some vice grips, and drill to depth first, then ..
Hey, have you ever used the drill dept stops, such as collars like this?
Amazon.com: Professional Stop Collar Set - Drill Bit Depth Stop - 8 Piece Kit (1/2”, 7/16”, 3/8”, 5/16”, 1/4", 7/32”, 3/16”, 1/8”) Superior Aluminum Split Ring Design : Tools & Home Improvement
Amazon.com: Professional Stop Collar Set - Drill Bit Depth Stop - 8 Piece Kit (1/2”, 7/16”, 3/8”, 5/16”, 1/4", 7/32”, 3/16”, 1/8”) Superior Aluminum Split Ring Design : Tools & Home Improvement
www.amazon.com
I often use them for fairly shallow depth holes. I have a couple of drill bits mounted in wooden handles. Set the collar to the depth I want, tighten the set screw, hold the bit by the handle and push into the wood while the blank is spinning until the stop collar contacts the surface. Very quick, repeatable.
Sort of. I use a piece of rubber hose or clear tubing about 1/8” long that stretches over the bit. Just move it to the needed depth.Hey, have you ever used the drill dept stops, such as collars like this?
- Joined
- Apr 27, 2004
- Messages
- 9,301
- Likes
- 6,055
- Location
- Lakeland, Florida
- Website
- www.hockenberywoodturning.com
His back-hollowing technique is on my agenda to try as soon as I work up the courage. I can just imagine the catch if you get off the bevel!
Just go for it. If you can find a local turner to show you it makes it easier.
Saw a Raffan demo went home and tried it
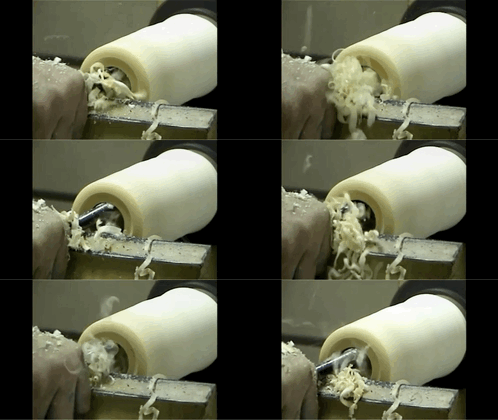
I had a few non catostrophic catches learning it mostly from angling the nose too far towards the wall.
Coming out on the side wall I cut with the wing pulling nose so the nose isn’t cutting.
I like using a spindle gouge with a finger nail grind. The wing has a nice curve to the tip
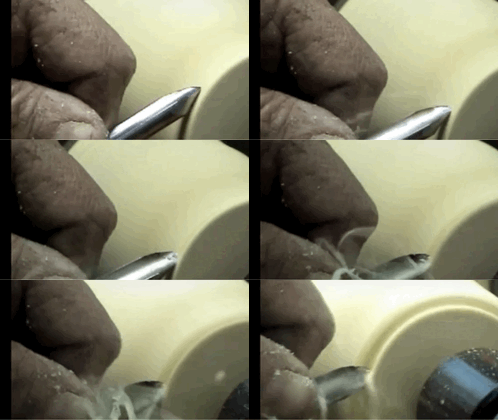
Drill a hole. Opened it up.
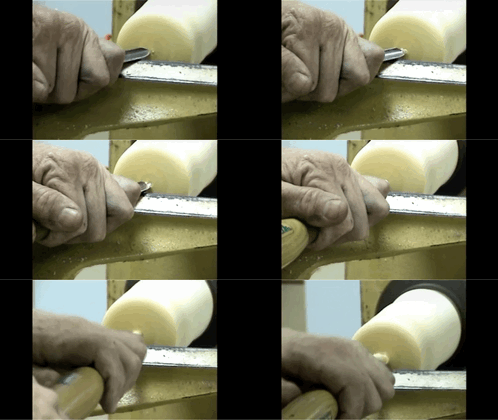
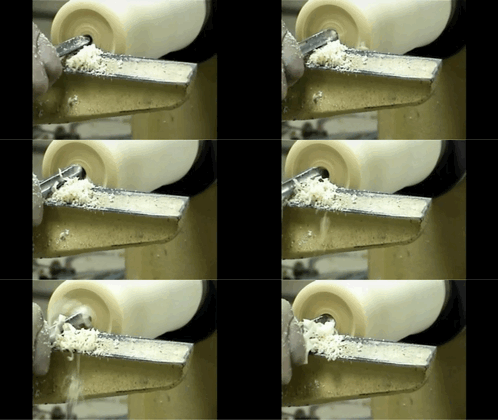
Last edited:
Thanks for the encouragement, Al-My usual approach to any new daunting challenge in wood-turning (or really in every aspect of life) is to stew on it for awhile before suddenly giving myself a pep-talk that goes something like "Man up, you ******* *****" (use your imagination), and then I do indeed just go for it. I can see this making lidded boxes much easier especially.Just go for it. If you can find a local turner to show you it makes it easier.
Saw a demo went home and tried it
I had a few non catostrophic catches learning it mostly from angling the nose too far towards the wall.
Coming out on the side wall I cut with the wing pulling nose so the nose isn’t cutting.
I like using a spindle gouge with a finger nail grind. The wing has a nice curve to the tip
View attachment 78129
Dull a hole. Opened it up.
View attachment 78128View attachment 78127View attachment 78126
Some of you guys are also encouraging me to try feet on bowls; I especially like them on live-edge bowls. Always something new to learn. Speaking of which, I'm out the door here in a few for Matt Monaco's platter class at John C. Campbell: I'm ready to up my platter game. Anyway, y'all enjoy a break from me!
Well, if I used a drill depth stop, since every piece is different depths, it would take forever. I do like Doug's idea of using a piece of hose. Now, to find a piece to match my drill bit....
robo hippy
robo hippy
Well, if I used a drill depth stop, since every piece is different depths, it would take forever. I do like Doug's idea of using a piece of hose. Now, to find a piece to match my drill bit....
The metal depth stops I use are split rings loosened and tightened with an allen head screw, stored in a shallow drawer with the allen key. Adjusting one takes me about four seconds.
Since I hold the bits by the handle and drill with the wood spinning (slowly) setting the depth and drilling the hole is very quick.
EDIT: This is what I keep near the lathe. I think the set I got had five sizes.
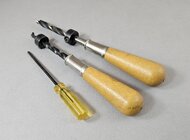
BTW, I never use this method when I need a precisely centered hole - only to set depth for hollowing.
I also don't use the depth collars with a drill bit in the tailstock - for non-critical depth holes I make a mark on the bit with a red sharpie or a bit of tape.
@Ted Pelfrey showed another method to drill precise shallow depth holes for use when carving. (The depth looked to be maybe 3/16" or so.) He found a suitable split roll pin at the hardware store that fit snugly over a small diameter drill bit. It looked tight but could be adjusted as needed. When carving one piece he drilled multiple shallow depth holes inside one shape before using a rotary bit to cut away wood so the bottom of that area was uniform. Nice idea. I took notes.
JKJ
Last edited:
- Joined
- Apr 27, 2004
- Messages
- 9,301
- Likes
- 6,055
- Location
- Lakeland, Florida
- Website
- www.hockenberywoodturning.com
Enjoy CampbellAlways something new to learn. Speaking of which, I'm out the door here in a few for Matt Monaco's platter class at John C. Campbell
What a great place.
, I'm out the door here in a few for Matt Monaco's platter class at John C. Campbell: I'm ready to up my platter game.
If it's not too late to read this: if you haven't been there before, make SURE to take a break and walk around and visit some of the other shops: carving, blacksmith, fiber arts, paper making, glass, jewelry, painting, stone, etc, etc, etc, especially after the evening meal. Some of the most enthusiastic people spend their evening off-times in the shops. I've met so many wonderfully creative students and instructors that way.
And the grounds are beautiful. And the food great. Hold me back...
JKJ
Dave Landers
Beta Tester
I do the same but use an O-ring insteadSort of. I use a piece of rubber hose or clear tubing about 1/8” long that stretches over the bit. Just move it to the needed depth.
I like that idea a lot. Handle and depth stop all in one. Must be much faster than using the jacobs in the tailstock like I do now...I made this to drill my depth hole.
Must be much faster than using the jacobs in the tailstock like I do now..
Considering Jacobs chucks...
Have you heard of or used taper shank bits? They fit directly into the morse taper of the tailstock (or the headstock)
Since I discovered them they are my first choice for drilling with the tailstock.
One reason is I don't need the jacobs chuck.
Another is it avoids the unnecessary length and possible compromises to precision.
Also very quick to use and change sizes.
The down side is it's an additional cost, but might be worth it for sizes used a lot.
One other thing is the smaller sizes use a #1MT and need a inexpensive adapter.
This picture compares the total length when using a small diameter standard twist drill in a jacobs chuck vs a taper shank bit, this one with a 2MT adapter::
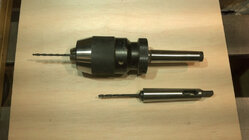
I like using them so much I found sources and got sizes from less than 1/8" up to 1".
I first saw these when Rudy Lopez used one to get a start on hollowing a goblet. He used a 1" bit and cut it off short and resharpened.
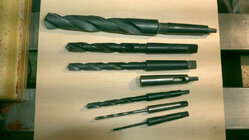
Some taper shank bits. I think I now have most sizes in 32" increments and some in 64ths.
A 1" bit at the top, an #1 to #2MT adapter in the middle, smaller bits at the bottom.
Another thing about drilling I can't stop myself from mentioning is starter holes, especially when drilling deep holes or those where precising is needed. I always drill a starting hole with a "Center bit" then switch to the standard bit. Center bits are short and stout so they can't flex.
A set of center bits is cheap - will start even a long bit precisely without getting off a little and risking some wobble which can make a bit get off further by following the grain in a spindle. My drilling has improved since using these.
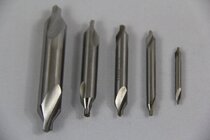
JKJ
Last edited:
I always drill a starting hole with a "Center bit" then switch to the standard bit. Center bits are short and stout so they can't flex.
A set of center bits is cheap - will start even a long bit precisely without getting off a little and risking some wobble which can make a bit get off further by following the grain in a spindle. My drilling has improved since using these.

+1 on starting holes with these bits, which I have seen called "drill point counter sink bits".
There's no need for a Jacobs chuck for drilling a depth hole. You're drilling into the center of rotation, where the wood's speed is minimal, and the accuracy of the hole is irrelevant.I like that idea a lot. Handle and depth stop all in one. Must be much faster than using the jacobs in the tailstock like I do now...
And Aaron, fear not. I've come up with a lot of creative ways to get catches, but back hollowing doesn't seem to be one of them.
Al, your video is very illuminating, but it seems to my fuzzy memory that Richard Raffan has more of a Figure-8 motion of the tool handle and tip than what you show. My assumption had always been that this allowed cutting of the deep end of the hole, as well as the sides, but I could easily be mistaken.
Thanks for the mini-vid clips, too, Al! To my eyes that spindle gouge looks to have about a 30ish-degree bevel and a gentle downward curve to the nose, which is pretty much exactly how I have a couple of mine ground. I'm gonna try this on my next lidded box.There's no need for a Jacobs chuck for drilling a depth hole. You're drilling into the center of rotation, where the wood's speed is minimal, and the accuracy of the hole is irrelevant.
And Aaron, fear not. I've come up with a lot of creative ways to get catches, but back hollowing doesn't seem to be one of them.
Al, your video is very illuminating, but it seems to my fuzzy memory that Richard Raffan has more of a Figure-8 motion of the tool handle and tip than what you show. My assumption had always been that this allowed cutting of the deep end of the hole, as well as the sides, but I could easily be mistaken.
Plus I've got some more options for depth hole drilling AND different approaches to end-grain tear-out in one thread!
Allow me to add on that topic that, even though my warhorse gouges remain my pair of 5/8" Ellsworth grind Crown PM's, at our recent calabash class, Kirk DeHeer convinced me with his smaller gouge (IIRC it was 3/8") with a secondary bevel that a smaller gouge/edge exposure can result in cleaner finishing cuts. And I must admit that sometimes shear-scraping with that long wing and so much edge exposure sometimes doesn't give ideal results for me. I just picked up a Crown 3/8" bowl gouge with my Woodcraft birthday gift card, and plan to grind something like his fingernail grind on it along with that thin relieved bevel. I have high hopes for that set up on my next bowl.
Or before the next lidded maybe first do as Raffan suggests and experiment on a practice blank first!spindle gouge ... how I have a couple of mine ground. I'm gonna try this on my next lidded box.
I've never tried the back hollowing but I might sometime. I've been pretty happy with method I've been using with the spindle gouge - maybe slower but I'm usually not in a hurry. You know, slow down, smell the rosewood.
Perhaps even better (for me) is hollowing with the small Hunter Hercules followed by a box scraper if I want straight walls inside.
I buy these from Little Machine Shop, where I bought my mill and metal lathe - the quality of their tools as never disappointed me.+1 on starting holes with these bits, which I have seen called "drill point counter sink bits".
I understand they are made for precision metal turning to drill a hole with a 60-deg angle to fit a (lubricated) dead center. I think the stiffness and the small drill tip (I think made for point clearance on the metal lathe) is perfect for starting holes in wood where precision is needed. One of my Jacob's chucks is much larger and heavier than the others so I keep a center bit in it all the time, ready to go.
JKJ
Good point, John-I'll practice on some cheap wood I won't mind screwing up if it comes to that!Or before the next lidded maybe first do as Raffan suggests and experiment on a practice blank first!
I've never tried the back hollowing but I might sometime. I've been pretty happy with method I've been using with the spindle gouge - maybe slower but I'm usually not in a hurry. You know, slow down, smell the rosewood.
Perhaps even better (for me) is hollowing with the small Hunter Hercules followed by a box scraper if I want straight walls inside.
I buy these from Little Machine Shop, where I bought my mill and metal lathe - the quality of their tools as never disappointed me.
I understand they are made for precision metal turning to drill a hole with a 60-deg angle to fit a (lubricated) dead center. I think the stiffness and the small drill tip (I think made for point clearance on the metal lathe) is perfect for starting holes in wood where precision is needed. One of my Jacob's chucks is much larger and heavier than the others so I keep a center bit in it all the time, ready to go.
JKJ
Thanks, Rusty-I will probably study this tomorrow. It amazes me how aggressive both he and Raffan are with this technique. Raffan pulls huge shavings chucked up with a blank he pounds into a cup center-never seen one of those before!Here is a good video on back hollowing from Tomislav.View attachment 78435
Interestingly, I was sort of approaching something like this cut on a green 6" deep side-grain calabash maple bowl today, practicing after instruction in the technique from Kirk DeHeer a few weekends ago (though obviously going nowhere near so far across the center, just way up and back down over to the center nib as Kirk helped me practice with a smaller gouge with a little micro-bevel, and pushing instead of pulling up around the left side wall). I was amazed at how much more controllable the cut was, and how much cleaner a finish I could get, I guess because it's more of a planing cut?
I have yet to meet an instructor who could explain and demo the physics of why certain grinds and cuts cut cleaner than others than Kirk. It's really all physics, and it seems the more I can convert any gouge-cut into a drop-handle planing cut, the better control and too finishes I get, if any of this makes any sense.
It amazes me how aggressive both he and Raffan are with this technique. Raffan pulls huge shavings chucked up with a blank he pounds into a cup center-never seen one of those before!
I suspect the aggressiveness possible is related to the amount of practice and level of tool control! I put some tools to wood and cut very aggressively with the cuts and maintain good control and have no catches. This doesn't mean the cut is always smooth with no tearout! For that I like to use less aggression and more finesse, lighter cuts, slower tool motion, and higher lathe speed. But even that may be not completely about the physics of the tool and wood and speed, but I think the variability of the wood.
Certain types of wood and grain direction, perhaps with the grain at a very shallow angle to the surface, can cause grief. If the sharpness is not the problem (test by shaving arm hairs) I may try a different tool, a different skew angle, a different cutting direction, or even something weird like dampening the wood with some liquid like oil, alcohol, or even water.
But what's the reason for aggressive cuts? Is there a speed trophy? I mentioned I've never tried the fast backhollowing method Raffan loves - who but a production turner getting paid by the piece needs to work that fast? I'm proud to be the slowest turnier in the Southeast.
I vaguely remember Raffan using a cup chuck, according to some of my old books a common method hold spindles and other work before scroll chucks were widely available. Sometimes the end of a branch or blank was carved with an axe or knife to fit the cup. (We have things SO unbelieveably good these days!) The mistake some made was pounding the wood into the cup while the cup was mounted in the lathe headstock - can damage bearings, just like pounding wood into a spur drive center instead of the other way.
I tried it once and it didn’t go well. I watched again to find out it has to be end grain. I will be trying it again.Thanks, Rusty-I will probably study this tomorrow. It amazes me how aggressive both he and Raffan are with this technique. Raffan pulls huge shavings chucked up with a blank he pounds into a cup center-never seen one of those before!
Interestingly, I was sort of approaching something like this cut on a green 6" deep side-grain calabash maple bowl today, practicing after instruction in the technique from Kirk DeHeer a few weekends ago (though obviously going nowhere near so far across the center, just way up and back down over to the center nib as Kirk helped me practice with a smaller gouge with a little micro-bevel, and pushing instead of pulling up around the left side wall). I was amazed at how much more controllable the cut was, and how much cleaner a finish I could get, I guess because it's more of a planing cut?
I have yet to meet an instructor who could explain and demo the physics of why certain grinds and cuts cut cleaner than others than Kirk. It's really all physics, and it seems the more I can convert any gouge-cut into a drop-handle planing cut, the better control and too finishes I get, if any of this makes any sense.
I did see this yesterday, and had asked him to do a video about it. I guess I was not the only one. I was playing around with it yesterday, and will do more today. Yesterday's results makes me think that there is a VERY THIN LINE between on the bevel and off the bevel, and off the bevel catches...... I do not think this is a novice skill. I have been doing boxes a bunch lately, and goal is for a 1/2 inch long tenon, and a 3 to 5 second drop as in pick it up by the lid and it takes 3 to 5 seconds for the bottom to fall off. Eric Lofstrom has a box he turns with a 1 inch tenon, and the recess is spot on parallel to the ways of the lathe. The tenon has a VERY SLIGHT curve to it with just middle of it being spot on diameter of the recess. He rough turns his down over 6 or so months, a little at a time. Thus far, I am making smaller diameter, like 2 to 3 inches, and letting them sit a day or three. The wood does seem to move a little bit from day to day. Thus far, 2 are "perfect", and 4 or 5 are okay, and one or two are way too loose.... Practice!
robo hippy
robo hippy

