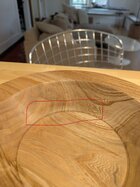
Hi, I am plagued by surface quality issues. Or something I'm not really sure what's going on. I'm not sure what to call this. It feels like bruising. So I sheer scraped this, multiple passes, with the delicate touch worthy of a neurosurgeon. Then I sanded it with 180 - 400 for a good long time and I can still see a "ring". It shows up better in person than the picture. I don't know what more to do to get rid of it. It wasn't cut with an aggressive cut to start either. This is some fairly well seasoned pecan. It's very frustrating because I could not see this noise when sanding. Just after I added the finish.

-
Congratulations to Bernie Hyrtzak, People's Choice in the January 2026 Turning Challenge (click here for details) -
Congratulations to Matt Carvalho for "Red Mallee Folded Form" being selected as Turning of the Week for February 9, 2026 (click here for details) -
AAW Symposium demonstrators announced - If the 2026 AAW International Woodturning Symposium is not on your calendar, now is the time to register. And there are discounts available if you sign up early, by Feb. 28. Early Bird pricing gives you the best rate for our 40th Anniversary Symposium in Raleigh, North Carolina, June 4–7, 2026. (There are discounts for AAW chapter members too) For more information vist the discussion thread here or the AAW registration page
-
Welcome new registering member. Your username must be your real First and Last name (for example: John Doe). "Screen names" and "handles" are not allowed and your registration will be deleted if you don't use your real name. Also, do not use all caps nor all lower case.
You are using an out of date browser. It may not display this or other websites correctly.
You should upgrade or use an alternative browser.
You should upgrade or use an alternative browser.
tool marks or sanding problem or something
- Thread starter Raif Harik
- Start date
I’ve never turned pecan, but suspect it’s similar to walnut. With walnut I can often see sanding scratches even at 600 grit.
Not sure if that’s what you’re experiencing from the photo, but that would be the first place I would look. Sanding in a different direction will quickly show you if that’s the issue. As always, no reason to go up to the next grade of sandpaper until you’ve eliminated all scratches from the one lower and you only see sanding scratches from the grit you’re on.
If bruising, that often goes deeper than you think. I assume you’ve already ground off the heel of your gouge and use a very light final pass or two. I also often negative rake scrape, and if concerned about bruising start at 120 even if it looks like 180 would do.
Last edited:
My first guess is tear out. When cutting uphill against the grain, there will always be tear out since the grain is unsupported. They are opposites on inside and outside. Some times it can be reduced to being mostly unseen, but you can feel it with your fingers. Besides cutting uphill, it can be made worse with different woods, and dull tools. Main thing is to start sanding at lower grits. With the myrtle I am turning now, aka California Bay Laurel, I will be starting with 100 grit, then 120, 150, 180, 220, 320, and 400. About the same with big leaf maple. With Pacific madrone, I can start at 120. Some times I could start at higher grits, but it saves some time starting with the lower grits. Having good lighting when sanding helps, natural light especially. I power sand all of my bowls, mostly because it is easier and faster in the long run. I do sand with the 2 o'clock position for a bit and then switch to the 7 o'clock position to have different scratch patterns.
robo hippy
robo hippy
My vote is bruising because, correct me if I'm wrong, but the left side of the picture looks like supported grain. Does the ring go the whole way around the bowl? What bevel angle is on the gouge you used and as Ron said do you have the heel of the gouge rounded over?
Tear out? Fellow told me pecan is the first cousin to hickory. He declared that we all know what hickory is used for...hammer handles, axe handles.
I have seen bruising that started going all the way around the bowl in a ring, but then went away as I fixed it... but only on portions of the ring. The parts that remained were still there because the bruising either went in further on the end grain portion of the bowl interior or the side grain. Don't ask my brain to try and figure out which part as I type on my keyboard! That's just too much to ask!My vote is bruising because, correct me if I'm wrong, but the left side of the picture looks like supported grain. Does the ring go the whole way around the bowl? What bevel angle is on the gouge you used and as Ron said do you have the heel of the gouge rounded over?
However, what I do understand is that sanding goes quicker and easier on side grain than it does on end grain. The plan to do like a negative rake to clean the surface is a good call. Less variation that way in your removal of material. But when it is time for sanding, end grain/side grain is something to keep in mind.
Last night I ran one of my gouges into my chuck and chipped an edge. Had to regrind the gouge. Didn't grind the heel because I wanted to get back to turning my spindle project... but Vincent is twisting my arm into getting that heel ground for the next bowl project.
In my experience Pecan is nowhere near as hard as hickory. Maybe similar in final appearance sometimes? However, I have found it to be very variable in texture. But I have only turned local Pecan here in Central Texas.Tear out? Fellow told me pecan is the first cousin to hickory. He declared that we all know what hickory is used for...hammer handles, axe handles.
I'm not sure what to call this. It feels like bruising.
If it's what it looks like from that photo, I'd call it sub-surface deformation.. When I ran a metallography lab to grind and polish aluminum for grain growth analysis, sub-surface deformation was a common problem. Grinding a surface "enthusastically" with coarse grit not only removed metal on the surface but could apply enough force to deform the metal below the actual scratches. Later grinding with a finer grit and polishing would often expose the flaws.
I've seen similar thing in end grain wood. Scratches from heavy sanding with a coarse grit could tear fibers deeper than the points of the largest grit particles. These could show up in later steps when working through the grits and be very difficult to remove. I've never called it "bruising" but I guess that description works. The only sanding method that worked for me was going back to the coarsest grit and carefully sand down past the marks with special attention to the end grain. Then work through the grits, skipping none.
Of course, it's hard to tell exactly what's going on in your piece without actually working with it.
As Ron mentioned, sanding in a different direction is important to me. Before switching to a lower grit I always sand perpendicularly - I figure that if I can't get the sanding marks out with THAT grit they'll never come out with the next finer grit. However, most of my sanding is by hand, more effort but easier to control. I don't power sand with rotating disk. Also, long ago I quit sanding by holding paper against the spinning work - just that elimineated several problems.
What works even better for me is skipping the sandpaper completely, especially on problem areas. Instead, I use NRS with the piece spinning to get back to good wood then smooth with hand scrapers with the lathe off. Then go to hand sanding, or depending on the surface shape, use a gentle pneumatic ROS. I made a variety of sizes and shapes of hand scrapers to work with nearly any surface. Properly prepared hand scrapers don't leave anything but smooth wood.
Another reason I said bruising is it looks like that's the transition of a curve, could also be putting too much pressure on the heel. (rubbing bevel too hard). Lots of good advice here how to fix it.
My two cents the "ring" is an abrupt change from "down the side" to "across the bottom" rather than a continuous flowing curve. Took a long time to train myself not to stop a downward cut on the side at the "transition zone" and then try to pick up a shaving from there across the bottom. When taking a shaving down the side, I try to remember to move the cutting edge so the shaving contiues at least 1/4" along the bowl bottom, beyond the transition zone. With a 70 deg "bottom feeder" bowl gouge I can then "pick up a shaving" where the "vertical" cut ended and continue a flowing transition, into a shaving across the bottom.
Think of a bowl with a vertical side, flat bottom perpendiular to the side, with a 90 degree angle where they meet. to convert that right angle into a smooth curve, it would be necessary to remove wood from the side and/or the bottom to blend the transition of the two surfaces iknto a flowing curve.
Or it is brusing.")
Think of a bowl with a vertical side, flat bottom perpendiular to the side, with a 90 degree angle where they meet. to convert that right angle into a smooth curve, it would be necessary to remove wood from the side and/or the bottom to blend the transition of the two surfaces iknto a flowing curve.
Or it is brusing.
Wow, really great analysis y'all.
So first, I thought I was making up that is bruising business, but I guess that really is a thing. No, my heals are nice and cutthroat sharp. And I think in many previous bowls that is probably what caused a similar issue. But in this case, I believe what happened was this. The bottom is flat. It's got a little v groove accent too. So when I was sheer scraping the bottom, I "bumped" into the edge/side and caused a v groove in the side at about the level of the problem. I then sheer scraped that clean again. It was so much fun that I did that same thing as least one more time. So I guess I was causing some deeper damage that appeared to be removed by the sheer scraping but was likely just exposed when I got to higher grits.
Generally speaking I tend to treat my wood like a dunken kgb agent treats his dog (hmmm might have to work on that metaphor) at least till I get to the final cut. But now that I know it can cause "subdural" damage, Im going to have to lean a gentler touch.
So, off with the heals and be gentle around the danger zone. Good stuff
Thanks!
I had a similar defect in a walnut bowl recently. My bowl had two very similar areas to yours. Very disappointing as they were not visible until finish was applied. My bowl was turned from rim to bottom in stages of an inch or so at a time due to flexing from a thin wall. To compensate for this I tried to leave some thickness below the cut to support the thinner wall above. What I discovered was the two defects were the same distance apart as the distance between cuts. I'm guessing the rings were actually transition lines at start/stop points in the cut. I hope this helps and makes sense.Hi, I am plagued by surface quality issues. Or something I'm not really sure what's going on. I'm not sure what to call this. It feels like bruising. So I sheer scraped this, multiple passes, with the delicate touch worthy of a neurosurgeon. Then I sanded it with 180 - 400 for a good long time and I can still see a "ring". It shows up better in person than the picture. I don't know what more to do to get rid of it. It wasn't cut with an aggressive cut to start either. This is some fairly well seasoned pecan. It's very frustrating because I could not see this noise when sanding. Just after I added the finish.
Heels of bevels can certainly cause problems. I like to round and polish heels, such as the one on this Hunter Hercules tool. Also do this with std gouges and even a little to skews.

Chris Ramsey, turning amazing cowboy hats, grinds his gouge link this. Grinds free-hand, doesn't polish anything.
MOST of the bevel is rounded. I've marked the actual cutting bevel in the photo:

JKJ
Chris Ramsey, turning amazing cowboy hats, grinds his gouge link this. Grinds free-hand, doesn't polish anything.
MOST of the bevel is rounded. I've marked the actual cutting bevel in the photo:
JKJ
Checked on two sources; both pecan and hickory measure 1820 on the Janka scale. Possibly a difference in the area of central Texas.In my experience Pecan is nowhere near as hard as hickory. Maybe similar in final appearance sometimes? However, I have found it to be very variable in texture. But I have only turned local Pecan here in Central Texas.
Hmmm... Maybe what I was given was not Pecan as I was told. Thanks!Checked on two sources; both pecan and hickory measure 1820 on the Janka scale. Possibly a difference in the area of central Texas.
For what it's worth...pecan is in the same family as hickory.I’ve never turned pecan, but suspect it’s similar to walnut. With walnut I can often see sanding scratches even at 600 grit.
Not sure if that’s what you’re experiencing from the photo, but that would be the first place I would look. Sanding in a different direction will quickly show you if that’s the issue. As always, no reason to go up to the next grade of sandpaper until you’ve eliminated all scratches from the one lower and you only see sanding scratches from the grit you’re on.
If bruising, that often goes deeper than you think. I assume you’ve already ground off the heel of your gouge and use a very light final pass or two. I also often negative rake scrape, and if concerned about bruising start at 120 even if it looks like 180 would do.
Thanks, my mistakeFor what it's worth...pecan is in the same family as hickory.
had you considered a scraper with a fresh burr? When working with hickory or white oak I've had success removing tooling marks with a large thick scraper barely grazing the wood. Alternatively, I've also had success with a 3/8" bowl gouge, freshly sharpened, with a high shear angle barely touching the wood. Just some things that have worked out for me...good luck.
I have been following Richard Findley on You Tube for a bit. One thing we both agree on is that a scraper with a fresh burr will work okay on the bottom of the bowl. Your marks are in the transition area. Neither Richard or I will come up the sides of a bowl with a scraper for finish cuts. I know Tomislav does, but I don't and won't. The reason is unsupported fibers, best illustrated by Brian Havens videos about turning where he uses plastic straws to show why it is not a good idea. So think of a 6 inch radius half circle, and the bottom has a flat, so kind of like a bowl cut in half. Take the straw sections, about 1 inch long for a cross section of the bowl, and the straws along the bottom make for the bottom of the bowl. Try to go from the bottom to the top on the inside of the bowl and you can feel why it does not work. I prefer a shear scrape through the transition area. A NRS is still a scraper and it will pull at the fibers more than a shear cut or shear scrape will.
robo hippy
robo hippy
Appears to be light tearout. I see the same surface at the rim. I also see very faint tool marks. My tool of choice for this is a hand cabinet scraper, followed by sanding to blend.