• It's time to cast your vote in the August 2025 Turning Challenge. (click here for details)
  • Congratulations to Guillaume Fontaine for "Méandre 2.1" being selected as Turning of the Week for August 25, 2025 (click here for details)
  • Welcome new registering member. Your username must be your real First and Last name (for example: John Doe). "Screen names" and "handles" are not allowed and your registration will be deleted if you don't use your real name. Also, do not use all caps nor all lower case.

Tool rest height

Odie

Panning for Montana gold, with Betsy, the mule!
Joined
Dec 22, 2006
Messages
7,481
Likes
12,714
Location
Missoula, MT
It has been my practice to adjust the tool rest height to accommodate the overall thickness of the turning tool to centerline height of the spindle. While in progress the tool handle is usually dipped downward, and there are a few instances where the tool handle is tipped up. Because of this, the cutting action can vary slightly from the spindle centerline according to your stance, body, arms, shoulders and hands.

My presumption is that this practice may vary from individual to individual....

What are YOUR thoughts on the best tool rest height?

=o=
 
Last edited:
I adjust the tool rest often too. For a bowl gouge ground to less than 55 degrees the rest is slightly below center and the cut is just above center with the tool handle dropped. For the bowl gouge ground to greater than 55 degrees my tool rest is a bit higher so the cut is still just above center but with the tool handle more level. For a negative rake scraper inside the hollow, my tool rest is set so the edge is at center or a hair below center with the tool handle level. For a skew the rest is up so that the cut is in the upper third of a spindle with handle lowered. For a sheer scrape with the gouge my tool rest is generally just below center and the tool handle dropped to the max.
 
What is YOUR thoughts on the best tool rest height?

I'm not sure there IS a best tool height, at least not for me.

I haven't given it much thought, but like others, adjust the tool rest often. I might start by setting the height based primarily on the thickness of the tool, or rather, the distance from the contact point with the tool rest to the cutting edge (easy to see in something like a parting tool), then make small adjustments as needed for the cut that feels the best. Some of it may depend on how I feel, if my back or shoulder hurts!

I think a lot of the tool presentation, and therefore the rest height, depends on the grind.

In thinking of it just now, and using the parting tool as an example, I'm pretty sure my methods changed a bit when I started grinding the diamond parting tools this way instead of the "normal" way. This grind changes the geometry. I'm still experimenting with variations - so far I like the one in the front the best for efficient peeling cuts.
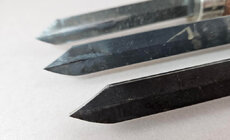
diamond_parting_tool_grinds.jpeg

But with scraping cuts, I use this grind exactly the normal grind. Both function as negative rake scrapers. I often hollow and smooth end grain with NRS, for example I use that same diamond parting tool to hollow the bell for handbell ornaments, tool close to horizontal - the cleanest, quickest, easiest, most foolproof way I've found. FWIW, this bell is Dogwood, turned last night while prepping for a demo.
Of course, for scraping anything with NRS I set the rest so the cutting edge is right at the center of rotation.
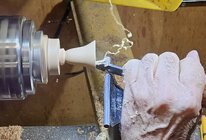
handbell_lollowing.jpg
(Robust rests, always!)

Interesting topic. I need to pay closer attention while peeling and compare this grind with some similar parting tools still ground with the normal shape.

And pay more attention to tool rest height with other tools - spindle gouges and skews. I frequently adjust the height and distance those and other tools, depending on the cut that works the best for that piece of wood.

I typically hone in on the rest height while making the rough shaping cuts, then leave it alone for finishing cuts with the same tool. For example, while rough shaping this African Blackwood handle I set the tool rest height to what felt "right", whatever that means.

This is the first finishing pass on the handle - all cuts with the small Hunter Hercules. (Sorry, part of the handle is a bit out of focus - I didn't notice the camera autofocused on the lathe bed!)
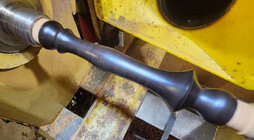
handle_1st_pass_Hunter_20250620_184829_ecs.jpg

Tool rest heights and shaft angles are likely different for other tools and applications, such as typical hollowing tools in a vase, gouges on the inside and bottom of a bowl, etc.

Note to self: pay more attention.

JKJ
 
My tool rest are locked in position with a lock collar for my 5/8 bowl gouges, which is my most used tool, and the lowest position it will ever be set at. Therefore I only have to slightly raise my tool rest for smaller diameter gouges and scrapers.
 
I move it to whatever position best lets me get the angle I want on the tool. That varies with the tool, the cut, and the diameter of the work piece. I don't often think about it and never measure it. If the cut is uncomfortable to make I move the tool rest.
 
In-out, up-down, left-right, around-and-around... In other words, I'm always moving it to suit the conditions of the tools, location of the banjo to the stock, diameter of the wood, etc. I never really think about it, it's all second nature to me, sort of like walking, driving a car, or riding a bicycle- once trained, my body knows how to operate the machine for the conditions. And a final predictor, the height of the human's arms relative to the component's heights on the machine, but that would really only vary when a singular turner is moving to differently set up machines.

But, tool handle aims down slope from the tool contact point on the tool rest. The only time the handle might be aiming upward (i.e. lifting the handle) relative to/away from the rest might be when using a parting tool (to maintain bevel rubbing), or a scraper inside of a bowl form when going after a negative rake angle, and I may at the same time be twisting the scraper counterclockwise a bit as I sweep outward from bottom center to the rim area.

Boy, I had to think of these things. My body is always just doing it for me.
 
Last edited:
The Variables of Tool Rest Height
There is no single "best" height for a tool rest; its optimal position is a nuanced decision based on several factors. The goal is to maximize control and minimize effort while cutting, which requires adjusting the tool rest to suit the specific tool, cutting method, and material.

The most critical variable is the geometry of the tool and its cutter. For deep hollowing, even a minor adjustment of a few thousandths of an inch can be crucial for aligning the cutter's edge with the wood. Different cutters, especially those with complex profiles, require specific tool rest heights to ensure the cutting edge makes contact at the correct angle.

The technique being used significantly influences the preferred tool rest height. For example, some turners prefer to use a spindle roughing gouge with a peeling and slicing motion, which is often easier to execute with the tool rest slightly above the centerline. This contrasts with the more common centerline abrasion method, where the tool rest is typically set at or slightly below the centerline.

The tool rest is designed to be the primary support, absorbing the cutting forces to prevent the tool from being deflected. A well-positioned tool rest minimizes the need for the turner to fight these forces, allowing for a more controlled and precise cut. Adjusting the height so that the tool rest is optimally positioned to absorb all the force from the wood is key to efficient and safe turning.
 
For my bowl gouge generally set the rest so that I’m cutting at center with the gouge level to the floor.
On pull cuts on the outside of the form I may lower the rest slightly to get better bevel contact range.

Whenever I’m not achieving the cut as well as I can do it, I consider changing the rest portion and or height.
 
Back
Top