
-
We just finished moving the forums to a new hosting server. It looks like everything is functioning correctly but if you find a problem please report it in the Forum Technical Support Forum (click here) or email us at forum_moderator AT aawforum.org. Thanks! -
Beware of Counterfeit Woodturning Tools (click here for details) -
Johnathan Silwones is starting a new AAW chapter, Southern Alleghenies Woodturners, in Johnstown, PA. (click here for details) -
Congratulations to Dave Roberts for "2 Hats" being selected as Turning of the Week for April 22, 2024 (click here for details) -
Welcome new registering member. Your username must be your real First and Last name (for example: John Doe). "Screen names" and "handles" are not allowed and your registration will be deleted if you don't use your real name. Also, do not use all caps nor all lower case.
You are using an out of date browser. It may not display this or other websites correctly.
You should upgrade or use an alternative browser.
You should upgrade or use an alternative browser.
Turn a one-piece yo-yo
- Thread starter Ed Davidson
- Start date
Thank you Ed! Watched the video. (I have your DVD). Thanks so much for sharing. You nailed the profile on the second side.
Another thank you for the video. I also have had your DVD for some time and have turned a number. It's an interesting project, and the new video is a good summary.Thank you Ed! Watched the video. (I have your DVD). Thanks so much for sharing. You nailed the profile on the second side.
Great video Ed! What did you use to insert in the recess on the yo-yo? Again thanks for the posting, got to try it.
Thanks for the post.
You mention the "depth" of the axle, but what is the finished diameter of the axle?
You mention the "depth" of the axle, but what is the finished diameter of the axle?
1/4" to 3/8" in diameter. Be careful not to make the axle too thin, as it might break or "burn-through" with use.Thanks for the post.
You mention the "depth" of the axle, but what is the finished diameter of the axle?
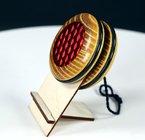
Thanks...are you referring to the black O-rings or the decorative counterbores on the sides? The O-rings are "EPDM"...relatively inexpensive and easy to find, hold up well after years of use. Try to avoid the less expensive "Buna-N (Nitrile) plumber's O-rings, as they will crack and fall apart if exposed to sunlight. I'm still working on the side decoration counter bore areas...it takes 3 or 4 days for the epoxy resin I'm using to cure. I normally will use handmade epoxy resin or polymer clay cabochons to decorate the sides. Will post pictures of the finished yo-yo (shown in the video) soon.Great video Ed! What did you use to insert in the recess on the yo-yo? Again thanks for the posting, got to try it.
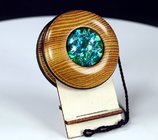
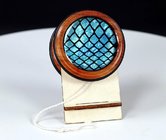
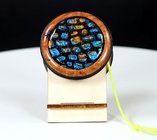
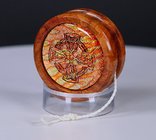
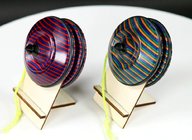
Okay, here's the completed yo-yo from the how-to video, fully finished. The side cabochon embellishments are made with epoxy resin & black alcohol ink coloring, and a top layer of chunky holographic glitter...using the lathe-turned counterbores as a mold for the epoxy to set up in.
Great video!! Thanks for sharing. Have you ever tried UV cured inlays for the sides? I tried one on a yo-yo and it works pretty well..
Terrific tutorial video Ed! Thank you. The grandchildren will love these when they’ve mastered their Duncans we just gave them.
I've tried UV resin several times, but could never get the stuff to cure completely...ended up with a sticky mess. The two-part resin I use air cures to finger-touch hardness in about 12 hours at 70 degrees. Faster if warmer, but it'll take at least 24 hours to fully cure.Great video!! Thanks for sharing. Have you ever tried UV cured inlays for the sides? I tried one on a yo-yo and it works pretty well..
Thanks for sharing Ed. Beautiful design and great videos
Nice. I don't think I would be able to be that precise with the turning. I did find out a long time ago that the sides had to be exactly the same weight, like down to 0.01 gram or so, otherwise it would spin side wise. Another toy I played with but never mastered....
robo hippy
robo hippy
In my experience, the grain and density of the wood has the most influence on balance. Burls & spalted woods generally don't work well. Hard Maple, Osage, Purpleheart, Bloodwood, SpectraPly and the like tend to work best. My favorite wood for yo-yo turning is baseball bat factory reject Maple. Another balancing pointer to consider: the two rubber o-rings tend to add stability to the yo-yo's performance, and will sometimes get a out of balance yo-yo into a useable state. As the o-rings stretch, you can even use two different diameter rings to help compensate for one side of the yo-yo being heavier than the other.Nice. I don't think I would be able to be that precise with the turning. I did find out a long time ago that the sides had to be exactly the same weight, like down to 0.01 gram or so, otherwise it would spin side wise. Another toy I played with but never mastered....
robo hippy
Attachments
Last edited:
Tom Gall
TOTW Team
Enjoyed your video, Ed. A question or two about your process ... I know you probably have good reasons for your methods, but ...
")
- Why don't you wrap your protective masking tape while the yo-yo is still mounted on the chuck? I think that would be a little easier and quicker (a 3rd hand). I thought I noticed a very minor, mostly insignificant, wobble when you reversed mounted over the tape.
- Maybe you could use another chuck with something like spigot jaws (1"closed) to expand into your drilled hole (1-3/8"? or 1-1/4"?). Probably would take the same amount of time or less to change chucks than to wrap & unwrap the tape. And may be a little more accurate.
Wrapping the tape while on the chuck would certainly work...old dog learns new trickEnjoyed your video, Ed. A question or two about your process ... I know you probably have good reasons for your methods, but ...
Just my 2¢.
- Why don't you wrap your protective masking tape while the yo-yo is still mounted on the chuck? I think that would be a little easier and quicker (a 3rd hand). I thought I noticed a very minor, mostly insignificant, wobble when you reversed mounted over the tape.
- Maybe you could use another chuck with something like spigot jaws (1"closed) to expand into your drilled hole (1-3/8"? or 1-1/4"?). Probably would take the same amount of time or less to change chucks than to wrap & unwrap the tape. And may be a little more accurate.
The side counterbores are just one form of dozens I use for decoration...probably 5 out of 6 I make don't have that feature. But yes, it would probably work for those that do have a counterbore in the design.
Attachments
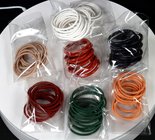
Just curious Ed, where do you get the colored o-rings?
This is the only place I've been able to find colored o-rings: The O-Ring StoreJust curious Ed, where do you get the colored o-rings?
Thanks for the info EdThis is the only place I've been able to find colored o-rings: The O-Ring Store
Cheers
Harold
Your precision and attention to detail certainly are reflected in your work. Attention to detail in your photography background shines through. Very nice, thanks for sharing.
PSA: if you haven't thrown much before, it's super critical to not let the yo-yo string become highly overtwisted on a wood axle. This often happens when new players would rewind the string on the yo-yo, holding the yo-yo on one side and winding over the other, but can also happen from some tricks. E.g. skilled players would alternate their loop-de-loops on the inside and outside of the throwing arm to keep the net twist neutral. Failing to keep the twist out will eventually either 1) groove the wood axle which then kills that string and all subsequent strings instantly or 2) even weaken and break the axle. With the old Tom Kuhn yo-yos, the wood axle was replaceable so this was annoying, but not the end of the yo-yo.1/4" to 3/8" in diameter. Be careful not to make the axle too thin, as it might break or "burn-through" with use.
Of course, since the early 00s brought on the crazy high skill bearing yo-yo era... most of that is historical knowledge re: kids these days. ;-)