What would happen if one turned a piece of wet, green wood to its final shape, then left it to dry? Accepting the normal warpage as a desired effect, doing nothing more than sanding and applying finish? Is that an acceptable technique?

-
It's time to cast your vote in the March 2026 Turning Challenge. (click here for details) -
Congratulations to Chris Lawrence for "Dragon's Grip" being selected as Turning of the Week for March 30, 2026 (click here for details) -
Welcome new registering member. Your username must be your real First and Last name (for example: John Doe). "Screen names" and "handles" are not allowed and your registration will be deleted if you don't use your real name. Also, do not use all caps nor all lower case.
You are using an out of date browser. It may not display this or other websites correctly.
You should upgrade or use an alternative browser.
You should upgrade or use an alternative browser.
Turning green wood
- Thread starter David A Morris
- Start date
Yes. It is quite common.
David, I like that kinda warped look and do this from time to time. I saw a Mike Pease video where he turned some small pots green then let them warp as they dried. The deformed rim of the top of the pots made them look very interesting and each one comes out unique. Be sure not to leave the pith in the blank as that is where it will normally crack from when drying. I tend to dry these in a shop microwave to speed along the process.
the risk is that in addition to warping they might crack...badly
Cracking is what I thought might be a problem.the risk is that in addition to warping they might crack...badly
My favorite book on this topic is Turning Green Wood by Michael O'Donnell especially the 2020 edition. I have read it many times and consider the $20 an excellent investment.
- Joined
- Feb 28, 2021
- Messages
- 1,812
- Likes
- 1,625
- Location
- Roulette, PA
- Website
- www.reallyruralwoodworks.com
Sure. it is very often done regularly with "natural edge" bowls so that you have bark (or the surface that had bark on it) as the natural wavy rim - almost always turned green and allowed to warp - bottoms I'd suggest having a raised bead so once dry you can cut away parts of it to give it 3 "feet" to stand on and they are less likely to wobble... If you turn them thin enough they'll often warp without cracking (since the tinner wood will "bend" rather than "break" much like the difference between 1/8" plywood and 1/2" plywood, for example... )What would happen if one turned a piece of wet, green wood to its final shape, then left it to dry? Accepting the normal warpage as a desired effect, doing nothing more than sanding and applying finish? Is that an acceptable technique?
I try to turn everything green but not always an option. I turn close to finish, inch or so thick then let dry for a year or 2. *Most* the time I leave enough meat on the bone to get a good finished dry turn. The ones I have turned green to finish usually warp some depending on how much pith I have left in. Some even crack but that's the risk you take.
Absolutely! Couple of things to keep in mind if you decide to turn green:What would happen if one turned a piece of wet, green wood to its final shape, then left it to dry? Accepting the normal warpage as a desired effect, doing nothing more than sanding and applying finish? Is that an acceptable technique?
* Different woods will yield different results. Oak and fruit woods will see a lot of warping and distortion. Other woods will just go oblong on you. There are some good threads on the forum that offer more details about how different species behave as they dry.
* If you’re looking for interesting warping, thinner walls usually elicit a better result and are less likely to split (especially if they are a consistent thickness throughout)
All of these were turned from a tree cut days before. Not a crack in the batch. In the 38 years of turning, the only time I have twice turned is some cremation urns so I could get a round hole for a threaded insert. ALL the other work is once turned green wood. You must consider species, drying techniques and even and identical wall and base thickness. The stack of salad bowls are 18” in diameter.the risk is that in addition to warping they might crack...badly
Attachments
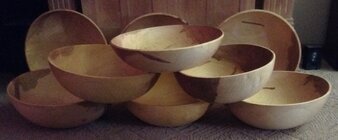
All of my bowls, 8" diameter up to 18" diameter salad mixing bowls, are once turned. Oak, black walnut, black cherry, ambrosia maple - whatever. For me, the warping is more honest result, a natural property of wood. I bet an occasional narrow crack in wall or bottom I fill with two part epoxy colored with dry pigment. The just turned bowls are placed in paper grocery or larger bags on the floor and weighed every friday. When no weight loss they stay in bag but now on table, continue friday weighing. When no weight loss out of the bag and continue weekly weighing until no weight loss. At that point they are dry enough to sand and apply finish.
Drawback of once turned bowls is that I can't sand with the lathe running, because they are no longer round. I grab the tenon to sand the inside and rim through various grits, friction chuck to sand outside and turn off tenon.
Drawback of once turned bowls is that I can't sand with the lathe running, because they are no longer round. I grab the tenon to sand the inside and rim through various grits, friction chuck to sand outside and turn off tenon.
Warping is due to different shrinkage rates along the growth rings (tangential) and across the growth rings (radial). Discussed in R Hoadley's book "Understanding Wood."
Please excuse me Monte but I can't resist commenting when someone says "be sure not to leave the pith in".Be sure not to leave the pith in the blank as that is where it will normally crack from when drying. I tend to dry these in a shop microwave to speed along the process.
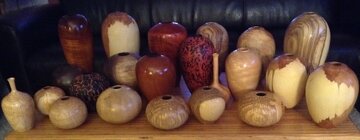
If the pith is solid with no cracks in a fresh cut live tree then it is possible to leave the pith in and you will also see the grain pattern presented in a way that is very attractive. The key to success is turn as soon as possible and for keeping the bark on cut the tree when it is dormant.
The goblets were turned from small trees cut in the fall or winter so the bark is as tight as it can get and the moisture is the lowest. The walls of bowels and goblets need to be as thin as possible especially around the pith and often the pith will push out like a pimple on the convex side or a dimple on the concave side.
 This is a northern red oak crotch bowl with 3 piths.
These goblets are also northern red oak.

These goblets are black cherry note: black cherry rarely get bigger then about 6" diameter in this neck of the woods. My home is about 10 miles south of Lake Itasca the source of the Mississippi river so there are 3 different watersheds or divides in the area.
I do it a lot. I like the character the warping and distortion adds. There have only been a couple of pieces that turned sort of oval in a way that I didn't like like.
Sounds like something I'll have to try then!
I once turn all of my bowls, plates and platters. I just love the warped shapes. I do use a recess on them. My favorite is Pacific Madrone because it warps in totally unpredictable ways. I have found that with it, I need spring harvested trees, which around here is March through May, but later than that, I get more cracking. I turn the walls to about 1/4 inch thick. I do round over the rims. I use the LDD soak, which is kind of messy, but it makes the bowls easier to sand out. LDD is liquid dish washing soap and water in equal parts, soak for 24 hours or more, rinse off, wrap stretch film around the rim (big box stores in "moving" supplies", and let it dry. Some do sand them wet, but it seems to take more time. They are dry in a week at most. I let them sit on the concrete floor of the shop for a day or 5, then up on wire racks to finish. It takes at most a week for it to finish moving and drying. It REALLY helps to have a lathe with 15 or ro rpm speed for sanding. Any faster and you can't keep the abrasives on the wood as it spins. I had my Robust slowed down to that speed range, my Vicmark 240 already goes that slow. Final wall thickness can vary a bit from wood to wood. Walnut and maple, mostly big leaf out here can be 3/8 inch thick. I would not leave them thicker. Oh, I power sand too, just more "efficient", and my "articulated arm for sanding", a video I did, is a must because the arm takes all the weight of the sander off so you can actually spin the piece by one hand and hold the drill on the sanding arm. You get a lot of comments about why is it so out of round and after you explain it, many go "oh, it so organic"!
robo hippy
robo hippy
I just watched a couple of your YouTube videos. Glad to see you here! And thanks for the info.I once turn all of my bowls, plates and platters. I just love the warped shapes. I do use a recess on them. My favorite is Pacific Madrone because it warps in totally unpredictable ways. I have found that with it, I need spring harvested trees, which around here is March through May, but later than that, I get more cracking. I turn the walls to about 1/4 inch thick. I do round over the rims. I use the LDD soak, which is kind of messy, but it makes the bowls easier to sand out. LDD is liquid dish washing soap and water in equal parts, soak for 24 hours or more, rinse off, wrap stretch film around the rim (big box stores in "moving" supplies", and let it dry. Some do sand them wet, but it seems to take more time. They are dry in a week at most. I let them sit on the concrete floor of the shop for a day or 5, then up on wire racks to finish. It takes at most a week for it to finish moving and drying. It REALLY helps to have a lathe with 15 or ro rpm speed for sanding. Any faster and you can't keep the abrasives on the wood as it spins. I had my Robust slowed down to that speed range, my Vicmark 240 already goes that slow. Final wall thickness can vary a bit from wood to wood. Walnut and maple, mostly big leaf out here can be 3/8 inch thick. I would not leave them thicker. Oh, I power sand too, just more "efficient", and my "articulated arm for sanding", a video I did, is a must because the arm takes all the weight of the sander off so you can actually spin the piece by one hand and hold the drill on the sanding arm. You get a lot of comments about why is it so out of round and after you explain it, many go "oh, it so organic"!
robo hippy
I saw your video on using dish soap and how you wrap it in plastic.I once turn all of my bowls, plates and platters. I just love the warped shapes. I do use a recess on them. My favorite is Pacific Madrone because it warps in totally unpredictable ways. I have found that with it, I need spring harvested trees, which around here is March through May, but later than that, I get more cracking. I turn the walls to about 1/4 inch thick. I do round over the rims. I use the LDD soak, which is kind of messy, but it makes the bowls easier to sand out. LDD is liquid dish washing soap and water in equal parts, soak for 24 hours or more, rinse off, wrap stretch film around the rim (big box stores in "moving" supplies", and let it dry. Some do sand them wet, but it seems to take more time. They are dry in a week at most. I let them sit on the concrete floor of the shop for a day or 5, then up on wire racks to finish. It takes at most a week for it to finish moving and drying. It REALLY helps to have a lathe with 15 or ro rpm speed for sanding. Any faster and you can't keep the abrasives on the wood as it spins. I had my Robust slowed down to that speed range, my Vicmark 240 already goes that slow. Final wall thickness can vary a bit from wood to wood. Walnut and maple, mostly big leaf out here can be 3/8 inch thick. I would not leave them thicker. Oh, I power sand too, just more "efficient", and my "articulated arm for sanding", a video I did, is a must because the arm takes all the weight of the sander off so you can actually spin the piece by one hand and hold the drill on the sanding arm. You get a lot of comments about why is it so out of round and after you explain it, many go "oh, it so organic"!
robo hippy
I've found that Pecan is the most likely to warp, at least among the woods I most often turn while green. The Live Oak here in South Georgia hasn't moved at all after turning green. It's a completely different kind of grain than most other oaks.Absolutely! Couple of things to keep in mind if you decide to turn green:
* Different woods will yield different results. Oak and fruit woods will see a lot of warping and distortion. Other woods will just go oblong on you. There are some good threads on the forum that offer more details about how different species behave as they dry.
* If you’re looking for interesting warping, thinner walls usually elicit a better result and are less likely to split (especially if they are a consistent thickness throughout)
Add The Wood Database to your repertoire. Each wood listed will have this at the top:


The volumetric shrinkage will tell you how much a wood will shrink. The T/R ratio tells you how much the wood will "oval" if you will. Here you can see that red oak shrinks a lot more than Osage orange, and warps (radial to tangential) more as well.
The volumetric shrinkage will tell you how much a wood will shrink. The T/R ratio tells you how much the wood will "oval" if you will. Here you can see that red oak shrinks a lot more than Osage orange, and warps (radial to tangential) more as well.
Attachments

Love the screen name. Nicely done D.I do it a lot. I like the character the warping and distortion adds. There have only been a couple of pieces that turned sort of oval in a way that I didn't like like.

I have to guess here, but don't know for sure. I think that a lot of wood movement comes from how much water the tree is holding to begin with. Some will hold a LOT more water than others. Some of it could depend on what time of year you harvest, like spring sap trees will shrink a bit more than fall or winter harvested trees. So, sycamore tends to hold a lot of water and I would expect it to move more than other woods. Most of the time movement is predictable. There is very little movement length wise in the wood since it grows up and down, and is under compression for all of its growth cycle. The wood moves a lot during seasonal changes, mostly to the sides to accomodate the spring sap. This means the bowls go oval. I know mesquite is supposed to move hardly at all from wet to dry. I have found black walnut to move a little bit. I don't turn cottonwood since it always seems to stink badly, but I would expect it to warp a lot. With my once turned bowls, I have learned to cut close to branches because that wood will move differently. Madrone, well, it just moves however it wants to.... Some times, depending on how I cut the blank, it can move in ways that I can almost predict.
robo hippy
robo hippy
Thank you.I have to guess here, but don't know for sure. I think that a lot of wood movement comes from how much water the tree is holding to begin with. Some will hold a LOT more water than others. Some of it could depend on what time of year you harvest, like spring sap trees will shrink a bit more than fall or winter harvested trees. So, sycamore tends to hold a lot of water and I would expect it to move more than other woods. Most of the time movement is predictable. There is very little movement length wise in the wood since it grows up and down, and is under compression for all of its growth cycle. The wood moves a lot during seasonal changes, mostly to the sides to accomodate the spring sap. This means the bowls go oval. I know mesquite is supposed to move hardly at all from wet to dry. I have found black walnut to move a little bit. I don't turn cottonwood since it always seems to stink badly, but I would expect it to warp a lot. With my once turned bowls, I have learned to cut close to branches because that wood will move differently. Madrone, well, it just moves however it wants to.... Some times, depending on how I cut the blank, it can move in ways that I can almost predict.
robo hippy