• September 2025 Turning Challenge: Cindy Drozda Finial Box! (click here for details)
  • Congratulations to Dave Potts, People's Choice in the August 2025 Turning Challenge (click here for details)
  • Congratulations to Jim Mclain for "Carved Chaco Passages" being selected as Turning of the Week for September 15, 2025 (click here for details)
  • Welcome new registering member. Your username must be your real First and Last name (for example: John Doe). "Screen names" and "handles" are not allowed and your registration will be deleted if you don't use your real name. Also, do not use all caps nor all lower case.

turning salt shaker

Brian Horais was good at it. His files on it are saved at the World of Woodturners. He had a good tutorial on it. I've done a few but it would be hard to explain all the details.
 
Brian Horais was good at it. His files on it are saved at the World of Woodturners. He had a good tutorial on it. I've done a few but it would be hard to explain all the details.
Definitely a good reference. His website seems to have disappeared -- he died several years ago. I hadn't thought to look on WOW.
 
I just went to WOW and looked at all his files. The one on making a spiral peppermill is there. It's a very good tutorial. It's good that someone there saved this information because his web site is out of commission.
 
How do yo turn a triangular salt and peppers with a spiral twist?

Ed

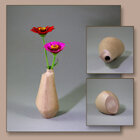
Brian Horais was a member of our club and turned twisted things often. We all miss him. He visited my shop and we made some twisted things; he gave me one of his pieces. This one is a vase with carved petals on the top, but the same technique could be used for a salt/pepper grinder.

I walked down to the shop just now and took a couple of quick photos of the piece Brian gave me. You can see the spiral on the side. The end view may not quite look 3-sided because of the carving.

Brian_Horais_twisted.jpg

What he used could be described as a type of therming where a spindle, for example, is turned with the axis off to the side a bit instead of in the center of the round. To make different sides, you move the two center points to other positions around the central axis.

What Brian did was mark three positions on each end of the spindle on a small circle. I forget the approximate circle diameter but I have his template here somewhere, maybe I can locate it. The diameter of the circle would depend on the size of blank and the extent of the effect. (Any number of marks equally spaced around the circle would have the same effect but with more sides, eventually defeating the strong twisted effect.)

Would be a lot easier to explain with a diagram or three. But here are some words, probably not crystal clear:

Let's say circle was 1" in diameter for a 3" diameter rounded blank. If you made the three marks 120-deg apart on one end and numbered the marks 1-2 3 clockwise, then made an identical circle on the other end and numbered them 1-2-3 counterclockwise, and if the numbers were in the same position on each end, then putting the drive and live centers both on number 1 would let you turn part of a cylindrical surface opposite the #1 mark. Repeating this with the #2 then the #3 marks would result in a piece with three sides parallel to the central axis but with no twist.

But if you started with the drive center on #1 and the live center on #2 and turned the piece in the same way, the result would be a twisted side. Repeat with #2 and #3, then #3 and #1 and the end result would be a cylinder with three sides twisting along the piece, each side 120 from the next at any one point.

The ending shape depends on your imagination. Experiment! Vary the size of the circle and the shape turned (for example something a bit conical), and the result could be quite interesting. It would be straight forward to make a cylinder prepared/drilled for a salt/pepper grinder, then make appropriate wooden mandrels to fit the holes in the end, and turn the outside twisted.

I think I made notations and maybe a diagram in my notebook, I'll have to look. If I get time (and it would have to be after Sept 16), I could easily experiment and make a diagram and take a photo or two.

Brian turned with some kind of spindle and/or roughing gouge I think. After we played a while I tried making one with a skew and it worked the same way. I think about any tool would be OK, whatever comfortable with. A Hunter tool could be excellent. I wouldn't waste my time with a flat-topped "scraper" carbide tool.

After spending an afternoon with Brian,, I used the same principle, but with two axes on one end and three on the other, none of them equally spaced or on circles. As you might see, the end result can vary a great deal!!

bud_vase_comp_IMG_8238.jpg

JKJ
 
Last edited:
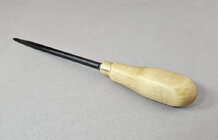
Just for fun I turned a small handle from Tulip Poplar for a birdcage awl using the multi-axis method, non-twisted.
Did it real quick, just to review the principle, and kind of sloppy! Function, not art...

I made a circle with four points, 1-4, and mounted between centers 1-1, 2-2, etc. Turned about 2500 rpm with skew.

A little hard to see in the photo but each side, from near the end to the ferrule is radiused, not flat as if cut with the bandsaw. (The domed end is circular)
I sanded the off corners so it would be comfortable in my hand.

If I had put the centers on points 1-2, 2-3, etc, the four sides would have been twisted.
(Sorry, the focus is bad on the pointed end, but I'm quitting for the night.)

awl_handle_thermed.jpg

JKJ
 
How do yo turn a triangular salt and peppers with a spiral twist?
Practice with a 3” diameter spindles
First turn one or two with straight sides. These use three centers aligned on opposite ends of the spindle

To get the twist you offset the center points on one end by 1.
You can get less twist by offsetting a half


My preferred method is turning the faces with a bowl gouge with an Ellsworth grind
Pull cut leave a nice surface.
I can show you how to do the lay out and how I use the bowl gouge


View: https://youtu.be/Ys4tMzwh7jE?si=AT3VNq-lhlCEQ-IP
 
Back
Top