Here is an update from a few of my latest woodturning adventures.
I’ve slowed down a lot in May due to a strained shoulder (probably tool related from lugging around a 45 lb air compressor). I still managed to prep some logs from an ash tree and some from a hackberry.
I only am turning green wood so it takes time for the moisture content of the wood to equalize. Patience is one of my new skills that I need to continue to practice. There are a lot of lessons in these pieces too. How to minimize radial cracking on pieces turned with the pith (mostly don’t turn pieces with the pith). How to process the wood. What finishes to use on the dry pieces. I’m continuing to add tools that I make to my collection also.
The air compressor will be used with an autobody reciprocating saw to carve pieces that I’ve turned. I also will use die grinders with it at some point. And it is very useful for blowing out the shavings from hollow forms. I’ve found that the shavings get compacted in the vessel very quickly AND they are hot so they dry out the form from the inside and this can lead to more cracking.
I am still experimenting with Renaissance Wax which is a microcrystaline wax. And today I tried using a parafin/synthetic wax blend called Enkaustikos Slick Wax (used for Encaustic painting).
Also also tried Howard’s Feed and Wax and really like this beeswax/orange oil combination.
Some of these pieces only have thinned shellac followed by Renaissance Wax.
Here are some pics…
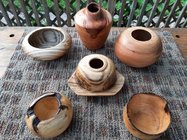
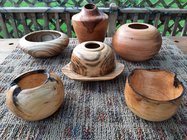
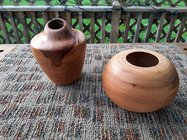
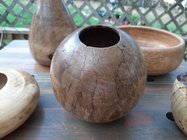
Some of these are pecan with Renaissance Wax buffed out (tall one). The globe/bowl has a seal coat of shellac and the Enkaustikos Slick Wax buffed out.
These two products may be very similar in composition.
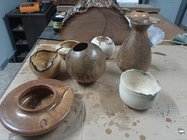
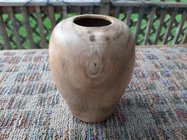
The following two are ash or hackberry (I think) They had some spalting but it was so wet that it began to mold more after I turned them and placed them in a paper bag with moist shavings. The bowl was spalting unevenly so I sprayed it once or twice with water to encourage the mold on the less affected side.
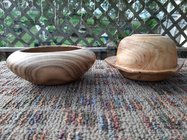
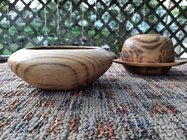
Again, the shorter bowl has the Renaissance Wax and the tri-corner bowl has the Slick Wax applied to it.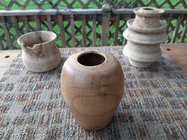
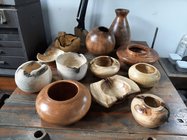
These last three are unfinished at this point. Since I am very new to turning (6 months) Everything I try is a new challenge. The piece on the right with the collars/rings is still drying and will be the first carved piece I try. I intend to cut the rings/collars into fringe or petal like shapes. All three of these include the pith and had extreme radial cracking. That means that I will have no remorse when it come to carving or trying other texturing techniques on them. I will mostly cut the pith out of my blanks in the future though it seems like this ash is especially prone to cracking more than other woods I've turned.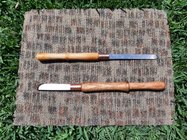
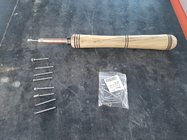
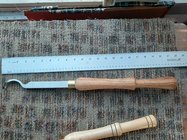
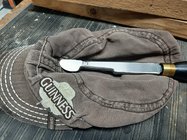
This pic is of a couple of the lathe tools I've made recently. The Alan Lacer style skew is fantastic to use.
And here is the amazon link the hss tool blank I bought to make it.
This is a link to a great article on how to shape your own skew in this style.
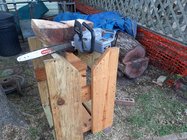
I've made a few other tools and a log processing bench.
I've also made a few other hollow forms but these are all from the last month.
Thanks for looking.
Comments and criticisms welcome.
Al in Texas
I’ve slowed down a lot in May due to a strained shoulder (probably tool related from lugging around a 45 lb air compressor). I still managed to prep some logs from an ash tree and some from a hackberry.
I only am turning green wood so it takes time for the moisture content of the wood to equalize. Patience is one of my new skills that I need to continue to practice. There are a lot of lessons in these pieces too. How to minimize radial cracking on pieces turned with the pith (mostly don’t turn pieces with the pith). How to process the wood. What finishes to use on the dry pieces. I’m continuing to add tools that I make to my collection also.
The air compressor will be used with an autobody reciprocating saw to carve pieces that I’ve turned. I also will use die grinders with it at some point. And it is very useful for blowing out the shavings from hollow forms. I’ve found that the shavings get compacted in the vessel very quickly AND they are hot so they dry out the form from the inside and this can lead to more cracking.
I am still experimenting with Renaissance Wax which is a microcrystaline wax. And today I tried using a parafin/synthetic wax blend called Enkaustikos Slick Wax (used for Encaustic painting).
Also also tried Howard’s Feed and Wax and really like this beeswax/orange oil combination.
Some of these pieces only have thinned shellac followed by Renaissance Wax.
Here are some pics…


Some of these are pecan with Renaissance Wax buffed out (tall one). The globe/bowl has a seal coat of shellac and the Enkaustikos Slick Wax buffed out.
These two products may be very similar in composition.
The following two are ash or hackberry (I think) They had some spalting but it was so wet that it began to mold more after I turned them and placed them in a paper bag with moist shavings. The bowl was spalting unevenly so I sprayed it once or twice with water to encourage the mold on the less affected side.


Again, the shorter bowl has the Renaissance Wax and the tri-corner bowl has the Slick Wax applied to it.


These last three are unfinished at this point. Since I am very new to turning (6 months) Everything I try is a new challenge. The piece on the right with the collars/rings is still drying and will be the first carved piece I try. I intend to cut the rings/collars into fringe or petal like shapes. All three of these include the pith and had extreme radial cracking. That means that I will have no remorse when it come to carving or trying other texturing techniques on them. I will mostly cut the pith out of my blanks in the future though it seems like this ash is especially prone to cracking more than other woods I've turned.

This pic is of a couple of the lathe tools I've made recently. The Alan Lacer style skew is fantastic to use.
And here is the amazon link the hss tool blank I bought to make it.
This is a link to a great article on how to shape your own skew in this style.
I've made a few other tools and a log processing bench.
I've also made a few other hollow forms but these are all from the last month.
Thanks for looking.
Comments and criticisms welcome.
Al in Texas
Last edited:

