
This is my interpretation and adaptation of DJ DeLorie's parallax jig ( http://www.delorie.com/wood/tips/parallax-jig.html ). Although the physical phenomenon of parallax is the principle of operation, "visual calipers" seems a more appropriate name for its function. "Parallax" also implies some obscure high-tech magic, and the scary movie "The Parallax View" of 1974 hasn't helped at all.
In colloquial use, "visual calipers" generally means eyeball measurement, usually with precision and accuracy of about 10%. This tool is a lot better than that.
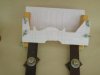
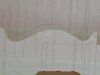
The general idea is to have two copies of the pattern, with one copy cut along the profile, and both of them offset from the axis of the lathe, as well as from each other. Then cut the workpiece until corresponding points are all in alignment from the turner's point of view. The advantage of this technique is that it enables "downhill" slicing of the wood fibers for a better finish. It also allows minute variations characteristic of manual cutting.
Most copying contrivances merely scrape to the required shape, and substantial sanding is needed. In fact, for some really mass production (such as baseball bats), the scraper may be the entire profile, pressed into service in a single motion. This works well enough when the medium is plaster of Paris, scraped while it hardens and expands; when the medium is wood, fine details can be lost to grain tear-out.
I made my version with an adjustable angle, and variable pattern separation, for maximum flexibility in further studies. It seems intuitively obvious, that greater pattern separation will provide more precise results. And of course, the near pattern must be far enough from the lathe axis to accommodate the rough blank. The far pattern could be farther yet, but depth of focus could be an issue.
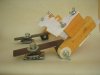
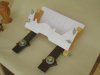
I made this from materials on hand: surplus bed frame angle irons, a single stick of furring strip, and some orphan signs in extruded plastic; thin plywood or foamboard would also be suitable for the pattern supports. The threaded fastenings provide registration of the two patterns. The notch in the near pattern accommodates the tool rest support (aka "banjo"). The lock-down nuts are DIY weldments, tapped to suit. The angle irons can be inboard or outboard, depending on workspace constraints.
Very bright lighting provides better results. Further studies may explore the benefits, if any, of using contrasting colors in different parts of the patterns. Ideally, the tool will dynamically mimic the fit and gaps between the work in progress and a stationary template.
[link to results: http://www.aawforum.org/photopost/showphoto.php?photo=6959 ]
In colloquial use, "visual calipers" generally means eyeball measurement, usually with precision and accuracy of about 10%. This tool is a lot better than that.
The general idea is to have two copies of the pattern, with one copy cut along the profile, and both of them offset from the axis of the lathe, as well as from each other. Then cut the workpiece until corresponding points are all in alignment from the turner's point of view. The advantage of this technique is that it enables "downhill" slicing of the wood fibers for a better finish. It also allows minute variations characteristic of manual cutting.
Most copying contrivances merely scrape to the required shape, and substantial sanding is needed. In fact, for some really mass production (such as baseball bats), the scraper may be the entire profile, pressed into service in a single motion. This works well enough when the medium is plaster of Paris, scraped while it hardens and expands; when the medium is wood, fine details can be lost to grain tear-out.
I made my version with an adjustable angle, and variable pattern separation, for maximum flexibility in further studies. It seems intuitively obvious, that greater pattern separation will provide more precise results. And of course, the near pattern must be far enough from the lathe axis to accommodate the rough blank. The far pattern could be farther yet, but depth of focus could be an issue.
I made this from materials on hand: surplus bed frame angle irons, a single stick of furring strip, and some orphan signs in extruded plastic; thin plywood or foamboard would also be suitable for the pattern supports. The threaded fastenings provide registration of the two patterns. The notch in the near pattern accommodates the tool rest support (aka "banjo"). The lock-down nuts are DIY weldments, tapped to suit. The angle irons can be inboard or outboard, depending on workspace constraints.
Very bright lighting provides better results. Further studies may explore the benefits, if any, of using contrasting colors in different parts of the patterns. Ideally, the tool will dynamically mimic the fit and gaps between the work in progress and a stationary template.
[link to results: http://www.aawforum.org/photopost/showphoto.php?photo=6959 ]
Attachments
Last edited: