I keep seeing references to alcohol based dyes. I am just wondering what brands are popular here in the US. I want to get started, and would like to try various colors. Hate spend a ton to try a color only not like it. Any suggestions on how to get started? Looking for a good starter set?

-
Congratulations to David Bartell, People's Choice in the March 2026 Turning Challenge (click here for details) -
Congratulations to Chris Lawrence for "Dragon's Grip" being selected as Turning of the Week for March 30, 2026 (click here for details) -
Welcome new registering member. Your username must be your real First and Last name (for example: John Doe). "Screen names" and "handles" are not allowed and your registration will be deleted if you don't use your real name. Also, do not use all caps nor all lower case.
You are using an out of date browser. It may not display this or other websites correctly.
You should upgrade or use an alternative browser.
You should upgrade or use an alternative browser.
Want to get started with dyes
- Thread starter JeffWimer
- Start date
I've been experimenting with dye for the last couple years. I've been using the Craftsupplies Artisan Dyes. They're alcohol based and I've been happy with many of the results. Some will say there are better dyes but I can't address that because I've never tried any others.
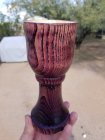
What I can say is that even after several years and dozens of dyed pieces every thing I do with dye is still an experiment. Each piece of wood will accept the dye differently. I don't think it's necessary to buy all of the colors unless you want the result to be a specific color. Start with black, red, yellow, and blue. With those 4 colors you can blend and get just about any color. Most wood benefits from being dyed black to begin. Dilute the black dye with denatured or isopropyl (rubbing) alcohol, about an ounce of alcohol and several drops of dye, and give the area you're dying an even dose of color. I use a small can to dilute the dye and apply it with cotton balls. Good rubber gloves are a must. Let it dry and rub it down with a dry paper towel. Then sand it back to reveal the bare wood, as much or little bare wood as you want. From here on it's an experiment. You can't remove the dye but you can sand it back again, add a different color, and the results just keep changing. The black base makes any of the colors have a richer, deeper look. But if you want a bright bold color, I guess you could skip the black. All of the colors are very concentrated. You can use them straight out of the bottle but I've found that diluting them significantly makes blending the colors much easier. If you're dying a very large area you'll need to keep the surface "wet" with alcohol to keep the dye from drying and creating hard lines at the edge of the dryed area. I spritz it with a spray bottle of alcohol. The colors will always appear somewhat dull until you apply a finish. The finish is what makes them really pop. Also, sanding lines will really pop out and show with dye so make sure you have a well sanded surface to begin with and sand between colors with finer grits so you don't create lines. I've never really had a bad experience, just quite a few that didn't turn out like I was expecting. The more 'character' in the wood the better. Have fun!
What I can say is that even after several years and dozens of dyed pieces every thing I do with dye is still an experiment. Each piece of wood will accept the dye differently. I don't think it's necessary to buy all of the colors unless you want the result to be a specific color. Start with black, red, yellow, and blue. With those 4 colors you can blend and get just about any color. Most wood benefits from being dyed black to begin. Dilute the black dye with denatured or isopropyl (rubbing) alcohol, about an ounce of alcohol and several drops of dye, and give the area you're dying an even dose of color. I use a small can to dilute the dye and apply it with cotton balls. Good rubber gloves are a must. Let it dry and rub it down with a dry paper towel. Then sand it back to reveal the bare wood, as much or little bare wood as you want. From here on it's an experiment. You can't remove the dye but you can sand it back again, add a different color, and the results just keep changing. The black base makes any of the colors have a richer, deeper look. But if you want a bright bold color, I guess you could skip the black. All of the colors are very concentrated. You can use them straight out of the bottle but I've found that diluting them significantly makes blending the colors much easier. If you're dying a very large area you'll need to keep the surface "wet" with alcohol to keep the dye from drying and creating hard lines at the edge of the dryed area. I spritz it with a spray bottle of alcohol. The colors will always appear somewhat dull until you apply a finish. The finish is what makes them really pop. Also, sanding lines will really pop out and show with dye so make sure you have a well sanded surface to begin with and sand between colors with finer grits so you don't create lines. I've never really had a bad experience, just quite a few that didn't turn out like I was expecting. The more 'character' in the wood the better. Have fun!
Curtis,I've been experimenting with dye for the last couple years. I've been using the Craftsupplies Artisan Dyes. They're alcohol based and I've been happy with many of the results. Some will say there are better dyes but I can't address that because I've never tried any others.
What I can say is that even after several years and dozens of dyed pieces every thing I do with dye is still an experiment. Each piece of wood will accept the dye differently. I don't think it's necessary to buy all of the colors unless you want the result to be a specific color. Start with black, red, yellow, and blue. With those 4 colors you can blend and get just about any color. Most wood benefits from being dyed black to begin. Dilute the black dye with denatured or isopropyl (rubbing) alcohol, about an ounce of alcohol and several drops of dye, and give the area you're dying an even dose of color. I use a small can to dilute the dye and apply it with cotton balls. Good rubber gloves are a must. Let it dry and rub it down with a dry paper towel. Then sand it back to reveal the bare wood, as much or little bare wood as you want. From here on it's an experiment. You can't remove the dye but you can sand it back again, add a different color, and the results just keep changing. The black base makes any of the colors have a richer, deeper look. But if you want a bright bold color, I guess you could skip the black. All of the colors are very concentrated. You can use them straight out of the bottle but I've found that diluting them significantly makes blending the colors much easier. If you're dying a very large area you'll need to keep the surface "wet" with alcohol to keep the dye from drying and creating hard lines at the edge of the dryed area. I spritz it with a spray bottle of alcohol. The colors will always appear somewhat dull until you apply a finish. The finish is what makes them really pop. Also, sanding lines will really pop out and show with dye so make sure you have a well sanded surface to begin with and sand between colors with finer grits so you don't create lines. I've never really had a bad experience, just quite a few that didn't turn out like I was expecting. The more 'character' in the wood the better. Have fun!
Thank-you very much for the in-depth reply. It is always hard to know which direction to take, without making some expensive mistakes. It look like I can order the 4 colors you recommend for not much money for the 1.7 oz bottles. I will give it a try and play around. Thanks again.
The current American Woodturner issue has a great article that covers dyes and airbrushing. Even if you don't use an airbrush, there is good information to learn about the dying process.
- Joined
- Jan 27, 2005
- Messages
- 13,223
- Likes
- 5,851
- Location
- Dalworthington Gardens, TX
- Website
- pbase.com
I have used TransTint, Artisan, and Chestnut dyes. Since I started using Chestnut dyes a few years ago they have become my favorite because the colors are by far the most vibrant of the three. My opinion of the Artisan dyes is that they are very weak and drab looking in comparison to the others.
I tried using Transtint and did not like the way it got uneven coverage on the wood. Maybe I am doing something wrong. For little things, however, I painted pieces with red artist ink and then when dry, used 1000 grit paper lightly to take off the whiskers and then wipe on poly. Gave a great uniform intense color. Years ago, I finished some small pieces of furniture using black india ink and the same process. Looked like ebony.
I use both Chestnut Stain and TransTint dyes. I think they both have their places. I usually use Transtint straight out of the bottle when just dying a local area that has been textured. For those pieces I always use sanding sealer first to prevent the dye from “jumping” out in unwanted areas. I also use Fiebing's Black Leather Dye. One advantage of the Chestnut Stain is it comes in white. Not necessarily good for making the wood white, but great when mixed with red to get pink and shades of colors. I do avoid using water based dyes.
- Joined
- Apr 27, 2004
- Messages
- 9,334
- Likes
- 6,159
- Location
- Lakeland, Florida
- Website
- www.hockenberywoodturning.com
I like chestnut for colors other than black
Easy to work with and blend the edges.
Also can be removed to lesson the intensity using cloth or sponge damped with alcohol
Or spritzed with alcohol to let the colors flow around a bit.
for black - Fiebings USMC leather dye
Easy to work with and blend the edges.
Also can be removed to lesson the intensity using cloth or sponge damped with alcohol
Or spritzed with alcohol to let the colors flow around a bit.
for black - Fiebings USMC leather dye
I've been coloring wood with stains and dyes for many years. There are many variations of products available. Although not 100% universally accepted, typically stain refers to a product with larger colored pigment particles like highly thinned paint, like Minwax stains, and use a binder. Dyes have microscopic sized particles that go into solution with the solvent carrier and don't have a binder. GF "dye stains" use dye with a binder - the list goes on.
IMO the best place to start is to get more knowledgeable about coloring wood - just what are all those products and how do they work. I recommend Understanding Wood Finishing by Bob Flexner / Pub: Reader's Digest 2005. I primarily use Transtint for water / alcohol / lacquer solvent products and WD Lockwood powdered oil based dyes (dissolve with acetone and naptha) for oil based products like poly. I've never used the Chestnut Spirit Stain several mention, but based on the name and the limited info I could find, it is probably a dye with shellac mixed in as a binder. The white probably contains pigment. Adding a little shellac to Transtint will create a "spirit stain". I've done this many times to achieve much more brilliant intensity of color with Transtint. Transtint is great for making toner coats which adds color intensity and depth - the picture below doesn't do justice to the depth and brilliance of this maple vase, colored with Transtint and finished with solvent lacquer.
I use transtint when I will be topcoating with a thicker film building finishing that will be rubbed out. I use the Lockwood dyes mixed into thinned poly for a more subtle color and a thin wiped on finish. There are so many options - describe what look are you after to narrow the options.
Thanks Bill, an informative article.
Just this past weekend I did an experiment with Chestnut Spirit Stains... From my understanding poplar doesn't take dye very well, but I figured I'd give it a shot anyways... not completely satisfied, but neither am I completely dissatisfied... I definitely learned I have much more learning to do though. ")
Attachments
Actually poplar takes dye all too well - called blotching. Using a blotch controller helps even out the color. I have a write up I’ll post. Your results are typical for a dye with a binder applied on the lathe. You might try applying off the lathe or with it not turning and wiping with the grain. It will help wipe the dye and binder out of the negative grain. If a lot of color intensity is wanted, the best I have found is to apply the dye without binder, alcohol works better that water - no raised grain - then spray toner coats to get the desired evenness and intensity without build up in negative grain.
Link to blotch control https://www.lumberjocks.com/OSU55/blog/81210
Link to blotch control https://www.lumberjocks.com/OSU55/blog/81210
Last edited:
Actually poplar takes dye all too well - called blotching. Using a blotch controller helps even out the color. I have a write up I’ll post. Your results are typical for a dye with a binder applied on the lathe. You might try applying off the lathe or with it not turning and wiping with the grain. It will help wipe the dye and binder out of the negative grain. If a lot of color intensity is wanted, the best I have found is to apply the dye without binder, alcohol works better that water - no raised grain - then spray toner coats to get the desired evenness and intensity without build up in negative grain.
Well, that definitely explains the "blotching" I ended up with
")
It's all still experimental for me, but thanks for your tips!
- Joined
- Feb 6, 2010
- Messages
- 3,520
- Likes
- 2,597
- Location
- Brandon, MS
- Website
- threeringswoodshop.square.site
Not Sure about blotching with dye but for stain use a wash coat of thinned finish and then apply stain .
Now as to dye I use Chestnut and Chroma Craft. The Chestnut seems to allow more of the grain to show and then ChromaCraft is much darker but seems to also be more vibrant. There are many methods to apply dye. The method Curtis told you about is one that allows a multitude of color in one piece. In the same idea but wwith out the base coat you can use a paper towel to blot on color in different areas and then apply another color using the alcohol spritz to blend the colors. One thing to remember is your color wheel. When dyes are mixed they do create another color, Blue + Yellow= Green and many more.
As to using a airbrush you can get a more even transition of colors but also more mixed color.
The first image is airbrushed and the second is a blotted on . The platter is the method Curtis was referring to.
I've usually leaned towards more subtle, darker colors when I've dyed wood. Just my own personal taste. But I've been teaching my grandson to turn pens lately and when I turn him loose and let him do whatever he likes, well he has a lot more vivid imagination than his grandpa. He does some pretty wild shapes and colors. These are some from this fall that he made pretty much on his own. Pens are a really good way to experiment with dye.
Those are some good looking pens! I like the colors and that he has found a way to do something different with the shapes. They still look like they would fit well in the hand, too.
I read some of the reference material on wood bleaching and want to give that a try before coloring.The current American Woodturner issue has a great article that covers dyes and airbrushing. Even if you don't use an airbrush, there is good information to learn about the dying process.
I agree--very creative and appealing pens!
One of the most striking experiences working with brand new, high school aged student turners is the unconventional things they dream up to make. They are uninhibited by what the experts say or do, or the standard teachings on form, balance, whatever. What they make is wonderful. Goofy, bizarre, unartful, but brash and brand new.
One of the most striking experiences working with brand new, high school aged student turners is the unconventional things they dream up to make. They are uninhibited by what the experts say or do, or the standard teachings on form, balance, whatever. What they make is wonderful. Goofy, bizarre, unartful, but brash and brand new.
- Joined
- Feb 6, 2010
- Messages
- 3,520
- Likes
- 2,597
- Location
- Brandon, MS
- Website
- threeringswoodshop.square.site
I left off one thing and dean's post reminded me. All woods have an inherent color which is not always obvious and this affects the dye color. If you want the color to be like the dye you use you will have to bleach the wood.
The current American Woodturner issue has a great article that covers dyes and airbrushing. Even if you don't use an airbrush, there is good information to learn about the dying process.
I left off one thing and dean's post reminded me. All woods have an inherent color which is not always obvious and this affects the dye color. If you want the color to be like the dye you use you will have to bleach the wood.
There are couple of articles on bleaching referenced at the end of this article. Haven’t tried it yet but anxious to do. The dying I’ve done so far has not satisfactory so I think bleaching will help.
I want to thank everyone for their great insight. This gives me a good start on where to head next.
well you got him off to a great start, really like his designs and color, he will be good turner, have him to keep up the good workI've usually leaned towards more subtle, darker colors when I've dyed wood. Just my own personal taste. But I've been teaching my grandson to turn pens lately and when I turn him loose and let him do whatever he likes, well he has a lot more vivid imagination than his grandpa. He does some pretty wild shapes and colors. These are some from this fall that he made pretty much on his own. Pens are a really good way to experiment with dye.View attachment 31281
While on the subject of dyes, I had an interesting thing happen to me with dyes. I was making a Sputnik Sea Urchin finial and used undiluted Color Tone dye, Red Mahogany, from Stewart McDonald. I had this from when I worked on guitars. The wood was white ash and I applied shellac to it. When I applied dye it turned a deep dark green. I thought okay that looks good. So I then sprayed with Deft Lacquer finish and it turned back to deep red. Just would like to know what went on here. Very strange to me but I’m no dye expert. Anyone have an explanation?