• Congratulations to Dave Potts, People's Choice in the August 2025 Turning Challenge (click here for details)
  • Congratulations to Ted Pelfrey for "Cherry Burl" being selected as Turning of the Week for September 1, 2025 (click here for details)
  • Welcome new registering member. Your username must be your real First and Last name (for example: John Doe). "Screen names" and "handles" are not allowed and your registration will be deleted if you don't use your real name. Also, do not use all caps nor all lower case.

Weight Loss

Randy Anderson

Beta Tester
Beta Tester
Joined
May 25, 2019
Messages
1,010
Likes
1,661
Location
Eads, TN
Website
canthony.gallery
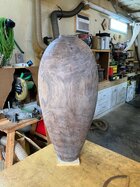
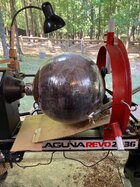
I know a lot of folks weigh their pieces to determine when dry enough to finish. I don't but recently decided to track the weight loss on a large walnut hollow form I finished. Interesting to me to see in writing just how much water and material weight that gets lost from start to finish, especially in the final step. Approx 18lbs of water in a 28" piece that's 1/2" or less wall thickness. About half of its weight before drying was all water. Likely the same on a small bowl but really strikes me when seen at this scale. I do twice turn the outside after the piece is dry but on this piece it was a very very light cut or sheer scrape of dry wood to get it cleaned up so not much weight loss from that step.

Initial 32" log weight - 300lbs
Turned round end to end - 192lbs
Turned to outside shape (28" x 14") - 128lbs
Hollowed to thickness - 37lbs
Dry, sanded and ready for finish - 19lbs
 

Attachments

  • IMG_0225.jpg
    IMG_0225.jpg
    558.8 KB · Views: 34
I know a lot of folks weigh their pieces to determine when dry enough to finish. I don't but recently decided to track the weight loss on a large walnut hollow form I finished. Interesting to me to see in writing just how much water and material weight that gets lost from start to finish, especially in the final step. Approx 18lbs of water in a 28" piece that's 1/2" or less wall thickness. About half of its weight before drying was all water. Likely the same on a small bowl but really strikes me when seen at this scale. I do twice turn the outside after the piece is dry but on this piece it was a very very light cut or sheer scrape of dry wood to get it cleaned up so not much weight loss from that step.

Initial 32" log weight - 300lbs
Turned round end to end - 192lbs
Turned to outside shape (28" x 14") - 128lbs
Hollowed to thickness - 37lbs
Dry, sanded and ready for finish - 19lbs
picture?
 
I know a lot of folks weigh their pieces to determine when dry enough to finish. ...
Turned to outside shape (28" x 14") - 128lbs
Hollowed to thickness - 37lbs
Dry, sanded and ready for finish - 19lbs

Yikes, that's a huge turning! You must be related to David Marks. :)

It's surprising how much water is in wood.
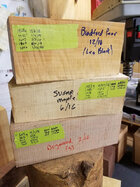
I rarely turn wet wood but I do process a lot of wood into blanks to turn dry. I track the dryness by casual periodic weighing.
I write the date and weight (in grams) on a piece of tape stuck to the blank, or at least to a typical blank or two from a batch.
When the weight quits dropping (or starts to go up) I know the blank is dry. I do the same for rough turned bowl blanks and hollowed things.

I cut blanks on the bandsaw and seal at least the end grain.
I usually cut up a log section to get the largest blanks possible while keeping away from the pith and unstable juvenile wood.
I've cut blocks up to 12x12x16".

It's surprising to some how long blanks take to dry. Some spindle blanks from cherry might be dry in a few weeks; I've had some large pieces that took over 10 years. I have to chuckle when I hear someone say a log "has been drying for months so it's prob good and dry now"!

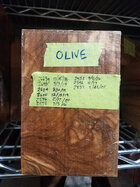
Some pics from a few years ago.
The olive was purchased dipped in hot paraffin, quite wet inside. (After 7 years it's down to 2306g, still changing)
I usually scrape off most of the wax after I judge it's past the cracking stage.
drying_tracking.jpg drying-olive.jpg

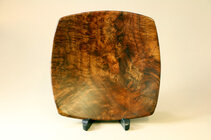
I have had some big wood given to me that was dry - one was a big mahogany mantel hanging over a fireplace for decades. And some big rounds of figured english walnut from a guy who said they were old when his dad got them 40 years before! Incredible stuff. I made this from a piece.

penta_plate_walnut_IMG_46.jpg

I do have pin and pinless moisture meters but they are not as reliable as the weight method.

JKJ
 
John, I seldom turn dry wood. Most everything I turn is freshly cut down or sealed and stored out back in log form. Yep, logs sealed for years are still full of water. I boil my pieces once I get them shaped out. Greatly reduces the drying time and minimizes cracking. You might want to consider it if your'e trying to move a specific piece along the way a bit faster.
 
Hey Randy. Most of the bowls, platters and hollow forms I turn are from wet wood (it’s cheaper). I rely on weight a great deal. Typically, a 2,000 gram walnut bowl turned wet will lose up to 400 grams in the first 10 days in my climate. Then it will take about 6 months to stabilize at about 1,100 grams. From here it goes in my heated box at 35 to 42 degrees C. Then it will typically lose about another 150 grams over the next 4 to 6 weeks. Then it’s ready for the second turning. There’s something very satisfying about seeing the weight stabilize. Interestingly, when this typical bowl is removed from the heated box, it will usually gain perhaps 50 grams of weight due to moisture gain.

Would like to see some pics of your hollowing setup for a piece this large. It’s very impressive!
 
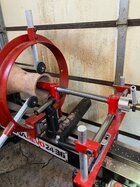
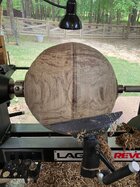
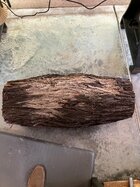
Kevin, I use the hollowing system made by Keith Clark. Here are few pics of it with the 1 1/4" bar set up. I also have a 1 3/4" bar for when I get toward the bottom on really deep pieces. Same setup just different collars and a lot longer. I just finished turning this 18" round one a couple days ago. It's been boiled and up in the drying box now. Getting ready to start the large mesquite piece on the shop floor. It's 36" long so I hope to get a 32" piece out of it.
 

Attachments

  • IMG_0182.jpg
    IMG_0182.jpg
    576.5 KB · Views: 28
  • IMG_0210.jpg
    IMG_0210.jpg
    666.9 KB · Views: 26
  • IMG_0197.jpg
    IMG_0197.jpg
    615.1 KB · Views: 26
  • IMG_0226.jpg
    IMG_0226.jpg
    643.1 KB · Views: 25
Kevin, I use the hollowing system made by Keith Clark. Here are few pics of it with the 1 1/4" bar set up. I also have a 1 3/4" bar for when I get toward the bottom on really deep pieces. Same setup just different collars and a lot longer. I just finished turning this 18" round one a couple days ago. It's been boiled and up in the drying box now. Getting ready to start the large mesquite piece on the shop floor. It's 36" long so I hope to get a 32" piece out of it.
I found your large HF blog in the Projects Forum. Outstanding! One question, how long would you boil a 15 inch bowl? I’ve never done it but now I’m interested in trying it.
 
John, I seldom turn dry wood. Most everything I turn is freshly cut down or sealed and stored out back in log form. Yep, logs sealed for years are still full of water. I boil my pieces once I get them shaped out. Greatly reduces the drying time and minimizes cracking. You might want to consider it if your'e trying to move a specific piece along the way a bit faster.

And I seldom turn wet wood! The other John Jordan, the late great one, was right there with you - told us once "only turn wet wood." He told me he liked to get entire large logs delivered and set up off the ground. Never sealed the end grain. When ready to turn something he would cut off 6", throw it away, mark and cut his blank, take it in the shop and turn it right then.

Yes I know of the advantages of boiling, have done some. Worth repeating in case some don't know.

The late Jim King, wood exporter from Iquitos, Peru told me they boiled all bowls in a 55gal drum over a wood fire. I got some incredible large blocks of rare tropical wood from Jim and he warned me to boil them to prevent disintegration. One block was this (now all used up!):
http://hobbithouseinc.com/personal/woodpics/pink flamewood.htm

And Steven Russel used to have a wonderful web site with a lot of info on boiling (and other great articles) based on experience and research. I was dismayed when his site disappeared. I found it on the internet archive and downloaded and set up a local mirror on my own computers.

One warning about boiling that is worth repeating occasionally, especially for those interested in getting started - don't boil larger round things that just barely fit into a pot or container such as a convenient turkey fryer. Steven Russell put it like this:
"Boiling Green Wood - CAUTION: Do not load pieces into your pot that are near the same size as the maximum diameter of the pot. When the wood takes up water during the boil, it will expand in size. If the piece is near the same size as the pot’s diameter when you place it in the pot to boil, the wood will swell, creating a tight fit, or plug in the pot, causing a build-up of pressure under the plug.​
This is a dangerous condition that can cause severe injuries. For safety, always allow 6" of free space around your boiled pieces in the pot as a safety margin. For example, if your pot measures 24" in diameter, the maximum size piece you should ever boil is 18". If you need to boil larger pieces, get a larger pot, observing the 6" safety margin."​

I have turned a variety of twice-turned green wood things, bowls, hollow forms, even lidded boxes, and some natural edge things, but in general the typical green turning doesn't grab my interest. Some might consider it a shame NOT to turn green since TN is a major national hardwood epicenter.

Yes, green hardwood wood is free here and dry wood is expensive if you have to buy it, especially larger sizes, and hard, dry wood presents certain challenges. However after many years of processing wet hardwood into dry blanks, I have have enough dry wood for at least three lifetimes of turning.

I found I simply prefer what I consider the many advantages to turning dry. And I LOVE to turn relatively small things, sometimes very challenging detailed things. I have enough justification for THAT addiction that about 10 years ago did a club demo I titled "The Top 10 Reasons to turn Small" :)

And it's nice there is room for all without worrying about a raid from the woodturning mafia or even getting kicked off the forums. :)

JKJ
 
Kevin, the rule of thumb I've been told and read is 1 hour per inch of thickness. I've seen different times but I don't think it's that critical if you go over. There are some online articles that go over it as well. My pieces are always around 1/2" - 3/4" thick. Often thicker in the base with the tenon and the bottom curve. I boil for 1 hour or a little longer on all of them, regardless of thickness. That's 1 hour of actual boiling time. Put the piece in, start the heat, once it starts boiling start the timer for 1 hour or more and then cut off the heat. I let it stay in the water overnight and cool slowly. I think taking it out of boiling hot water to cool in the open air would be a bit dangerous and just asking for trouble. You'll then need to put it somewhere to dry. For bowls I would use a paper grocery bag. For my vases I put them in large cardboard boxes with tube fans to extract the moisture from inside.
 
Kevin, the rule of thumb I've been told and read is 1 hour per inch of the thickness.

That agrees with Steven Russell, after his extensive testing in 2000 with the help of several friends - he said they tested with 450 bowls, species were Maple, Walnut, Mulberry, Sycamore, Pecan, Winged Elm, White Ash, Flowering Plum, Bodark, Sweet Gum, Black Ash, Cottonwood and a few others.. He wrote:
"I boil most of the items for one full hour per inch of wall thickness, under a low to medium heat (not a simmer, not a full rolling boil).​
When boiling green wood, begin your one-hour timing (after placing the bowls into the pot) when your pot RETURNS to a boil!"​
I have more boiling info in my archives. If anyone is itching for some of it send me a private message. I think it's OK to put snippets here but not to publish the article. I wrote to Steven a few years ago to ask about this bug never saw a response. Others I know have also kept up with him but have no definitive info. At one point I heard he was considering moving to Hawaii.

JKJ
 
Randy, how do you normally decide when a piece is dry enough for finish turning? And how do you deal with what I assume is the included pith on some of these large pieces? Very impressive work, by the way.
 
Thanks Kevin. For moisture level I use one of the common 2 prong meters that a lot use. Stable MC where I live is about 13%. When a piece gets to 13% or less all over, especially on the end grain at the bottom where the piece is a bit thicker, I consider it ready for the next step. I’ve used the same process on countless pieces over the years with good predictable results. I take it slow and usually let a piece sit in the open air in the shop for a while before I start the second turning just to be sure it’s stabilized.

Cracks can be an inevitable common part of pieces this large, especially around the pith on a side grain turned piece like the round one in the pic. It has some good sized cracks on each side. This much wood real estate and movement creates more opportunity for them to occur. While no cracks is great, I don’t see them as an issue. I fill them with dark black GFlex epoxy before the final turning and move on. They’re not an issue on a piece like this and can actually blend in to add character.
 
Last edited:
Humans—and I suspect trees—are about 70% water.

My books indicate that depending on species, season, and environment, green wood is often 50% water but can be higher, 60% or above.

The moisture meters are good to have on hand but can be inaccurate. For example, due to the natural internal moisture gradient of air drying wood, pin meters can measure the moisture near the surface but the middle of a chunk may be wetter. The deeper the pins are inserted, but better, but some wood is too hard to insert pins very deep by hand. Pins also make holes in the wood, of course.

Pinless meters are non-destructive and can measure deeper, maybe 3/4 or 1" down from the surface, but they need a flat surface to work from. Another problem is they (at least the one I have) must be told something about density of the species. Mine came with a booklet showing what calibration numbers to set for specific species, with more species on a website. It takes some time to select the correct number, at least on mine, so checking various species can be a pain. Also, there is also natural variation between different specific trees. That said, the pinless is wonderful for a quick check, especially for boards of common species.

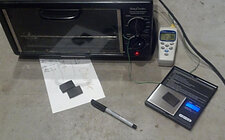
A more scientific way to determine the absolute moisture content is the Oven Dry Method. This is destructive in that it needs to have a small sample cut from the wood, best from the center away from the ends and sides. It involves carefully measuring the weight of the sample then heating it to a specified temperature and reweighing until the weight no longer changes. A formula using the starting and ending weights will give the absolute moisture content of the wood.

I once got a quantity of ebony and the dealer coated the pieces in wax as a matter of course - he did that with most wood to defend against possible cracks. I wanted to know the true moisture content so using a sensitive calibrated scale (good to 0.01 grams), a toaster oven, and a thermocouple to monitor the heat, I did the test on several small samples cut from the middle of one piece of the ebony. It took a while but I determined the wood was dry inside to the EMC of my indoor shop environment, about 9%.
Oven_dry_MC_ebony.jpg
The simple formula: The Absolute Water Content = ((Weight of Wet Sample - Weight of Dry Sample) / Weight of Dry Sample) * 100%

The reason I like the method of monitoring the weight of an entire blank when air drying is it's quite accurate for the specific environment. My shop has heat and air conditioning so if I turn something, say a lidded box, and give it to someone who keeps it inside their house, the chances of warping are reduced.

Warning: a topic tangent below - but directly related to moisture in wood!

Many of us know about and make Beads of Courage boxes for kids with cancer to store their beads. Unfortunately, I've seen SO many with unforgivably sticking lids. At one symposium I checked 10 boxes turned in and the lids were stuck on 5 of them. Ack. The wood can't help it - it naturally changes with the humidity.

The guy who collects them at our club told me he has to fix most of them before taking them to the children's hospital.

Woodturners are taught to make a suction fit that makes a little "pop" when opening - a Woodturner's a badge of skill. Thing is, real people don't like suction fit. For example, no one want's to pick up a jewelry box with two hands to remove the lid. Kids with cancer and other physical problems don't need to fight with the lid of a Beads of Courage box to get it open. I started teaching and making most boxes BOC and others, with tapered lids, either inside or outside tapers, both work, EVEN if made from face grain wood.

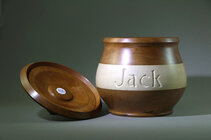
I made this BOC box made for a little boy named Jack with an external taper on the box. The taper inside the lid fits over the box rim.
The wood is cut from 8/4 lumber, cherry and basswood for the chip carving, layers rough turned before glueup.
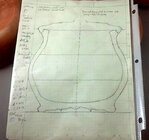
(I make drawings for many turnings - if I design at the lathe by letting the wood "speak to me" it sometimes speaks in cursive.)
BOC_C_Jack_01_small.jpg boc_drawing_smaller.jpg

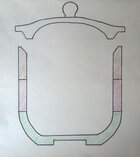
This drawing shows how I make an internal taper on the box so the lid fits inside.
Both the internal and external tapered lids can always be lifted with one hand, even if the wood warps a bit with the season.
BOC_drawing_D.jpg

OK, I quit now...

JKJ
 
Last edited:
Does wood loose it's tanin when boiled? If not, could this be a problem if using a plain uncoated steel container? If the tanin stays, could a dry first turned piece be boiled in rusty water and come out thoroughly ebonized? Could this process give a look more like the varied shades in bog oak?
 
Terry, when I boil walnut or black cherry the water turns dark black or deep deep red. Especially with black walnut. The water will be dark black. I've saved the water from boiling black cherry a few times and boiled a lighter color piece in the water later. In some cases some of the color transfers to the piece but, when second turned a lot if not all of it gets cut away. My boiling pot is an old large air compressor tank that I stood on end, cut the end cap off and put legs on the other end. Inside is painted with a thick coat of high temp engine/grill paint. It sits outside and I didn't want it to rust up again. Net, who knows till you try.
 
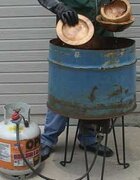
This is some of what Steven Russell wrote about boiling pots. He uses a cut-down steel 55-gal drum:

"I prefer to use a 55-gallon drum for the boiling pot. This has been cut down to 18" high. The pot is heated with a Cajun-style propane burner, which is typically sold to fry turkeys or boil seafood outside. If you live in a rural area, you can easily heat your pot with scraps from your studio. Whatever container you decide to boil in, use a pot that you can dedicate exclusively to timber boiling. The extractives in the timber will quickly make a mess of your boiling pot and you will not want to use it for anything else."​
1757274154949.jpeg
I didn't see any mention of tanins or ebonizing. I think all boiled pieces will be further turned after drying.​
Anyone who lives nearby who wants to boil: I have 55gal drums, smaller steel tanks, and a 110gal steel fuel tank I no longer need. (I bought a 300gal tank for diesel fuel deliveries.)​
And I have a plasma cutter and I'm not afraid to use it.​
JKJ​
 
Back
Top