• We just finished moving the forums to a new hosting server. It looks like everything is functioning correctly but if you find a problem please report it in the Forum Technical Support Forum (click here) or email us at forum_moderator AT aawforum.org. Thanks!
  • Beware of Counterfeit Woodturning Tools (click here for details)
  • Johnathan Silwones is starting a new AAW chapter, Southern Alleghenies Woodturners, in Johnstown, PA. (click here for details)
  • Congratulations to Peter Jacobson for "Red Winged Burl Bowl" being selected as Turning of the Week for April 29, 2024 (click here for details)
  • Welcome new registering member. Your username must be your real First and Last name (for example: John Doe). "Screen names" and "handles" are not allowed and your registration will be deleted if you don't use your real name. Also, do not use all caps nor all lower case.

Weird sanding marked

Joined
Sep 29, 2021
Messages
86
Likes
190
Location
Hatboro, PA
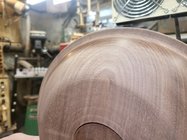
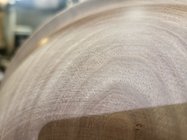
I am trying to teach a student,and we recently came across these weird "sanding" marks. They can't be sanding marks because we have just been sanding with cloth backed in a circular motion around 700-800. 12" shallow bowl. I have seen this before, I am pretty sure in Walnut, but I want to speak intelligently to it, but I cannot. They only show at 220. We were at 400, saw a mark we missed and went down to 220, and they showed up. Too me, it's like a alien crop circle.... can't figure out how it got there, and it goes away not before too long. Please help!!

Thanks everyone!!

1000011622.jpg
 

Attachments

  • 20240211_082947.jpg
    20240211_082947.jpg
    513.8 KB · Views: 30
Joined
Mar 19, 2016
Messages
1,190
Likes
1,283
Location
Haubstadt, Indiana
To me (guess) they look like tool marks that were not completely sanded at 150 grit. Many times I thought I got everything at 150 grit only to see something show up at 220. Just a guess.
 

Dave Landers

Beta Tester
Joined
Dec 1, 2014
Messages
813
Likes
2,515
Location
Estes Park, CO
Website
dlwoodturning.com
My experience with walnut is that it just likes to show sanding scratches. But they often don't show up till I've gone to higher grits - smoothing the surrounding surfaces. So I have to back up to whatever grit-sized scratches I find - sometimes two or three times. And I usually have to sand walnut to around 600 or 800 if I want what would be, on other woods, a 400 grit surface.
 
Joined
Apr 1, 2019
Messages
358
Likes
236
Location
Bashaw, Alberta
I can see sanding scrathes(random arcing scratches) and what look like tool marks to me(circles going all the way around the bowl). Or possibly sanding scratches from the lowest grit(80?) I suppose. A shear scrape or negative rake scraper can help get rid of them, or dropping back down to 120 or 180 grit. When I hand sand I usually do it at a slow speed, maybe 150 to 200 rpm max.
 
Joined
Jul 27, 2020
Messages
300
Likes
1,214
Location
Durham, NC
Lots of deep inline scratches. Are you sure your student took care to keep the sandpaper moving, speaking of hand held pad. The grit will carve into the wood if held still.

When power sanding, be careful not to use the wrong side of the spinning disk. So, sanding the outside, as you’re showing, only the left side of the disk can touch, the side going against the direction of rotation. The right side, going with the rotation will put nasty swirly scratches. Also swinging around toward the midpoint of the bowl, you will be using more of the top and left side of the disk. Running perpendicular to the rotation is ok. Stay away from the center of the disk. To power sand near the bottom of the bowl, you need to reverse the direction of the piece or of the sander, to be sanding again against the rotation.

The best, and only way I’ve found to avoid the issue of dropping back two or more grades after finding ‘new’ scratches is to sand alternately by hand holding paper, and power sanding. Sand handheld (I sand at 750), you should start at 120 given the look of those marks. Inspect it carefully. The ONLY scratches must be inline! Zero swirls. None. Look close with a raking light.
Then, sand by power, the goal being to simply eliminate all of the in-line scratches. Sand with the same grit as handheld. All scratches must be swirls or random looking. Again, look very closely with a raking light.

Personally, I continue this process through at least 800,,usually to 2000. No surprises when the sun hits it!
 
Joined
May 4, 2010
Messages
2,449
Likes
1,877
Location
Bozeman, MT
I have two thoughts. One is that it's from the edge of the sandpaper. I don't KNOW that this is a problem, but I find mystery scratches sometimes, and that's my theory. The second is that it could be leftover loose grits from prior sandpaper. If you don't clear those out, you'll have 1% 80 grit on your 220 paper. (same thing if you pick your dropped 220 sandpaper up off the floor and return to sanding)
 
Joined
Jan 29, 2023
Messages
10
Likes
11
Location
Eugene, OR
To get those sanding lines to go away I would do a test patch hand sand in the direction of the grain starting with one grit finer than the grit I think it was caused by. Then hand sand that area up to the finer grits to see if the lines went away completely. Start over going down a grit if it didn’t work.
Once you get the right culprit grit hand sand the entire bowl in the grain direction then resume sanding while turning as before. I’d check super carefully after each grit change and even hand sand in the direction of the grain each time. Caution your student not to use too much pressure on the paper or they’ll have the same issue all over again. Power sanding isn’t always the answer.
 
Joined
Jul 27, 2020
Messages
300
Likes
1,214
Location
Durham, NC
To add; consider your lights. As most know, sunlight shows all of the sanding and finishing flaws. The sun is a point light source, light rays only in one direction. Hard light that casts shadows in any defect.
Compare that with larger led shop lights, especially the strip lights. Great for most of our work since the light scatters, illuminating everything reasonably even. That scattered, diffuse light will hide all but the big honking scratches that you can almost feel.
Try it out. Use a flashlight only, then turn on general or lathe soft lights and watch the surface change, the scratches disappear.
 
Joined
Aug 14, 2007
Messages
5,493
Likes
2,844
Location
Eugene, OR
There are 2 different marks I see, the semi circular ones and the linear ones. Both are probably sanding scratches. If I start at 80 grit, which I do need to some times, I go to 100, then 120, then 150, and 180. I do wipe the dust off with my hand which will push finer dust into deeper scratches and high light them. Other things that can cause mystery scratches, if you have 3 inch discs and 3 inch pads, the edge of the pad can leave 80 grit scratches, as can the edges of the abrasives. My preference when sanding is to rotate the bowl by hand for the first couple of grits which allows me to see what I am doing and make sure I get all the abrasive marks out. This is not too difficult if you have an articulated arm for sanding, which is one of my videos. I can not sand without it any more since it holds my arm with the sander so the only thing I have to do with that arm is squeeze the trigger. Another thing some one said, "Never take a finished piece from the shop into the house on a sunny day because sunlight causes scratches." This is a matter of having good lighting, and natural sun light is what our eyes have evolved into seeing best in. I have multi spectrum lights for all of my detail work.

robo hippy
 
Joined
Aug 14, 2009
Messages
2,057
Likes
1,149
Location
Peoria, Illinois
Definitely sanding scratches. Nothing else makes tiny swirl marks. Always harder to remove on end grain. On walnut I wipe down the wood with a slightly damp cloth before going to the finest grits. Swells the fibers and scratch marks.
 
Back
Top