• April 2025 Turning Challenge: Turn an Egg! (click here for details)
  • Congratulations to Kelly Shaw winner of the March 2025 Turning Challenge (click here for details)
  • Congratulations to Guillaume Fontaine for "Nebules" being selected as Turning of the Week for April 6, 2025 (click here for details)
  • Welcome new registering member. Your username must be your real First and Last name (for example: John Doe). "Screen names" and "handles" are not allowed and your registration will be deleted if you don't use your real name. Also, do not use all caps nor all lower case.

What to do about cracks on a once turned bowl?

Joined
Jan 3, 2023
Messages
101
Likes
91
Location
Arnold, CA
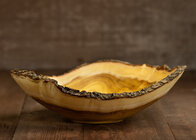
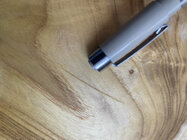
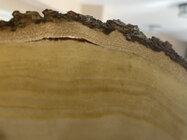
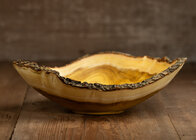
I green turned this mulberry bowl 5 days ago and have been drying it in paper bags since then. While drying a crack has started and the bark is starting to lift in one spot. It's turned fairly thick so it still has a fair amount of drying left. Wondering what advice you all may have to mitigate the damage.

It's from a friends birth tree, a tree her father who recently passed planted when she was born. It came down a few months ago and I was able to grab just a few pieces (it was cut into firewood lengths and left to crack unfortunately). I know it would mean a lot to her so I am hoping to try and minimize the cracking and bark lift. I tend to just chalk up cracks and losses as part of my experience as a newish turner but hopefully I can save this one and give it to her......

Thanks in advance!
 

Attachments

  • 014 copy.jpg
    014 copy.jpg
    209.9 KB · Views: 96
  • IMG_1481 copy.jpg
    IMG_1481 copy.jpg
    418.8 KB · Views: 96
  • IMG_1482 copy.jpg
    IMG_1482 copy.jpg
    258.9 KB · Views: 96
My experience with Mulberry is limited but what I've experienced, seen and heard is - it almost always cracks, a lot. My approach to cracks and other perceived imperfections is to either accept them as character and move on, accent them with some sort of color fill or try to hide/mask them. The last mulberry bowl I turned was full of cracks up through the end grain on both ends. The person that bought it loved it that way.

If you decide to hide them then you have to really hide them or they just look like repairs and can ruin the look. You could start putting CA glue on them and try to stop or slow them down. Risk is creating what I call snail trails in/on your wood or, since it's mulberry, you could end up with more CA than wood in some places. For bark that starts to pull away in a few places I sometimes let it finish drying then snap off the raised pieces, soak the pieces in water to make a bit flexible and then carefully trim and glue back in place. I've had times when it's a great blend that even I have trouble finding it. Other times it doesn't work out and I end up leaving a gap or snapping it all off.
 
Last edited:
In years past, I turned a fair bit of mulberry and the bark always wants to come off during drying. If it was my piece, I'd let it finish drying/moving around before I tried to do too many repairs. But if the bark is critical to you, you can soak the rim where the bark meets the wood with thin CA. You're smart to have left it relatively thick. Once it has settled down, all the usual tricks can be considered. Im crossing my fingers for you on the bark staying put... it's a good looking bowl you have there.
 
It's from a friends birth tree, a tree her father who recently passed planted when she was born. It came down a few months ago and I was able to grab just a few pieces (it was cut into firewood lengths and left to crack unfortunately). I know it would mean a lot to her so I am hoping to try and minimize the cracking and bark lift. I tend to just chalk up cracks and losses as part of my experience as a newish turner but hopefully I can save this one and give it to her......

Thanks in advance!I
I often remove the bark. The bowls often look better and the owner can use it.

It’s a lot more work to take the bark off but with the sap ring you will have a nice looking bowl.
I use dental picks an small flat chisels to remove the bark.
You’ll have a sweet looking rim without the bark. You can leave the top edge of the rim alone or color it.

Sans bark you have a bowl that can be used.
It’s easy to remove bark before the bowl dries a lot.

It could be a great popcorn bowl…..
 
Last edited:
Bark - can always use ca to hold an area on. As mentioned, removal is a good option, particularly if the bowl will be lifted up much - bark can be easy to break off on a finished piece. For me, if the bark stays on through finishing, I leave it. If a small piece breaks off I might ca it. Many I remove the bark if much of a piece breaks off.

Cracks - one 1 turn I leave as is, or I might repair - create sanding dust, add a bit of wood glue at the crack, sand the glue and dust into the crack, let dry, finish sand.

I turn mulberry thin, down to 1/8” or less for small pieces. Usually 1/8” or so thinner than other woods. No issues with major cracks - small ones are just part of the hobby.
 
Thank you all for the thoughtful and very helpful replies!
In the past when the bark starts to come off I just take the rest of it off as Hockenbery suggests. I'm keeping my fingers crossed that I can keep it on this time as I thought a live edge bowl would have more of a connection to the actual tree. If it keeps coming off and I peel it off I am sure she will still be very happy to have a bowl from a special tree. I might try to do a repair first as Randy suggests and if it looks obvious then it will be a natural edge instead of a live edge. Challenges like this are opportunities to learn and grow, thanks for helping in that quest!
 
Make sure when drying the bowl in the paper bag to use the shavings and stuff them around the bowl. This slows the drying process and reduces the chance of cracks because of a sudden change in moisture content. Or use a wood sealer like Anchorseal
 
Thanks Gabriel! I usually do shavings for the first day or two, then just a paper bag. How long do you typically use shavings?
 
Provided you can sand the piece while green- only the surface needs to be reasonably dry-I’ve had great results finishing the piece while green. This, of course is an oil or danish oil finish. Soak everything well and put it on the shelf!
 
if bark comes off, you can burn with a torch the exposed area and get a nice contrast. Have to be careful finishing as the char comes off on your hands and gets everywhere as you manipulate the piece to sand and stain/oil/seal.

Here’s an unfinished jacaranda piece I burned since the wood is boring and bark came off—turquoise in crack and pewa.
 

Attachments

  • IMG_6664.jpeg
    IMG_6664.jpeg
    413.5 KB · Views: 40
Check out this article on www.turnawoodbowl.com: https://turnawoodbowl.com/wood-bowl-crack-fix-secrets-woodturning-repairing-cracks/

He has a short video on fixing cracks but I didn't find right away so I gave up. Here's the summary: For small cracks, rub a little wood glue in the crack and immediately had sand the area. The heat from the friction will cure the glue and sometimes virtually make the crack disappear.
I’ve done this—learned from Kent—and it usually works pretty well for narrow cracks.
 
Provided you can sand the piece while green- only the surface needs to be reasonably dry-I’ve had great results finishing the piece while green. This, of course is an oil or danish oil finish. Soak everything well and put it on the shelf!
Marc, I agree. Thats what I did here as the surface was dry enough to sand. I finished with Tried and True original, I have always made the assumption that the wax would help slow drying a little bit.
 
Check out this article on www.turnawoodbowl.com: https://turnawoodbowl.com/wood-bowl-crack-fix-secrets-woodturning-repairing-cracks/

He has a short video on fixing cracks but I didn't find right away so I gave up. Here's the summary: For small cracks, rub a little wood glue in the crack and immediately had sand the area. The heat from the friction will cure the glue and sometimes virtually make the crack disappear.
Thanks Kent! Hopefully the crack stays small enough to use this method.
 
Marc, I agree. Thats what I did here as the surface was dry enough to sand. I finished with Tried and True original, I have always made the assumption that the wax would help slow drying a little bit.
I haven’t used t&t original, but use their varnish oil which I find too thick in general and, I think not the best choice for these purposes. My thought had been to get as much oil in to the wood as it will accept, hoping to flood the cells even as the water is leaving. So, something like walnut oil, linseed oil thinned 50/50 with turpentine. I like the extended drying time of turpentine as it soaks in deeply.
 
Make sure when drying the bowl in the paper bag to use the shavings and stuff them around the bowl. This slows the drying process and reduces the chance of cracks because of a sudden change in moisture content. Or use a wood sealer like Anchorseal
Shavings can also promote mold. I use yard waste bags because they are double thickness and no shavings. Every day or two I take out the bowl and put it inside a dry bag. I hang the wet bag on a clothes line and just keep rotating until the blank stops loosing weight.
 
DO NOT USE SHAVINGS IN THE BAG DRYING WET TURNED. WOOD !!!.

Mold and mildew like this condition where air cannot get at the wood surface.

I have for many years preached the use of the brown paper bag to slow down the drying of rough turned bowls, while the rest was preaching the submerging of the bowls in alcohol vats, or the use of 50/50 water and dishwashing soap submerging, you can still find these fallacies on the net, and now the use of shavings in the bags with the rough turned pieces.

With shavings either wet or dry you will have spots/areas where the wood sits against the shavings and the wood can not dry at all, and that is where the problems start.

You do not want to prevent the drying, just slowing it down is what you want.

Placing he bags in cooler places can have it slow down more than have it sit in a warmer area.
 
Like @Richard Coers ans @Leo Van Der Loo
No shavings. Shavings are a mold factory and don’t add anything to the process

The bags act as a humidity chamber. Keeps the fast drying endgrain moist while the long grain looses some moisture. Keeping the bags out of rapid airflow lets the moisture leave the bag slowly.

Every day for up to a week I swap the damp bags for dry ones.
Usually about a 5 days. Once the bags are dry I put the bagged bowl on a shelf for 8 months then set the bowl on shelf without the bag. Usually dry now
I check with a moisture meter.
My drying room is kept a 50% humidity with a dehumidifier.
In that environment wood dries to 9% MC
 
Agree with others, no shavings in the bag, for all the reasons they state. Been there did that.

“Paper bag drying” is its own process, and each turner will have to go through a bit of development. The environment the work will dry in has everything to do with success/failure. The best situation is to place the work in a consistent environment (temp and humidity). Keeping the work in a place that varies significantly in conditions just adds to confusion, as the work will not behave consistently. Recommend you dry them in an area that is environmentally controlled 24/7/365, such as the house.

All paper bags are not created equal. You need the same paper type and thickness to be consistent and predictable. I happen to double up on the bags, as 1 bag dries too quickly in my situation. Just be consistent with the environment and the bags, it removes variables from the process making it much easier to develop your process that works in your situation.
 
Last edited:
DO NOT USE SHAVINGS IN THE BAG DRYING WET TURNED. WOOD !!!.

Mold and mildew like this condition where air cannot get at the wood surface.

I have for many years preached the use of the brown paper bag to slow down the drying of rough turned bowls, while the rest was preaching the submerging of the bowls in alcohol vats, or the use of 50/50 water and dishwashing soap submerging, you can still find these fallacies on the net, and now the use of shavings in the bags with the rough turned pieces.

With shavings either wet or dry you will have spots/areas where the wood sits against the shavings and the wood can not dry at all, and that is where the problems start.

You do not want to prevent the drying, just slowing it down is what you want.

Placing he bags in cooler places can have it slow down more than have it sit in a warmer area.
I was taught to use shavings in the bag but I always got mold too. That's why I mentioned earlier I only do one or two days with shavings but I think after reading all of these replies I will stop using shavings at all.
 
I totally agree with Leo. Have tried many suggestions from this forum. After some major cracking and none on other items this is what works for me. I turn fairly large bowls 14 -16 inch diameters in Hickory, Maple, Horse Chestnut, Red Oak and currently have a ton of Walnut to turn. I have roughly 200 roughed out bowl in my heated crawlspace at a comfortable 70 degrees on average throughout year. Less than 5-10 have cracked, usually due to my experimenting while learning a process that works for me.
Turn bowl thickness 10 percent of dia. of bowl. Sometimes a bit larger depending on species. While turning I sometimes spray with a misting bottle of water on the exterior to slow drying time. Even wrap with plastic wrap if I am hollowing and its going to take a while to rough out piece. I sand with 80 grit and round all sharp edges and use CA glue on all large knots or defects that might cause a problem later. After turning , place bowl in place in sink and run water over entire bowl like washing a bowl, and wipe with towel so bowl isn't dripping wet and take a few photos for my records. I then let it dry for an hour or two on the workbench and use anchor seal on entire bowl and use a thin glue water mixture on the tenon, depending on species.Place it in a large heavy duty lawn leaf bag. Close it and check in 2-3 days. Change to new bag and check in a week. Take it out and let it sit in shop for 2 weeks. Place in crawlspace and see you in a year. Hackberry 8 months, again depending on species. Just seems to work for me.
 
to summarize, basically what is done with cracks depends on personal preference and goals for the piece: ignore, repair, or enhance. Ignore speaks for itself. Repair can be with CA or Titebond, with or without sawdust, pewa or other wood bridges. Enhancement is a whole ‘nother thread.

And general consensus is to dry without shavings in the paper bag—1 or 2 depending on environment. Also, rough turn thickness to 10% of the diameter.
 
Last edited:
Like @Richard Coers ans @Leo Van Der Loo
No shavings. Shavings are a mold factory and don’t add anything to the process

The bags act as a humidity chamber. Keeps the fast drying endgrain moist while the long grain looses some moisture. Keeping the bags out of rapid airflow lets the moisture leave the bag slowly.

Every day for up to a week I swap the damp bags for dry ones.
Usually about a 5 days. Once the bags are dry I put the bagged bowl on a shelf for 8 months then set the bowl on shelf without the bag. Usually dry now
I check with a moisture meter.
My drying room is kept a 50% humidity with a dehumidifier.
In that environment wood dries to 9% MC
Good to know!
 
Or burn it. Not all the baby turtles make it to the sea.
My comment was not meant to discourage Kurt or anyone else from trying to salvage a piece that took an unexpected turn. That's a nice shape and the fact that it is from a treasured tree makes it a good candidate. Sometimes though the game is not worth the candle. I have plenty of pieces that for one reason or other wind up in the woodstove- less often from drying problems than from looking more clunky to my more experienced and critical eye than when I made them. I used to know a blacksmith who said he didn't sign his work because he didn't want to be linked to pieces he had grown out of.

I used to spend a lot of effort filling voids in burls with epoxy but gave up on that and now accept them as natural characteristics of the material. As David Ellsworth said (more or less), "People expect to see cracks in a piece of stone, why not in wood?" It all depends on the effect you are looking for. A wide open check in a polished piece looks equivocal. To my eye the best repairs are either invisible (think furniture restoration with fillers and graining- very difficult) or accept and accentuate the flaw with a decorative fix, like pewas or lacing a crack with wire or gluing in contrasting splines.

Rather than trying to fix the loose bark I would probably take off the rest of it. If the loose piece popped due to drying it suggests the tree was cut during its growth phase and all of the bark is somewhat tenuously attached. I like the look of a bark-free live edge, but again it can be a lot of work to get there if the bark has a varying marginal bond to the wood underneath
 
Last edited:
Shavings vs no shavings. Bag vs Box. Paper or plastic. Concrete floor vs wire shelf. Anchor seal vs whatever... etc... So many options.

Drying bowls is dependent on the climate and atmosphere where you dry the bowls. Not just the part of the world you're in, but also the local micro-climate of the place in your shop where your drying bowls are. It also depends on the wood you are drying - not just species, but the individual tree itself (harvested from a stream side vs a dry hilltop, fresh or standing dead...) Etc.

So what's gospel to one turner is worth listening to - but it might be merely be good advice, or something to try - and it might not work for you. You gotta just keep trying things till you hit on something that works well enough.

I moved into a new shop last November - just across town from the old place. But I'm having to reassess my drying protocol.
 
After letting this bowl dry for a couple more weeks I ended up trying Randy's method and it worked out pretty well. I broke the bark that had lifted up off a couple weeks ago so it could relive the stress on the rest of the rim. When I went to glue it back on I had to break it into a few pieces to get it back on as it was too big and no longer fit. There were gaps after i glued the pieces back on so I trimmed some of the leftovers and glued them in after the big pieces had dried.
The only mistake I made was sanding while the glue was wet-usually this works pretty good to hide the size gaps I had- but I wasn't careful enough and got some of the darker dust from the outer layer of bark in there and it made the repairs more obvious. If I was to do it over again I would sprinkle on sawdust that matched rather than sanding the piece itself.
But, there's so much going on in the bark that I am probably the only one that will ever see it and the wood and tree it came from has so much meaning that a few tiny flaws are insignificant.

Any other bowl and I would have just taken the bark off but I got it in my head that it should be live edge to be more connected to the actual tree itself since it was such an important tree to her. I am grateful for all of the advice and am very excited to give her the bowl. I made one for her mom too. This is from her birth tree, a tree her father planted when she was born. Her father recently passed away and the tree came down a short while later. I know it will mean a lot. My absolute favorite part of woodturning - making something from a tree that is special to someone and giving it to them.
 
Last edited:
Or burn it. Not all the baby turtles make it to the sea.
That line comes from the wonderful Kalia Kliban. She said that when I was interviewing her for the profile I wrote about her for American Woodturner. She had taken a bowl and just tossed in into the wood stove without a second glance. When I gasped and protested, that's what she said to me. Absolutely timeless. It has entered my family's lexicon. I literally have a box labeled "Dead Baby Turtles" in my shop. That's where the rejects go.
 
"Not all the baby turtles make it to the sea." :) I subscribe to the Kalia Kliban school of thought. I once rough turned over 100 bowls at one go over a few days. There was no way I was going to bag, Anchorseal, or otherwise treat that many bowls. (I'm lazy.) I keep them in my basement workshop which has consistent temperature and humidity year-round. Only about 3 of them cracked, none fatally, so it was a good trade-off.
 
Pacific madrone is my favorite wood to turn. Cuts like butter, and warps to no rhyme or reason. For reasons unknown, and this was an early spring harvested tree, my larger bowls were cracking. No dry shavings, and I had the rims wrapped with stretch film. I went to the paper bag inside a plastic bag, and changed out the paper bags a couple of times. That worked. As always, ask 10 people the same question, and you will get at least a dozen answers. Some times you have to experiment and change things up to see if that may help.

robo hippy
 
Back
Top