• Beware of Counterfeit Woodturning Tools (click here for details)
  • Johnathan Silwones is starting a new AAW chapter, Southern Alleghenies Woodturners, in Johnstown, PA. (click here for details)
  • Congratulations to Paul May for "Checkerboard (ver 3.0)" being selected as Turning of the Week for March 25, 2024 (click here for details)
  • Welcome new registering member. Your username must be your real First and Last name (for example: John Doe). "Screen names" and "handles" are not allowed and your registration will be deleted if you don't use your real name. Also, do not use all caps nor all lower case.

What Would You Do About These Voids

Joined
Jan 18, 2023
Messages
8
Likes
8
Location
Durham, NC
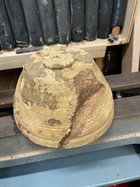
I have had this burl for more than 10 years. I took a woodturning class in (I think) 2011 and roughed it out green then. I never finished it mostly because I never figured out a plan for the voids. They are from digging out some very soft wood (I think cambium). Inside the bottom of the bowl there's some knotholes but those are easily filled with epoxy. I wanted to leave the voids but I think they're too big and the piece will fly apart when turning. At it's deepest its about 3/4 deep. There is one on the other side that doesn't hit the rim or the bottom of the bowl. At some point in the past I started filling it with blue resin (looking back that was a mistake IMO) so I may try to drill and chip it out. If I can't, I will figure out something similar for this side and live with it. Could I do something like turn the rim flat and then glue on a solid piece to hold the top of the rim together? Then figure out a creative way to stitch wood across the voids?
IMG_0057.jpeg
 

Randy Anderson

Beta Tester
Beta Tester
Joined
May 25, 2019
Messages
834
Likes
1,228
Location
Eads, TN
Website
www.etsy.com
Don't know what the inside looks like but from the outside I would turn down the rim dia until I got a solid top rim flat surface thick enough to then work the inside. Can then decide do you turn thin enough to have the inclusion go to the inside of the bowl like some of Leo's examples or leave thick enough that it's entirely an outside character feature.
 
Joined
Nov 15, 2020
Messages
431
Likes
279
Location
Huntington, VT
Rather than glue a piece to the rim which will have to be removed at some point to finish that area, stich over the voids with shaped wood bridges or plywood rings attached with hot melt glue.
 
Joined
Jan 18, 2023
Messages
8
Likes
8
Location
Durham, NC
Don't know what the inside looks like but from the outside I would turn down the rim dia until I got a solid top rim flat surface thick enough to then work the inside. Can then decide do you turn thin enough to have the inclusion go to the inside of the bowl like some of Leo's examples or leave thick enough that it's entirely an outside character feature.

The inside is solid except for a knotty section at the bottom that I can easily fill with epoxy. My goto for voids like that is epoxy mixed with coffee grounds. Through the years I have discovered that kcups have a finer grind and are better for that. I understand what you are saying about the rim. I want to preserve as much of the bowl as possible. As it sits now I can get a max of 10-11 diameter if I don't make it any smaller.
Rather than glue a piece to the rim which will have to be removed at some point to finish that area, stich over the voids with shaped wood bridges or plywood rings attached with hot melt glue.
I was thinking of attaching a piece to the rim that would be permanent. I would cut out a section of the rim sort of like a butterfly over a large crack, but I don't think it would look all that good. I like the idea of a plywood ring. I can true the rim, then attach the ring and turn+sand the outside, then wrap it in plastic and then do the inside. As an alternative I will see how much of the rim has to be cut off to get me back to a thickness where I can use Leo's idea.
 
Joined
Aug 6, 2009
Messages
694
Likes
498
Location
Lummi Island, WA
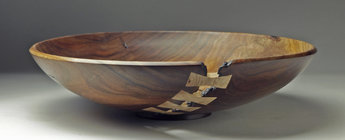
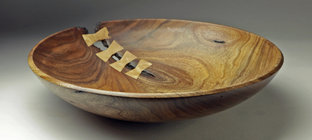
Another option is to turn it (stabilize the rim if needed with a plywood ring until done hollowing, then span the void with dutchmen so the bowl is at least still useful as a fruit bowl…
1FA697BA-92DB-4856-B7FA-5FBA676C4F2F.jpeg
 

Attachments

  • E30B0717-485D-4EE4-88DA-13CFD3F96687.jpeg
    E30B0717-485D-4EE4-88DA-13CFD3F96687.jpeg
    201.3 KB · Views: 9
Joined
Dec 16, 2022
Messages
111
Likes
173
Location
Mesa, AZ
I'm with Jeff Smith. Bowties do a great job of stabilizing without turning it into a resin casting turning
 

hockenbery

Forum MVP
Beta Tester
TOTW Team
Joined
Apr 27, 2004
Messages
8,592
Likes
4,888
Location
Lakeland, Florida
Website
www.hockenberywoodturning.com
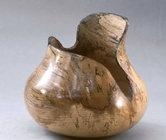
I like voids in hollow forms a lot more than in bowls.

This is a NE beech bowl 12”D that I turned from a blank with deep grooves in the bark contour.
Not a void but vaguely similar to your blank
4EA84941-6D01-422A-9841-6933359FED37.jpeg
 
Last edited:

odie

TOTW Team
Joined
Dec 22, 2006
Messages
7,076
Likes
9,487
Location
Panning for Montana gold, with Betsy, the mule!
I believe I'd continue to turn the outside until I get an acceptable, but natural looking imperfection. @Leo Van Der Loo is on the right track, IMHO.....although I'd first try to keep the flaw from coming through to the other side.....if I could.

If that didn't work to my satisfaction, I'd reject the whole thing, and go on to something else.

One of the sayings I have written on my wall is: "Don't mess with it, reject it".....and, I do believe in this philosophy. It's much more satisfying, in the long run, to go on to things that work for the better. Just about always, when I do go on to try and save bowls, and some of my severely handicapped bowls do turn out for the better, it's certainly a satisfying feeling to have saved it. However, the great majority of them turn out to be failures.....and, I have learned to accept the inevitable.

In my opinion, pewas, turquoise fills, stitching, and all of those obvious looking things that turners have come up with to save a handicapped bowl......they all look like repairs, and will always look like repairs. To my thinking, if I can't make a natural flaw look intentionally kept and aesthetic looking, it's not worth trying to put a band-aid on it.

-----odie-----
 

Michael Anderson

Super Moderator
Staff member
TOTW Team
Joined
Aug 22, 2022
Messages
1,327
Likes
3,784
Location
Chattanooga, TN
If you’re worried about the piece exploding (and you want to keep the voids), you can always wrap it in something while you hollow out the inside. Gaffers tape, duct tape, or even galvanized straps. Will still likely require light passes when you get close to the wall, but unless you get a bad catch, I doubt it will explode on you.
 
Joined
Jan 18, 2023
Messages
8
Likes
8
Location
Durham, NC
I believe I'd continue to turn the outside until I get an acceptable, but natural looking imperfection. @Leo Van Der Loo is on the right track, IMHO.....although I'd first try to keep the flaw from coming through to the other side.....if I could.

If that didn't work to my satisfaction, I'd reject the whole thing, and go on to something else.

One of the sayings I have written on my wall is: "Don't mess with it, reject it".....and, I do believe in this philosophy. It's much more satisfying, in the long run, to go on to things that work for the better. Just about always, when I do go on to try and save bowls, and some of my severely handicapped bowls do turn out for the better, it's certainly a satisfying feeling to have saved it. However, the great majority of them turn out to be failures.....and, I have learned to accept the inevitable.

In my opinion, pewas, turquoise fills, stitching, and all of those obvious looking things that turners have come up with to save a handicapped bowl......they all look like repairs, and will always look like repairs. To my thinking, if I can't make a natural flaw look intentionally kept and aesthetic looking, it's not worth trying to put a band-aid on it.

-----odie-----
I understand what you are saying. A couple weeks ago I had a piece of 8/4 walnut that was about 11" square. It was an offcut from a project. It had some large checks in it that made it unusable for flatwork. I thought I could turn it into a platter or something. After I got it round and started turning it I realized that wasn't going to work so I cut a dado about 3" wide and 1" deep in it to cut the checks out then tried filling it with a mix of mahogany, cherry and some thin walnut strips. After I did all that, it looked like crap. What I should have done was cut it all the way through and basically made a simple segmented platter. I could have probably saved it, but I threw it in the pile for my brother's woodstove. OTOH, this burl is a challenge and hopefully I learn a new skill. Some stuff I do say that it's not worth it and they go into the burn pile.
 
Joined
Jul 19, 2017
Messages
430
Likes
344
Location
Roscoe, Illinois
For me, it always comes down to whether I want to fix something or just go on to something new and different. No doubt all the methods suggested work, sometimes better than others. If you want the challenge, and that is what gives you satisfaction in this case, do it - try to save it with one of these suggestions. The result may be satisfying or it may just be a learning experience which you can apply to future bowls, the current bowl just being tossed in the trash. Sometimes I feel like trying to make the piece into something by trying different techniques and sometimes I just want to move on to something that interests me more. In the end, for me, it's always about what gives me satisfaction and keeps me interested. That's really all that matters.
 
Joined
Aug 6, 2009
Messages
694
Likes
498
Location
Lummi Island, WA
My fix above was experimental - living up north, my access to black acacia is limited to those times when good friends in California have logs on hand and I actually feel like driving A thousand miles to fetch enough to make. It all worthwhile. Rather than trying to install Hawaiian pewas (small patches for cracks that don’t penetrate to the inside) I decided to go large and turn the broad inclusion into a design feature With thru dutchmen visible from both sides. It does require an extra long router bit to account for the final wall thickness and the template thickness.
 
Joined
Jul 27, 2020
Messages
298
Likes
1,209
Location
Durham, NC
If it were me:
a lot of material needs to be removed to give a pleasing shape. One curve, rim to rim. That’s going to eliminate much of that void. I don’t like having a gap in the rim - not a deal breaker though. Also possible to reduce the rim diameter, a bit of a recurve. Keeping a graceful flow could be a challenge.

I would want to clean up that tenon, if possible. That’s about the only issue I see with continuing with the turning.

Filling the voids always looks like fixing a mistake or problem.

I typically avoid working with “special” wood. You are somehow then, required to make a “special” piece!
I prefer making bowls from logs, as many here do. Plenty of blanks from free wood. This way, it’s all about my craft, my vision. If the wood enhances the final, all the better. If I blow it, I don’t feel badly or feel that I have to save it. Each bowl is an experiment. Quite often, but not always, it works.
 
Joined
Aug 14, 2007
Messages
5,436
Likes
2,792
Location
Eugene, OR
You could turn it as is. If that is where you want to go, take the inside down in small stages, like 1 inch max, and make all finish cuts before moving on. You will not be able to make a final cut from rim to bottom on this piece because the wood will move as you spin the piece. The outside gap might look really nice, and this would be a good challenge for your skills. I would not turn at high speeds either. Stand out of the line of fire also because one small catch could make it explode. When it comes to sanding, you might have to sand with the spindle lock engaged, and very light pressure. It can be done with a drill. slow speed only.

Another alternative would be to turn the defect/gap away. You would end up with more of a bell shaped piece, which could look nice as well.

robo hippy
 
Joined
Feb 27, 2006
Messages
53
Likes
7
Location
Hatteras Island NC
I believe I'd continue to turn the outside until I get an acceptable, but natural looking imperfection. @Leo Van Der Loo is on the right track, IMHO.....although I'd first try to keep the flaw from coming through to the other side.....if I could.

If that didn't work to my satisfaction, I'd reject the whole thing, and go on to something else.

One of the sayings I have written on my wall is: "Don't mess with it, reject it".....and, I do believe in this philosophy. It's much more satisfying, in the long run, to go on to things that work for the better. Just about always, when I do go on to try and save bowls, and some of my severely handicapped bowls do turn out for the better, it's certainly a satisfying feeling to have saved it. However, the great majority of them turn out to be failures.....and, I have learned to accept the inevitable.

In my opinion, pewas, turquoise fills, stitching, and all of those obvious looking things that turners have come up with to save a handicapped bowl......they all look like repairs, and will always look like repairs. To my thinking, if I can't make a natural flaw look intentionally kept and aesthetic looking, it's not worth trying to put a band-aid on it.

-----odie-----
+1.
I don't mind a little epoxy fill project. But often they do look like repairs.
If you've not done it enough, then by all means experiment & get comfortable with that skill.
Sometimes a project demands completion ( a piece for someones memorial comes to mind).

I'd probably just chuck it up, finish what I could get out of it and move on.
Over they years, most of the rescues I've worked out took a lot of time, probably more than warranted of my limited lifespan.
More important, Only once or twice did I end up with something that was truly spectacular.

Chuck it up, ride the bevel
 
Joined
Oct 1, 2008
Messages
705
Likes
1,124
Location
Sydney Australia
If you’re worried about the piece exploding (and you want to keep the voids), you can always wrap it in something while you hollow out the inside. Gaffers tape, duct tape, or even galvanized straps. Will still likely require light passes when you get close to the wall, but unless you get a bad catch, I doubt it will explode on you.
I routinely drop the speed on suspect blanks
 
Joined
Jul 26, 2016
Messages
2,326
Likes
1,105
Location
Nebraska
Treat it like a river table, you can always fill a void with epoxy and any other suitable material that is compatible with epoxy.
You can make it any color that accents the wood and adds an artistic element to the bowl.
Some turners will put a hole in a bowl for a knitting application. Work with the piece and create what it makes available to you.
 
Back
Top