• Congratulations to John K. Jordan winner of the June 2025 Turning Challenge (click here for details)
  • Congratulations to John Shannon"Cherry Bowl" being selected as Turning of the Week for June 30 2025 (click here for details)
  • Welcome new registering member. Your username must be your real First and Last name (for example: John Doe). "Screen names" and "handles" are not allowed and your registration will be deleted if you don't use your real name. Also, do not use all caps nor all lower case.

What's in a Lathe?

If that "uneven waviness" is what I think it might be, I'd suspect a sharper tool would solve a lot of your frustration. I know, I know.....the subject of what is and isn't sharp is a very touchy subject to a lot of turners....even to those who have years of turning experience under their belt.

Most turners use an edge created from their slow-speed grinder and go directly from there to the lathe. Some will swear they have sharp tools, and even use words like "scary sharp" to describe their cutting edges.....but, I have my suspicions.

For myself, the grinder is nothing more than a tool that speeds up removing metal up to the edge, but does not create the cutting edge itself. My gouge cutting edges are all hand honed.....the modern diamond hones are the best at this task......but, even the old Arkansas honing stones will do just as well. My finest scraper burs are created with diamond hones on the top edge and then manually raised on a carbide post. (For general rough work, the scraper burs created on the grinder will suffice for that purpose.)

-o-

Added content: If you want the sharpest edges possible.....then be prepared to sharpen much more often than you ever thought you would, or should. It is these fine edges, when maintained, can and do produce the finest surface quality. When you reach that level of cutting edge maintenance, then you will make it possible to create surfaces direct from the tool that require a bare minimum of sanding.

I actually do sharpen a lot. Constantly. Especially when turning bowls, I sharpen many times for both the inside and the outside (unless its a small bowl, I guess.)

I have not, however, used a hone to fine tune the edge. I have CBN wheels, 350 and 600, and will use the 350 if I need to really re-grind the shape, and the 600 to get a finer edge. I don't know how the 600 grit CBN compares to a diamond hone though... I think I did try to hone in the past, but, my concern always was losing the angle of the edge vs. the bevel. I don't think I ever found anyone demonstrating how to properly hone a gouge back then, and just stuck with the grinding wheels. If there is a technique to properly honing a gouge, though, that wont' muck it all up, I'll happily give it a try.
 
I am still aspiring to starting at 180. :)

I used to start at 180... But I found that was leaving scratch marks in my bowls, vases, etc. once I sanded up to 320 or 400. Even after more extensive sanding with 220 and 320, there were often scratches left by the 180 that I just couldn't get rid of, without going back to 180. I am not a hard sander, either, I use a pretty soft touch, and learned to sand at a speed slow enough that the sandpaper "grips" and then to let the grit do the work, and not use pressure (unless there was some serious tearout or something.) Starting at 220, I no longer have that issue. If I am lucky enough to get a pretty well-tooled surface (and I've learned a lot of techniques for that now...such as sheer scraping, using a negative rake scraper designed for the kind of grain and inside vs. outside, etc.) then I may even start at 320.

I haven't touched a piece of 60, 80, or 120 grit since early 2021 (I started turning the beginning of 2020). Late last year, I got back into turning things other than pens (which was all I really did from mid 2021 through mid 2023), and have hardly touched even 180 grit. I DO use it, when I end up with tearout that other grits just don't seem to correct, and then, only if I cannot first use a tool to correct the tearout (some woods, like this cottonwood I'm working with now, just...seem to tear out so easily, and even with careful tooling, sometimes the only way to completely get rid of the remnant is sanding... :'( ).

I think the keys that got me to this point, were learning how to properly sheer scrape (something I think I only learned properly after watching a Jimmy Clewes video on turning a platter). Proper sheer scraping required re-sharpening the tools so it was extremely sharp, keeping it that sharp until you were done with your sheer scraping, and also keeping the angle of the cutting edge VERY high, so that there was really only a glancing of the surface to peel off these super fine shavings. That has honestly been one of the best tools for me, to produce a super clean tooled surface, that doesn't need too much sanding. It is not as good, I don't think, as tooling well enough with a proper finishing cut using the gouge normally...but, I can't seem to figure that out, so I'm still not able to get those "perfect" geometries...at least, I don't know how with a sheer cut. Sometiems I can still faintly feel peaks and valleys, and if I try to fully correct them with a sheer cut, then I am often bound to create other issues. But anyway, its a good way to clean up your wood surface so that you don't have to start at say 60 grit!
 
I bought my Oneway 2424 in mid-2004. Can't comment on the others but can say the following:
  • Oneway is designed by Oneway and built by Oneway in ON
  • When I've had a question, I call Oneway - I'm then transferred to an engineer or to Kevin Clay, president / owner
  • I've turned several 400-lb+ logs - never gave a thought about an equipment problem. A slipping banjo or toolrest or tail-stock can be a "problem"
  • The attached pic is Planet Mesquite - 1200-lbs when it was mounted
  • I used the standard 10-yo live-center it came with - never an issue
  • Called Kevin asking if I could run a 1200-lb, grossly out of balance log at low RPM
  • He also did the drawings and fabricated the outboard ways and the risers for the 17" extension
  • His answer "yes" but I should NOT help the motor start the load - it will start and it did.
  • I asked about the spindle and got a lesson in metallurgy - never had to worry about spindle, quill or any other components
  • I was worried about the 3-hp motor heating at under 100-rpm for hours on end - never an issue - I think it's a Leeson
  • Every wonder why several on this forum, when replacing or buying a second banjo, go with Oneway?
  • In 20-years of doing large hollow-forms, I've not changed a bearing or even a belt
The higher price amortized over a bunch of years was a non-issue. Using great equipment when "re-creating myself" is well worth the difference.
 

Attachments

  • Y16-0905 Day-1-2a.JPG
    Y16-0905 Day-1-2a.JPG
    46.2 KB · Views: 35
I used to start at 180... But I found that was leaving scratch marks in my bowls, vases, etc. once I sanded up to 320 or 400. Even after more extensive sanding with 220 and 320, there were often scratches left by the 180 that I just couldn't get rid of, without going back to 180. I am not a hard sander, either, I use a pretty soft touch, and learned to sand at a speed slow enough that the sandpaper "grips" and then to let the grit do the work, and not use pressure (unless there was some serious tearout or something.) Starting at 220, I no longer have that issue. If I am lucky enough to get a pretty well-tooled surface (and I've learned a lot of techniques for that now...such as sheer scraping, using a negative rake scraper designed for the kind of grain and inside vs. outside, etc.) then I may even start at 320.

I haven't touched a piece of 60, 80, or 120 grit since early 2021 (I started turning the beginning of 2020). Late last year, I got back into turning things other than pens (which was all I really did from mid 2021 through mid 2023), and have hardly touched even 180 grit. I DO use it, when I end up with tearout that other grits just don't seem to correct, and then, only if I cannot first use a tool to correct the tearout (some woods, like this cottonwood I'm working with now, just...seem to tear out so easily, and even with careful tooling, sometimes the only way to completely get rid of the remnant is sanding... :'( ).

I think the keys that got me to this point, were learning how to properly sheer scrape (something I think I only learned properly after watching a Jimmy Clewes video on turning a platter). Proper sheer scraping required re-sharpening the tools so it was extremely sharp, keeping it that sharp until you were done with your sheer scraping, and also keeping the angle of the cutting edge VERY high, so that there was really only a glancing of the surface to peel off these super fine shavings. That has honestly been one of the best tools for me, to produce a super clean tooled surface, that doesn't need too much sanding. It is not as good, I don't think, as tooling well enough with a proper finishing cut using the gouge normally...but, I can't seem to figure that out, so I'm still not able to get those "perfect" geometries...at least, I don't know how with a sheer cut. Sometiems I can still faintly feel peaks and valleys, and if I try to fully correct them with a sheer cut, then I am often bound to create other issues. But anyway, its a good way to clean up your wood surface so that you don't have to start at say 60 grit!

Thanks for the perspective, Jon. On the bigger pieces, do you use an angle drill or a RO sander? I use both. The angle drill leaves pretty bad scratches vs. the ROS. I get the tough stuff with the drill, and then switch to the ROS for all the finish sanding.
 
The best quote for bevel use was from some unknown skew master, "The bevel should rub the wood, but the wood should not know it." Too much bevel pressure and just the right amount of bevel pressure are huge concepts to getting the cleanest cuts. The finish cuts always need to be VERY FINE!

robo hippy
 
Thanks for the perspective, Jon. On the bigger pieces, do you use an angle drill or a RO sander? I use both. The angle drill leaves pretty bad scratches vs. the ROS. I get the tough stuff with the drill, and then switch to the ROS for all the finish sanding.
I've tried powered sanding. I am not real sure what I think of it yet. I have both powered and inertial sanders for discs, and I've had similar problems with scratches...but, I think that depends on the wood, too. Softer woods are a lot harder to deal with regardless, I think? I am working with some live edge aspen blanks right now, and even hand sanding, I'm getting some scratch marks in the tighter corners that I am having a heck of a time getting rid of.

I mostly hand sand, and if I've done a good enough job with the tools, then the hand sanding goes pretty smoothly. The key issue is tearout...even small amounts that you may not initially see, will show up quite well once you start sanding. I've learned the key is, eliminate the tearout first, before moving to higher grits. If I move to higher grits before the tearout is entirely eliminated, then I inevitably end up back at the lower grit (usually 220 for me) anyway, and have to work through them all again once I finally manage to eliminate the tearout.

For tearout I DO sand with the lathe on, and that does produce radial scratches. However, trying to clean up tearout without power seems to be a futile endeavor...at least in my limited experience anyway. I think that a powered sander might help here, however I have yet to find a sanding disc I truly love. I normally use Norton brand sandpapers, which have a grit that just seems to do the job superbly well. I've never found a sanding disc, even abranet, that seems to do as good a job. So I guess that's probably one of the reasons I mostly hand sand. Once tearout is eliminated, then I can fairly quickly move through all the grits to achieve the finish I want. Once I start moving through grits, I'll alternate...lathe on, low speed, then hand sanded with the next grit to eliminate the scratches. On some woods, if they need it, I'll just manually hand sand through all the grits. I will usually sand up to 320/400 if I intend to use a penetrating finish, or maybe higher like 600 to even 1200 if I intend to use a film finish.

FWIW, I do think its best to try and eliminate tearout as much as you can with the tools first. Finishing cuts, sheer scraping (with a VERY sheer angle), a good french curve negative rake scraper for the inside of bowls, etc. are all better ways to deal with tearout. Sometimes you can really get it all, sometimes you don't see everything until you start sanding (I don't know why, sometimes the surface looks fine, but once you sand, I guess maybe the fibers shred and you can see tearout better?) If you see tearout once you start sanding, its still better to go back to the tools to try and remove it first, and use coarser (i.e. for me that's usually 220 grit) sanding to try and remove it before fully sanding.

For any tools, if you are going to try and clean up the wood surface, its best to sharpen right before you do, even for finishing cuts. A good, sharp tool will give you a cleaner cut than a not freshly sharpened tool, and sharp is key when trying to cut out torn out wood fibers. My weak spot is finishing cuts...I always seem to add ridges or valleys when I try to do finishing cuts...I can never quite seem to get that light, single-sweep, perfect cut that I see other turners using. So I usually end up resorting to a NR scraper or sheer scraping, which will usually do the job, just not as well.
 
Sorry, just back here after a long absence and I wasn't able to read all the posts yet but I saw a some about choosing a lathe.

As for lathe size, I think a lot depends on what you want to turn. I have turned some big bowls and things, but although technically not difficult, they don't interest me that much.

I prefer to turn small things including spindles. The swing of the lathe doesn't matter as much, but the sturdiness, precision, and length of the bed are important to me. I currently have 4 lathes and the PM 3520b is my favorite. I have a bed extension on it for a little extra length. The build, materials, and precision are excellent. I also have a couple of Jet 1642 lathes, which makes teaching more than one students at once a lot easier, and a Jet Mini for the portability. The 1642s are fine (used one as my primary lathe for years) but the PM is superior, even for ornaments and tiny miniatures.

Another thing to evaluate is the benefit from an expensive lathe. Again, a lot depends on what you want to turn. A good used lathe might save a LOT of money that can be used for tools. And a good dust collector. I bought three of my lathes used. I pulled a trailer well over 1000 miles to pick up the PM.

This is where I spend the most quality time:

lathe_PM_Jan17_IMG_5751.jpg

My little turning nook. Sharpening is across the room, bandsaw in the middle.

WV_boys_IMG_20170319_154641_356.jpg
JKJ
 
Thanks for the perspective, Jon. On the bigger pieces, do you use an angle drill or a RO sander? I use both. The angle drill leaves pretty bad scratches vs. the ROS. I get the tough stuff with the drill, and then switch to the ROS for all the finish sanding.
Most turners wish to turn some bowls, but most turners buy lathes which are poorly suited for bowl turning. The best way by far is outboard because your body and tool positioning aren't restricted by the bed. A pivoting or sliding headstock are superior to turning inboard on a fixed headstock. You'll also want to be able to lock the chuck you're using onto the outboard spindle nose. The lathe will also need a reverse. Variable speed is also handy.

Typically turning a bowl in one session requires three stages:
1. Chuck the bowl blank by its top, turn a chucking spigot on the bottom, and finish-turn the outside. If you're right-handed you'll want to run the lathe in reverse, if you're left handed in the opposite direction
2. Chuck the blank by the chucking spigot just turned. Hollow the inside. If you're right-handed you'll want to run the lathe forwards, if you're left handed in reverse
3. Turn off the chucking spigot. This can be done inboard or outboard.

For hollowing, gouges with a convex bevel are ideal.

I don't use scrapers or sand. My bowls are therefore a memorial to how well of badly I turn. Further details in my eighth book Sharpening Woodturning Tools.

Doesn't outboard turning still need something to support a tool rest? Some kind of outboard bed? Does that not get in the way of the tool?

Also interested in this book of yours, "Sharpening Woodturning Tools." Is that available online somewhere? Searching Amazon, it only kept spitting back "Woodturning Sharpening Tools" which was grinders, grindstones, CBN wheels, etc. :P
 
I have been considering a new video on sanding. I power sand only. The problem with scratches remaining is that you need to make sure you get ALL the previous grit scratches out before advancing to the next grit. I some times start at 80 grit, but usually at 100 or 120. I never skip grits. So, 80, 100, 120, 150, 180, 220, 320, 400 then grey synthetic steel wool for applying the finish. Like some one said, "Never take a finished piece from the shop to the house on a sunny day. Sunlight causes scratches." Learning to see the remaining scratches is an art. 150 grit is considered an extra step to some. It will remove 100 grit scratches, though slowly....

robo hippy
 
Doesn't outboard turning still need something to support a tool rest? Some kind of outboard bed? Does that not get in the way of the tool?

I bought this "mobility kit" from Rikon for my 70-1824. I have only used the tool rest extension so far (front left). I haven't needed the riser attachment.

1727712455797.png

I have the bed extension mounted to the bed in the traditional manner. Another option is to mount it for outboard turning as shown here.

1727712608067.png

In that case, the riser comes into play.
 
I have been considering a new video on sanding. I power sand only. The problem with scratches remaining is that you need to make sure you get ALL the previous grit scratches out before advancing to the next grit. I some times start at 80 grit, but usually at 100 or 120. I never skip grits. So, 80, 100, 120, 150, 180, 220, 320, 400 then grey synthetic steel wool for applying the finish. Like some one said, "Never take a finished piece from the shop to the house on a sunny day. Sunlight causes scratches." Learning to see the remaining scratches is an art. 150 grit is considered an extra step to some. It will remove 100 grit scratches, though slowly....

robo hippy

Are you sure that full scale of grits is necessary? I thought that 100, 150, 220/240, etc. were on a different scale than 80, 120, 180, 280, etc. The grit scales are usually a "50%" rated scale, meaning the subsequent grit would be 50% as coarse as the prior. Or in other words, sanding with 150 after 100, a 50% increase in grit (or 50% reduction in abrasive scale) would cut through HALF the depth of the scratches left by the previous grit. When you run through the full scale, each grit being 50% the last, then you eventually eliminate all the scratches, or at least, reduce them to a scale beyond human visual acuity.

I agree that you shouldn't skip grits, but, it seems like you are using two different grit scale systems together, which is doubling the number of grits you have to deal with? I would think that 80->120->180->280 (270 really, but 280 is the closest to the exact doubling grit)->400...would be a sufficient scale to acheive the 50% grit scale and sufficiently sand out all sandpaper scratches. At least, theoretically...

I could see using more lower grits, to make sure you eliminate scratches left by very coarse grits. That is part of the reason why I try not to start so low. I used to use 60 and 80 grit sandpaper, and all it ever seemed to do was shred my wood fibers and leave a FAR coarser, rougher surface than I was able to tool out in the first place. That seemed highly counterintuitive, so I moved up grits, until I found that I could generally start with 220, and sand out most tearout if I had any, occasionally falling back to 180 if I just couldn't get rid of all the tearout (more common on soft and punky woods, spalted woods, etc.) Then sand up to 400 or maybe 600 grit. I probably use 220/240, 320, 400 and 600 most of the time, and I guess that is actually a finer gradation than a normal 50% grade. I use these grits mostly because its what Norton sells, and I've found their sandpaper works really well for me.

I would have thought, that with power sanding, the need to start at very low grits should actually be LESS? I figure, if I power sanded, rather than hand sanded, starting at 220, any and all tearout would vanish within a couple of minutes? Once the tearout was gone, it should only take minutes to move through the rest of the grits...

I am truly curious if 80, 100, 120, 150 grits are helping, or hurting, if your tooling is good? Is there a particular reason you feel those lower grits are truly necessary to get the job done? Are you only using those grits, because once you use 80, and it puts big, obvious, deep scratches into your piece, is using the rest of those grits the only way to clean up the 80 grit scratches?

Just musing here... I think with good tool skill, starting at low grits could probably be eliminated, but, I only really have my own personal experience to base that on.
 
There are two grit scales, from what I understand, P and K. Google can help. One rule of thumb I have heard is that each grit should be 50% finer than the previous grit. So you'd go 80, 120, 180, 240 (I use 220 here), and then 360 (or 320 because it is more common). If you started with 100 you'd have 100, 150, 220 or 240, then 360. That isn't a hard and fast rule by any means.

I can't see how going 80, 100, 120, 150, etc. could hurt, but it might be overkill in some situations.
 
Jon you might find this helpful:


The grits Robo mentioned do indeed all exist in the CAMI system, and I'd wager that with the amount of bowls he has turned, he has his tooling all sorted at this point.

I also don't think he seems like the type to do anything extra just for fun so if he says he's having good results with the protocol he mentioned, it's probably worth taking a closer look at it or even trying it out. He only mentioned two grits outside of what I use: 80 (when needed) 120-180-220-320-400, so the next time I have something ornery I'll try with 100 and 150 added back in and see what happens.

Sure... Its just that, sometimes people develop a pattern, and maybe the pattern was necessary at one time, but the need may have faded. If your tooling is good, or excellent, or exceptional, I do indeed wonder if starting at lower grits is truly essential, or whether it might have drawbacks.

Part of why I wonder that, is I've heard it stated a lot that you need to start at 80, or 120... But, I have yet to see anyone actually try to scientifically determine WHY and WHETHER its truly necessary. Its one of those things...is it "just what people do" and "its the established pattern" so its how its done? Or is there really, truly a good reason to do it? Just wondering. Its a lot of grits, thus a lot of 2-3" discs, maybe 1-2 discs per grit? I guess if it takes a lot of sanding to fully remove scratches from the previous grit, maybe its 2-3 or more discs per grit? Perhaps more at lower grits than higher? I think the last time I checked, 2" discs for the discs I've bought are about $0.10-0.20/disc... I generally use these 9x11" sheets, cut em down to about 1x2" strips, and I get about 25 strips a sheet, five sheets to a $9 package or 25 sheets to an $18 package, which comes out to about $0.03-0.07/strip. I guess I probably use a couple of strips per grit...but, only 4-5 grits rather than...8? Maybe this cost is just immaterial...I have not actually calculated my total sandpaper cost per year (I probably should.)

Anyway...just stuff I think about. :P
 
I've heard it stated a lot that you need to start at 80, or 120... But, I have yet to see anyone actually try to scientifically determine WHY and WHETHER its truly necessary

Much about sandpaper may depend on how the turners works, the tools used, and how they are used. And how the person was taught, and maybe how his friends work.

I personally never use rotating sandpaper such as with an angle drill, with either coarse or finer grits. I hate the clouds of dust and dislike the result on some wood. Instead, I begin smoothing the surface with negative rake scrapers, then take out any remaining tool marks with curved hand scrapers. If I power sand, I do it with the piece OFF the lathe, with a very gentle pneumatic ROS (such as the Grex) running at slow speed, occasionally starting with 400 grit, but usually only finer grits are needed. Finish sanding is by hand. The hand scraping eliminates the need for coarser sandpaper. After developing this way to work, I can’t go back.

If I'm not using sandpaper that comes in rolls (I like the Klingspor Gold), I also cut sandpaper from sheets into 1x2 or 3” strips. My favorite sandpaper for 600 and finer is sheets of Rhynowet Redline.
https://www.supergrit.com/rhynowetred.html

BTW, when sanding bowls or platters by hand I back up the strips with a “Magic Rub” eraser, what I call a soft sanding block.
 
Last edited:
Much about sandpaper may depend on how the turners works, the tools used, and how they are used. And how the person was taught, and maybe how his friends work.

I personally never use rotating sandpaper such as with an angle drill, with either coarse or finer grits. I hate the clouds of dust and dislike the result on some wood. Instead, I begin smoothing the surface with negative rake scrapers, then take out any remaining tool marks with curved hand scrapers. If I power sand, I do it with the piece OFF the lathe, with a very gentle pneumatic ROS (such as the Grex) running at slow speed, occasionally starting with 400 grit, but usually only finer grits are needed. Finish sanding is by hand. The hand scraping eliminates the need for coarser sandpaper. After developing this way to work, I can’t go back.

If I'm not using sandpaper that comes in rolls (I like the Klingspor Gold), I also cut sandpaper from sheets into 1x2 or 3” strips. My favorite sandpaper for 600 and finer is sheets of Rhynowet Redline.
https://www.supergrit.com/rhynowetred.html

BTW, when sanding bowls or platters by hand I back up the strips with a “Magic Rub” eraser, what I call a soft sanding block.

This is more what I do, I guess. I am actually lacking a proper negative rake scraper, and can't afford one right now. My brother used to have a beautiful French curve neg rake from Carter & Son, but he sold it, and I didn't realize until recently (would have bought it myself!) I used to use that pretty religiously to clean up the insides of my bowls at the very least. I recently found Stuart Batty's online store for his tools, and he actually has some replaceable rake negative rake tools, where you can buy replacements for about $25. They can also be taken off the rest of the tool, which would make them easier to sharpen on a diamond stone and the like as well. But they are pretty darn pricey (full set for the entire tool system, including the core handle set (cheapest, he only seems to sell them in sets of 3 min), handle insert, tool with the rake piece, is something like $400. Once you have the handle and the inserts for them, and the core negative rake tool, then all you would need to do is replace the rakes, so long term its cost effective, and you don't have to worry about trying to sharpen those often unusual curves (I never quite could do that properly with the Carter & Son French curve.)


I do have a couple of other scrapers, but they aren't nearly as good as the french curve. They aren't negative rake, but with a good burr they do a nice job. Bit more fiddly, and they can sometimes grab the wood suddenly, but I've come to learn how to use them. I use them pretty religiously to clean out the insides of my bowls. I have not used hand scrapers. I assume you mean like a cabinet scraper? Do you by chance have any resources I could reference to learn how to properly use a hand scraper on turned items? Someone else a while back mentioned something similar to this, I guess that was in late 2021... I never actually tried it. Maybe that's one of the missing pieces to avoid having to start at grits lower than 400...

I also forgot that I have a pneumatic ROS with an adjustable pressure lever, so I can run it at a slowish speed. I may have stuffed that in a drawer, and I forgot all about it. Its small, palm sized, so its pretty easy to use. I do like the idea of using the tools to clean up the wood enough, that you don't need to start at very low grits and power sand your way through a whole extensive series. I used to hand sand from 80 through 400 or so, and boy, it was so tough with those lower grits. I probably didn't spend enough time on the 100-220 grits to really clean up the scratches properly...but, at the same time, maybe I just needed to do a bit more tool-based cleanup so I simply didn't need those grits at all!

It might be worth taking this sanding discussion to another thread, though... I forgot this was a lathe thread, and I don't want to keep it derailed on a side topic. ;)
 
I am actually lacking a proper negative rake scraper, and can't afford one right now. My brother used to have a beautiful French curve neg rake from Carter & Son, but he sold it, and I didn't realize until recently (would have bought it myself!) I used to use that pretty religiously to clean up the insides of my bowls at the very least. I recently found Stuart Batty's online store for his tools, and he actually has some replaceable rake negative rake tools...

I buy plain scraper stock from Thompson tools and make my own. I posted a picture of these recently, it's a design similar to some that a lot of turners use but my contribution was making a flat on the end instead of continuing the curve around and back down a bit like all I've seen. This makes ALL the difference for me for some applications! I shape these on a 60 grit CBN wheel, then sharpen on a 600 grit wheel.

The one in the middle is turned up on it's edge to show the cross section of the grind, made from a Thompson skew, with the same sort of curve and flat. I then remove any grinder burr and use a burnisher to make a smooth, long-lasting burr. When the burr gets worn, I use a small extra-fine EzeLap diamond hone to take off the burr and form a new one - I do that several times before I go back to the grinder. I was using two of these just a few minutes ago and had to put a new burr on one.

scrapers_neg_rake.jpg

I also make a variety of small NRS, so useful for some things. Here are a few, the middle one made from a shallow spindle detail gouge.
(I was at John C Campbell once and got that one out and a friend exclaimed "Yikes. I've been waiting for months for those gouges to come back into stock and here you are, grinding them into scrapers!" 😅)

scrapers_small_thompson.jpg

It might be worth taking this sanding discussion to another thread, though... I forgot this was a lathe thread, and I don't want to keep it derailed on a side topic. ;)

I don't know how this thread took such a turn from "lathes" to "sanding" (and now, smoothing).
If I knew how to dissect it and reform the pieces into a coherent new thread I would, but that would have to be done by a moderator, or perhaps with a coordinated effort by all the individual contributors.

JKJ
 
Part of why I wonder that, is I've heard it stated a lot that you need to start at 80, or 120... But, I have yet to see anyone actually try to scientifically determine WHY and WHETHER its truly necessary.

You start at the highest grit your turning skills will allow. Some folks start at 180, or even 220. Me, I'm aspiring to start at 120. ;-)

Talking to no one in particular, your lowest grit removes tool marks, etc. Every subsequent grit removes scratches from the previous grit. If you don't get those marks out with your lowest grit, they won't go away with higher grits. I probably spend 60% of my sanding time on the lowest grit.
 
Some folks at my WT club call it “80 Grit Gouge” 🤣 
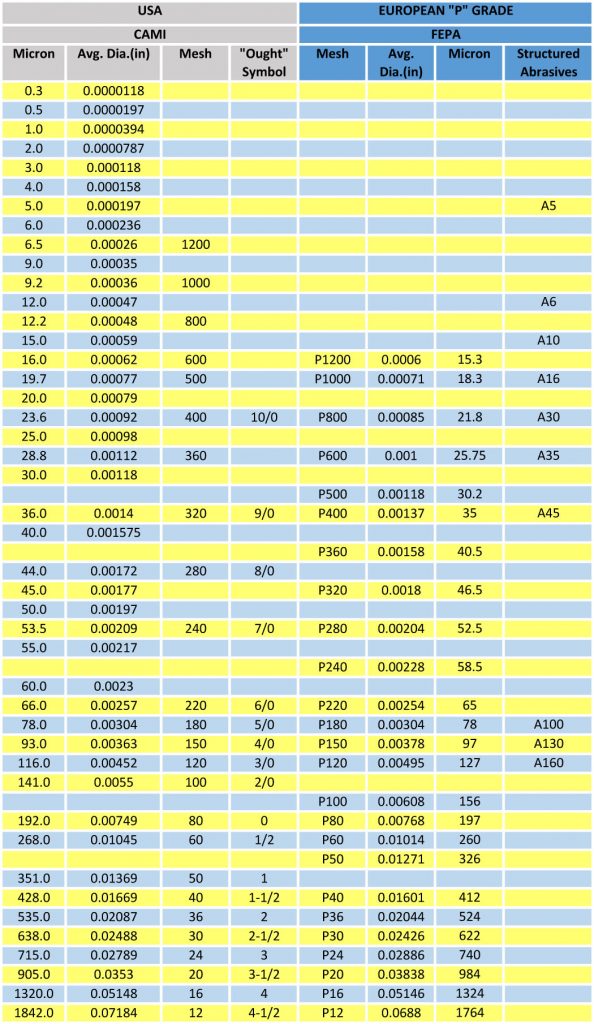
I don’t turn many bowls but with careful use of a scraper some demonstrators have suggested you shouldn’t need to go coarser than 120 or even 150 grit. My problem is often getting a smooth shape straight from the tool, requiring some “Adjustment” with abrasives! 😕
 
There are many who would say that I over sand. Yes, I am aware of the 50% rule for stepping up. I have found that 80 grit scratches are a bear to remove, and using 100 grit and then 120 that makes SURE that I get all the scratches out before stepping up. Same with the 150. For reasons I don't understand, big leaf maple is impossible to cut without tear out. I do use a fresh edge off of a 600 grit wheel for the final cut. Maybe I should go to 1000. Still, when I get done sanding, I almost never find 80 grit scratches any more. Good lighting and good glasses. I still prefer natural spectrum lights rather than halide or other more white lights. I did sand out one bowl that had a date of 2012 on it, and it was when I was still doing the LDD (liquid dishwash detergent soak). It sanded out with half the effort required for the non soaked bowls I have been doing for the last couple of years. I will need to experiment again this spring when I get new logs.

robo hippy
 
You start at the highest grit your turning skills will allow. Some folks start at 180, or even 220. Me, I'm aspiring to start at 120. ;-)
Bah. You start at the grit appropriate to what you're sanding. If it needs 80, start at 80. Starting at 220 because you believe you are "good enough" is just going to be trouble. (also, the coarsest grit in your sandpaper drawer says nothing about your turning skill).
 
Bah. You start at the grit appropriate to what you're sanding. If it needs 80, start at 80. Starting at 220 because you believe you are "good enough" is just going to be trouble. (also, the coarsest grit in your sandpaper drawer says nothing about your turning skill).

I was thinking of folks like Odie. I start at 80 or 120 usually.
 
Bah. You start at the grit appropriate to what you're sanding. If it needs 80, start at 80. Starting at 220 because you believe you are "good enough" is just going to be trouble. (also, the coarsest grit in your sandpaper drawer says nothing about your turning skill).

I agree that the coarsest grit says nothing about your turning skill. I would say the quality of the wood surface after you are done turning does. I've met some people who don't sand...their tooling is incredible. I also wouldn't say, I guess, that its gouge skill...its really scraper skill I think. A turner who really knows how to sharpen, hone and add a proper burr to the right scraper for the job, can get results that don't need to be sanded. I'm not at that level, may never be...but I do believe its possible, and its certainly something I think is worthy to strive for. Imagine being able to turn, and when your done with the turning, your just done. Well, your ready to put on a finish at least. I think that would be awesome.
 
I start at 80 or 120 usually.
Don’t worry about it. THE important thing is FORM. Surface quality off the tool is something to work on. And screwing up the form with a lot of sanding is bad.

But
A good form sanded from 80 beats a bad form started at 320 every single day.
 
The fact that Richard Raffan and Glenn Lucas sand their work tells me that getting there would be quixotic at best. But, hey, maybe you'll be the one!
I've watched a lot of Raffan's videos. I honestly think he could get away without sanding. ;) I often wonder why he bothers. He is exceptional though.
 
After a demo at my club, last months competition was “straight from the tool”, no sanding allowed. Sadly I was on vacation so haven’t seen the entries.

For several reasons it’s not a fair comparison, but using a scraper on flat work leaves a better finish than sandpaper. 😆
 
For several reasons it’s not a fair comparison, but using a scraper on flat work leaves a better finish than sandpaper. 😆

I like to thing it might be a fair comparison, at least for some turnings. Before I starting turning, I used cabinet (card) scrapers to good effect on flat wood work.

Over 20 years ago, not long after I started woodturning I ran into a a problem when sanding the inside of cedar bowl. I was faithfully following the sanding method taught at a quick bowl class at the local Woodcraft store. However, heat from the sandpaper caused checks in the cedar. After struggling with it for a while, I thought of my cabinet scrapers and used a Dremel to cut off the end off the "gooseneck" scraper, the curved one with a kind of hooked end.

I sharpened and burnished a good burr on it and very quickly remove the heat checks and leave a surface on the inside of that bowl that even 600grit sandpaper wouldn’t improve. The size is perfect to hold between thumb and finger and get into tight curved areas.

scraper_PB054025_s.jpg

This is the cedar bowl I completed, both top and bottom with the help of this scraper, both, very early in my woodturning journey! Very little sanding needed, and with fine grits.

cedar_bowl.jpg

Since then, I’ve ground many card scrapers into curved shapes and use them on almost every bowl, platter, boxes and more. I even use very small ones on thin spindle turnings at times. For bowls and platters, as mentioned earlier, I shape with the gouges or Hunter tools, clean up if needed with NRS, then smooth with the curved hand scrapers (mostly off the lathe). I'm such a strong believer in using them that I've turned in to a hand-scraper evangelist and teach these techniques ever chance I get, in demos and with students. (It's hard to get me to shut up about hand scrapers in woodturning - I seriously need to write a comprehensive document on making and using these.)

The picture below shows some of the types hand scrapers I use the most on things like bowls and platters. I've given away many and am now making new ones now. I shape them with a coarse belt or disk sander, clean up on a 600 grit CBN wheel, then hand sharpen and burnish a burr exactly like as with a cabinet scraper used for flat work. They are sharpened all the way around so I can use the different curves as needed. If anyone want's to make some I can give some tips based on my experience. One thing - if you make these, I think it's better to start with good quality scrapers. My latest are made from Lie-Nielsen scrapers.

The two on the upper left are Stewart McDonald scrapers, often used by luthiers, are my latest acquisitions. These are thicker, sharpened differently, and to not use a burnished burr.

scrapers_favorite_IMG_7870.jpg

This article describes hand scrapers and how they are used, from a music instrument maker's perspective:

JKJ
 
In the ongoing play between Mike Mahoney and Stuart Batty, Mike commented that he usually starts at 80 grit and goes up, and he said he can sand out faster than Stuart. Stuart did not deny it. The thing with bowl/side grain orientation is that for 1/4 turn you go against the grain, 1/4 with, 1/4 against, and 1/4 with. The with grain always cuts clean. The against grain always cuts with tear out. Odie is in a world of his own.... On end grain turnings, like my boxes, I can only rough it up with 400 grit. My skew work needs a lot of work, but on the outsides and sides of the boxes, I usually start at 220.

robo hippy
 
I didn't dig that deep, to be honest. But I have to believe that the manufacturer would have gone through all the R&D and testing needed to prove out their technology. The servo motor will either be a fad, or the technology that takes us into the next generation of lathes.
I have never turned on a servo motor lathe. The last company I worked for had a lot of production machines. Everything ran on servo motors. They were very good motors. A lot of power and torque. You can buy servo motors and controllers at a lot of different places, not just from Harvey.
 
No mention of Nova Teknatool in these posts. I've turned on One Way, Robust, and Harvey, Jet and Rikon, but own a Nova Nebula. For the price difference, I'll stick with the Nebula. Great technology, rotating and sliding headstock. It is my third Nova product and their customer service has been outstanding.
I too use a Nebula and have found it to be a pretty good machine. The quality of their casting has gone down since the NOVA DVR XP but the machine offers a lot of possibilities for an affordable foot print.
 
I have heard others say they generally don't go higher than 320. Presumably, oils soak in better that way. I will go to 400 on display-type pieces that are going to be glossy.
I have heard the same, but Odie constantly says he sands to 600 and uses danish oil. So I don’t put much faith into stopping at 220. I feel my finish goes on and looks better when sanded to 400 or 600.
 
I have heard the same, but Odie constantly says he sands to 600 and uses danish oil. So I don’t put much faith into stopping at 220. I feel my finish goes on and looks better when sanded to 400 or 600.
For me it depends on the wood
For native hardwoods I sand the wood to 320. The first of finish coat is sanded with 400.
Then grey scotchbrite between coats of finish. The final step is often the Beal buff.


Sanding with the grain most native hardwoods don’t show scratches from 220
Demos by furniture finishes they all sand to 220.

Did an ebony insert and I had to go to 1200 it was showing scratches untill the 1200.
That wood was so fine it was like glass.
 
Last edited:
I go to 400, then use a grey scotch brite pad to apply the finish. With hand sanding, you can see scratch marks up into the 600 grit range. With the power sanders, I can't see any after 400 grit, unless there were some from a coarser grit that I didn't get out first time over. With the grey pad, that seems to take care of any remaining circular patterns. With some of the sprays, the painters I used for my furniture didn't want it sanded finer than 220 because there was not enough surface coarseness for the finish to stick. I think painting surfaces don't want anything finer than 150 since paint is less about binding and more about pigment, so it goes on thick.

robo hippy
 
Back
Top