• Congratulations to Phil Hamel winner of the April 2025 Turning Challenge (click here for details)
  • Congratulations to Paul Hedman and Donna Banfield for "Fire and Ice" being selected as Turning of the Week for 5 May, 2025 (click here for details)
  • Welcome new registering member. Your username must be your real First and Last name (for example: John Doe). "Screen names" and "handles" are not allowed and your registration will be deleted if you don't use your real name. Also, do not use all caps nor all lower case.

What's in a Lathe?

My problem is often getting a smooth shape straight from the tool

It's not your tool work that needs to be refined......it's your ability to see the curve at the tooling stage and then making appropriate adjustments to the shape.

This mental ability can be refined and improved with time, and I suspect it is the same sort of ability that some artists have when building up shapes on their paintings.

For a woodturner, this ability can be particularly difficult, mainly because you can't always strategically observe the curve while in the act of turning.

=o=
 
Last edited:
Some folks at my WT club call it “80 Grit Gouge” 🤣 I don’t turn many bowls but with careful use of a scraper some demonstrators have suggested you shouldn’t need to go coarser than 120 or even 150 grit. My problem is often getting a smooth shape straight from the tool, requiring some “Adjustment” with abrasives! 😕
It's not your tool work that needs to be refined......it's your ability to see the curve at the tooling stage and then making appropriate adjustments to the shape.
This mental ability can be refined and improved with time, and I suspect it is the same sort of ability that some artists have when building up shapes on their paintings.
For a woodturner, this ability can be particularly difficult, mainly because you can't always strategically observe the curve while in the act of turning.


Bill,
I'm sorry I missed your post before. I agree with what Odie wrote.
Made me think of a few things.

One question: is the problem needing sanding "adjustment" for smooth shape with getting a satisfactory continuous finishing cut (without high or low spots), or is it with tearout or surface roughness?

A suggestion: It might be huge help to have someone with a significant experience look at your lighting, tools, sharpening, watch you turn. They might have useful suggestions - sometimes the cause is immediately obvious. And for surfaces where you can't easily see the surface, there are some techniques that might help.

Besides the obvious: good wood, good shaving-sharp tools, steady hands, and assuming the problem you have is with shape and surface evenness rather than tearout/surface roughness, to me the most important things are the kind of lighting, the type of tool and how it's held and moved, and where the eye is looking while turning. If it's surface roughness, it's a different problem (e.g. sanding tearout can be a losing battle).
If turning the outside of a form, face work or spindle, I often have to remind some new (and remedial turners) to not look at the tool but instead watch the upper profile. (I also have to remind to move the body, not the arms.)

Seeing the surfaceon the inside of a bowl or box while turning is more difficult but the right lighting can even help there.

As I mentioned earlier in this and another thread, I personally use special NRS and sharp hand scrapers extensively - saves me a lot of time and a LOT of sanding. With these pieces often don't need coarser than 400 grit. BTW, I do almost all sanding by hand, much with the lathe off.

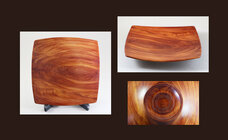
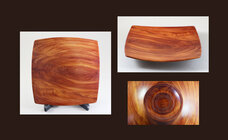
For demos on my design shown below, I take several examples pieces including this one from eastern red cedar. It's admittedly a fairly soft wood but after the NRS and hand scrapers the only sandpaper needed was 600 grit. I may have to start with coarser paper, say 320, some similar pieces. Oil finish.

penta_platter_cedar_IMG_7434.jpg

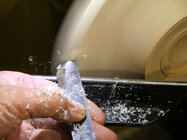
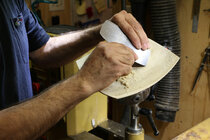
Here's my favorite NRS and a hand scraper in action on this design (and I was told once you can't use scrapers when turning air - not totally true). To evaluate the surface while turning and smoothing I use sight and touch.
The NRS refines the surface, the hand scrapers remove any NRS tool marks.

IMG_7515_ce.jpg scraper-shavings-IMG_7864.jpg

If the problem is making smooth, continuous passes, there is one thing I and some others I know do: When working towards the final pass, don't just hog out the wood until very close to the intended surface.

Instead, make numerous "practice" passes, sometimes trying different things. Sometimes it helps to vary the tool presentation, tool rest, lathe speed, cutting speed, tool pressure, body motion, etc. Sometimes I try completely different tools in earlier passes - a different grind or type of tool may work better for that particular chunk of wood. This method does take longer, but practicing that finishing cut as I proceed often gives me a better "final" finishing cut.

JKJ
 
Bill,
I'm sorry I missed your post before. I agree with what Odie wrote.
Made me think of a few things.

One question: is the problem needing sanding "adjustment" for smooth shape with getting a satisfactory continuous finishing cut (without high or low spots), or is it with tearout or surface roughness?

A suggestion: It might be huge help to have someone with a significant experience look at your lighting, tools, sharpening, watch you turn. They might have useful suggestions - sometimes the cause is immediately obvious. And for surfaces where you can't easily see the surface, there are some techniques that might help.

Besides the obvious: good wood, good shaving-sharp tools, steady hands, and assuming the problem you have is with shape and surface evenness rather than tearout/surface roughness, to me the most important things are the kind of lighting, the type of tool and how it's held and moved, and where the eye is looking while turning. If it's surface roughness, it's a different problem (e.g. sanding tearout can be a losing battle).
If turning the outside of a form, face work or spindle, I often have to remind some new (and remedial turners) to not look at the tool but instead watch the upper profile. (I also have to remind to move the body, not the arms.)

Seeing the surfaceon the inside of a bowl or box while turning is more difficult but the right lighting can even help there.

As I mentioned earlier in this and another thread, I personally use special NRS and sharp hand scrapers extensively - saves me a lot of time and a LOT of sanding. With these pieces often don't need coarser than 400 grit. BTW, I do almost all sanding by hand, much with the lathe off.

For demos on my design shown below, I take several examples pieces including this one from eastern red cedar. It's admittedly a fairly soft wood but after the NRS and hand scrapers the only sandpaper needed was 600 grit. I may have to start with coarser paper, say 320, some similar pieces. Oil finish.

View attachment 67841

Here's my favorite NRS and a hand scraper in action on this design (and I was told once you can't use scrapers when turning air - not totally true). To evaluate the surface while turning and smoothing I use sight and touch.
The NRS refines the surface, the hand scrapers remove any NRS tool marks.

View attachment 67843 View attachment 67842

If the problem is making smooth, continuous passes, there is one thing I and some others I know do: When working towards the final pass, don't just hog out the wood until very close to the intended surface.

Instead, make numerous "practice" passes, sometimes trying different things. Sometimes it helps to vary the tool presentation, tool rest, lathe speed, cutting speed, tool pressure, body motion, etc. Sometimes I try completely different tools in earlier passes - a different grind or type of tool may work better for that particular chunk of wood. This method does take longer, but practicing that finishing cut as I proceed often gives me a better "final" finishing cut.

JKJ
Thanks for the educating information. BC
 
Well like a lot folks I started out with a cheap generic lathe,what you guys would call a grizzly. Did a few mods to overcome some of its issues including fitting a VFD. Later messed around with several old Woodfast 400's renovating, painting, some fitting with a VFD. But all the while never really found what I was looking for, OK if I had found a Woodfast 408 probably would have stopped there [ 20" swing ].

What a I liked about the old Woodfasts is their simplicity and rugged construction, weighty and very solid. Lol price was a factor I have too admit where I am old Woodfasts in good condition sell for around $500AUD and thats a cheap lathe. Vicmarc and Stubby were to some extent out of my price range, plus there were a few 'darn its' of 'I wonder why they didnt' etc

But in the end I sat down made list of all the aspects etc I thought I would need and drew up a lathe, all welded construction, good sized headstock shaft to give me a solid bearing set up. My own version of an wide ranging indexing system with simple fast adjustment. Initially a three pulley set up to give me a wide range of speeds on a 1.5hp motor and planning to go to a VFD 2.5hp motor.

Now I have all the bits but have yet to install the VFD etc. Large-ish swing at 29" OK I dont really turn much over 12-15" but I just like space it gives me. All this on a short bed 18" later lengthen to 29" I add two short utility beds at right angles to the Headstock end. This is to carry the banjo for those awkward dias and my layout indexing system , also it allows me to set up a swing arm set up to the back side o the lathe to carry whatever.

I have developed a lay out system to go with the Indexing set up which works ok. But like many things I build its a work in progress and I do improvements as I go along. The current stand is pine, screwed n glued, 4 legs but again my own version, three legs at the Headstock end one at the tailstock. This allows easy access around the tailstock end and I often hollow from there.

The centre height of the lathe is set at my arm pit height around 47", I find this really useful during hollowing. also it requires minimal bending during hollowing. I have had this set up for over 10 years and apart from a few little mods here and there it works well for me.

There is no real tailstock as yet although I have one I have one on the drawing board, I have a very simple basic one to get me out of trouble made out of angle iron and a cam follower, does the job but its rough. But at the end of the day my use of the tailstock is intermittent at best. I have couple of DIY steadies , all welded construction to suit the lathe.

I run all Nova SN2 large dia chucks, basically the forerunner of the Titan chuck only because I bought the first three for less than half price and just stayed with the one design for ease of use and in the early stages there were the only chuck with interchangeable jaws, and of course there are some modified jaws for these chucks, :) sorry cant help myself.
 
Last edited:
It's not your tool work that needs to be refined......it's your ability to see the curve at the tooling stage and then making appropriate adjustments to the shape.

This mental ability can be refined and improved with time, and I suspect it is the same sort of ability that some artists have when building up shapes on their paintings.

For a woodturner, this ability can be particularly difficult, mainly because you can't always strategically observe the curve while in the act of turning.

=o=
Its a skill that can be learned and there are a few tricks of the trade. As Odie mentioned if you watch the tool as form is shaped you will miss it. I find you need to watch the curve or horizon on the top of the piece as you turning, you may need to alter that back ground for contrast to see the curve more clearly
 
Last edited:
maybe might be better to run a separate thread, rather than hijack this one

If you do, I have a tiny suggestion: maybe break up that big block of text into a number of smaller sections to make it easier to read! I went crosseyed before I could finish it! It looks there is SO much interesting stuff in the post, though!

JKJ

Oh, update: I copied the text and pasted it into a text program, split it up into paragraphs, and these old eyes could finish reading. Fascinating!
You sure are an ambitious person!
it was a bit of a ramble, thinking on the run and baby sitting a couple of grand kids, such is life :) put some paragraphs in although it wasn't written for paragraphs.

As for ambitious, maybe I am a retired engineer and at one time managed a Research and Development engineering shop for a decade. Have been involved in packaging industry in process control and improvement, so its kinda what I do. :)
 
Last edited:
put some paragraphs in although it wasn't written for paragraphs.

Hey, re-reading the reformatted "ramble" was not only incredibly interesting but cured my headache. :) And your breaks made more sense then some of mine.

I too would love to see some photos - and some of us would love sketches of things like your indexing system. (I use the Alisam indexing wheel and when needed, the rotary table I bought for my mill - I found it made laying out precise chip carving designs on turnings almost trivial)

(My wife of 55 years was a journalist, a proofreader, then an editor, then the manager of a major gov office of scientific and technical information. I still have scars from when she reviewed some of my early documents!)
Lol The R&D outfit had a guy who wrote manuals for most of the gear we built and yes the revues can be devastating. I built the lathe out what was in my head free of all paperwork although I would normally draw something up in one of my many note books.
 
(My wife of 55 years was a journalist, a proofreader, then an editor, then the manager of a major gov office of scientific and technical information. I still have scars from when she reviewed some of my early documents!)

When I wrote books, I dreaded the editor's comments. And yet those comments taught me a lot and over time they became fewer and less traumatic.
 
Part of why I wonder that, is I've heard it stated a lot that you need to start at 80, or 120... But, I have yet to see anyone actually try to scientifically determine WHY and WHETHER its truly necessary.
Its not about science @Jon Rista, its about what is seen by the eyes. The point of refining the surface, whether with sandpaper or a scraper, on or off the lathe, is to remove tool marks and tear out, and refine the shape.

With experience one improves tool control and what tool is used to reduce tear out and tool marks, as well as final shape.

Starting out I used a lot of 80 grit. Now I try to get the surface to the point of starting with 220gr.

Tool control and NRS on the lathe, and cabinet scrapers with the lathe off but piece mounted, go a long way to reducing sandpaper usage. Any m2 hss scraper can be shaped for an NRS - they don’t have to be purchased, and they dont have to be made out of more expensive steel. I shape all of my own with a 46gr stone wheel.

I sand with the piece mounted on lathe, but most of the time the lathe is off, focusing on areas that need improved. Use both a drill, for initial refining, and then an electric ros for subsequent finer grits.

Straight cabinet scrapers on the piece OD, where it makes sense, then primarily a french curve on the ID and some OD areas.
 
When I wrote books, I dreaded the editor's comments. And yet those comments taught me a lot and over time they became fewer and less traumatic.
I've been on both sides. Forty years of publication of archaeological research, so on the receiving end of editing.

Before turning to turning, I did ship modeling, concentrating on half-models and plank on frame models of 18th-19th century sailing ships. 'Plank on frame' involved building timber by timber at 1:48 scale. During that period, I was involved in commenting on drafts of a practicum which was later published as "The Fully Framed Model, HMN Swan Class Sloops 1767 - 1780 Volumes I-II" by David Antscherl. Every individual timber at 1:48. All the fittings, etc. I also spent a couple years editing for a journal on building/sailing pond yachts.
 
When I wrote books, I dreaded the editor's comments. And yet those comments taught me a lot and over time they became fewer and less traumatic.

The thing that helped me the most with writing was when I asked turner Frank Penta to review some. Franks background and degree is in education and I found his writing clear and understandable. I sent him a draft turning-related document and gave me helpful suggestions about content plus layout and readability, all which made good sense!

When I sent him an updated version and asked for further suggestions he pronounced it finished!

JKJ
 
With experience one improves tool control and what tool is used to reduce tear out and tool marks, as well as final shape.

Starting out I used a lot of 80 grit. Now I try to get the surface to the point of starting with 220gr.

Tool control and NRS on the lathe, and cabinet scrapers with the lathe off but piece mounted, go a long way to reducing sandpaper usage. Any m2 hss scraper can be shaped for an NRS - they don’t have to be purchased, and they dont have to be made out of more expensive steel. I shape all of my own with a 46gr stone wheel.

I sand with the piece mounted on lathe, but most of the time the lathe is off, focusing on areas that need improved. Use both a drill, for initial refining, and then an electric ros for subsequent finer grits.

Straight cabinet scrapers on the piece OD, where it makes sense, then primarily a french curve on the ID and some OD areas.

I agree. Things do improve by experience, but I have to add: ONLY if you learn how to evaluate by look and feel and make changes. If one can't learn to see and feel it, can't fix it!

The easiest thing to learn to detect and fix is the little dip or mound I see in the center of SO many bowls and platters - once you know to detect it, it only takes a few seconds to fix with a hand scraper. (I felt a "grotesque" center mound recently on an otherwise beautifully outstanding piece by a pro demonstrator. I wish there had been a time and place to discuss it.)

I'm sure many here are already perfect but for anyone interested in improving, if possible, find someone whose work you admire to evaluate your pieces. But warning: honest criticism can sometimes be hard to take!

A friend asked me to look at one of his bowls (he was SO proud of it). I asked if he wanted my honest opinion or if he just wanted me to just tell him how nice it was! Wanted the full treatment. Then he got a upset when I showed him how to feel for small irregularities both inside and outside his piece. But I was told later that he took all it to heart and it greatly improved his turnings! He even asked me repeatedly to sell him one of my bowls but I wouldn't - my wife said to just give it to him!

I also start with the best tool control I can manage, use curved NRS, then hand scrapers. My use of sandpaper has gone from using rotating disks (now never) to fairly coarse to finer sandpaper, usually sanding by hand. When I do demos on this I take the piece below to pass around. It's admittedly made from a soft wood, cedar, but after the other smoothing the only sandpaper that has touched it was 600 grit.

penta_platter_cedar_IMG_7434.jpg

I also bring one of these pieces made from maple with the top divided into sections to pass around and let people feel the difference:
from the gouge, after NRS, after scraping, and after 600 grit paper.

These days I do most smoothing and final sanding on bowls and platters and such with this carving and finishing stand from Best Wood Tools. Off the lathe it's so much easier for me to see and smooth. I recently bought a second one for just in case.
IMG_7504.jpgscraper-shavings-IMG_7864.jpgIMG_7499_e.jpg
I mostly sand by hand with a "soft sanding block", sandpaper stretched over a flexible "Magic Rub" eraser.
(If anyone is interested, my two favorite sandpapers are Klingspor Gold in rolls and sheets of Indasa Rhynowet Redline for fine grits which I buy in 9x11" sheets and cut up into 1"x3" or so strips - the best I've found anywhere, NOTHING like the horrible automobile wet&dry sandpaper!)

I've been preaching from my Hand Scraper Soapbox for about 20 years now and can point to a few converts.
At one symposium (NC?) several turners met up with me and traced my favorite NRS design and asked Doug Thompson to grind the shape!

JKJ
 
I usually power sand my bowls starting with 80 or 120. I prefer not to use scrapers inside, but I got thinking after spending a long time with 80 grit trying to remove a bump or ridge. Why not hit that with scraper?
 
As Odie mentioned if you watch the tool as form is shaped you will miss it. I find you need to watch the curve or horizon on the top of the piece as you turning, you may need to alter that back ground for contrast to see the curve more clearly

I shared this with a very experienced long time turner and was surprised that he had never done this. I turn in a darkened workshop except for a planet style lamp on a moveable arm. He wanted to move the lamp to a position where it also illuminated the background behind the piece. I explained why I wanted the dark background and he said he had never heard anyone suggest that he concentrate on the side away from where he was turning. It is understandable that beginners concentrate on the area where the tool contacts the wood, but if they miss the advanced lesson they may continue to do that and struggle to see and get a good form.
 
I explained why I wanted the dark background and he said he had never heard anyone suggest that he concentrate on the side away from where he was turning.

I always point out where to look, repeated reminding as needed. Too many concentrate on the tool - understandable if they are just learning to make good shavings with good movement, but not needed past that stage for most cuts.

I also use lamps on swing and flexible arms. But I've never thought of changing the background to better contrast with the wood! I sometimes use backdrops for photos but not for teaching. I can see a couple of backdrops in my future, maybe a dark one and a lighter one (for darker wood). And an easy way to clip them behind the lathe. Thanks.

Another thing important to me is to use several small, bright "point source" lights adjusted as needed to glance over the surface. I find this easier to judge the curves and forms (and to see scratches/defects). I think the worst lighting at the lathe is diffuse lighting, or high banks of long fluorescent bulbs.

JKJ
 
Is great to read that I’m not the only turner who works with the house lights off! I have a Laguna lathe light at the headstock, moves, swivels, tilts, as my fill light, and a studio fresnel (focusing spot light) mounted to the ceiling with a mount system that allows me to have it almost anywhere around the lathe. The sharp clean light from the fresnel shows the surface quality. All scratches become obvious, so much easier to fix.

The other great advantage, with just the two lights, is the view of the form. And not for only the last steps, ie. using a black backdrop but find turning the lights off a better approach.

I also enjoy being in my little private space. Just me, good music, and my turning. The rest of the world recedes into darkness and quiet.
 
Back
Top