I teach beginners bowl turning and that is a question sometimes raised and I do not have a good answer. Why are most bowls turned in a cross grain orientation?

-
It's time to cast your vote in the March 2026 Turning Challenge. (click here for details) -
Congratulations to Chris Lawrence for "Dragon's Grip" being selected as Turning of the Week for March 30, 2026 (click here for details) -
Welcome new registering member. Your username must be your real First and Last name (for example: John Doe). "Screen names" and "handles" are not allowed and your registration will be deleted if you don't use your real name. Also, do not use all caps nor all lower case.
You are using an out of date browser. It may not display this or other websites correctly.
You should upgrade or use an alternative browser.
You should upgrade or use an alternative browser.
Why bowls tend to be cross grain
- Thread starter russ stanton
- Start date
I don't know the reason, but I'll throw out that:
end grain is harder to turn
end grain is more porous (if anything is going in the bowl)
to turn an 8" wide x 2" tall end grain bowl you'd need a piece of wood 2" long, but 8" wide and 8" thick, and thick boards are harder to come by.
end grain is harder to turn
end grain is more porous (if anything is going in the bowl)
to turn an 8" wide x 2" tall end grain bowl you'd need a piece of wood 2" long, but 8" wide and 8" thick, and thick boards are harder to come by.
End grain bowls are highly prone to cracking as the pith remains. A properly cut cross grain blank removes the pith thereby mitigating against cracking.
When I turn end grain bowls, boxes, and vessels I NEVER leave the pith. This may require having access to larger blanks. I also normally let them dry first so cracking from drying is not a problem.
I think one reason is as Mark mentioned - bowl and platter blanks are typically cut from either lumber or from easily acquired green log sections. These are limited in size for many due to the means of loading, hauling, and working with huge blanks. Far easier to cut and manhandle cross-grain blanks, green or dry, from smaller log sections. When I get logs up to about 28" I usually slice them up on the sawmill - it's easy to cut and handle even thick slabs.
That said about large blanks - when I get big wood people who turn big things (cowboy hats, big bowls, etc) come with a truck or trailer. I can usually gently load even large log sections with the excavator. I have a 36" y.poplar tree coming down soon as well as a 28" red oak. Also some big sassafras and other species.
I'm in the process of clearing and prepping a site for a new building. Took down 14 smaller (10 to 18") trees recently by digging around the roots and either pushing and/or pulling them over. Doing this with most trees over 24" diameter scares me!
An exception: this pine was about 36" in diameter at the base BUT it was already leaning in a good direction with enough clear space that it wouldn't get hung up in other trees. Had to dig around the roots 4' down and 6' across before it would budge:
View: https://youtu.be/iTx7IDZ8sQQ
Once, however, a friend called me with some beautiful ambrosia maple log sections about 40" across. Took a lot of chainsawing to make pieces small enough for us to load in my truck and years of drying blanks but I now have some big end-grain pieces to turn.
BTW, for those who have a suitable trailer it's relatively easy to load even large logs (as long as they are round with limbs removed) with just a rope or a chain and a couple of improvised ramps (I use two 10' lengths of i-beam). Look up "parbuckling". Many time I've hauled a big trailer to a site with the truck, wrapped a chain around the log, rolled the logs by pulling on a chain with the truck or a car, then tied down and drive home. Can even load by hand with several helpers.
JKJ
I think one reason is as Mark mentioned - bowl and platter blanks are typically cut from either lumber or from easily acquired green log sections. These are limited in size for many due to the means of loading, hauling, and working with huge blanks. Far easier to cut and manhandle cross-grain blanks, green or dry, from smaller log sections. When I get logs up to about 28" I usually slice them up on the sawmill - it's easy to cut and handle even thick slabs.
That said about large blanks - when I get big wood people who turn big things (cowboy hats, big bowls, etc) come with a truck or trailer. I can usually gently load even large log sections with the excavator. I have a 36" y.poplar tree coming down soon as well as a 28" red oak. Also some big sassafras and other species.
I'm in the process of clearing and prepping a site for a new building. Took down 14 smaller (10 to 18") trees recently by digging around the roots and either pushing and/or pulling them over. Doing this with most trees over 24" diameter scares me!
An exception: this pine was about 36" in diameter at the base BUT it was already leaning in a good direction with enough clear space that it wouldn't get hung up in other trees. Had to dig around the roots 4' down and 6' across before it would budge:
Once, however, a friend called me with some beautiful ambrosia maple log sections about 40" across. Took a lot of chainsawing to make pieces small enough for us to load in my truck and years of drying blanks but I now have some big end-grain pieces to turn.
BTW, for those who have a suitable trailer it's relatively easy to load even large logs (as long as they are round with limbs removed) with just a rope or a chain and a couple of improvised ramps (I use two 10' lengths of i-beam). Look up "parbuckling". Many time I've hauled a big trailer to a site with the truck, wrapped a chain around the log, rolled the logs by pulling on a chain with the truck or a car, then tied down and drive home. Can even load by hand with several helpers.
JKJ
Google AI answers;
AI Overview
Most wood bowls are turned from the side of the tree (side-grain orientation)
to increase structural strength, prevent splitting, and allow for better wood movement during drying. By cutting from the side and avoiding the center pith, the grain runs horizontally, reducing the risk of cracking and creating a more stable, durable bowl.
 Turn A Wood Bowl +2
Key Reasons for Side-Grain Orientation:
AI Overview
Most wood bowls are turned from the side of the tree (side-grain orientation)
to increase structural strength, prevent splitting, and allow for better wood movement during drying. By cutting from the side and avoiding the center pith, the grain runs horizontally, reducing the risk of cracking and creating a more stable, durable bowl.
Turn A Wood Bowl +2Key Reasons for Side-Grain Orientation:
- Structural Stability: Turning from the side (side-grain or "face grain") ensures the grain runs across the bowl. If an end-grain bowl is made, the bottom can act like a sieve and is prone to splitting.
- Preventing Cracks: The center of the tree (pith) causes excessive stress and splitting when drying. Avoiding the center by using the side of the log ensures a more stable, crack-resistant finished piece.
- Enhanced Aesthetics: This orientation often allows for beautiful, consistent grain patterns (like "butterflies") to appear symmetrically around the bowl, rather than just concentric circles.
- Efficiency: From a single log, taking blanks from the sides allows for larger diameter bowls compared to using the end grain.
 Turn A Wood Bowl +4
For me, it is more about getting the most out of the logs I get. You just get more bowls per log if you go with side grain. I did mistakenly cut some end grain blanks. I don't like turning them AT ALL! For bowls that have spectacular medullary rays like oak or sycamore, I cringe, but some times do it anyway, I will cut the blanks with the pith at the bottom of the plate form. Another way is to quarter saw the blanks. One can waste a lot of wood going that way....
robo hippy
robo hippy
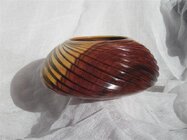
Both side grain and end grain bowls have drawbacks and both can present the grain in an attractive fashion.End grain bowls are highly prone to cracking as the pith remains. A properly cut cross grain blank removes the pith thereby mitigating against cracking.
The side grain bowl will benefit from a low sided sweeping curve, where as the end grain bowl needs to be higher sided but still have the sweeping curve
The side grain bowl has both end grain and side grain and the 2 transition points are very difficult to turn without tearout.
The end grain bowl can be turned with or without the pith and there is no transition point.
The side grain bowl will go oval as they dry, where as an end grain bowl with the pith has less tendency to distort, but an end grain bowl without the pith will go oval as it dries.
The end grain bowl with the pith should be turned from green wood that does not have checks near the pith or any end checking in the blank that can't be cut away.
I personally do not turn many end grain bowls but since about 1995 I have been making threaded lid urns with the pith visible in the base.
Thanks for all your replies. The reasons expressed are pretty much along the line of my thoughts and I will pass these along to the students
"Also some big sassafras"When I turn end grain bowls, boxes, and vessels I NEVER leave the pith. This may require having access to larger blanks. I also normally let them dry first so cracking from drying is not a problem.
I think one reason is as Mark mentioned - bowl and platter blanks are typically cut from either lumber or from easily acquired green log sections. These are limited in size for many due to the means of loading, hauling, and working with huge blanks. Far easier to cut and manhandle cross-grain blanks, green or dry, from smaller log sections. When I get logs up to about 28" I usually slice them up on the sawmill - it's easy to cut and handle even thick slabs.
That said about large blanks - when I get big wood people who turn big things (cowboy hats, big bowls, etc) come with a truck or trailer. I can usually gently load even large log sections with the excavator. I have a 36" y.poplar tree coming down soon as well as a 28" red oak. Also some big sassafras and other species.
I'm in the process of clearing and prepping a site for a new building. Took down 14 smaller (10 to 18") trees recently by digging around the roots and either pushing and/or pulling them over. Doing this with most trees over 24" diameter scares me!
An exception: this pine was about 36" in diameter at the base BUT it was already leaning in a good direction with enough clear space that it wouldn't get hung up in other trees. Had to dig around the roots 4' down and 6' across before it would budge:
View: https://youtu.be/iTx7IDZ8sQQ
Once, however, a friend called me with some beautiful ambrosia maple log sections about 40" across. Took a lot of chainsawing to make pieces small enough for us to load in my truck and years of drying blanks but I now have some big end-grain pieces to turn.
BTW, for those who have a suitable trailer it's relatively easy to load even large logs (as long as they are round with limbs removed) with just a rope or a chain and a couple of improvised ramps (I use two 10' lengths of i-beam). Look up "parbuckling". Many time I've hauled a big trailer to a site with the truck, wrapped a chain around the log, rolled the logs by pulling on a chain with the truck or a car, then tied down and drive home. Can even load by hand with several helpers.
JKJ
Dang, wish I lived closer. I drink a lot of sassafras tea, probably 3 gallons a week. The thought of those big roots you will be digging up would make a lot of tea
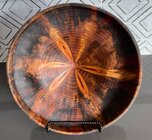
Wood moves with moisture changes. Your design must always take this into account. This is easier for cross grain bowls. For end grain bowls this is much more difficult, unless you just use half logs. However, with suitable shape which lets it deform without stresses it is possible, this usually requires a small diameter bottom and fairly sloping walls. Also note that you must turn it from green wood, let it dry and do the final touch up. Example here in oak 29x13 cm, foot 5 cm diam.


Another alternative is to split in half logs, dry and glue together before turning, or even better, turn green with thick walls, split and let dry, glue together and finish turn. Here willow

Another alternative is to split in half logs, dry and glue together before turning, or even better, turn green with thick walls, split and let dry, glue together and finish turn. Here willow
- Joined
- Apr 27, 2004
- Messages
- 9,329
- Likes
- 6,142
- Location
- Lakeland, Florida
- Website
- www.hockenberywoodturning.com
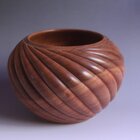
StrengthI teach beginners bowl turning and that is a question sometimes raised and I do not have a good answer. Why are most bowls turned in a cross grain orientation?
Face grain bowls are much stronger in use and less likely to crack
When you teach cut 2 thin pieces on the 2 x 4 band saw on with face grain showing the other with endgrain showing
Let the student try to snap them in half
Looks
funitture makers have been striving* to hide engrain for 2000 years
Do you want to show the bad side of the wood in the bottom of bowl
There are occasional pieces that look good turned end grain
Workability
In general much easier to turn and finish facegrain bows than it is to turn endgrain bowls
Drying
Pith in an engrain bowl is always a crack in waiting
Lennart,Wood moves with moisture changes. Your design must always take this into account. This is easier for cross grain bowls. For end grain bowls this is much more difficult, unless you just use half logs. However, with suitable shape which lets it deform without stresses it is possible, this usually requires a small diameter bottom and fairly sloping walls. Also note that you must turn it from green wood, let it dry and do the final touch up. Example here in oak 29x13 cm, foot 5 cm diam.
View attachment 85720 View attachment 85721
Another alternative is to split in half logs, dry and glue together before turning, or even better, turn green with thick walls, split and let dry, glue together and finish turn. Here willow
View attachment 85722
Is it better to rough the end grain bowl and twice turn it? I assume thats what you meant by let it dry then touch it up?
This very subject is where i am at right now, have a bunch of logs that i need to deal with before they start checking and deteriorating on me, i need to get them blanked into useable pieces that i can turn at a later date. Have a feeling the end grain slices will be the toughest to keep viable because of the pith, not a total loss if they check, can fill with resin, but prefer to just have good blanks so am trying to figure out a path forward. Am planning on dicing stuff up as close as possible to pieces i can handle and end coating them and sticking them on shelves to dry/sit till i have time to turn them.
Creating blanks for taller vessels is one of the things im curious about, figuring i need to just rough out larger square long shapes like 8x8 or 10x10 etc and as long as i think i can pull off, or handle safely, say 12 to 20 or so inches.
Some of the smaller branches i am thinking of just turning end grain whole piece vessels and bowls, am thinking i need to leave them a bit longer and seal the hell out of the ends to reduce cracks. Sorta frustrating really, get going with saw and chalk in hand then go blank standing there looking at the piles, but i know i cant just leave whole logs as i will end up with big piles of compost!
You cannot leave the walls thick as normal twice turning and then turn it again. It must be fairly thin at the bottom to avoid splitting.Lennart,
Is it better to rough the end grain bowl and twice turn it? I assume thats what you meant by let it dry then touch it up?
You cannot dry the blanks with pith, however carefully. Radial and tangential shrinkage are different and will make them crack.This very subject is where i am at right now, have a bunch of logs that i need to deal with before they start checking and deteriorating on me, i need to get them blanked into useable pieces that i can turn at a later date. Have a feeling the end grain slices will be the toughest to keep viable because of the pith, not a total loss if they check, can fill with resin, but prefer to just have good blanks so am trying to figure out a path forward. Am planning on dicing stuff up as close as possible to pieces i can handle and end coating them and sticking them on shelves to dry/sit till i have time to turn them.
Creating blanks for taller vessels is one of the things im curious about, figuring i need to just rough out larger square long shapes like 8x8 or 10x10 etc and as long as i think i can pull off, or handle safely, say 12 to 20 or so inches.
Some of the smaller branches i am thinking of just turning end grain whole piece vessels and bowls, am thinking i need to leave them a bit longer and seal the hell out of the ends to reduce cracks. Sorta frustrating really, get going with saw and chalk in hand then go blank standing there looking at the piles, but i know i cant just leave whole logs as i will end up with big piles of compost!
Thats kinda what i figured, long term nothing with the pith will survive. Pretty much like lumber.You cannot dry the blanks with pith, however carefully. Radial and tangential shrinkage are different and will make them crack.
In your post above this,
How thin is thin enough? I am sure species has some influence on this, but as a general rule, 1/2” or less? 3/8”? I suppose once turned may well be a better option and just take it thin straight off
Thank you for the input. I dont want to waste perfectly good turning stock, hard to come by
PROCESSING AND DRYING BLANKS
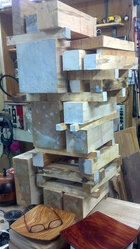
Tom, I've cut and dried many 100s, maybe 1000s of blanks over the years, mostly end grain for boxes, vessels, etc, and have had very few failures. Of course we don't have the same wood species but I do process a variety. Almost all of my blanks are square or rectangular, from 1/2" square up to 12", and various lengths. The length doesn't matter except for the drying time. I use Anchorseal - note that it's basically blended paraffin wax, water, and a surfactant to let the water and wax play together well.
I find several things important.
For end grain bowls or vessels, or boxes, I may partially turn the outside and maybe the inside after drying a bit, then reseal and continue drying. If the piece is getting close to dry there's not much reason to reseal.
Here are some blanks I cut up on the sawmill and trimmed the ends with the chainsaw, ready to take inside to prepare for drying.

Some blanks I cut up one afternoon, ready to stack on the drying shelves.

2x2s might dry in a few weeks. Large blanks of some species might that 5-10 years. Have enough on hand and the drying time is no problem - there is ALWAYS plenty of dry ready to pick of the shelf and dry.
Since I even prefer to turn bowls dry, I'll first dry the blank then cut a round bowl blank. The will dry faster if rounded first but they will warp out of round and still might develop cracks on the end grain. This is, of course, a side/face grain blank.

TURNING WET
For those who prefer to turn wet sopping wood, not much of this matters. Best thing is to keep the wood wet until. ready to turn, rough, seal and dry or simply turn to finished thickness. The worst thing to do is wait too long until checks and deep cracks have started to form on the end grain. In this case, cut away enough to remove the cracks and test for hidden cracks as before.
The late great John Jordan woodturner said to avoid all this he just bought whole logs and stored them off the ground out of the sun. If necessary, he would hire someone to deliver the log. When ready to turn a piece, he'd cut about 6" off the end and throw that piece away. Then mark and cut the blank he wanted and take it inside and turn it. He obviously turned green.
He gave me a blank once of the size he used for many hollow forms. I took it home, sealed it, and put it up to dry.
This is my favorite kitchen scale for weighing, higher capacity than most, accurate, I have three. $10 more a few years back but that's life in today's world. I've tried multiple scales and like this one best.
www.amazon.com/dp/B07QP4XQNV
This it my favorite tape to use around that lathe to support things and for labels that will stick or concrete block and wet wood. It is NOT your father's masking tape, nothing like the stuff from the big box store. Scotch 2060 masking tape for rough and 'hard to stick' surfaces. We also use it in the kitchen to label containers for the fridge and things that go in the freezer, to label containers and boxes in the shop. To tape up things that need to stay together. To provide extra holding when jam chucking or using Cole jaws, turning the detail in the top of a box lid. (tape the lid to the base.) I've found a multitude of uses.
Best tape ever. I buy it in widths from up to 2" for labels, narrower for other uses. I write on it with fine and extra-fine black Sharpies.

JKJ
Tom, I've cut and dried many 100s, maybe 1000s of blanks over the years, mostly end grain for boxes, vessels, etc, and have had very few failures. Of course we don't have the same wood species but I do process a variety. Almost all of my blanks are square or rectangular, from 1/2" square up to 12", and various lengths. The length doesn't matter except for the drying time. I use Anchorseal - note that it's basically blended paraffin wax, water, and a surfactant to let the water and wax play together well.
I find several things important.
- Cut away any visible cracks in the log section or after cutting the log into blanks. This does not prove there are no invisible cracks which will come back to haunt you later.
- After cutting away any visible blanks, cut off one additional thin section from the end grain - maybe 1/8" to 3/16" thick. This is easier after the wood is cut into square or rectangular blanks which can sit flat on the bandsaw table. Bend that thin section and see if it cracks or breaks in two. If it does, cut away a little more and repeat the bend. Keep cutting until NO thin sections will crack.
- Best to immediately seal that end with Anchorseal
- Note that I never use Anchorseal as provided but always thicken it first. That will result in a thicker coat of wax and seal much better. (It doesn't work so well to apply a second coat later since you will be applying water to paraffin and it won't coat effectively. To thicken Anchorseal I pour about 1" or so into a plastic coffee can and let is sit without the lid of for a few days or weeks, whatever it takes to thicken it. I keep a cheap brush in the can and stir occasionally. When it's thick enough to suit me, I put the lid on with the brush inside. When that coat starts to get low I may start another can or simply add and mix some new Anchorseal, stir it around, and let that thicken.
- If I can't apply Anchorseal immediately I might submerge the blanks in a tub of water or spritz them with water and put them in a plastic bag for overnight. (If left in a plastic bag TOO long, depending on the temperature, the wood may well begin to spalt. This can be wonderful or turn to rot.
- I also seal the side grain of some blanks, for example the sides of blanks of some species (dogwood is a good example) where the both the heart wood are visible on the side. (The two dry and shrink at much different rates and can crack along the where they meet) I also seal any side grain that is highly figured, such as burl.. I seal some blanks on all 6 sides.
- After trimming both ends and sealing, I put the blank on a wire shelf to air dry, making sure the species and date are written on the side of each piece. Do not use a fan or heat to accelerate drying. I dry inside my climate=controlled shop.
- I'd rather have smaller good quality blanks than longer blanks. I don't do crack filling.
- After letting them air dry for a week or several weeks I examine each blank for cracks that are starting to form in spite of the sealing.
- If I find any developing cracks, they go back to the bandsaw to be cut away. Since the blank has been drying for a bit much of the water has already left the ends of the blank and remaining water gradient inside has started to equalize.
- I test thin slices as before for hidden cracks. When all good, the cutaway ends or sides get another coat of sealer, put back of the shelf. I'll recheck a time or two then put them up and forget about them
- Note that on some occasions I leave some cracks in the wood. And example is some spindle blanks where I know I'll hold one end in a chuck and cut it away as waste at the end. A few short, minor cracks won't hurt anything.
- I mark ALL visible remaining cracks, even if they are in a place that will probably be cut away. When I grab a dry blank to turn, this alerts me to examine the blank to make sure it will work for that turning.
- I separate the blanks into lots of the same species, blanks roughly close in sizes. I put a piece of green Scotch 2060 masking tape on the side o the blank, weigh with a precise scale, and write the month, day, and the weight in grams on the tape.
- Every few months I weigh again and record the month and the weight. The weight will drop and when it quits dropping that blank and those of similar size in the same batch are dry. The original strong moisture gradient inside has equalized and the wood is at EMC for that environment and can be safely turned. The weight may even go up a little with seasonal changes, but they are still dry.
For end grain bowls or vessels, or boxes, I may partially turn the outside and maybe the inside after drying a bit, then reseal and continue drying. If the piece is getting close to dry there's not much reason to reseal.
Here are some blanks I cut up on the sawmill and trimmed the ends with the chainsaw, ready to take inside to prepare for drying.
Some blanks I cut up one afternoon, ready to stack on the drying shelves.
2x2s might dry in a few weeks. Large blanks of some species might that 5-10 years. Have enough on hand and the drying time is no problem - there is ALWAYS plenty of dry ready to pick of the shelf and dry.
Since I even prefer to turn bowls dry, I'll first dry the blank then cut a round bowl blank. The will dry faster if rounded first but they will warp out of round and still might develop cracks on the end grain. This is, of course, a side/face grain blank.
TURNING WET
For those who prefer to turn wet sopping wood, not much of this matters. Best thing is to keep the wood wet until. ready to turn, rough, seal and dry or simply turn to finished thickness. The worst thing to do is wait too long until checks and deep cracks have started to form on the end grain. In this case, cut away enough to remove the cracks and test for hidden cracks as before.
The late great John Jordan woodturner said to avoid all this he just bought whole logs and stored them off the ground out of the sun. If necessary, he would hire someone to deliver the log. When ready to turn a piece, he'd cut about 6" off the end and throw that piece away. Then mark and cut the blank he wanted and take it inside and turn it. He obviously turned green.
He gave me a blank once of the size he used for many hollow forms. I took it home, sealed it, and put it up to dry.
This is my favorite kitchen scale for weighing, higher capacity than most, accurate, I have three. $10 more a few years back but that's life in today's world. I've tried multiple scales and like this one best.
www.amazon.com/dp/B07QP4XQNV
This it my favorite tape to use around that lathe to support things and for labels that will stick or concrete block and wet wood. It is NOT your father's masking tape, nothing like the stuff from the big box store. Scotch 2060 masking tape for rough and 'hard to stick' surfaces. We also use it in the kitchen to label containers for the fridge and things that go in the freezer, to label containers and boxes in the shop. To tape up things that need to stay together. To provide extra holding when jam chucking or using Cole jaws, turning the detail in the top of a box lid. (tape the lid to the base.) I've found a multitude of uses.
Best tape ever. I buy it in widths from up to 2" for labels, narrower for other uses. I write on it with fine and extra-fine black Sharpies.
JKJ
Attachments
Like Lennart said about shape applies but that does not mean that it won't survive.Thats kinda what i figured, long term nothing with the pith will survive. Pretty much like lumber.


These 2 bowls were turned with the pith from northern red oak (MN US) and they survived without ever cracking on the pith and just looking at Lennart's bowl I wouldn't expect to be a problem.
Now thats the way to have blanks!PROCESSING AND DRYING BLANKS
Tom, I've cut and dried many 100s, maybe 1000s of blanks over the years, mostly end grain for boxes, vessels, etc, and have had very few failures. Of course we don't have the same wood species but I do process a variety. Almost all of my blanks are square or rectangular, from 1/2" square up to 12", and various lengths. The length doesn't matter except for the drying time. I use Anchorseal - note that it's basically blended paraffin wax, water, and a surfactant to let the water and wax play together well.
I find several things important.
Even after sealing, some blanks can start to develop cracks. How I save them:
- Cut away any visible cracks in the log section or after cutting the log into blanks. This does not prove there are no invisible cracks which will come back to haunt you later.
- After cutting away any visible blanks, cut off one additional thin section from the end grain - maybe 1/8" to 3/16" thick. This is easier after the wood is cut into square or rectangular blanks which can sit flat on the bandsaw table. Bend that thin section and see if it cracks or breaks in two. If it does, cut away a little more and repeat the bend. Keep cutting until NO thin sections will crack.
- Best to immediately seal that end with Anchorseal
- Note that I never use Anchorseal as provided but always thicken it first. That will result in a thicker coat of wax and seal much better. (It doesn't work so well to apply a second coat later since you will be applying water to paraffin and it won't coat effectively. To thicken Anchorseal I pour about 1" or so into a plastic coffee can and let is sit without the lid of for a few days or weeks, whatever it takes to thicken it. I keep a cheap brush in the can and stir occasionally. When it's thick enough to suit me, I put the lid on with the brush inside. When that coat starts to get low I may start another can or simply add and mix some new Anchorseal, stir it around, and let that thicken.
- If I can't apply Anchorseal immediately I might submerge the blanks in a tub of water or spritz them with water and put them in a plastic bag for overnight. (If left in a plastic bag TOO long, depending on the temperature, the wood may well begin to spalt. This can be wonderful or turn to rot.
- I also seal the side grain of some blanks, for example the sides of blanks of some species (dogwood is a good example) where the both the heart wood are visible on the side. (The two dry and shrink at much different rates and can crack along the where they meet) I also seal any side grain that is highly figured, such as burl.. I seal some blanks on all 6 sides.
- After trimming both ends and sealing, I put the blank on a wire shelf to air dry, making sure the species and date are written on the side of each piece. Do not use a fan or heat to accelerate drying. I dry inside my climate=controlled shop.
Actually, I don't forget about them, but start monitoring the moisture content after a few more weeks.
- I'd rather have smaller good quality blanks than longer blanks. I don't do crack filling.
- After letting them air dry for a week or several weeks I examine each blank for cracks that are starting to form in spite of the sealing.
- If I find any developing cracks, they go back to the bandsaw to be cut away. Since the blank has been drying for a bit much of the water has already left the ends of the blank and remaining water gradient inside has started to equalize.
- I test thin slices as before for hidden cracks. When all good, the cutaway ends or sides get another coat of sealer, put back of the shelf. I'll recheck a time or two then put them up and forget about them
- Note that on some occasions I leave some cracks in the wood. And example is some spindle blanks where I know I'll hold one end in a chuck and cut it away as waste at the end. A few short, minor cracks won't hurt anything.
- I mark ALL visible remaining cracks, even if they are in a place that will probably be cut away. When I grab a dry blank to turn, this alerts me to examine the blank to make sure it will work for that turning.
What about moisture meters? I have both pinless an pin moisture meters. The problem with both of these is unless the blank is almost dry there can be a moisture gradient with the blank (wetter in the center than towards the surfaces) and the meters are not accurate. Both types are more suited to boards than thick turning blanks. The pin type won't measure much deeper than you drive the pins. The pinless will measure a little deeper but not deep enough for turning blanks. The pinless meters, at least the one I have, require a flat spot to fit the sensor area on the meter. I think the best way is to monitor the weight.
- I separate the blanks into lots of the same species, blanks roughly close in sizes. I put a piece of green Scotch 2060 masking tape on the side o the blank, weigh with a precise scale, and write the month, day, and the weight in grams on the tape.
- Every few months I weigh again and record the month and the weight. The weight will drop and when it quits dropping that blank and those of similar size in the same batch are dry. The original strong moisture gradient inside has equalized and the wood is at EMC for that environment and can be safely turned. The weight may even go up a little with seasonal changes, but they are still dry.
For end grain bowls or vessels, or boxes, I may partially turn the outside and maybe the inside after drying a bit, then reseal and continue drying. If the piece is getting close to dry there's not much reason to reseal.
Here are some blanks I cut up on the sawmill and trimmed the ends with the chainsaw, ready to take inside to prepare for drying.
View attachment 86655
Some blanks I cut up one afternoon, ready to stack on the drying shelves.
2x2s might dry in a few weeks. Large blanks of some species might that 5-10 years. Have enough on hand and the drying time is no problem - there is ALWAYS plenty of dry ready to pick of the shelf and dry.
Since I even prefer to turn bowls dry, I'll first dry the blank then cut a round bowl blank. The will dry faster if rounded first but they will warp out of round and still might develop cracks on the end grain. This is, of course, a side/face grain blank.
View attachment 86658
TURNING WET
For those who prefer to turn wet sopping wood, not much of this matters. Best thing is to keep the wood wet until. ready to turn, rough, seal and dry or simply turn to finished thickness. The worst thing to do is wait too long until checks and deep cracks have started to form on the end grain. In this case, cut away enough to remove the cracks and test for hidden cracks as before.
The late great John Jordan woodturner said to avoid all this he just bought whole logs and stored them off the ground out of the sun. If necessary, he would hire someone to deliver the log. When ready to turn a piece, he'd cut about 6" off the end and throw that piece away. Then mark and cut the blank he wanted and take it inside and turn it. He obviously turned green.
He gave me a blank once of the size he used for many hollow forms. I took it home, sealed it, and put it up to dry.
This is my favorite kitchen scale for weighing, higher capacity than most, accurate, I have three. $10 more a few years back but that's life in today's world. I've tried multiple scales and like this one best.
www.amazon.com/dp/B07QP4XQNV
This it my favorite tape to use around that lathe to support things and for labels that will stick or concrete block and wet wood. It is NOT your father's masking tape, nothing like the stuff from the big box store. Scotch 2060 masking tape for rough and 'hard to stick' surfaces. We also use it in the kitchen to label containers for the fridge and things that go in the freezer, to label containers and boxes in the shop. To tape up things that need to stay together. To provide extra holding when jam chucking or using Cole jaws, turning the detail in the top of a box lid. (tape the lid to the base.) I've found a multitude of uses.
Best tape ever. I buy it in widths from up to 2" for labels, narrower for other uses. I write on it with fine and extra-fine black Sharpies.
View attachment 86659
JKJ
After blowing up a natural edge bowl i was trying to turn this morning im thinking i will turn most of the stock i want to use for turning into blocks like that, just easier to deal with, will save some of the outer cuts from the mill to make those natural edge sorta blanks, the band mill definitely makes dicing stuff up easier, i made a jig that sits on the mill with a couple long bar clamps and can hold blocks, shorts, small logs etc from 8”- up to 7’.
I like the idea of getting rid of the pith right away, when i was cutting commercially id just toss those boards, unless the log was big and there was a wide quarter sawn piece outside of the pith, nobody wanted them anyway.
Yep, the moisture meters are pretty much useless for this stuff, even my ligno with the long remote probes, kinda a waste of time, plus then theres holes in the wood.
I think my cypress chunks will survive better than the koa or the jackaranda, doesnt seem to check as bad but the pith can be punky in the oddest places. I guess to turn deeper calabash style bowls i should just get some of the primo pieces off the biggest log and just close my eyes when i cut it so i dont feel bad about not slabbing it. Was thinking half for big blanks and half cut into slabs, dont think its worth cutting boards out of it, isnt curly or anything remarkable so people are just not interested in it for furniture pieces, thats part of why im retiring and just doing my own thing, sick and tired of picky ass people who cant make toast telling me how i should build a cabinet.
Good idea on the tape, was going to use some plastic plant tags i have and thumb tack them on, dont need to do everything because i basicly just have 4 species im cutting, and all are pretty distinct, tags are more for id on what i was thinking for certain pieces, everything will be from about the same timeframe so not sure i need to get too carried away on dating everything. If i start getting more stock ill date that,


I like the little feet, that must have taken some time to rough those out. I think my biggest problem will be not cutting too thin, almost went through a little bowl i was fooling with today, kept screwing up my last cut in the center on the inside, kept telling myself, “ a little more wont hurt “ its pretty thin.Like Lennart said about shape applies but that does not mean that it won't survive.
View attachment 86660View attachment 86661
These 2 bowls were turned with the pith from northern red oak (MN US) and they survived without ever cracking on the pith and just looking at Lennart's bowl I wouldn't expect to be a problem.
Yikes, on last inventory I had at least 125 species. If I don't at least write the names on the wood I'm hopelessly confused later, especially when some wood darkens.i made a jig that sits on the mill with a couple long bar clamps and can hold blocks, shorts, small logs etc from 8”- up to 7’.
...i basicly just have 4 species im cutting, and all are pretty distinct,
I also made means for my mill to cut short pieces. The cross bars are 4' across so for short pieces I use lag screws to make a big "L" from two pieces of dimensional lumber, maybe 2x12 and 2x8 pine I think. I can position that on the mill, set a log section near the front and cut blocks (people want them for bowl blanks). The vertical part of the "L" is sacrificial as I make different sized cuts. I hold the log section with one clamp.

This bowl turner was happy.

JKJ