• Beware of Counterfeit Woodturning Tools (click here for details)
  • Johnathan Silwones is starting a new AAW chapter, Southern Alleghenies Woodturners, in Johnstown, PA. (click here for details)
  • Congratulations to Paul May for "Checkerboard (ver 3.0)" being selected as Turning of the Week for March 25, 2024 (click here for details)
  • Welcome new registering member. Your username must be your real First and Last name (for example: John Doe). "Screen names" and "handles" are not allowed and your registration will be deleted if you don't use your real name. Also, do not use all caps nor all lower case.

Wire Inlay

Randy Anderson

Beta Tester
Beta Tester
Joined
May 25, 2019
Messages
834
Likes
1,227
Location
Eads, TN
Website
www.etsy.com
I searched the forum and couldn't find any discussions with details so - watching a video I saw a turner put a thin groove in his work and then tap in thin wire that stayed in place. No audio in english and one of those from India with no details. He cut the ends very very close so the gap was barely visible. I thought this might be something to try that might actually not be too hard. Several discussions I found here about using metal powders and epoxy for inlays but wondering if anyone has used just copper wire or jewelers wire tapped into a thin groove. If so any tips on technique or wire to use?

Well, didn't think to just do a youtube search - duh. I see a few to look at so maybe info there I can use.
 
Joined
May 4, 2010
Messages
2,432
Likes
1,846
Location
Bozeman, MT
You'll find some youtube help, and there's a DVD or two by someone whose name is escaping me. (Oldtimers strikes) The thing that I recall being a key, is that round wire tends not to stay in the grooves. The round wire needs light hammering so it has a more squared off cross section.
 
Joined
Jun 13, 2020
Messages
233
Likes
312
Location
Jackson, NJ
Website
www.blacklabelwoodworks.com
2 guys in my club do this in different ways. One guy does it strictly on turned work and uses round wire. he cuts the ends at about a 45 degree angle and overlaps them to make the seam disappear. Then he sands it flat. The other guy does alot of flat work and runs his wire through a pair small rollers that flattens it out. I think he said the rollers were made for jewelry making. He does alot of intricate inlay work.
 
Joined
Oct 25, 2005
Messages
935
Likes
241
Location
Newberg, OR: 20mi SW of Portland: AAW #21058
I've done a little bit of this sort of inlay. Choose non-ferrous materials: copper, aluminum, pewter, silver, even gold ;). These metals can easily be cut with standard HSS turning tools or scrapers. The channel needs to be pretty snug in width and not more than 50-60% of the wire's thickness. Use a steeply angled miter cut to mate the ends when coming around to form a continuous loop. This can help hide the joint.

Be aware that there can be seasonal changes to the flush-ness of the wire to the wood surface as the wood moves with humidity. For this reason, epoxy is preferred over CA due to its flexibility.
 

Emiliano Achaval

Administrator
Staff member
Beta Tester
TOTW Team
Joined
Dec 14, 2015
Messages
3,307
Likes
4,224
Location
Maui, Hawaii
Website
hawaiiankoaturner.com
I don't know that friction alone would hold the wire in permanently. Probably some well place super glue would be helpful.
I'm also having a young turner mental block, LOL, but one of the traveling professionals that visited us, inlay Sterling wire in a box. I bought the wire, I still have a lot. It is a thick gauge, he drilled little holes on top of the lid of the box, then a bit of CA on the hole then goes the wire, cut it, then sand it flush. YOu can make endless patterns. Looks great on darker timber, like African Blackwood.
 

john lucas

AAW Forum Expert
Joined
Apr 26, 2004
Messages
8,321
Likes
3,576
Location
Cookeville, TN
It's called Silver Wire Inlay and has been done on high end Rifles for a long time. I found some great videos on youtube but I just changed computers and may have lost all of that. I will see if I can find one. I watched a man do it years ago and bought the wire but it's simply been on the back burner due to 2 moves and having to build 2 shops and other assorted things to push it back. I do plan on making the tools and trying it because I think it's perfect for my hand mirrors and some lidded boxes. It is very time consuming. I'm still having trouble doing simple things on this computer and can't seem to open a new window to look for the videos. Yep just looked and I've lost all my youtube subscription. I did a search for silver wire inlay and found on of my favorites. Thyis guy
View: https://www.youtube.com/watch?v=AN9Yzbgepj8&t=485s
There were quite a few more.
The man who showed me how cut a groove a different way using a custom made knive that you pull through the work. I built one but it was hard to control. Tye technique shown in the video I posted is much easier to control and tools are easy to make using Exacto knive blades. The man who showed me cut the groove, pushed the wire down in and then rubbed water over it to swell the wood and lock the wire in place. He makes very high end muzzleloader rifles. To inlay larger pieces like leaves he used brass brads that he makes. and after driving them flush with the brass part he files and sands them flush any you can't see them.
 
Last edited:
Joined
Nov 14, 2020
Messages
69
Likes
32
Location
Fergus, Ontario
I use a fair bit of stirling wire for inlay. The groove is cut with a sharpened broken hacksaw blade, just the right thickness, and glued with ac .
Sanded smooth with the wood surface. To avoid staining certain woods with the ac glue, spray some lacquer and then glue the wire.
It will be sanded off with the final sanding.
 

Randy Anderson

Beta Tester
Beta Tester
Joined
May 25, 2019
Messages
834
Likes
1,227
Location
Eads, TN
Website
www.etsy.com
Thanks for all the tips. I've watched a number of youtube videos on the process and think I have the basics. I see guys using plain heavy gauge single strand copper wire, sometimes twisted into a braid. Would think over time it would tarnish and lose it's shine. I see some good options online for purchasing stirling silver wire spools that are not nearly as expensive as I would have thought.
 
Joined
Oct 25, 2005
Messages
935
Likes
241
Location
Newberg, OR: 20mi SW of Portland: AAW #21058
Thanks for all the tips. I've watched a number of youtube videos on the process and think I have the basics. I see guys using plain heavy gauge single strand copper wire, sometimes twisted into a braid. Would think over time it would tarnish and lose it's shine. I see some good options online for purchasing stirling silver wire spools that are not nearly as expensive as I would have thought.

I can't think of a common metal that won't tarnish (oxidize) -- excepting maybe high-carat gold. Some get very dark, like silver and copper, some get a dulled appearance like aluminum and pewter. For this reason, you have to be sure to take into account the oxidized look and how polishing it will affect the surrounding wood. For example, I can envision removing silver tarnish will stain a lighter colored wood.

In my experience, pewter seems to keep its luster a fair length of time and is easy to work with.
 

Bill Boehme

Administrator
Staff member
Beta Tester
TOTW Team
Joined
Jan 27, 2005
Messages
12,884
Likes
5,168
Location
Dalworthington Gardens, TX
Website
pbase.com
I searched the forum and couldn't find any discussions with details so - watching a video I saw a turner put a thin groove in his work and then tap in thin wire that stayed in place. No audio in english and one of those from India with no details. He cut the ends very very close so the gap was barely visible. I thought this might be something to try that might actually not be too hard. Several discussions I found here about using metal powders and epoxy for inlays but wondering if anyone has used just copper wire or jewelers wire tapped into a thin groove. If so any tips on technique or wire to use? ......

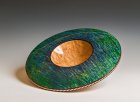
I have made a few dyed rim platters with a twisted pair of copper wires. Here is one that I made several years ago and the boss lady said it's a keeper.

dyed rim and copper platter.jpg

The wire is 14 gauge copper Romex that I pulled out of the wall in the garage when doing some rewiring to add circuits for a lathe and an air conditioner. Fourteen gauge copper is easy to work with. I have used twelve-gauge copper wire, but it's a lot more work and ten gauge copper wire is next to impossible.

I turn a rabbet on the edge of the platter that is slightly undercut and a tight fit at the opening so that once the wire is pushed in it will stay (usually). I paint the inside of the rabbet black. The ends of the two wires are cut so that they are staggered one twist apart such that the joined ends are hidden on the backside. Use a small file to bevel the ends of the wires so that the joint will be less noticeable. This part is the most time consuming because it involves adjusting the twist in the wires and sneaking up on the length (there's no fix other than starting over if you cut the wires too short). For the best clarity, I prefer clear Inlace. I've tried several types of epoxy and didn't like the results. Once the Inlace has cured 12 to 24 hours I use a bowl gouge to trim about one-quarter of the way through the copper and stop when I like the appearance. I use Micromesh up to 12000 grit to polish the edge. Finally, I use a black paint pen to add a black border on each side of the copper braid.

I use clear gloss lacquer to finish the piece and that protects the copper from tarnishing ... going on eight years.
 
Joined
Oct 25, 2005
Messages
935
Likes
241
Location
Newberg, OR: 20mi SW of Portland: AAW #21058
Did a couple, but the biggest problem that showed up was the wire coming out of the groove with the drying and expanding wood, they always did come out eventually, even the one I soldered the ends together.
I made this pewter rimmed and footed bowl a number of years ago. It's about 8" across and the wood is cherry. It's a situation where you look at it and notice something is odd - asymmetric, warped maybe... The reason it looks warped is because it is. The wood moves throughout the year and the pewter moves with it. You don't generally notice such movement in a regular bowl but the bright pewter really accentuates the warp. Pewter bowl.jpg
 

Bill Boehme

Administrator
Staff member
Beta Tester
TOTW Team
Joined
Jan 27, 2005
Messages
12,884
Likes
5,168
Location
Dalworthington Gardens, TX
Website
pbase.com
Did a couple, but the biggest problem that showed up was the wire coming out of the groove with the drying and expanding wood, they always did come out eventually, even the one I soldered the ends together.

I suppose that I've been fortunate and haven't had any of the wire and resin inlays come loose. One factor is probably due to the much lower winter indoor absolute humidity in Ontario compared to the mild winters and higher humidity in Texas (this week being the exception ... this week we are having a little bit of Canada with temperatures hovering around 0° F (approx. -18° C). Another factor is size ... the platter that I posted above is only about 9½" diameter (approx. 24 cm). I also make the rims relatively thin so that the wood won't have enough "muscle" to crack the inlay.
 

Randy Anderson

Beta Tester
Beta Tester
Joined
May 25, 2019
Messages
834
Likes
1,227
Location
Eads, TN
Website
www.etsy.com
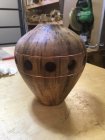
Nothing like the samples you guys posted but, my first copper wire inlay. Some spalted magnolia that I have a few hollow forms of already so a good test piece. Lessons learned - I had to true up the outside of the piece so that my groove depth could be consistent. I need to better match my groove width to the wire so it fits tighter. This was a good fit but not tight enough to hold it on it's own. I didn't try the taper method for the ends. I cut them flat, very close, and then filed the end of the wire so the joint is barely visible. I only have CA glue in a few spots on each wire so will see how it holds over time. And yes, for those that notice - my wall thickness is not great. I wanted room to practice, mess up and fix, true up, etc. Not sure how I would do this on a thin walled one that dries out of round.
 

Attachments

  • IMG_4511.JPG
    IMG_4511.JPG
    50.8 KB · Views: 59
Joined
Jul 26, 2015
Messages
328
Likes
428
Location
Hot Springs, AR
Randy... nice. I've been thinking about doing something with wire for a while but I always seem to get dragged in another direction. perhaps this year?
 
Joined
Jun 1, 2006
Messages
326
Likes
154
Location
Freelton, ON
Any time I hear about wire inlay, I think of an opportunity I had to listen to Canadian Master Furniture Maker, Michael Fortune as he went through two carousels of slides of his work which started in the late 70s. He has sold hundreds of his chair number one. The chairs with sterling silver inlay went for $1000 more and that was more than 15 years ago. https://www.wooddustaustralia.com/blog/woodworking-is-a-journey-the-work-of-michael-fortune/ He uses a modified cabinet scraper. I do not know it it could be adapted to turning. http://web.hypersurf.com/~charlie2/InlayingLine/Inlaying1.html
 
Last edited:
Back
Top