• Congratulations to Tim Soutar winner of the May 2025 Turning Challenge (click here for details)
  • Congratulations to Dave Landers for "Pod Box" being selected as Turning of the Week for June 2, 2025 (click here for details)
  • Welcome new registering member. Your username must be your real First and Last name (for example: John Doe). "Screen names" and "handles" are not allowed and your registration will be deleted if you don't use your real name. Also, do not use all caps nor all lower case.

Witness Marks, Sanding Scratches, and other issues that crop up when trying to produce a superb finish...

Joined
Jul 30, 2021
Messages
688
Likes
211
Location
Aurora, CO
I have opened a couple of other threads on finishing recently. I figure it won't hurt to start another. Something I've often run into, when I use a variety of finishes, are either witness marks (which I think is what occurs when you sand through, entirely or partially, a prior coat before layering on the next), or sanding scratches that are not visible on the bare wood, but show up once you start coating on layers of finish.

I used to run into witness marks a fair bit, when I spent several months trying to learn how to optimally apply poly, without much success. I eventually learned just how important wood surface prep was, and how perfect the surface needed to be, in order to get a good quality, shiny (to one degree or another) poly (or spar) finish. The amount of effort at the time seemed rather daunting, and I fell back on my more trusted approach: shellac with Acks sanding paste and polishing wax. It produces this nice satin sheen that I really love, although its not really durable.

Thing about the shellac...it very easily makes any and all remnant sanding scratches, if they are not otherwise perfectly obscured in the grain and other features of the wood, show right through! In fact some times it seems as though shellac can even greatly enhance them and make everything look quite terrible. The worst part of it is, I will often spend a heck of a lot of time prepping the wood surface, examining the piece from a wide variety of angles, to see if I've found and eliminated all the scratches, before putting on the first coat of shellac. The way bare wood fibers disperse and scatter light, I think, is what makes it so hard to see these scratches. I've gotten into, what I think is actually a bad habit, of sanding with rather fine grits...I used to stop at 320 or 400, but now I'm up to 600 and even 800 on most pieces, and sometimes even 1200, after which I'll maybe go back down to 800 once I'm sure I've removed all the scratches, as even shellac doesn't seem to penetrate the smooth, closed off pores from 1200 grid sanding.

I am wondering if I am missing something, here, about witness marks and visible scratches. Are there techniques to help ensure you either don't leave any scratches from lower grit sandpapers behind at all, or help you make sure you clean all of them up more easily, before you start layering on your finish? My eyesight, even though I'm only 45, is not the best...I have what my eye doc calls "cloudy masses" in my vitreous humor, which often sit right in the middle of my vision. They make my vision a bit milky, which then makes it hard to see fine details. I picked up a pair of glasses for close up vision, which has helped a bit, but if these cloudy masses get in the way, its often hard to move them out of the way and they do limit my vision. I don't know what to do here, really, to make sure I'm fully eliminating scratches in particular. I feel like I spend an inordinately exorbitant amount of time trying to produce a clean, scratch-free surface, that its ultimately not worth it (I mean, I sell most of my work, and while I don't pay myself an hourly wage, if I do account for it, I could never actually make any revenue, let alone a profit.)

I don't often run into the problem of sanding through a prior coat of finish that much anymore, however, I also haven't been using much poly and never used much lacquer until recently. So I don't know if it'll become a bigger problem in the future if I get back to using them.

There has been some discussion on how some of you apply your finishes. Danish oils in particular. Seems the process often involves wet sanding (I assume with the oil finish itself), rubbing/burnishing the finish into the wood, and maybe more wet sanding later on in the process, before final coats are layered on. Does this process of wet sanding help eliminate scratches and the like from prior sanding? Or are there other purposes for it as well? Some of the pieces I've been seeing that are finished with these longer, thoroughly burnished in, wet sanded processes, are truly amazing, with beautiful wood surfaces, that as far as I can tell bear no witness to any kind of defect at all. I have to say, that kind of finish, is truly appealing, and I'd say the pinnacle of a well finished piece. Right now for me, though, I feel its a "some day, if I can master the basics"...
 
Finishing is my least favorite part of turning! My go to is EEE and Shellawax but it is not good for natural edged or irregular rims. I've tried shellack and osmo oil - runs, drips too much sanding. :(
 
Strong raking light is the best way to see problems before finish. Try setting up a light at either end of your work on the lathe just above center and douse or dim the overhead lights. Alternatively, look at the work early in the morning or late in the evening when the sunlight is streaming in the windows at a low angle.

With most woods and finishes you don't need a very high grit, but you do need to start at a low enough grit to eliminate defects efficiently and then erase each grit's tracks with the next one. It can help to alternate methods with successive grits - hand sand with the piece turning at the first step, then use rotary sanding for the next grit. If you don't see any more circumferential scratches after the second grit, move onto the third, hand sanding again, and eliminate the rotary scratches from the second grit.

On flat work I rarely go above 180 for a buildup film finish like lacquer or 220 for wiping varnish. It's harder to avoid cross grain sanding scratches on turnings so I go higher, at least 400 for hand sanding. On bowls I usually stop at 320 using a random orbit sander.
 
Last edited:
Hi Jon- I'm mainly an oil guy, the three versions of Tried & True are what is on my bench. Before that, and before it got doubly expensive, Waterlox, and before that, homemade wiping finish of 1:1:1 tung oil/mixwax varnish/mineral spirits. All have been applied only to just before the point of creating an obvious surface film finish, so, a polished high gloss appearance has never been my goal.

That means for me, scratches are the ones in the wood itself. Scratches and other surface imperfection start with tool control, specifically making sure the tool edge isn't leaving imperfections behind. You'll never get a truely perfect from-the-tool surface on the wood (shy of a honed skew), but making sure you start with an abrasive grit that handles all of the tooling marks is the third step to success (after tool control and a good tool edge).

Going to 1200 grit, to me, sounds a bit much, not really needed for penetrating oil finishes, anyway. And surface film finishes do need a bit of a surface "tooth" to mechanically attach to, just like sanding between layers of varnish. Rather, making sure you are truly done with one grit before moving to the next is highly important.
-Fresh, clean paper without sanding buildup in the grit.
-Make sure the surface is clean before moving to the next grit.
-Good sidelight to cast shadows across the surface to see scratches. Maybe a good LED flashlight can help for that purpose if sun and shop lighting aren't helping, here's a great little Streamlight Macrostream pocket size light I've been using in my day job recently, https://a.co/d/2VV9pXF They also sell the less powerful (maybe adequate for extreme closeup work such as scratch detection at the lathe) and less expensive Microstream pocket light, either may be worth considering.
-When using adustible sidelight, maybe turn off the overhead lights to assist finding the shadows of the scratches.
-A quick, light wipe of the wood surface with mineral spirits can mimic wet finish and help expose scratches, too.

Most times, my cutting allows me to start sanding in the mid-100 grit zone. The advantage there is that I don't have to worry about removing the more course sanding marks of heavier grits. Normally, I can stop sanding at 320-400, but I have 600 on hand if conditions warrant, such as extreme wood density.

My last abrasive is wood shavings themselves, the clean, lighter shavings of later-stage cutting, not the thick, heavy shaving of early rough cuts. It is more burnishing at this point more than sanding, but burnishing with shavings will also, with good directional light, show me the scratches left over from the sandpapers. If needed I'll back up into the sanding process a grit or two to re-sand the entire surface to remove the scratches, then burnish again with a handful of shavings. I burnish with shavings at turning-speed RPMs and firm pressure of the shavings on the wood. Repeat as needed. People have also used brown packing paper (check your next Amazon delivery...) as a final burnishing step, common lore says brown packing paper equates to about 2000 grit abrasive paper. I dunno... probably has a similar effect to my burnishing with shavings.

I have learned to avoid steel wool on bare wood- metal particles imbed themselves into the pours of the grain, a real mess esp. with light color woods. #0000, oil-free steel wool may be useful in the sanding coats of finish, just be meticulous about cleaning the surface after using it, before applying the next coat.

I don't ever think to wet sand the wood with fine paper and the oil finish, to me that seems unnecessary, and if I do need to back up a grit, now my papers are immediately clogging with oily dust. Not to mention spontaneous combustion issues later with the oily sandpaper. I use paper towel to apply oils, a firm touch onto the wood. Even paper towel is abrasive, and maybe it serves as a final abrasive step, my wet sanding(?).

I don't know if my protocols will be useful to you or not, particularly since you are chasing scratches more in the finishes vs. the wood, but assuring a good wood surface to begin with should help with the finishes later.

My final philosophy- I try not to forsake my very best efforts with impossibly perfect expectations. I don't mind a well executed project, mine, nor others, that still demonstrate a couple signs of the human touch. Compare museum-quality hand-thrown pottery to the surface of a $4 Walmart coffee cup. Which one has a perfect surface, and which one has true artistic value? I hope this has been helpful.
 
Last edited:
Strong raking light is the best way to see problems before finish. Try setting up a light at either end of your work on the lathe just above center and douse or dim the overhead lights. Alternatively, look at the work early in the morning or late in the evening when the sunlight is streaming in the windows at a low angle.

With most woods and finishes you don't need a very high grit, but you do need to start at a low enough grit to eliminate defects efficiently and then erase each grit's tracks with the next one. It can help to alternate methods with successive grits - hand sand with the piece turning at the first step, then use rotary sanding for the next grit. If you don't see any more circumferential scratches after the second grit, move onto the third, hand sanding again, and eliminate the rotary scratches from the second grit.

On flat work I rarely go above 180 for a buildup film finish like lacquer poor 220 for wiping varnish. It's harder to avoid cross grain sanding scratches on turnings so I go higher, at least 400 for hand sanding. On bowls I usually stop at 320 using a random orbit sander.

Thanks for the tips. I actually have lamps at both of my lathes, however, only one. I haven't actually put a lamp at either end... Will have to give that a try. I have no windows that the sun can stream through, sadly, so it will have to be artificial. I have used one lamp at both lathes. I have the Powermatic lathe lamp on my PM, and its pretty versatile, and I can swing it around at any angle and height. That's where I turn most of the pieces that have this kind of issue. I have the WW Lathe Track system on that lathe, too, and I should be able to set something up to hold another lamp, so I can get more light on the piece.

FWIW, I eliminated all grits below 180, and I usually start at 220/240. I try not to go above 400, but, on some pieces/some woods, I run into this problem with scratches. Sometimes, I'll sand with 320 and that's it, and I really like that, but more often its 320,400, or 240,230,400. The thing that often surprises me, though, is I'll spend a lot of time, sanding with the grain, and then when I put on a couple coats of shellac each sanded back a little (usually with 800 grit paper), once I polish that finish, I'll see scratches. Not 800 grit scratches, though...if I had to guess, I'd say they were either 240 or 320 grit scratches, given the scale they usually seem to be at. I think this is also partly why I have stopped using lower grits...they seem to leave behind junk far more easily. I used to start at 60 or 80, then I came to a point where I would start at 180. I think some of it, was my tooled surfaces were getting better, but I think some of it is trepidation at using low grits because they seem most prone to causing the issue I often seem to run into. (Which seems to occur, despite my best efforts, so much of the time...boy I spend a TON of time sanding...)

Regarding the random orbit sander... I picked up this small palm sander with a random orbital pad. Its compressed air powered. I have a whole bunch of WW pads, sanding discs, etc. I picked this up, because I was previously spending all too much time sanding out tearout earlier on, before I knew how to properly sheer scrape or use an NRS. While this did make shorter work of tearout cleanup, I felt it left me with even worse issues with visible scratches. And the scratching with that, the scratches that showed up once I would polish the shellac (which I usually do with Acks sanding paste, sometimes Yorkshire grit) looked a lot like a pile of wool...just tons of radial, winding scratch marks all over the place. So, I stopped using the palm sander. (I guess I felt there were other issues with it as well...I would often spend a lot of time trying to get a particular surface profile, which sometimes I thought the palm sander would screw up...)

I should probably, try and get some photos of an example of the issue I have, if I can. Before applying the shellac, and after polishing it, I guess. Before, I can't see the scratches well, but if I do, then I usually try to manually sand with the grain. Even with those corrections, though, I'll often still end up with visible scratch marks. Once shellac is on the piece, then its a lot of sanding back if I find scratch marks that I have to clean up, and the process, gets so incredibly long...
 
Hi Jon- I'm mainly an oil guy, the three versions of Tried & True are what is on my bench. Before that, and before it got doubly expensive, Waterlox, and before that, homemade wiping finish of 1:1:1 tung oil/mixwax varnish/mineral spirits. All have been applied only to just before the point of creating an obvious surface film finish, so, a polished high gloss appearance has never been my goal.

That means for me, scratches are the ones in the wood itself. Scratches and other surface imperfection start with tool control, specifically making sure the tool edge isn't leaving imperfections behind. You'll never get a truely perfect from-the-tool surface on the wood (shy of a honed skew), but making sure you start with an abrasive grit that handles all of the tooling marks is the third step to success (after tool control and a good tool edge).

Going to 1200 grit, to me, sounds a bit much, not really needed for penetrating oil finishes, anyway. And surface film finishes do need a bit of a surface "tooth" to mechanically attach to, just like sanding between layers of varnish. Rather, making sure you are truly done with one grit before moving to the next is highly important.

Thanks for the insights. I prefer oils or oil based finishes myself! I love what oil does to wood as it penetrates, and brings out deep characteristics, often layers of them, along with the chatoyant shimmer. I doubt I'll ever get to a point where I can use water based finishes. :P

To be clear, this is always scratches in the wood, as far as I know, not scratches in the finish. So they are there from before the finish is applied, and the finish seems to bring them out and make them much more visible. I've actually had the worst luck with poly, but, pure poly (I need to try one of these 1:1:1 blends people are talking about!) Poly seems to make scratches and other defects worse with every coat, and if you leave any defects in a prior coat when you sand it, then the next coat enhances those as well. The effort to get a good pure poly finish seems mind boggling. However I've seen enough of the results of people who are using a 1:1:1 blend of an oil, a varnish and mineral spirits (I'll have to find something that will work) and the results are amazing... When you say minwax varnish, are you just talking about their polyurethane, or are you talking about a specific varnish, maybe one that does not use urethane?

FWIW, the 1200 grit, was really only so I could get a better highlight reflecting off the wood, so I could actually see the scratches. If I leave the wood at say 320 or even 400, there is still enough dispersion of the light reflecting off of it, that usually I cannot really see the bigger scratches that seem to cause this problem? So I'd sand higher, find the spots that need cleanup, and then focus on those with lower grits again. The only time I actually sand to a very high grit and leave it, is when using Pens Plus as a finish for pens. With that particular finish, sanding up through 3000 grit can produce better results, but its a fairly unique situation. So I don't really sand up to 1200 to sand up to 1200, just more...it helps me see the defects?

-Fresh, clean paper without sanding buildup in the grit.
-Make sure the surface is clean before moving to the next grit.
-Good sidelight to cast shadows across the surface to see scratches. Maybe a good LED flashlight can help for that purpose if sun and shop lighting aren't helping, here's a great little Streamlight Macrostream pocket size light I've been using in my day job recently, https://a.co/d/2VV9pXF They also sell the less powerful (maybe adequate for extreme closeup work such as scratch detection at the lathe) and less expensive Microstream pocket light, either may be worth considering.
-When using adustible sidelight, maybe turn off the overhead lights to assist finding the shadows of the scratches.
-A quick, light wipe of the wood surface with mineral spirits can mimic wet finish and help expose scratches, too.

I might have to pick up a flashlight. I do have lathe lighting, and I do use that, but its more of a panel light with a whole array of LEDs, and I wonder if that may also be limiting my ability to see the scratches with the piece illuminated by that particular light...

Regarding mineral spirits. The stuff I have access to is Klean Strip Odorless Mineral Spirits. I DESPISE that stuff...and, if I use it on any wood, it seems to wet the wood permanently, the stuff does not ever seem to evaporate off or anything. It seems to affect other finishes (msot of the time I use shellac as my initial sealing coats, but I've also used poly or spar urethanes), so I usually have to try and find some way of getting rid of it first. Colorado has sadly outlawed any other kind of mineral spirits, it seems. I sometimes use DNA to wet the surface....I don't think that has ever helped me find scratches before though. I am actually quite bummed about the restrictions on finishing and thinning compounds here in Colorado. When I first started, we could get just about anything, and now we can hardly get anything. The only other kind of mineral spirits I know I have access to, is a particular kind of cutting board oil, and I guess its really a mineral oil not mineral spirits. In any case, the KS Odorless MS is....well, 99.999% useless. I've never even been able to clean anything up with that stuff. :P And sadly, I have most of two whole gallons of the stuff! 😢

Most times, my cutting allows me to start sanding in the mid-100 grit zone. The advantage there is that I don't have to worry about removing the more course sanding marks of heavier grits. Normally, I can stop sanding at 320-400, but I have 600 on hand if conditions warrant, such as extreme wood density.

My last abrasive is wood shavings themselves, the clean, lighter shavings of later-stage cutting, not the thick, heavy shaving of early rough cuts. It is more burnishing at this point more than sanding, but burnishing with shavings will also, with good directional light, show me the scratches left over from the sandpapers. If needed I'll back up into the sanding process a grit or two to re-sand the entire surface to remove the scratches, then burnish again with a handful of shavings. I burnish with shavings at turning-speed RPMs and firm pressure of the shavings on the wood. Repeat as needed. People have also used brown packing paper (check your next Amazon delivery...) as a final burnishing step, common lore says brown packing paper equates to about 2000 grit abrasive paper. I dunno... probably has a similar effect to my burnishing with shavings.

Hmm, I have seen some of the YouTubers I watch use shavings... I had actually been avoiding it because I thought it burnished the wood. But isn't that something to be avoided, if you burnish does that close off the pores? I actually thought the results looked good in the cases I've seen youtubers I follow use shavings. Gave the wood a nice natural satin sheen even without a finish. I've never tried the brown packing paper. The interesting thing is, it sounds like this kind of achieves what I was trying to do with the 1200 grit, which was produce a smoother surface so I could see the defects. I guess the 1200 grit is probably burnishing as well, so maybe I'll just switch to the shavings (and save myself some money!)

I have learned to avoid steel wool on bare wood- metal particles imbed themselves into the pours of the grain, a real mess esp. with light color woods. #0000, oil-free steel wool may be useful in the sanding coats of finish, just be meticulous about cleaning the surface after using it, before applying the next coat.

I learned this too. I hardly use steel wool anymore, even on coats of finish. I actually had a piece that I used steel wool on the bare wood, and even with all my efforts to get rid of all the junk that got stuck in certain places (It was a bit more of a porous wood and had some knots and other things with fine cracks in them), the deeper particles would never come out. I cleaned off the surface with DNA a few times before coating on finishes...DNA can sometimes have water in it, and the darn steel wool particles rusted!!

I do sometimes use the white 3M pads, which unlike all the other pads which use some kind of metal-based abrasive, the white pads are just some kind of synthetic fiber and I've never seen any of that get left behind. It is hit or miss with those pads, though...sometimes they are made really well with a pretty even surface texture, other times they seem to be made such that there are various "knots" in the surface of the pad, and those can easily leave their own scratches behind...

Suffice it to say, I mostly just use sandpaper these days...

I don't ever think to wet sand the wood with fine paper and the oil finish, to me that seems unnecessary, and if I do need to back up a grit, now my papers are immediately clogging with oily dust. Not to mention spontaneous combustion issues later with the oily sandpaper. I use paper towel to apply oils, a firm touch onto the wood. Even paper towel is abrasive, and maybe it serves as a final abrasive step, my wet sanding(?).

I hadn't thought about the combustibility of oil saturated paper. But I do keep a bucket of water around for dousing any oil saturated materials. I am pretty intrigued by what other people seem to achieve with a lot of rubbing of the finishin to the wood, wet sanding with the finish, and the quality of the final results as far as wood surface goes. In one of my other threads there are some examples of just exceptional results.

I don't know if my protocols will be useful to you or not, particularly since you are chasing scratches more in the finishes vs. the wood, but assuring a good wood surface to begin with should help with the finishes later.

My final philosophy- I try not to forsake my very best efforts with impossibly perfect expectations. I don't mind a well executed project, mine, nor others, that still demonstrate a couple signs of the human touch. Compare museum-quality hand-thrown pottery to the surface of a $4 Walmart coffee cup. Which one has a perfect surface, and which one has true artistic value? I hope this has been helpful.

So, my issue is actually scratches in the wood. The issue is definitely in the wood. Its just that, I cannot really see the scratches until I have at least a somewhat polished and semi-shiny finish...then, the scratches show up superbly, and horribly, well... So this is a wood surface prep issue I have. I just don't quite know why, or whether...the sheer amount of effort it seems to take to correct the issues well enough that I feel a piece actually looks professionally made, is in fact normal, or unusual? It just seems to be a monumental effort, to really get a truly clean surface that can take a finish well... Maybe that is indeed just how it is, and if that is the case, then I will resign myself to that fact, and do the necessary work. I am kind of hoping though, that I am either doing something wrong, or just haven't learned the best techniques, or something like that...you know?
 
With good light you should be able to see scratches in the wood prior to finish. Try wetting the piece with denatured alcohol as you go to enhance their visibility.

I have no idea what your surfaces look like before sanding. If I had a tooled surface that warranted starting with 320 I might just pat myself on the back and leave it alone, maybe send it to mother for an ataboy. If I have any tearout whatsoever I would be there til doomsday trying to get it out with 220. If you are starting at a high grit and spending an inordinate amount of time you may be better off starting lower and making sure each level of abrasive erases the evidence of the previous one.
 
Without the old style mineral spirits available, I guess denatured alcohol is worth a try to wet the suface lightly then hit it with a light held at a shallow angle to help get the scratches to cast shadows.

Me and DNA are not friends. Same with most solvents. They seem to cause me some mild allergic reactions. For me, I'll put on nitile gloves and take whatever I'm scrubbing outside to be in the fresh air.

Sorry to hear about your reactions to DNA. In my case its CA fumes. I don't wish that kind of suffering on anyone. I guess for me, its severe allergic/toxic reactions, but still...they can take a toll. I try to wear nitrile or latex whenever I'm doing finishing though...over time, exposure to any of these compounds can have deterimental effects.

I really wish I could find a gallon of REAL mineral spirits somewhere and bring it home. I honestly am suspicious that whatever is sold as mineral spirits here, maybe even isn't? It doesn't thin poly right, doesn't thin spar right, doesn't thin stains properly, doesn't clean anything up, STINKS to high heavens!! (Odorless my rear end!!) Even though aromatics can be dangerous, phew, they at least usually smell good!! :D
 
To my nose, the mineral spirits available now smells identical to Kingsford brand charcoal lighter fluid. So much so that once when I ran out of charcoal juice, I grabbed the can of low odor mineral spirits and lit 'er up.
 
I have no idea what your surfaces look like before sanding. If I had a tooled surface that warranted starting with 320 I might just pat myself on the back and leave it alone, maybe send it to mother for an ataboy. If I have any tearout whatsoever I would be there til doomsday trying to get it out with 220. If you are starting at a high grit and spending an inordinate amount of time you may be better off starting lower and making sure each level of abrasive erases the evidence of the previous one.

Hmm, well, this is food for thought. Some of it may be, that I start at 320 for fear of lower grit scratches. But, especially after some tips given to me by JKJ, I try to tool my surfaces as clean as I can. I also have been reworking some of my grinds on my tools, which have drifted over time as for a while, I wasn't using consistent setups to grind each, and was referencing the prior bevel on the tool instead, and my tools are often cutting better than they ever had in the past. Especially the 40/40 grinds on bowls now. They generally give me a pretty clean result. I'm getting better at avoiding tearout entirely, but if I do get some, its a lot less problematic than it was around this time last year, where it could be a millimeter deep or so into the wood. I get just little spots now of tearout...and I'd love to get to a point where I don't even have that!

For the outside of bowls, some light sheer scraping usually takes care of all the tearout now, and I can do some minor shape refinement. On the inside, I'm generally using NRS to clean things up. I did see some posts, maybe one was yours, about using dedicated sheer scraping tools for the inside of bowls. I've never used (or even seen) such a tool, but I'm intrigued.

Maybe that is a solution here...instead of trying to solve my sanding deficiencies, maybe I refocus the effort into using the tools even better and avoid sanding at all.

With regards to the sanding process... The first grit, is usually fairly quick, maybe a few minutes to fully sand the inside or outside of a bowl. I don't spend a lot of time on it at first. Then the next grit, I will spend more time on, trying to erase evidence of the prior. Then after that, if I go even further (i.e. 400), it seems I spend even more time on that, trying to erase evidence of 320... I try not to use too much pressure, but maybe I still am. Perhaps I just need to spend more time with the initial grit, maybe, before moving on...

I'm working on getting some photos of what I often encounter. Its not on every single piece, and I guess, there might be certain woods its more of a problem with than others. Hopefully pictures will help explain what too many words cannot. Maybe I am also assuming its something other than it is, as well...
 
Me and DNA are not friends. Same with most solvents. They seem to cause me some mild allergic reactions. For me, I'll put on nitile gloves and take whatever I'm scrubbing outside to be in the fresh air.
I'm not sure how effective gloves are. Back when I was preparing large numbers of ceramic samples for neutron activation, I wore lab gloves. After grinding each sample, I had to clean the mortar and pestle with pure grain alcohol. By the end of the day I'd have a slight buzz, and a week later my fingertips would peel.
 
I'm not sure how effective gloves are. Back when I was preparing large numbers of ceramic samples for neutron activation, I wore lab gloves. After grinding each sample, I had to clean the mortar and pestle with pure grain alcohol. By the end of the day I'd have a slight buzz, and a week later my fingertips would peel.

Interesting... At least pure grain alcohol wouldn't have the poisons that denatured alcohol has, but still, interesting... Do you remember what kind of gloves they were? Wonder if some materials are unable to protect you from alcohols?
 
Hmm, well, this is food for thought. Some of it may be, that I start at 320 for fear of lower grit scratches. But, especially after some tips given to me by JKJ, I try to tool my surfaces as clean as I can. I also have been reworking some of my grinds on my tools, which have drifted over time as for a while, I wasn't using consistent setups to grind each, and was referencing the prior bevel on the tool instead, and my tools are often cutting better than they ever had in the past. Especially the 40/40 grinds on bowls now. They generally give me a pretty clean result. I'm getting better at avoiding tearout entirely, but if I do get some, its a lot less problematic than it was around this time last year, where it could be a millimeter deep or so into the wood. I get just little spots now of tearout...and I'd love to get to a point where I don't even have that!

For the outside of bowls, some light sheer scraping usually takes care of all the tearout now, and I can do some minor shape refinement. On the inside, I'm generally using NRS to clean things up. I did see some posts, maybe one was yours, about using dedicated sheer scraping tools for the inside of bowls. I've never used (or even seen) such a tool, but I'm intrigued.

Maybe that is a solution here...instead of trying to solve my sanding deficiencies, maybe I refocus the effort into using the tools even better and avoid sanding at all.

With regards to the sanding process... The first grit, is usually fairly quick, maybe a few minutes to fully sand the inside or outside of a bowl. I don't spend a lot of time on it at first. Then the next grit, I will spend more time on, trying to erase evidence of the prior. Then after that, if I go even further (i.e. 400), it seems I spend even more time on that, trying to erase evidence of 320... I try not to use too much pressure, but maybe I still am. Perhaps I just need to spend more time with the initial grit, maybe, before moving on...

I'm working on getting some photos of what I often encounter. Its not on every single piece, and I guess, there might be certain woods its more of a problem with than others. Hopefully pictures will help explain what too many words cannot. Maybe I am also assuming its something other than it is, as well...
I think you starting at too high a grit is the heart of your issues. I’m at the point in my learning curve where I’m able to get a really good finish off the tools that looks nearly flawless at first, but it never really is as fair a curve as it will be with proper sanding. Sharpening the tools on the grinder and the inevitable micro movements of your hands and body will always leave some scratches/undulations in the surface. Even if I think I have a good surface off of the tool I’ll pretty much always start at at least 180 grit and often on larger bowl exteriors I’ll opt for 120 with power sanding just because it will very quickly fair the curve of the whole surface. This is part of why a bright isolated directional light source is so important. As you move your head from side to side, inspecting the surface, you watch to see if the size of the reflected light patch grows or shrinks. This will tell you if your curve suddenly changes radius too quickly. This will also highlight scratches from tooling or a previous grit.
Regarding sanding, you should spend the most time on the first grit. Make sure you’re using fresh paper and definitely utilize those rubber sandpaper cleaning sticks. They’re very effectiv. When you move onto each subsequent grit it should only take 30 seconds or less to remove the scratches from the previous grit. I often use a combination of compressed air and reversing the direction of my lathe each time I switch grits. This avoids contamination with larger particles of the previous grit. The higher the grit, the more quickly the paper will clog, and lose its effectiveness. You’ll spend much more money and time starting with too high grit.
If you power sand, make sure that the direction of the sander is opposite the direction of travel of your work or at a right angle to it.
Finally, I’ve had good luck with following 320 grit with dr Kirk’s scratch free as a super quick and easy final step.
 
Interesting... At least pure grain alcohol wouldn't have the poisons that denatured alcohol has, but still, interesting... Do you remember what kind of gloves they were? Wonder if some materials are unable to protect you from alcohols?
No poisons except for the ethanol itself, which is itself a "poison". There is a reason it disinfects.
Nitrile gloves (or latex; avoid vinyl) will be fine for working with alcohols, but like anything not all gloves are the same and the main determinant is contact time. You wouldn't want to wear the same gloves for hours if they are in direct contact with solvents.
 
From my message above (message #6), I just used my Streamlight Macrostream pocket flashlight to look at finished turnings in the house. At a casual glance all are beautiful and perfect and museum quality 😊, but under the hard LED side light I can see fine sanding scratch patterns in the wood that simply are not readily visible under normal viewing conditions. They really need to be looked at hard to see them.

Two lessons learned for myself with this exercise-
1- the Streamlight Macrostream is freaking bright for this process! I may buy its little brother, the Streamlight Microstream, as a workbench flashlight/directional scratch detection light.
2- Stop looking at the surface of the wood with a hypercritical eye. A critical eye, yes, most definitely, but a hypercritical view of your work may in the end just drive you bonkers, when in reality such a level of self-criticizm is most likely unwarranted. I need to practice what I preach from my closing words in that same post above- I should not forsake my very best efforts with impossibly perfect expectations.
 
Strong raking light is the best way to see problems before finish. Try setting up a light at either end of your work on the lathe just above center and douse or dim the overhead lights. Alternatively, look at the work early in the morning or late in the evening when the sunlight is streaming in the windows at a low angle.

With most woods and finishes you don't need a very high grit, but you do need to start at a low enough grit to eliminate defects efficiently and then erase each grit's tracks with the next one.

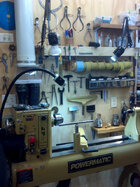
I'm a believer in using multiple, small diameter lights on adjustable mounts. The worst lighting, IMO, is broad, diffuse lights such as long fluorescents high on the ceiling. The "raking" angle is important, as is the use of naphtha I mentioned elsewhere. I adjust the light positions often while turning and smoothing. This shows three of the five lights I usually use:

Lathe_PM3520b_IMG_20160323_122528.jpg

About sanding. I do most sanding by hand with the lathe off except for initial sanding on spindles.

Every time I sand with one grit I always follow by sanding across the last direction at some angle with the same grit. My reason is if I can't completely remove the scratches from the current grit by sanding at an angle, it would be difficult to get them out with the next finer grit!

For thin spindles, I often start sanding with small strips of paper with the lathe spinning - but it's important to always keep the paper moving. Holding it in one spot risks creating deeper circular scratches. For straight or tapered sections, I then turn the lathe off and sand along the grain. For small coves, I like to roll sanding strips into cylinders or cones and sand by hand at about a 45-deg angle, touching both sides and the bottom of the the cove at the same time, again with the lathe off.

I am a big fan of the Klingspor Gold "paper" - the quality of the abrasive is good and the backing is a heavy cloth. I keep 1" and 2" rolls up to 400 grit on a dispenser rod on the wall above the lathe, visible in the photo above. I rarely use coarser than 220.

For finer paper, my favorite paper is Indasia Rhynowet Redline which I cut into strips about 1"x3". This is NOT the hardware/autoparts store wet&dry paper. For one thing, the backing is very flexible and can be folded tightly without the abrasive cracking. I use 600 the most, occasionally up to 1000, depending.

I never, ever use rotating disks on angle drills. I dislike the clouds of dust and what they can do to the surface of certain pieces. I also don't sand bowls and platters by holding sandpaper against the rotating wood. One of the "unforgivable" things I sometimes see in turnings is circular scratches on the insides of bowls and such. Almost worse than tearout.

Sorry to repeat so much since I've described this several times before:

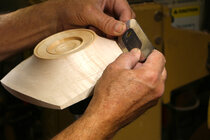
After turning, I remove any tool marks or small irregularities with a curved negative rake scraper. Then I remove the chuck from the lathe with the piece still mounted and fasten it to a carving and finishing stand from Best Wood Tools. This makes it easy to use hand scrapers to remove marks from the NRS as well as the other "unforgiveable" defects - little mounds or depressions in the center of bowls and platters. The worst I've seen recently was an embarassing raised hump in the center of an otherwise drop-dead gorgeous piece from a pro turner at a symposium. These central defects are all too easy to make by accident but easy to detect with the fingers and SO quick and easy to remove with a hand scraper.

I scrape face turnings "downhill" with or at an angle to the grain, whatever works best for that spot. I use scrapers from StewMac and some I grind from rectangular card scrapers, sharpened and a burnished burr added just like a cabinet scraper.

_scrapers_IMG_7499_e.jpg _scrapers_hand_scraping_comp.jpg

I follow hand scraping by hand sanding, usually backed by a flexible "Magic Rub" eraser, what I call a soft sanding block. This makes it easy to sand curved or flat surfaces. After scraping, I can usually start with 400 grit, occasionally with 600 for easy-to-sand woods like ERC and Goncolo Alves.

sanding_soft_block.jpg

I do the insides of bowls the same way, but in some areas use smaller curved scrapers.

I do on occasion use fine sandpaper disks on pneumatic random orbital sanders, with the air turned way down for very gentle orbital action. I use the Grex pistol type for 1" and 2" and one from Woodturners Wonders for 3" disks.

This method banishes sanding scratches! And it is quicker than one might think.

JKJ
 
I think you starting at too high a grit is the heart of your issues. I’m at the point in my learning curve where I’m able to get a really good finish off the tools that looks nearly flawless at first, but it never really is as fair a curve as it will be with proper sanding. Sharpening the tools on the grinder and the inevitable micro movements of your hands and body will always leave some scratches/undulations in the surface. Even if I think I have a good surface off of the tool I’ll pretty much always start at at least 180 grit and often on larger bowl exteriors I’ll opt for 120 with power sanding just because it will very quickly fair the curve of the whole surface. This is part of why a bright isolated directional light source is so important. As you move your head from side to side, inspecting the surface, you watch to see if the size of the reflected light patch grows or shrinks. This will tell you if your curve suddenly changes radius too quickly. This will also highlight scratches from tooling or a previous grit.
Regarding sanding, you should spend the most time on the first grit. Make sure you’re using fresh paper and definitely utilize those rubber sandpaper cleaning sticks. They’re very effectiv. When you move onto each subsequent grit it should only take 30 seconds or less to remove the scratches from the previous grit. I often use a combination of compressed air and reversing the direction of my lathe each time I switch grits. This avoids contamination with larger particles of the previous grit. The higher the grit, the more quickly the paper will clog, and lose its effectiveness. You’ll spend much more money and time starting with too high grit.
If you power sand, make sure that the direction of the sander is opposite the direction of travel of your work or at a right angle to it.
Finally, I’ve had good luck with following 320 grit with dr Kirk’s scratch free as a super quick and easy final step.

I've spent the morning turning some rounded blanks and trying to work on tooling. You are correct, outside of possibly doing what JKJ does, to hone the grinder burr off of each tool so the edge is truly pristine (and I don't really have any way of doing that), and even then, my sharpening doesn't leave a truly strait or a perfectly curved edge anyway, I am not sure I'll be able to eliminate tooling marks. I can get things pretty clean, but, I am at this point (its been several hours I've been working on this now) I am not sure that I can just tool a surface to perfect.

John K Jordan has mentioned several times he uses scrapers. I found a set of card scrapers that I bought some time ago... I think that needs to be my next step. I haven't really used card scrapers on bowls before, but...I'm now quite intrigued by them, as unlike a gouge or NRS, I can scrape along the grain.

That said... What exactly is the determinant for starting grit? With the kind of surface I am currently getting off the tool, while there are some fine radial marks that I cannot seem to eliminate with the tool on a spinning piece of wood, they are very fine. Scale wise, I'd say much finer than 180 grit, probably than 220/240... If I sand with 180 grit, on an otherwise pretty smooth wood surface that exhibits fine tooling marks (usually radial, due to the rotation of the blank), I feel I'm just shredding wood fibers, but for no real good reason... However maybe there is a rule of thumb that helps determine the optimal starting grit?
 
No poisons except for the ethanol itself, which is itself a "poison". There is a reason it disinfects.
Nitrile gloves (or latex; avoid vinyl) will be fine for working with alcohols, but like anything not all gloves are the same and the main determinant is contact time. You wouldn't want to wear the same gloves for hours if they are in direct contact with solvents.

I'm pretty sure denatured alcohols also contain methanol, and sometimes other toxic substances, beyond just the ethanol.

I never, ever use rotating disks on angle drills. I dislike the clouds of dust and what they can do to the surface of certain pieces. I also don't sand bowls and platters by holding sandpaper against the rotating wood. One of the "unforgivable" things I sometimes see in turnings is circular scratches on the insides of bowls and such. Almost worse than tearout.

This here. This is one of the first times I noticed the problem, when I was using my RO palm sander. I could never quite get rid of the radial scratches. I could make them finer with higher grits, but I couldn't seem to get rid of them. I wonder if shellac in particular, has a knack for making these scratches more visible once you polish the shellaced surface, too... I usually can't see scratches finer than 180 or so, until I have shellaced the surface and then polished the shellac. Then, they show up REALLY WELL...

Sorry to repeat so much since I've described this several times before:

After turning, I remove any tool marks or small irregularities with a curved negative rake scraper. Then I remove the chuck from the lathe with the piece still mounted and fasten it to a carving and finishing stand from Best Wood Tools. This makes it easy to use hand scrapers to remove marks from the NRS as well as the other "unforgiveable" defects - little mounds or depressions in the center of bowls and platters. The worst I've seen recently was an embarassing raised hump in the center of an otherwise drop-dead gorgeous piece from a pro turner at a symposium. These central defects are all too easy to make by accident but easy to detect with the fingers and SO quick and easy to remove with a hand scraper.

Been followig this advice lately! I've been using an NRS on each bowl, and work hard at working down any raised center. I agree, in the right light, especially with a satin or shinier surface, you can see even a relatively slight rise in the center. Interestingly, I've had the most luck cleaning up the center of my bowls, scraping and sanding by hand. Its the sides and particularly the outside of bowls (and platters) that seem to exhibit the scratch marks most.

I scrape face turnings "downhill" with or at an angle to the grain, whatever works best for that spot. I use scrapers from StewMac and some I grind from rectangular card scrapers, sharpened and a burnished burr added just like a cabinet scraper.

View attachment 75843 View attachment 75845

Do you follow the grain when scraping? Or do you go downhill, regardless of whether you are scraping with the grain or against it?

I follow hand scraping by hand sanding, usually backed by a flexible "Magic Rub" eraser, what I call a soft sanding block. This makes it easy to sand curved or flat surfaces. After scraping, I can usually start with 400 grit, occasionally with 600 for easy-to-sand woods like ERC and Goncolo Alves.

View attachment 75841

I do the insides of bowls the same way, but in some areas use smaller curved scrapers.

I do on occasion use fine sandpaper disks on pneumatic random orbital sanders, with the air turned way down for very gentle orbital action. I use the Grex pistol type for 1" and 2" and one from Woodturners Wonders for 3" disks.

This method banishes sanding scratches! And it is quicker than one might think.

This is my task today. I found my set of scrapers. They are not high quality, but I have a full set of smallish sized card scrapers of various shapes. I'm going to see if I can eliminate scratch marks with these before putting on a finish. Hopefully, this will be what I'm missing. I know you recommended this before, but I was unable to find my scrapers before. Some of them are squarish but with curved edges, some are more round, so hoping that will be enough to scrape both the inside and outside of bowls and platters.

I am lacking any real insight into technique.... I've seen cabinet makers use card scrapers, and they often seem to impart a curvature to them. Is that recommended with bowls as well? Anyone have any videos on using card scrapers to clean up bowls?
 
With regards to the sanding process... The first grit, is usually fairly quick, maybe a few minutes to fully sand the inside or outside of a bowl. I don't spend a lot of time on it at first. Then the next grit, I will spend more time on, trying to erase evidence of the prior. Then after that, if I go even further (i.e. 400), it seems I spend even more time on that, trying to erase evidence of 320... I try not to use too much pressure, but maybe I still am. Perhaps I just need to spend more time with the initial grit, maybe, before moving on...
Jon, I would reverse your process. The first grit (coarse-est, is that even a word?) is what does most of the work (tool marks, leveling, etc.). Each successive grit should just remove the scratch marks from the previous grit. So each finer grit should take less time than the previous grit. Be sure to remove the dust/grit before starting with the next grit. @David Hambleton said it all pretty well.
 
Jon, I would reverse your process. The first grit (coarse-est, is that even a word?) is what does most of the work (tool marks, leveling, etc.). Each successive grit should just remove the scratch marks from the previous grit. So each finer grit should take less time than the previous grit. Be sure to remove the dust/grit before starting with the next grit. @David Hambleton said it all pretty well.

I guess....let me try to explain better.

The first grit, works really well to clean up tool marks. I tend to spend less time using the first (coarsest) grit to clean up my tool marks, and get what APPEARS initially to be a clean surface, than other grits.

Then I get to other grits. Say from 240 first, to 320 second. If I spend just a little bit of time on 320 to try and clean up any scratches from 240, then wipe with some DNA to clean up the wood, and once that is dry apply a coat or two of shellac.

The next step for me most of the time (and this may change in the future, as I'm quite intrigued with these Danish Oil and 1:1:1 oil:varnish:ms finishes) is to sand back the shellack so its smooth (usually with a pretty high grit) then use Acks sanding paste or maybe Yorkshire grit, to polish up the shellac. I polish to a satin sheen on the vast majority of items.

Once the shellac is polished, I see scratches. If I've used an orbital sander, then its usually rather horrific!! Which is why my WW RO palm sander has been hanging on a wall for over a year now. However, even with my manual sanding, and I generally try to sand with the grain (although if I know I'm going to go through many grits, I'll sand with lathe on at say 240, lathe off by hand with the grain 320, on 400, off by hand 600), I still see scratch marks. They appear to be in the wood, not in the shellac (if I sand the shellac with 800 grit, then use Acks sanding paste, its a degrading paste grit so it starts out at a coarseness of around 600 IIRC, but as you polish with it the grit breaks down, and you end up at 1500 or 2000 or so), and they appear fairly coarse. Even though I sand with the grain, that I guess is an imperfect process, and sometimes I see arcing scratches that cross grain, soemtimes I even get some patches of kind of circular scratches, which I'm not sure how I'm doing that, but I appear to. Further, I don't think these scratches are tool marks...they look like 240 or maybe 320 grit sanding marks, they are larger in scale (when ti gets to 600 grit or finer, the scratches, which I can sometimes see in the right light, are just so much finer than the problem I usually seem to run into...although, I don't like 600 grit scratches any more than 240 grit, and in fact it often seems that the 600 grit scratches are much more prevalent...I expect, because the overall wood surface is much smoother now, maybe even beginning to get burnished, and the 600 grit scratches in the right light, or as someone said earlier SUNLIGHT!!, can actually show up really well against a specular highlight on unscracthed wood.)

So, that's the basic problem.

What's happened as a result, is I'll use the lowest grit to clean up the tool marks. That doesn't seem to "require" a lot of time. I guess I could spend more time, but, I don't want to needlessly remove wood? Since I know about the scratch problem, I'll then spend more time with the finer grits. I would say, though, that a lot of that time, is "investigative" to try and find where 240 grit scratches are, then I spend whatever time is necessary to eliminate them. So I'll 320 the whole piece, then eyeball every inch of it to try and find any remnant 240 scratches, and sand those out, until I'm reasonably sure I don't have any 240 scratches left. Then I move onto 400, do the same thing. If I shellac and polish at that point, the scratches are not as large, but, I usually can still see them... Which has lead to me trying to sand everything out with 600 grit...or, even to my own dismay, even higher. If I go higher, I will then often try to very lightly get back to 600 grit, but, sometimes I'll still see scratches in the highlights...

I don't think I am necessarily spending an "insufficient" amount of time at the lowest grit. Its more that, because of the scratch issue I seem to have, I then spend a lot more time at higher grits trying to eliminate anything the lower grits left behind. I would sand right up to 3000 grit, as I'm pretty sure that ultimately that would take care of the problem...but on bowls and other larger items, I have always been afraid that would totally close off the pores and keep oil based finishes from penetrating and doing what they to to beautify the wood...

:\
 
Christopher Schwarz (Lost Art Press and Crucible Tool) makes an excellent card scraper, and he has a nice video on how to make them work. This technique can be applied to card scrapers of any size and shape, and even to the ends of rhe tool, not just the long edges. With a gentle touch, you can cut and reshape card scrapers to suit your needs, just keep heat under control as not to wreck the temper.
View: https://vimeo.com/442798608


Here is the link to Crucible to buy the card scraper and the Arno burnsher you see him use.

Theirs is made from 1095 spring steel. If you shop elsewhere for scrapers, watch for spring steel being used. Various forms of spring steel alloys make great cutting edges for hand held cutting instruments such as knives.
 
@John K Jordan Ok. Here are the scrapers I have:

IMG_20250525_134822.jpg

They all have burrs right now. I think I have your previous post or message where you explain how you put a burr back on them. The one on the bottom look similar to what you showed in your photos. For the outside of bowls and platters anyway. For the inside, I might need to use those small oval ones or maybe the half circle ones. Going to give this a try in a little bit here.
 
@John K Jordan Ok. Here are the scrapers I have:

View attachment 75856

They all have burrs right now. I think I have your previous post or message where you explain how you put a burr back on them. The one on the bottom look similar to what you showed in your photos. For the outside of bowls and platters anyway. For the inside, I might need to use those small oval ones or maybe the half circle ones. Going to give this a try in a little bit here.

Jon, give those scrapers a go following the sharpening process I linked in that video just before your message.

Even though I'm not there standing alongside of you to see your process, a little corner of my mind thinks that maybe you are trying to achieve an absolutely perfect surface on the wood, to the level achieved with a well sharped hand plane, or "shaved" with a cabinet scraper or card scraper. I'm not sure abrasives can mimic that type of surface, unless, as you describe, you keep going with the grits to 2000 and beyond. I think following @John K Jordan's method with the card scrapers may be what nets the results you are looking for.

I'm going to try and get some photos today of the issue I am running into. Before shellac and polishing, the wood actually looks really good. Its once polished, that the scratches show up, and they often show up really well, especially in certain kinds of light.

If I was a customer buying a piece, and I saw scratches like I do, I probably wouldn't buy?

I'm about to try scraping on one of the holly bowls I've been working on. Hoping this solves the problem.
 
I'm pretty sure denatured alcohols also contain methanol, and sometimes other toxic substances, beyond just the ethanol.
Methanol is typically not used as a denaturant anymore. The point of denaturing is so that people won't consume it and methanol smells sweeter than ethanol and doesn't taste nearly bad enough and has much higher toxicity. Scientific grade "pure" ethnaol is still denatured with toluene. That's probably fairly common but there are probably a variety of organics that are used, depending on the manufacturer.
 
Jon, give those scrapers a go following the sharpening process I linked in that video just before your message.

Even though I'm not there standing alongside of you to see your process, a little corner of my mind thinks that maybe you are trying to achieve an absolutely perfect surface on the wood, to the level achieved with a well sharped hand plane, or "shaved" with a cabinet scraper or card scraper. I'm not sure abrasives can mimic that type of surface, unless, as you describe, you keep going with the grits to 2000 and beyond. I think following @John K Jordan's method with the card scrapers may be what nets the results you are looking for.

Thanks for the video.

I think this is what I've been looking for. I ended up not doing anything with the holly bowl. I already went through the sanding process, and it was quite extensive, and I have bathed the thing in light and examined it, and I am not seeing anything left to scrape.

What I did do, though, was take a few blanks that had visible saw marks, but otherwise had not been sanded. Used the scrapers on those, and wow! No more saw marks! Surface is really really clean. It is undoubtedly going to take me some time to get used to using these on curved surfaces, but, I think this has been my missing tool. I think what I am going to do is partially turn some shapes to some of the blanks I have lined up to work on, and try my hand at scraping them before I turn them to final shape and dimensions. That way I can practice on the kind of curved surfaces I'll need to actually clean up.

But this is pretty nice...on these blanks I already tested with, once the highs are scraped down, even these cheap card scrapers are giving me the kind of nice, fine fluffy shavings I'm used to getting with sheer scraping. But the final surface is much smoother than I get with sheer scraping.
 
I liken the process of finishing wooden items as something akin to chrome plating. The final finish is much dependent on how good is the initial surface is. How thats done? Well I guess there many ways of skinning the cat and you have to find what works for you. For me I use the inertia sanders both internally and externally. They produce for me the best finish consistently , ok some folk say they are too slow. But that strikes me like sharping my knife on 60 grit, quality anything takes effort and time. I do lot of gallery work where imperfections dont sell, or if they do the price is greatly effected.
The other aspect is the inertia sander is cheap to buy and even cheaper to make, require no power other than the lathe its self. I have several with varying grits this speeds up the process some.
 
If you power sand, make sure that the direction of the sander is opposite the direction of travel of your work or at a right angle to it.
This is something I learned recently from Mike Jackofsky and is rarely mentioned in sanding threads—I think it’s very important and has helped me greatly.
 
Christopher Schwarz (Lost Art Press and Crucible Tool) makes an excellent card scraper, and he has a nice video on how to make them work. This technique can be applied to card scrapers of any size and shape, and even to the ends of rhe tool, not just the long edges. With a gentle touch, you can cut and reshape card scrapers to suit your needs, just keep heat under control as not to wreck the temper.
View: https://vimeo.com/442798608


Here is the link to Crucible to buy the card scraper and the Arno burnsher you see him use.

Theirs is made from 1095 spring steel. If you shop elsewhere for scrapers, watch for spring steel being used. Various forms of spring steel alloys make great cutting edges for hand held cutting instruments such as knives.

@Steve Tiedman - The method of sharpening and burnishing shown in the video is much like the way I've been doing it for years. As I mentioned before, the Arno burnisher is the best I've ever had, hard to find at one time. Amazon sells them now so I got a second one.

I don't use the the stones and the block of wood to flatten and polish the edge as in the video. That doesn't work so well on some of the small scrapers I use. Instead, I use a idea I think I saw in FWW mag a few years ago. The little block of wood has a slot in the bottom for the scraper, and a place on top to hold a Eze-Lap diamond hone. I use the Fine if needed, followed by the Extra Fine. This is a great way to touch up curved scrapers - press the diamond hone down with the forefinger then slide the scraper into the slot and move it against the hone.

crucible_20241205_121139.jpg

A while back I bought some of the Crucible curved scrapers to try them out. The way they shape them is not very useful for bowls and platters. The fist thing I did was reshape one, at lower left. (I'm going to reshape it more later and add more curve to the ends.) The steel seems fine, as good as the high quality rectangular card scrapers I usually start with.

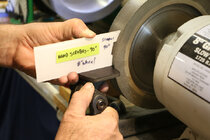
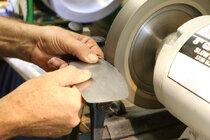
BTW, he mentions the way they cut these. Not many can do that at home, but one warning about shaping on a bench grinder - I find the steel gets too hot making me wonder if any heat treating would be affected. I found that a much cooler way to shape is with a coarse grit belt or disk sander. I put the scraper flat on a piece of board - easier than using the disk sander table. I then take it to the 600 grit CBN wheel, set the platform to exactly 90-deg, and gently smooth the edge all the way around.

I made this little plexiglass thing to set the 90-deg angle quickly with the CBN wheel. (I make these for a variety of angles for other tools. Spray paint the back sides white so I don't lose them and can see what I write on the other side.) Hey, if anyone has a Wolverine and hasn't seen the mini platforms - get one now! I bought two and rarely use the large platforms now. One great use for the small platform is for older tools that have been shortened by sharpening. Beats adding a block on top the large platform. I use these for all hand scrapers, skews, NRS, conventional scrapers, parting tools, bedan, and some others.
hand_scraper_setup_IMG_7898.jpg scraper_CBN_IMG_7894.jpg

Also, anyone interested in scrapers should check out the StewMac ultimate scrapers. They are an entirely different design, quite thick, great steel, sharpened a different way, and have no burr, burnished or not. It's amazing how well they work. I used the small curved one yesterday and today to smooth the insides of a lidded box made of persimmon - very hard wood, difficult to sand, the scraper made all the difference. These are marketed to luthiers for making stringed instruments. The way they are shaped make them VERY easy to hold and use!

I bought all three but use the small one the most. The large mostly-rectangular one would be good for guitar necks but not much use on turninga so I'm gradually reshaping it to suit me. These are not cheap but well worth it. I think they have a video on how to sharpen them. I also sharpen these on the 600 grit 8" CBN wheel. (These scrapers rely on the curvature of the wheel to form the sharp working edges.) Since they don't have a burnished edge they stay sharp longer.


I bought a nice 2" wide strip of 1/8" tool steel thinking I would cut out shapes with the plasma cutter, grind smooth, then heat them with a little kiln and harden by immersion to make some StewMac style hand scrapers. Some day I might actually get around to it...

Sorry, I've been preaching scrapers from my soap box to wood turners for years and not many seemed to care. I was a believer when I first used them and only got worse. I was happy when some turners at one of the symposiums found me and asked me about hand and negative rake scrapers. I just happened to have some in my backpack!

@John K Jordan Ok. Here are the scrapers I have:

View attachment 75856

They all have burrs right now. I think I have your previous post or message where you explain how you put a burr back on them. The one on the bottom look similar to what you showed in your photos. For the outside of bowls and platters anyway. For the inside, I might need to use those small oval ones or maybe the half circle ones. Going to give this a try in a little bit here.
@Jon Rista , I bought a set of those but don't like them much. They were pretty cheap, though. The problem is the steel (at least on those I got) doesn't seem very good and they are too thin compared to good quality cabinet scrapers. I use the little oval one sometimes and have reshaped a couple of the others.

Thick is better than thin for woodturning. Unlike flatwood smoothing, I never bend the scraper. I bought some of the best quality I could find. I should probably get some more since I tend to give them to people. The ones from Crucible seem good and the curved ones wouldn't need too much reshaping. Woodcraft, Highland Hardware, and other dealers usually carry good caabinet scrapers. I bought some Lie-Nielsen and they are good. (I can't have too many - when one gets dull I set it aside and grab a freshly sharpened/burnished one.)

JKJ
 
Abrasives make scratches. Depending on the material, those scratches become imperceptible at different abrasive grades. You may have to sand Gabon ebony upwards of 1000# to make the scratches "disappear". Red oak or heavily spalted wood, not so much. The finish used makes a huge difference. "Satin" poly filled with mud will obscure the surface while an optically clear glossy shellac film will magnify every abraded fiber. Your eyesight and tolerance for "defects" will affect your judgment of perfection, perhaps differently from your audience.

Watch a Richard Raffan video. He doesn't spend much time sanding. I know from personal observation that Al Stirt doesn't either. The work is clean off the tool, all he needs to do is wipe out the tool marks like the grooves on an LP and polish to whatever level he feels necessary to satisfy his customers. The work is ready for finish when it stops spinning. He and Raffan made a living at it for many years. Everyone has to decide on their own standards but it may be worth enlisting another set of eyes to determine what is "good enough" for the market.
 
@John K Jordan, looking at those scrapers at StewMac, they sell a small 3" wheel grinder to put a concave surface on the 1/8" thick scrapers. In the scraper product page is a video by the fellow who designed the scraper, and he is re-establishing the concave surface with what appears to be a 6" grinder (Baldor, of course!) with a fine alumimun oxide wheel. He shows the sharpening process, and the 6" wheel does barely make a concave surface of the 1/8" thick edge with careful adjustment of the tool rest.

What wheel diameter and grit are you using to re-establish the concave face on the edge of your StewMac card scrapers?

(Edit- looking at your post photos, it appears you are sharpening card scrapers on an 8" wheel, CBN.)

I may be compelled enough to get their scraper, maybe the full set of three sizes, for flat board work and maybe on turnings. Good thing I still own my old 6" Milwaukee bench grinder. I just bought a new 60 grit AO wheel for it, I may need to get a 100-120 grit for these StewMac scrapers.

Thanks (for the advice and for helping me spend some cash).
 
Maybe I need to redo my sanding video.... Well, I do. I remember Mike Mahoney commenting during one of his duo things with Stuart Batty, that he starts sanding with 80 grit and that he would be done in less time than Stuart. I am closer to that range. Most of the time I will start at 100 or 120 grit. I could claim that I could have sanded out every bowl I have made with 220 grit, but I would still be working on 3/4 of them. That being said, where I start depends a LOT on the wood. Some woods will cut more cleanly than others, which is the given nature of wood. Even pieces from the same tree will turn differently, and have cleaner or rougher surfaces. The same techniques will work with some woods and not others. My final cuts are generally a shear scrape. I am going through some bay laurel/myrtle and even a brand new forstner bit is smoking as I try to drill my recess into it for turning the outside. With this log, I will have to start at 80 or 100 grit. My tools are dulling more quickly, even the Big Ugly tool. I am having to finish with gouges. NRSs won't clean it up either. Now, I have been playing around a lot with "finish cuts". It seems that green wood will go much differently than dry wood. I have been turning some dry madrone, and with a NRS, I can easily start at 120. I may be able to start at finer grits, but starting at 120 is fine with me. My grit progression is 80 when necessary, 100 when necessary, 120, 150, 180, 220, 320, 400, and the walnut oil goes on with the grey synthetic steel wool pads. Many will consider this "over sanding", and perhaps it is. But, it saves me just once from having to go back and resand some thing after I am done, then it is worth the effort. I power sand only. I do make sure to sand with "opposite scratch patterns" both inside and outside on the bowls. I do this by changing where on the sanding pad I am contacting the wood and not reversing the drill, and having the video would explain this better.... So, on the outside, below center, and angled at about 45 degrees, then above center and angled at 45 degrees the other direction. The cross hatching of the grit arcs contrast each other and I figure it removes wood better, plus it can show if you "missed" some spots. I spend far more time with the first coarser grits than I do with the finer "polishing" grits since with them, you are mostly polishing out the scratches from the previous grit. Being able to "see" your sanding scratches seems to be helped by 2 main things. One is prescription reading or other glasses, and having "natural" lighting. This is where the "never take your pieces from the shop into the house on a sunny day, sun light causes scratches" comes from. The LED lights, when they first came out were mostly white. I was using a Blue Max lamp, which has a neon lamp, which was intended for needle point sewers. It was natural spectrum. These lights are some times sold as "therapy" lights for where it is grey and gloomy a lot. I am now using a "Bright Reader" lamp which is very bright and spreads the light around and is also a "therapy" lamp. I have several of them in the shop. Beyond that, I NEVER use the air hose to blow off the dust, even inside my sanding hood, because it sends dust up into the air and makes a mess. I do wipe my bowls by hand. Especially at the finer grits, this works the fine dust down into the scratches, and helps to high light them.

I have never tried the card scrapers. Just not sure if they would be efficient for production work.

robo hippy
 
What a great thread. I much prefer reading this then being in the shop sanding :) especially today which is >100 degrees.
JKJ Do you have, or could you make a video of using the card scrapers? I just can't imagine how you would use a card scraper on the inside of a box. Unless you can go across the grain and even then seems like there would just not be enough surface. This probably speaks to my having no idea how to use a card scraper. Which I guess speaks to my request for a video :)

One more comment. Sometimes I sand and sand just to the point of absolute misery and I can still see faint scratches. I then say screw it and put on the finish ( either a shellac as a sanding sealer or osmo hard wax stuff ) and I can't really see the scratches any more. Even more infuriating is that sometimes I can. It's like an intermittent problem that makes things so hard to diagnose.

Oh, and I'll go watch Robo's sanding video too as I'm sure there's good stuff in there!

Aye! I have tried to get into sanding, to like it...but, I just can't quite seem to get there.

It is an intermittent problem. The woods I'm working with right now, mostly maple and holly, seem to show scratches super easily. I guess that's why I started the thread, I'm running into it a lot. I was working with some woods not long ago, that didn't seem to have as much of a problem or a problem at all. I think most were harder woods...wonder if that's a factor.

"Satin" poly filled with mud will obscure the surface while an optically clear glossy shellac film will magnify every abraded fiber. Your eyesight and tolerance for "defects" will affect your judgment of perfection, perhaps differently from your audience.

I can attest that clear shellac (not even glossy, just satin even) does seem to magnify the problem! Sadly its been my go-to finish for most things. Once I am done with these lighter (and softer) woods, I am going to give some darker woods a try, and see about finishing with some danish oil and tung oil that also has varnish in it (the watco stuff...its basically danish with tung rather than linseed, both seem to have a varnish in them.) Really curious to see how those come out in the long run, and whether they exhibit the problem as much.

I've been trying to get some photos of the scratch issue, but I can't really seem to get them to show up in photos. Well, I can get some to show up once I polish the shellac to a satin sheen, but a lot of what I see with my naked eyes (especially with better lighting) just doesn't seem to be coming through in the photos. The first holly bowl I was working on, I had sanded up to 800. I re-sanded lightly with 400, as I think in part the smoothness of the surface was just making the problem worse. With 400 grit, fewer issues are obvious, but...every time I think I've got it, I then scan the surface again and there always seem to be additional issues. I'm going to leave it as is, and finish it with the super blond shellac, and see how things go here...
 
What wheel diameter and grit are you using to re-establish the concave face on the edge of your StewMac card scrapers?

(Edit- looking at your post photos, it appears you are sharpening card scrapers on an 8" wheel, CBN.)

I use a 600 grit 8" CBN wheel for both the card scrapers and the StewMac scrapers. I'm happy with the way they work. I used the small StewMac again today on more persimmon.

This is the same wheel I use to sharpen all tools except spindle gouges.

JKJ
 
Back
Top