• We just finished moving the forums to a new hosting server. It looks like everything is functioning correctly but if you find a problem please report it in the Forum Technical Support Forum (click here) or email us at forum_moderator AT aawforum.org. Thanks!
  • Beware of Counterfeit Woodturning Tools (click here for details)
  • Johnathan Silwones is starting a new AAW chapter, Southern Alleghenies Woodturners, in Johnstown, PA. (click here for details)
  • Congratulations to Dave Roberts for "2 Hats" being selected as Turning of the Week for April 22, 2024 (click here for details)
  • Welcome new registering member. Your username must be your real First and Last name (for example: John Doe). "Screen names" and "handles" are not allowed and your registration will be deleted if you don't use your real name. Also, do not use all caps nor all lower case.

Woodcut gouge tips and DIY

Joined
Oct 1, 2008
Messages
706
Likes
1,128
Location
Sydney Australia
I have often thought of getting a couple of these tips but never quite got around to pulling the trigger. Plus I wondered how they might be improved on, given the fact we now have a wide variety of exotic steels around today I thought yes. After all look how long it took Tungsten carbide to get in the woody scene. In engineering I had been using carbide tips back in the 1960’s, even made a few for my Dad back then as he was a successful wood turner. So the woody and craft folk are not fast adopters of new technology but that is changing.

I have always been an avid DIY enthusiast, having built my own lathes and much of my turning gear. In the beginning I originally made up several Oland type hollowers, very simple but very effective. Sometime later I was asked to review a 5/16 TCT [tungsten carbide tip] gouge tip. The test was a great success so much so I tried to buy several of them, unfortunately the project never got off the ground with the developer and at this point I was hooked the idea of gouge tips. One of the great advantages of gouge tips is you can heat treatment them to produce great hardness without the concerns over the brittleness of the shaft. As much of what I turn is done with some very hard native trees often with a decent amount of silica. Some well in excess of 3000 on the Janka scale species such as Inland Rosewood , Acacia Rhodoxylon, Dead Finish Archidendropsis basaltica, Buloke or Bull Oak Allocasuarina luehmanni and so on and anything long dead and dry from the Australian desert regions will always give you a hard time.

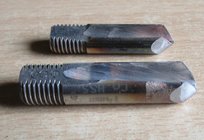
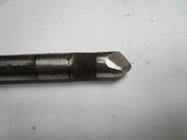
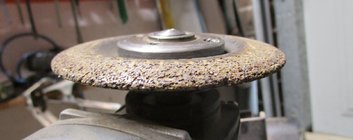
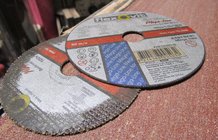
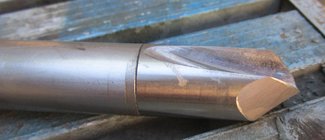
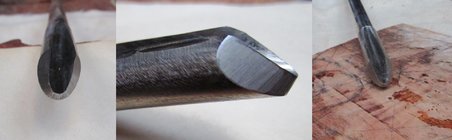
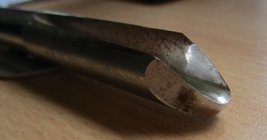
But it set me thinking about making my own especially as I remembered that I had a few broken end-mills 10,12, and 16mm dia that might make good gouge tips. I came up with the idea to grind the flute by hand with a 4” grinder. It worked fairly well a little challenging to try and produce anything more than a straight sided vee. I wasn’t to fussed on the flute design, I just wanted to test the edge holding capability of the end-mill figuring I would worry about the finer points of design later.
 

Attachments

  • IMG_3514.JPG
    IMG_3514.JPG
    420.5 KB · Views: 35
  • IMG_3638.JPG
    IMG_3638.JPG
    229.8 KB · Views: 34
Joined
Oct 1, 2008
Messages
706
Likes
1,128
Location
Sydney Australia
Grinding:-
I ground the flutes by hand using a 4” grinder holding the tip in the vice, first using the 1mm cut off blade followed by a standard used grinding disc as it had a decent radius worn on it. But I also discovered the speed of the grinder was far too fast, so it bounced around a lot, making it hard to control.
Note there is no guard, I found very hard to see around the guard with the guard on ,so face shields are a must here. The shape of the worn or used disc is pretty close to ideal for forming the flute, even if it was hard going.
 

Attachments

  • IMG_3799.JPG
    IMG_3799.JPG
    187.8 KB · Views: 11
  • IMG_3802.JPG
    IMG_3802.JPG
    567.2 KB · Views: 11
Joined
Oct 1, 2008
Messages
706
Likes
1,128
Location
Sydney Australia
The results here are a bit rough looking , but enough to test the edge holding capability. As you can see, its largely a straight sided vee grind. Then polished with a simple MDF disc on the pedestal drill and valve grinding paste, nothing really sophisticated here but really effective.
The test results weren’t spectacular and did vary somewhat between tips. But the over result was marginally better on roughing and reasonably good on finish cuts. The wood species I used were Australian hardwoods, but not the extreme species of hardwood. I figured with a little more care and time along with some decent polishing of the flute would help and hopefully show some improvements. As all the tips took a very good edge and showed promise with some very good finishing cuts.
Giving it further thought, I realised one of the main issues was edge strength and the flute design. As I had the wing edges give way with some decent chips. The end mills were capable of taking a very fine edge, in fact good enough to shave with so final finish cuts were very good. But the final sharpening was a full grind to remove the chipped area, no touch up here with e the stone. Also it became obvious the flute had to be wider and either a U or a parabolic type. Along with some refinement of the grinding process, it needed more control and perhaps a different grinding medium.

So at the end of the day if I went further with the end mills I would need a roughing tool and a finishing tool with particular angles, especially on the wings
 

Attachments

  • IMG_3627.JPG
    IMG_3627.JPG
    213.3 KB · Views: 32
  • IMG_3811.JPG
    IMG_3811.JPG
    540.1 KB · Views: 32
  • IMG_3782.JPG
    IMG_3782.JPG
    287.6 KB · Views: 31
  • IMG_3781.JPG
    IMG_3781.JPG
    468.3 KB · Views: 30

Michael Anderson

Super Moderator
Staff member
TOTW Team
Joined
Aug 22, 2022
Messages
1,363
Likes
3,933
Location
Chattanooga, TN
This is really cool Hughie, thanks for sharing! I love the experimental do it yourself approach. thinking about possible ways to have more control: what if you rigged your grinding disk onto the lathe, so you could control the speed? And, you could fix your tip blank to the banjo and/or some sort of jig. That would give you fine control over its position relative to the grinding disc.

I’m sure you’ve thought about these things already, but it’s fun to brainstorm.
 
Joined
Aug 14, 2007
Messages
5,493
Likes
2,842
Location
Eugene, OR
That V flute in picture #2 looks really steep. I would want to open it up more. I had an old Glaser V gouge, and it plugged up all the time, and I mean ALL the time. Wonder if you could glue or stick several of the grinding/cut off discs together and make a more open profile???

robo hippy
 
Joined
Oct 1, 2008
Messages
706
Likes
1,128
Location
Sydney Australia
This is really cool Hughie, thanks for sharing! I love the experimental do it yourself approach. thinking about possible ways to have more control: what if you rigged your grinding disk onto the lathe, so you could control the speed? And, you could fix your tip blank to the banjo and/or some sort of jig. That would give you fine control over its position relative to the grinding disc.

I’m sure you’ve thought about these things already, but it’s fun to brainstorm.
I have another post on using the lathe etc, I'm still sorting out the details.
 
Joined
Oct 1, 2008
Messages
706
Likes
1,128
Location
Sydney Australia
That V flute in picture #2 looks really steep. I would want to open it up more. I had an old Glaser V gouge, and it plugged up all the time, and I mean ALL the time. Wonder if you could glue or stick several of the grinding/cut off discs together and make a more open profile???

robo hippy
The biggest bug factor is, what I am using aint designed for HSS , its rather designed for mild steel. The grinder speed+disc composition = a darn long time. It was all a case of what I had on hand. Might be able use several of the cutting discs at once. But the grinding disc has an offset which might prove extremely challenging. But yes your right the angle and straight sides dont help I have tried diamond burrs and CBN burrs both are just about as slow as the grinding. I am looking into resin diamond wheels with slower speeds and probably a liquid grinding medium to assist like oil or kerosene
 
Joined
Aug 14, 2007
Messages
5,493
Likes
2,842
Location
Eugene, OR
It sounds like if you are going to do different flute shapes, you need a bunch of different bits to grind and polish the flutes. I think the more V shaped flutes are easier to make, one half round one for the bottom, and a straighter one for the wings. Still probably easier than forging them from flat bar stock.... In another life line, I might have been a blacksmith...

robo hippy
 
Joined
Oct 1, 2008
Messages
706
Likes
1,128
Location
Sydney Australia
My current efforts and I will be trailing it over the weekend , measuring the angles is awkward as the bottom of the flute in not parallel to the body of the tip, so roughly 70' on the nose and 45 on the wings. The blank will be a piece of very dry Acacia Melanoxylon or Blackwood it should cut well. I will be working the wings to see how well they hold up with more angle
 

Attachments

  • IMG_3847-horz.jpg
    IMG_3847-horz.jpg
    140.4 KB · Views: 6
Joined
Oct 1, 2008
Messages
706
Likes
1,128
Location
Sydney Australia
The test results of one hour of turning with the 70/45 grind of some very curly Blackwood. The edge held very well with no sign of chipping to either the wing or nose. I did touch up the nose with a diamond stone during the time,so for me it was a success. I will add images of the edge a bit later.
 
Back
Top