• January 2026 Turning Challenge: Turned and Bent! (click here for details)
  • Congratulations to Phil Hamel, People's Choice in the December 2025 Turning Challenge (click here for details)
  • Congratulations to Ric Taylor for "Black Ash Burl" being selected as Turning of the Week for January 26, 2026 (click here for details)
  • Welcome new registering member. Your username must be your real First and Last name (for example: John Doe). "Screen names" and "handles" are not allowed and your registration will be deleted if you don't use your real name. Also, do not use all caps nor all lower case.

Worm screw vs face plate

I did a search on the forums and couldn't find any info, so here's my question. How does one decide to use a worm screw or a face plate?
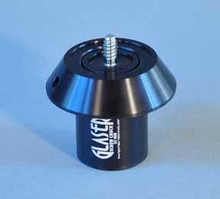
I would say that a worm screw is mostly convenience - drill one hole and thread it on. A faceplate requires several screws and generally a larger flat area. As may be mostly obvious, several screws vs one should normally be "better".

I've just started and can't afford a proper woodturners chuck right now so am using an old metalturners 3 jaw chuck.
...
I start mostly between centers but am trying to enhance my own safety as well as develop a variety of techniques.
For that safety enhancement thing, I'd stay away from the metalworker chuck - the jaws just aren't designed to grip wood effectively. Not enough contact.

Lots of bowls were turned before woodturners chucks became available.

One common technique was to screw a faceplate to the bottom of the bowl blank - and then deal with screw holes when it's finished :( Or waste a lot of wood at the base so you can avoid the screw holes :( Wasn't uncommon to see bowls with green felt glued to the bottom to hide the holes 😝

If I were to turn a bowl today with just a faceplate (or worm screw): I'd start with the faceplate attached in the mouth of the bowl (so screw holes will be turned away). Turn and sand the outside shape and then true up the bottom.
Have a waste block of wood with a faceplate attached (or with holes drilled to attach your only faceplate). I used to buy chunks of 2" thick poplar at the home despot for things like this, before I had a reasonable supply of scraps.
Glue the waste block on the bowl bottom, using the tailstock to align and clamp it (wood glue would be my preference if the wood is dry enough*). Let the glue do its thing and reattach the faceplate.
Should be able to now mount the bowl and turn the inside. If the bottom-truing/waste block/faceplate step was done with care, it should run pretty true.
Do what you can with the tailstock engaged for safety (you can't get very far inside a bowl that way, but every moment of extra support is worth it).
Then part off the waste block and deal with the bowl bottom.
Because I like a turned foot on the bottom of my bowls, I'd now turn it around between centers with a padded waste block in the inside of the bowl. That'll get me access to most of the bottom. Then finish the nub where the live center was using a chisel or pocket knife or sander or etc.

That's a lot of flipping stuff around and waiting for glue to dry etc. Which is why most of us turners bought a chuck as soon as we could afford to. But since the chuck really only saves you time and effort, it could be categorized as a luxury (I thought of my first chuck that way).
There is a distinct advantage to learning different ways of holding stuff on the lathe. Working without a chuck forces you to get some of those skills in your mental toolbox.

* If the wood is still wet, wood glue might not be a good choice for attaching the waste block. CA glue does ok against wet wood, but can be brittle and a catch might break it free, so easy does it. Gorilla glue (polyurethane) would probably be great, as it's moisture activated anyway. Other choices might include hot glue, good quality double-sided tape (not cheap carpet tape), epoxy... each has their strengths and limitations.
 
That is a good link Doug. I got down in the shop yesterday and got 1 of the two pieces I owe done and hope to go down today and finish the other. I cannot believe how much I have lost between a bad back and sciatica for 5 or 6 months and then low blood pressure. I could only stand at the lathe for a few minutes at a time and I'm so shaky. I've also lost 60 lbs. My back was pretty sore. I'm going to get on the stationary bike and build up my legs. Now as far as that link for David Morris, look at that link and in the first section you will see NCK - 4" That's a 4" Tommy Bar chuck about the same size as a Nova Tommy Bar chuck for $52.99 (if your lathe has a 1" X 8 spindle). There is nothing wrong with a TB chuck when you get used to using them they are way faster than screw to tighten chucks and hold just as well if not better. It would be better than the machinist chuck you are using and it takes a good selection of the other jaws. Once you get above the 4" TB chuck the prices go up steeply compared to the others. I'm going to keep an eye on the 2 3/4" chuck to see what it costs as I like these very small chucks. As far as the $69 good value chuck you asked about I still have not used it and all I can say is that it looks and operates very well but as yet I haven't used it.
 
Other choices might include..., good quality double-sided tape (not cheap carpet tape),

Double-sided tape used to be a very common technique for holding, the method taught to a friend 40 years ago. He uses the good "woodturners" double-sided tape, available from Woodcraft and elsewhere. (As Dave mentioned, do no use carpet tape.)

His old lathe had an reeves drive that didn't work well so I gave him a Jet 1642 and some dry blanks and a couple of days later he brought me this bowl, his first turning in many years, about 12" in diameter.

1767788786658.jpeg
PM 2025

He starts by mounting the top to a face plate. Turns round and shapes the outside and flattens the bottom. Removes the bowl and fastens the base to the faceplate with the double-sided tape and applies pressure. Then turns the inside.

The tape holds so well the problem is removing the wood from the faceplate. He generally injects acetone into the tape with a needle and syringe. When we use the tape for holding metals for machining, driving a thin wedge will separate the parts nicely (but very slowly!) Turned some much larger bowls outboard using this method.

I gave him some chucks so we may have a chuck lesson soon.

JKJ
 
More information would be nice for those concerned. Some questions come to mind.
  • Brand and type - high quality machined screw in a screw chuck or "wormwood screw" that came with a scroll chuck. Wood screw/lag screew?
  • Type, size of blank.
  • Hole diameter and depth
  • Species of wood - solid, cracks, punky?
  • Was the mounting face flat?
  • Wood blank in face (cross grain) or end grain?
  • Mode of failure - broken screw, screw separated from the wood, wood failure, other?.
  • Supported with tailstock?
  • At any particular speed?
  • Was there a catch or some other irregularity involved?
I know a lot of people who use screw chucks and wormwood screws and haven't heard of one failing.
Teknatool
6" and two 10"
Deeper than the screw and just big enough for the screw to 'bite'
Walnut, ash, and maple (all solid without defects)
yes
cross grain
screw stripped out
supported until I needed to get to the 'other side' of the blank
all less than 700rpms
no catches

I now have a sound assortment of face plates and the proper screws...never EVER going back to worm screws as there's no need.

thanks...john
 
I now have a sound assortment of face plates and the proper screws...never EVER going back to worm screws as there's no need.
That makes sense. I wondered if the screws were Teknatool/Novas. Breaking without provocation (side stress, overtightening, etc. is troubling - I'd think I would have sent them to Teknatool, especially since three broke.

When you said the screw "stripped out" do you mean the threads broke off the screw leaving a round shaft?

I have a bunch of the Nova wormwood screws since one came with every chuck. I don't like the way some of them look and and don't plan ever use one. Some look so bad I'm not really surprised to hear of problems. Some look like they were sand castings from mystery metal. Even the threads were rounded instead of sharp which seem like they would take a lot of force to . (After hearing your story I want to test the breaking strength on few with a hydraulic press or put some in a vise and see if they'll break with a hammer. The screws I've seen from other chuck makers looked better.

However, for my procedure turning a variety of face/cross grain pieces a single screw has many advantages including simplicity and efficiency. My method works so well for me I call it a "need." I'll stick to the Glaser screw chuck with the precision machined screw. I know several others who bought the Glaser after I demonstrated.

I have a couple of student/friends who work like I do (no surprise since that's the way they were taught!) and gave them the screws when I gave them Nova chucks but said I didn't trust them. I sent them on their way with Glaser screw chucks and said please use these instead!

JKJ
 
Lyle Jamieson shows how and why he uses faceplates and glue blocks rather than chucks. Not for everyone, but he has reasons. The CA glue he uses is fast-setting, sticks to wet wood, and can be split off when done with a chisel. You can use Gorilla Glue for wet wood or pva for dry blanks if you want a less brittle bond and can wait for the cure. I think it's the way to go for weak or punky blanks with poor screw-holding that would be crushed by chuck jaws,
 
That makes sense. I wondered if the screws were Teknatool/Novas. Breaking without provocation (side stress, overtightening, etc. is troubling - I'd think I would have sent them to Teknatool, especially since three broke.

When you said the screw "stripped out" do you mean the threads broke off the screw leaving a round shaft?

I have a bunch of the Nova wormwood screws since one came with every chuck. I don't like the way some of them look and and don't plan ever use one. Some look so bad I'm not really surprised to hear of problems. Some look like they were sand castings from mystery metal. Even the threads were rounded instead of sharp which seem like they would take a lot of force to . (After hearing your story I want to test the breaking strength on few with a hydraulic press or put some in a vise and see if they'll break with a hammer. The screws I've seen from other chuck makers looked better.

However, for my procedure turning a variety of face/cross grain pieces a single screw has many advantages including simplicity and efficiency. My method works so well for me I call it a "need." I'll stick to the Glaser screw chuck with the precision machined screw. I know several others who bought the Glaser after I demonstrated.

I have a couple of student/friends who work like I do (no surprise since that's the way they were taught!) and gave them the screws when I gave them Nova chucks but said I didn't trust them. I sent them on their way with Glaser screw chucks and said please use these instead!

JKJ
Sorry...I mean the wood is 'stripped' out
 
Vicmarc screw chuck is at the start of nearly every bowl I make. The ability to batch cut blanks on the bandsaw, drill holes for them all at the drill press, and then rough them out back to back on the lathe is great. Especially if it’s fresh cut green wood and you’re trying to beat the cracking! You can rough multiple bowls while minimizing context switching. If they are the same size blanks you don’t even need to change chucks/jaws.
 
That looks nearly identical to the Glaser screw chuck, with removable/reversible cone collar. Even the machined screw with the very sharp threads looks the same and the Glaser. Looks like it's $181 USD from Alan Lacer.

Also available for the Jerry Glaser designed screw chuck is a screw-on 5.5" support plate.

I mentioned recently I bought a spare Glaser for "just in case". Yesterday I found a demo piece mounted on another Glaser screw chuck. So I have three. What's wrong with me?! :)
Vicmarc screw chuck has buttress threads.
 
I prefer a worn screw in small pieces, those under 6 in in diameter, as long as the wood is solid. Anything larger I almost always use a faceplate.

It's great we can all work differently to make wonderful things!

I find a screw works fine with larger pieces. I don't remember if I mentioned it in this thread but I've turned several platters from small up to 19" diameter from 8/4 stock, held first by the top with a single screw. My first one was with a wormwood screw. It worked OK. All others were with Glaser screw chucks which I liked better. I've also held the top of some 8" to 12" diameter bowls turned from dry, solid blanks from maybe 3 to 6 inches thick. (not twice turned.) Note that I don't use a screw chuck with wood that doesn't have a perfectly flat area on what will be the top. If irregular, I use a different method.

BTW, the hardest thing about turning a bowl this way is getting the large, dry blanks! I cut them from green wood, seal, and dry so the lead time is years. (It's time to make a bunch more and start them drying - I'm running low! Or I could get stingy and quit giving them to friends...)

How I usually like to work:
  • Hold the flat top with a Glaser screw chuck.
  • If the blank is irregular in any way, support with the tailstock until round and balanced.
  • True up the bottom if needed and define the foot/base diameter.
  • Turn the outside shape from rim to foot.
  • Form the base, adding a recess of some sort. The recess "ring" needs to be no wider than to fit and expand the jaws. This leaves room for some detail in the center. I think there is no need to dovetail the recess but some always do. The surface of the ring inside the recess needs to be smooth. (I use a special tool I made or a small, flat NRS.)
  • Smooth/sand and apply finish to the entire outside and bottom. Let the finish cure.
  • Remove from the screw chuck, reverse and expand the scroll chuck jaws into the recess.
  • Turn the top/inside and finalize the rim. Smooth/sand, apply finish.
Never a hint of a problem in the turning. What I like about this method is after reversing and turning and applying finish to the top/inside the piece is completely done - never have to think about how to hold it to reverse again to work on the bottom/base/foot.

I've posted these pictures before showing a few examples of the recesses. The recesses stay in the bottom as part of the design.. And people often smile and comment when I give them one and they turn it over and see more than a plain base. Have done dozens with this method. Some may not like the look, that's OK!

1769576871973.jpeg 1769576926014.jpeg
1769576900181.jpeg 1769576970541.jpeg

I do all large boxes like lidded Beads of Courage boxes this way (they are basically some kind of bowl.)
The flat ring in recess does make a good place write stuff like the species, date, etc.

The recess can be any depth - I've made them as shallow as 1/8". With a shallow recess it might be best to turn with finesse rather than aggression.

This is just the way I do it. Room for lots of variation in this hobby. And none of it is "wrong!"

EDIT: I realized this morning that when I wrote the above I left out something important. Sorry (it was late!).

There is nothing magic about using a screw chuck in the top - I simply find it quicker and easier. Since not everyone will have or want to use a screw chuck or wormwood screw, when I teach this method to individuals or in demos I always show several alternatives. The top can easily be held by some other method such as a chuck or faceplate. Some options:
  1. Fasten the TOP of the blank with a faceplate instead of a screw chuck and prepare the bottom as describe above. Works with any size blank, round or irregular.
  2. With access to a drill press and a suitable Forstner bit, simply mark the center of the top and drill a recess for the chuck. (This works better if both the top and bottom of the blank are already flat and reasonably parallel.) To try this I bought a couple of inexpensive carbide Forstner bits, a 2-1/16" and a 2-1/8". Both work well with the 50mm standard Nova jaws. That recess can be deep and ugly since it will be turned away. Hold the top in that recess to work on the bottom.
  3. With no drill press, this can still be done: Mount a chuck on the lathe and spread the jaws a bit. Mark the center of the TOP. Tightly squeeze the blank firmly with a live center in what will end up being the TOP - this will hold the blank againse the jaws in the headstock by friction. This may not be suitable with large or unbalanced blanks but works well for 6"-10" blanks. (Again, this is easier if both sides of the blank are reasonably parallel.) Turn a suitable recess on the live-center end. This can be tricky if the live center gets in the way of the tool. I made a special tool to easily cut recesses for 50mm jaws, but if larger jaws are available just cut a larger recess with a parting tool or something. Reverse the piece and hold the blank in that recess to work gracefully on the bottom and outside. (All this is far easier to show than describe!)
  4. Hold the blank between centers and turn a tenon in what will be the TOP of the finished piece. Hold the blank by that tenon to work on the bottom.
As described before, after turning and finishing the outside, reverse the piece as before, holding by the recess in the base and turn the top of the platter or inside of the bowl.

JKJ
 
Last edited:
Drilling a hole for the a wormwood screw or a screw chuck in a flat top.

I think it's important to insure the hole is absolutely perpendicular to the top surface. If angled even a little there can be stresses which might lead to failure.
A drill press is perfect for this IF the bottom of the blank is parallel to the top.
If not, I'd buy or make a drill guide that will hold a hand-held drill so the hole will be perpendicular to the top.

Also, it's probably obvious the bit must be the right size! When drilling a hole in wood to hold any kind of a screw I use calipers to measure the small diameter (the thread root/valley). If the hole is too big, the strength of the connection may be compromised and the screw could tear out.

Bit note that if the hole is just right it may require an effort to insert the screw in hard wood.

For very hard wood, rather than do the easy thing and drill the hole a with a larger diameter bit, it's best to tap the holes for those threads. If using standard screws (say for a bottle stopper or for a drawbar) the right tap is readily available.

If no tap is available, I've been known to make a tap. Simply use a file or a thin metal-cutting bit on a Dremel to cut several angled grooves in the threads at end of the screw. The grooves don't really need to be angled but that just the way I do it. The Dremel is needed for hardened screws which can't be filed. These grooves don't have to be long, but should be cut deep enough to touch the root/valley of the threads. This will make an effective tap exactly the right size for that screw/bolt and cut threads nicely. If these grooves are short, the holding power of the screw in the wood is not weakened.

Note that the mandrels Ruth Niles sold for her bottle stopper hardware came with the ends grooved this way so you didn't have to buy a tap use the mandrel.

Veering a bit off topic, I've also done this with standard bolts when a tap was not available to clean up threads in metals such as mild steel. For example, sometimes a proper metric or imperial tap may not be at hand. I'll try to take a close up picture of these cuts.

The cuts are present but not visible in this 1/4-20 drawbar I made to hold wooden things after I cut short #2 morse taper on the end, such as this long, thin tapered spindle. (For these drawbars I also grind a short flat spot somewhere (near the middle of this one) to hold with an adjustable wrench to cut the threads - hard to do if held by hand!)

1769609594887.jpeg

Grinding a flat near the end is also useful to easily remove a drawbar from a steel MT drill chuck or collet that's tight in the headstock spindle! I like to back the drawbar out a couple of turns before tapping the end with a mallet to knock out the collet or chuck.
1769609654640.jpeg

JKJ
 
Took a bowl turning class at Woodcraft. As pointed out, the blank was flat so the hole was at a right angle for the worm screw. Drilled at an angle would put stress on the blank, as mentioned. I've done both both ways.
 
Took a bowl turning class at Woodcraft. As pointed out, the blank was flat so the hole was at a right angle for the worm screw. Drilled at an angle would put stress on the blank, as mentioned.
Thank you. That was my concern when I asked the original question. I haven't used a woodworm yet and was concerned about that very issue. Being the creative type, I'm formulating a plan to make a jig that will hold a piece level on the top where the bottom is round for drilling a hole on the drill press. I've watched a ton of YouTube videos and am always amazed at the skill experienced turners have.
 
Back
Top