-
February 2026 Turning Challenge: Cookie Jar! (click here for details) -
Congratulations to Matt Carvalho for "Red Mallee Folded Form" being selected as Turning of the Week for February 9, 2026 (click here for details) -
AAW Symposium demonstrators announced - If the 2026 AAW International Woodturning Symposium is not on your calendar, now is the time to register. And there are discounts available if you sign up early, by Feb. 28. Early Bird pricing gives you the best rate for our 40th Anniversary Symposium in Raleigh, North Carolina, June 4–7, 2026. (There are discounts for AAW chapter members too) For more information vist the discussion thread here or the AAW registration page
-
Welcome new registering member. Your username must be your real First and Last name (for example: John Doe). "Screen names" and "handles" are not allowed and your registration will be deleted if you don't use your real name. Also, do not use all caps nor all lower case.
You are using an out of date browser. It may not display this or other websites correctly.
You should upgrade or use an alternative browser.
You should upgrade or use an alternative browser.
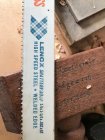
Would this make a good 1/16" parting tool?
- Thread starter Mark Corkern
- Start date
They work very well put a handle on grind the teeth down have used one for years with no problems.
john lucas
AAW Forum Expert
Yep should work fine.
Man, looks like I've tossed a lot of parting tools in the bin!
Pretty sure that welded edge means hardened teeth, with a soft back. So not an even heat treat all through the blade.
it is my guess that the high speed steel is welded to a softer metal so you would need to have the cutting point in the HSS portion of the saw blade.Pretty sure that welded edge means hardened teeth, with a soft back. So not an even heat treat all through the blade.
I recall that some have made a narrow parting tool with a flea market cook's knife or butcher knife.
Don't use it unless you have solid handle attached that is much wider than the thickness of the blade, else it can be lethal. I bought one off the back of a truck at a woodturning conference a few years ago made from an industrial saw blade. The handle consisted of a piece of soft plastic tubing shrunken onto one end. I used it one day to part deeply into a work piece and for whatever reason the blade seized in the kerf. The parting tool and handle were jerked out of my hand and then apparently folded into the kerf far enough for the end of the handle to clear the tool rest. It continued on around, the handle end unfolding again, and painfully bruised my hand. It could just of easily have pulled out of the kerf and launched at my face. This tool subsequently acquired a solid wooden handle.
I usually try to have a width of kerf one and a half times the thickness of the parting tool. This prevents tendecy of binding due to wood (and tool) getting hot and swelling fibres. Especially important if going deep.
- Joined
- Jan 27, 2005
- Messages
- 13,209
- Likes
- 5,814
- Location
- Dalworthington Gardens, TX
- Website
- pbase.com
Unless you are only planning to use it for small items I would say don't do it. Thin blades can easily twist and grab the tool especially with a soft backed blade.
+1 with Bill
I did manage a thin parting tool with a broken knife blade.
I did put a good comfortable handle, and he working point at the back of the blade,so, is more widht (<1/16) at this point in order not to catch in the groove.
It is carbon steel, and I use it only with small objects (and very carefully)
I did manage a thin parting tool with a broken knife blade.
I did put a good comfortable handle, and he working point at the back of the blade,so, is more widht (<1/16) at this point in order not to catch in the groove.
It is carbon steel, and I use it only with small objects (and very carefully)
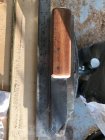
It has about 1/4" of hardened steel, I cut it on a 50 degree angle and ground a small angle on the hardened side. I drilled for and put 2 steel pins in the handle and put it all together with JB Weld, I will post a picture when I finish it. Thanks for all of the comments.
- Joined
- Jan 27, 2005
- Messages
- 13,209
- Likes
- 5,814
- Location
- Dalworthington Gardens, TX
- Website
- pbase.com
It has about 1/4" of hardened steel, I cut it on a 50 degree angle and ground a small angle on the hardened side. I drilled for and put 2 steel pins in the handle and put it all together with JB Weld, I will post a picture when I finish it. Thanks for all of the comments.
Just be very careful and don't go very far over the tool rest. I have a thin HSS parting tool and if it is extended too far over the tool rest then you can't control the side to side flexing. I once had a thin HSS parting tool grab and twist like a pretzel. I was lucky that I only got a bruise and minor cut. It could have been a severe laceration.
Bill do you use it with the short angle up or down?
- Joined
- Jan 27, 2005
- Messages
- 13,209
- Likes
- 5,814
- Location
- Dalworthington Gardens, TX
- Website
- pbase.com
It's the Nick Cook parting tool. If you're not familiar with it, the lower long edge is fluted and you only sharpen the short top edge. Eventually, the top edge will become the longer edge. The purpose of the fluting is to give the tool a bifurcated tip which cuts very cleanly rather than tearing through the wood. The only drawback is that a new tool will have at least 1½" overhang.
I think that Nick's main purpose for the tool is for making honey dippers.
I think that Nick's main purpose for the tool is for making honey dippers.
The Sorby parting tool is seen in use here from around 1:20
View: https://m.youtube.com/watch?v=n6QsGVmWyOo
Lars
Lars
I use my thin parting tool mostly when I want to retain a good grain match between the body and lid of a box or canister. Therefore, widening the kerf as I go would defeat the purpose.


