• Beware of Counterfeit Woodturning Tools (click here for details)
  • Johnathan Silwones is starting a new AAW chapter, Southern Alleghenies Woodturners, in Johnstown, PA. (click here for details)
  • Congratulations to Jim Hills for "Journey II" being selected as Turning of the Week for May 6th, 2024 (click here for details)
  • Welcome new registering member. Your username must be your real First and Last name (for example: John Doe). "Screen names" and "handles" are not allowed and your registration will be deleted if you don't use your real name. Also, do not use all caps nor all lower case.

(Big) gap fillers!

Joined
Jan 21, 2015
Messages
1
Likes
0
Location
Ontario, Canada
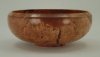
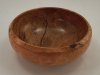
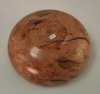
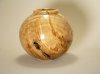
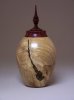
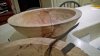
Over the years I have made a few pieces that have resulted in large holes (bark inclusions). If these holes are situated in awkward locations (e.g. at the bottom of bowls), they become useless, however, I have kept several of them as the wood itself is too attractive and I can't bring myself to destroy them!

Can anyone recommend any attractive and fairly easy to apply fillers? Colours or type of material is of no consequence to me as I would just like to experiment on saving these pieces. The holes in question, while more than mere splits, are not huge. Generally they are in the 1" to 2" square sizes.

I have seen many examples of filled work from magazines, so I know there must be solutions out there! I live in Canada so am prepared to have to order any product suggestions on-line (not too many turning retailers in this country).

Any advice would be much appreciated.

Many thanks.

Chris G.
 

john lucas

AAW Forum Expert
Joined
Apr 26, 2004
Messages
8,343
Likes
3,602
Location
Cookeville, TN
Inlace or colored epoxy are two good possibilities Inlace comes in a wide variety of colors and you can add colored powders and chips that they also sell to alter its appearance. It has the advantage of thickening and hardening fairly quickly so you can work with it that way.
Epoxy has lots of options since it can be thickened and colored to do what you want to do
 

odie

TOTW Team
Joined
Dec 22, 2006
Messages
7,124
Likes
9,901
Location
Panning for Montana gold, with Betsy, the mule!
Chris.......

You see here some rather large gaps in a Cherry burl bowl. At the widest point, the gaps are close to 1/8th inch, and go all the way through. These are filled with Devcon clear epoxy. You'll need to position the bowl so that the top of the opening is facing straight up (to prevent oozing out). Put tape over the bottom of the crack and fill the crack to overflowing on top. After the crack is filled, put tape over the top of the crack. It's best to use a "breathable" cloth tape, similar to medical cloth tape used in some bandages......this is so the ambient air will penetrate and dry the epoxy. I'm using "hockey tape", which is used to wrap ice hockey sticks. It's cloth, and breathable. The great news is the hockey tape doesn't stick to the epoxy after it's hardened......it's easily peeled off, leaving nothing but the epoxy.

Once the gap is filled, and exposed epoxy is sealed with the tape on both sides, you can go on to fill the next gap......with the breathable cloth tape in place, it's no longer necessary to worry about the epoxy oozing out of the crack prior to hardening....(gravity is no longer a consideration.)

ko
 

Attachments

  • 1217 cherry burl (2).jpg
    1217 cherry burl (2).jpg
    187 KB · Views: 77
  • 1217 cherry burl (3).jpg
    1217 cherry burl (3).jpg
    259.6 KB · Views: 79
  • 1217 cherry burl (5).jpg
    1217 cherry burl (5).jpg
    330.1 KB · Views: 87
Joined
Sep 16, 2014
Messages
97
Likes
1
Location
Palm Springs Area
The clear epoxy doesn't seem to show up as clear in the pictures it looks darker like the crack. Looks great!

Chris.......

You see here some rather large gaps in a Cherry burl bowl. At the widest point, the gaps are close to 1/8th inch, and go all the way through. These are filled with Devcon clear epoxy. You'll need to position the bowl so that the top of the opening is facing straight up (to prevent oozing out). Put tape over the bottom of the crack and fill the crack to overflowing on top. After the crack is filled, put tape over the top of the crack. It's best to use a "breathable" cloth tape, similar to medical cloth tape used in some bandages......this is so the ambient air will penetrate and dry the epoxy. I'm using "hockey tape", which is used to wrap ice hockey sticks. It's cloth, and breathable. The great news is the hockey tape doesn't stick to the epoxy after it's hardened......it's easily peeled off, leaving nothing but the epoxy.

Once the gap is filled, and exposed epoxy is sealed with the tape on both sides, you can go on to fill the next gap......with the breathable cloth tape in place, it's no longer necessary to worry about the epoxy oozing out of the crack prior to hardening....(gravity is no longer a consideration.)

ko
 

odie

TOTW Team
Joined
Dec 22, 2006
Messages
7,124
Likes
9,901
Location
Panning for Montana gold, with Betsy, the mule!
The clear epoxy doesn't seem to show up as clear in the pictures it looks darker like the crack. Looks great!

Richard.......If you catch the light just right, you can see clear through the epoxy from one side to the other. It does tend to take on a darker tint to it, and when cracks don't go all the way through, the epoxy doesn't look very clear at all. On darker woods, the clear epoxy repairs are even more successful, because they are less noticeable yet......

ko
 
Joined
Oct 2, 2006
Messages
1,049
Likes
35
Location
Tallahassee FL
Joined
Mar 3, 2009
Messages
244
Likes
1
Location
Madison, Indiana
Here is a cohttp://www.aawforum.org/vbforum/asset.php?fid=7959&uid=18833&d=1422365780uple in-lace ,turquoise filled pieces. Gary
 

Attachments

  • 2008-01-01 12.09.17.jpg
    2008-01-01 12.09.17.jpg
    511.4 KB · Views: 47
  • SOLD (33).jpg
    SOLD (33).jpg
    508.5 KB · Views: 48
Joined
Jan 24, 2010
Messages
3,058
Likes
901
Location
Cleveland, Tennessee
Don't two part epoxies cure by a chemical reaction rather than air drying? Just curious.
 
Joined
Apr 25, 2004
Messages
2,560
Likes
34
Location
Annandale, New Jersey
Don't two part epoxies cure by a chemical reaction rather than air drying? Just curious.

You are correct. There are no solvents in epoxy to evaporate nor is oxygen a necessary component of the curing chemical reaction between the resin and the catalyst. That said, when pouring/casting epoxy such that its cross section is more than 1/2" thick it's good practice to allow as much surface as possible to remain open to allow for reaction heat to dissipate. Too large a pour in an enclosed space can generate enough heat to deform and/or fracture the gelled resin.

Mixed epoxy can also be thickened with a variety of materials to prevent its "runny" character. Micro balloons and powders can be mixed in to create a paste. Screened wood flour works quite well as in the photo of a walnut surface

wood-fill-1.jpg
 
Joined
Oct 25, 2005
Messages
935
Likes
241
Location
Newberg, OR: 20mi SW of Portland: AAW #21058
Screened wood flour works quite well as in the photo of a walnut surface

I frequently add to my collection of various wood dusts when I sand pieces. So far I have black walnut, sycamore, white oak, and cherry. These are my most used local woods and the ones I will most likely need a good match for. Adding some old dry coffee grounds to the dust and epoxy lends a very natural looking crack and knot filler.
 

odie

TOTW Team
Joined
Dec 22, 2006
Messages
7,124
Likes
9,901
Location
Panning for Montana gold, with Betsy, the mule!
Don't two part epoxies cure by a chemical reaction rather than air drying? Just curious.

You are correct. There are no solvents in epoxy to evaporate nor is oxygen a necessary component of the curing chemical reaction between the resin and the catalyst. That said, when pouring/casting epoxy such that its cross section is more than 1/2" thick it's good practice to allow as much surface as possible to remain open to allow for reaction heat to dissipate. Too large a pour in an enclosed space can generate enough heat to deform and/or fracture the gelled resin.

Mixed epoxy can also be thickened with a variety of materials to prevent its "runny" character. Micro balloons and powders can be mixed in to create a paste. Screened wood flour works quite well as in the photo of a walnut surface

View attachment 8177

Good catch, gentlemen.....you can now consider me informed!:D

Before I arrived at the hockey tape, I tried several other kinds of tape that didn't work as well. I figured the "breathable" component had to do with the ambient air, and I now stand corrected. The fact that the hockey tape allows you to handle the epoxied bowl, without sticking, or gravity effecting it, makes it a good choice to do this kind of repair......whether or not my assumptions were correct.

ko
 

john lucas

AAW Forum Expert
Joined
Apr 26, 2004
Messages
8,343
Likes
3,602
Location
Cookeville, TN
One thing I've had problems with when using sawdust as a filler is it can look like you filled the gap with pressed wood. Not a good look in my opinion. I have used it successfully in a lot of places and it works well in smaller cracks and defects. It's the larger ones that tend to look odd when filled this way. At least that's my experience. Others may have better success. I prefer to mix up something that adds contrast and highlights the crack since it's rare that you can mix it up well enough to hide it. When I fill in knots I mix colors that are similar or darker than the knot and will often leave the mix transparent so it picks up the color of the surrounding wood and looks more natural.
I have bought Inlace products from this place. I didn't check the current prices but they used to be very reasonable and carried a larger variety than others. The chips and powders also mix well with epoxy.
https://www.turtlefeathers.net/
 
Joined
Jun 1, 2006
Messages
326
Likes
154
Location
Freelton, ON
If it is salvageable, I general saturate bark with thin CA and then maybe fill around it with something. I usually use 5 minute epoxy, West Systems have a kit of two four oz bottles that Exotic Woods in Burlington sell or Lee Valley also have a small kit from another manufacturer. For filler in cherry I use ground red shale and it comes close to the color of the pitch inclusions cherry has. LV have a series of earth pigments. Eugen Schlaak uses black embossing powders for contrast. If you have a laser printer, there is black toner left in the cartridge even though the printer says it is MT. I have never like the brass filings option or coloured sparkles. Bought some years ago and they are in the same drawer as tools that looked better at the show than in practical use. I keep sanding dust from individual woods. Used to use 35 mm film containers to store but afraid they are rare as hen's teeth now. Small baggies or envelopes also work. I do like Turquoise Mineral powder and got some from Craft Supplies USA years ago. They use US Postal Service, so no additional customs costs when importing low cost orders. Makes a nice contrast in light or dark woods. You can also buy finely divided metal powders, but I have never explored. In small cracks, I also use CA and any of the above as it is quicker.
 
Joined
Sep 26, 2013
Messages
45
Likes
1
Location
Atlanta Ga
I have a lot of scrap veneers of dark woods; Indian rosewood, ebony, etc. Many up to 1/8 thick.

I rub water resistant pva glue on splinters and stuff into the splits/holes. I like dark woods for fillers over lighter options. Once the hole/split is sound/strong, I often use a small drimmel type tool to detail the area rather than fill it. Large sawdust fillings don't appeal to me.

I repaired several cracks on the rim at the pith with thin splinters of black veneer. I roughed out 4-5 12" bowls from spalted magnolia. Bad cracks appeared in half of them so I fixed them this way last year.

Indian rosewood works great with spalted pecan.
 
Joined
Jun 9, 2004
Messages
1,223
Likes
49
Location
Haslett, Michigan
I have a lot of scrap veneers of dark woods; Indian rosewood, ebony, etc. Many up to 1/8 thick.

I rub water resistant pva glue on splinters and stuff into the splits/holes. I like dark woods for fillers over lighter options. Once the hole/split is sound/strong, I often use a small drimmel type tool to detail the area rather than fill it. Large sawdust fillings don't appeal to me.

I repaired several cracks on the rim at the pith with thin splinters of black veneer. I roughed out 4-5 12" bowls from spalted magnolia. Bad cracks appeared in half of them so I fixed them this way last year.

Indian rosewood works great with spalted pecan.

Bob-do you have a picture??? Can't see how "splinters" can make a "solid" appearing fill. Gretch
 
Joined
Sep 26, 2013
Messages
45
Likes
1
Location
Atlanta Ga
I hope this clearly shows my bowl and some of the repairs.

Foreground is one I am working on with small pieces of veneer. It was roughed out 8 months ago.

Behind is one with big cracks all over. Marginal. I filled a big one with bondo but don't like the look. below is what appears to be knots but are holes with rosewood splinters crammed into them.

Someday I will saw the bondo out with a hand saw and cram splinters in.

Or not.
 

Attachments

  • bowl-crack-repair.jpg
    bowl-crack-repair.jpg
    52.8 KB · Views: 39
Joined
Dec 30, 2012
Messages
105
Likes
33
Location
Cuero, Texas
Chris, some thoughts on "repairs", (all learned on my own) apologies for being verbose--
I do lots of "fill" or inlay in my turnings. I seem to gravitate to or attract pieces that need extra attention. I haven't posted many pics on this site (am more active on some others).
I like to use a 2 part epoxy that is sold as a "pour on" finish for tables ("famowood" is one, another brand is Parks--about $20), etc.--sold at the big stores--Lowes, HD here-not sure what's in your area. I just mix up as much as I need and get it into the defect. You'll have to use tape to seal the other side--have been using duct tape mostly, but a friend has recommended using a cloth tape.
The epoxy sets up over time, so if it's a crack I'll put it in early while it's a thin liquid, you'll find if it communicates anywhere--so have some paper down or something. If you're vigorous with mixing, let it set some then blow across the surface--most of the bubbles will dissipate. If you wait and let it start curing/thickening it becomes easier to keep in place; you'll have up to maybe an hour. If I want coloring, I mix in whatever mineral I want to use turquoise, malachite, chrysocollite, iron pyrite powder, etc.--be careful to pick minerals that won't hurt your tools---some are as hard as steel (remember the Mohs scale from school?) so research any colored rocks that you might want to use. You don't have to get it right with the first application, the epoxy will stick just fine to prior fills and once cured tools and sands easily. The only down side is that the epoxy takes about 24 hrs to cure--for me that's ok and likely others will chime in with whatever brand they prefer.

IMG_0918.JPGIMG_1122.JPGIMG_1179.JPGIMG_1193.JPG
 
Last edited:
Joined
Jun 9, 2004
Messages
1,223
Likes
49
Location
Haslett, Michigan
I hope this clearly shows my bowl and some of the repairs.

Foreground is one I am working on with small pieces of veneer. It was roughed out 8 months ago.

Behind is one with big cracks all over. Marginal. I filled a big one with bondo but don't like the look. below is what appears to be knots but are holes with rosewood splinters crammed into them.

Someday I will saw the bondo out with a hand saw and cram splinters in.

Or not.
Thanks for the photo, Gretch
 
Back
Top