
-
April 2026 Turning Challenge: Salad Bowl! (click here for details) -
Congratulations to David Bartell, People's Choice in the March 2026 Turning Challenge (click here for details) -
Congratulations to Ted Pelfrey for "Cherry Blossoms on Cherry" being selected as Turning of the Week for April 27, 2026 (click here for details) -
Welcome new registering member. Your username must be your real First and Last name (for example: John Doe). "Screen names" and "handles" are not allowed and your registration will be deleted if you don't use your real name. Also, do not use all caps nor all lower case.
You are using an out of date browser. It may not display this or other websites correctly.
You should upgrade or use an alternative browser.
You should upgrade or use an alternative browser.
Bowl depth
- Thread starter Heath Warren
- Start date
You could consider some of the alternative gauges that Doc Green has documented on his website in the Gauges section of his Articles webpage.
I would love to say that I have never had the inside diameter exceed the outside diameter, but that wouldn't be accurate.
Good luck!
I would love to say that I have never had the inside diameter exceed the outside diameter, but that wouldn't be accurate.
Good luck!
Thanks. I’ll check it out. This was the first time it happened. I’m sure it won’t be the lastYou could consider some of the alternative gauges that Doc Green has documented on his website in the Gauges section of his Articles webpage.
I would love to say that I have never had the inside diameter exceed the outside diameter, but that wouldn't be accurate.
Good luck!
I mounted a drill bit in a handle (sorry - no picture at the moment). (See Richard Raffan's or Tomislav's youtube videos.) Measure on the outside of the bowl, and mark the drill bit with a sharpie. Then using the lathe, drill down to the sharpie line. That is the depth to hollow out your bowl. In 3 years of turning, only went through the bottom once - and that was more on the side because I wasn't paying attention. I have had many very thin bottoms due to not estimating the depth very well. Also look at Sam Angelo's youtube for his shop-made depth gauge.
I span a ruler across the rim and use a second ruler or calipers to measure from the edge of the first ruler to the bottom.
Dave Landers
Beta Tester
My favorite calipers are my "Digital" ones (digits == fingers!)
When those aren't good enough I usually reach for my homemade bent-wire calipers.

Bend a stiff wire (like1/8" diameter) so it'll get to wherever you need it. A sorta "D" shape usually is pretty good. If you're aiming (for example) to get a 1/4" wall, and you set the gap in the wire at 1/2" - then when the wire gap is 1/4" (between wire and outer bowl wall), you're there. I think it works better than setting the wire gap at exactly what you're aiming for, because you can judge progress and how far you have to go.
The other thing I do with bowls is to first get a consistent but thick wall. Thick so there's still wood to work with to get it consistent without risking going too thin. Then, always take off a consistent depth of cut (watch the "shelf" created by the gouge). As an example, make a consistent wall thickness of 3/4", all the way down. Then take passes removing consistently 1/8" each time. 4 passes and you're at 1/4". If your passes were consistent, there's no way to break thru the bottom.
(Wall thickness examples are not recommendations for bowl walls, just convenient numbers to work with).
When those aren't good enough I usually reach for my homemade bent-wire calipers.
Bend a stiff wire (like1/8" diameter) so it'll get to wherever you need it. A sorta "D" shape usually is pretty good. If you're aiming (for example) to get a 1/4" wall, and you set the gap in the wire at 1/2" - then when the wire gap is 1/4" (between wire and outer bowl wall), you're there. I think it works better than setting the wire gap at exactly what you're aiming for, because you can judge progress and how far you have to go.
The other thing I do with bowls is to first get a consistent but thick wall. Thick so there's still wood to work with to get it consistent without risking going too thin. Then, always take off a consistent depth of cut (watch the "shelf" created by the gouge). As an example, make a consistent wall thickness of 3/4", all the way down. Then take passes removing consistently 1/8" each time. 4 passes and you're at 1/4". If your passes were consistent, there's no way to break thru the bottom.
(Wall thickness examples are not recommendations for bowl walls, just convenient numbers to work with).
I made several slide wire thickness gauges with parts from Menards like in the picture, but I needed something to do depth holes more easily. I made one of the Richard Raffan wood handled drill tools and it works ok. I saw someone online make a simple depth hole gauge using a Jacobs chuck. I made one for my son using the chuck I got from Amazon for about $10. I added a handle and the beauty is you can use any bit you want and like Richard does with his tool you can adjust the length of the bit in the chuck to your desired depth and then drill in to the end of the chuck. Except for the bit and my time I have 10-12 dollars in this tool.

Attachments
Last edited:
Well, this is my method:
View: https://www.youtube.com/watch?v=0Ov5m50NXJ8
I never drill out my bowls since that only gets me close, but not exact. You can measure the inside and site along the rim for the measure and then put that on the outside, which again gets you "close" but not exact. My method gets you pretty exact. I guess the only other method would be if there is air in between your grip on the tenon and you can slip a caliper in the gap. I do use a recess, always.
robo hippy
I mounted a drill bit in a handle
I mount drill bits in handles too - made these long ago, used drill stop collars to set the depth. The bit diameter, of course, doesn't matter. The outside is completely shaped first then the depth hole drilled.
Allow a "little bit" extra. Turn the wood, press the drill still it stops. Hollowing to the hole gets me the right depth as long as I keep the shape in mind. Once hollowed in the center, I have several specialized calipers to test the thickness while shaping the inside towards the wall and bottom.
The stop collars are nice because I don't have to watch the bit carefully and try to remember which Sharpie line is the the right one!

These are for small things but could use longer bits for deeper. I usually use longer taper shank bits directly in the tailstock MT and marked with a Sharpie (or a piece of tape) to drill deeper holes. The longer bits (up to 1" in dia") fit the 2MT, the smaller need a #1 to #2MT adapter.
(These are my favorite bits for drilling almost anything on the lathe). I started with several, now have most sizes. Using these I usually mark the depth with a bit of my favorite tape, Scotch #2026. (Hard to function without it.)

JKJ
Good idea. I’m going to do that.The stop collars are nice because I don't have to watch the bit carefully and try to remember which Sharpie line is the right one!
I use a pencil, or a chuck key. Simply place it in the bottom of the bowl then sight the depth.
Dave Landers
Beta Tester
I have o-rings on my depth drillsThe stop collars are nice because I don't have to watch the bit carefully and try to remember which Sharpie line is the the right one!

Hollow-Pro Caliper
Designed by Mike Jackofsky, the precision made Hollow-Pro Caliper combines steel and aluminum for maximum strength while maintaining a comfortable light working weight and is designed to indicate the wall thickness of hollow forms, vessels, bowls and platters by transferring the measurement from...
 woodturnerscatalog.com

Simon Hope Measuring Caliper
Never go through the bottom of a bowl again! Caliper made from stainless steel. Available in 10" and 16" Lengths. CNC routed numbers that wont wear out.
 blackforestwood.com
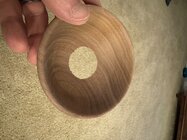
Congratulations on making your first funnel! It's a rite of passage. Some of us have been through the rite multiple times.
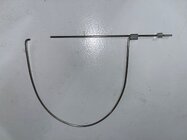
I've tried a variety of methods, and there are some pretty good gadgets available, but the one that works for me and my clumsy fingers is below. Somebody else figured this out and I just copied. It worked wonderfully on boxes, so I made a bigger one for bowls. Some versions have a screw to hold the sliding rod in place, but I find I can hold the measurement without a screw.
The gauge is used while the bowl is still in the chuck, but I don't have a blank with a tenon available. The process is to span the sides, slide the rod to the bottom of the bowl, take the gauge out, put the rod along the side with the cross piece on the rim and sight down on the end of the rod.
I use a variation of what Reed Gray shows in his video in Post #8. I started doing this when I was making a lot of natural edge bowls. The uneven rim on NE bowls makes some of the more common depth gauges less useful or at least trickier to use.
The key point is to know the distance from the headstock to the face of the jaws for each chuck. The face of the jaws is also the bottom outside of the bowl.
I measure that distance and write it on each chuck. To check my bowl depth I put the end of the shorter leg of a framing square against the headstock with the longer leg of the square standing vertically, aligned with the center of the bowl. Measure the distance from the framing square vertical leg to the inside bottom of the bowl. Do some math to get the thickness of the bottom of the bowl.
An example, with made up numbers:
Math can be challenging when fractions are involved. What I actually do is to subtract the distance from the headstock to the jaw face from 14" and write that on my chuck. So if the distance is 9 5/8", I write 4 3/8" on the chuck. When I measure, if the distance is greater than 4 3/8", I've already made a funnel. If it's less, you can see right on the tape measure how much room you have left before you hit 4 3/8". That the bottom thickness.
Hope this makes sense and is helpful.
The key point is to know the distance from the headstock to the face of the jaws for each chuck. The face of the jaws is also the bottom outside of the bowl.
I measure that distance and write it on each chuck. To check my bowl depth I put the end of the shorter leg of a framing square against the headstock with the longer leg of the square standing vertically, aligned with the center of the bowl. Measure the distance from the framing square vertical leg to the inside bottom of the bowl. Do some math to get the thickness of the bottom of the bowl.
An example, with made up numbers:
- 10" from headstock to face of jaws
- 3.5" from framing square vertical leg to center inside bottom of bowl
- 14" (from headstock to inside of framing square vertical leg) - 10" (from headstock to chuck jaw face) - 3.5" (from framing square vertical leg to bowl inside bottom) = 0.5" thickness on bottom of the bowl
Math can be challenging when fractions are involved. What I actually do is to subtract the distance from the headstock to the jaw face from 14" and write that on my chuck. So if the distance is 9 5/8", I write 4 3/8" on the chuck. When I measure, if the distance is greater than 4 3/8", I've already made a funnel. If it's less, you can see right on the tape measure how much room you have left before you hit 4 3/8". That the bottom thickness.
Hope this makes sense and is helpful.
Last edited:
That’s what Mike Jackofsky does.I guess the only other method would be if there is air in between your grip on the tenon and you can slip a caliper in the gap.
@robo hippy (post #8) & @Dave Bunge (#15), good ideas. And these methods will work independent of the height of the bowl and with either tenon or recess.
Using millimeters would greatly simplify the calculations.Math can be challenging when fractions are involved. What I actually do is to subtract the distance from the headstock to the jaw face from 14" and write that on my chuck. So if the distance is 9 5/8", I write 4 3/8" on the chuck. When I measure, if the distance is greater than 4 3/8", I've already made a funnel. If it's less, you can see right on the tape measure how much room you have left before you hit 4 3/8". That the bottom thickness.
Using millimeters would greatly simplify the calculations.
I totally agree and almost wrote that in my original post.
I'm comfortable with English units and fractions and have a more intuitive feel for dimensions using them. I did get a 3D printer recently and everything in the 3D printing world seems to be in metric so I'm getting reacquainted with the advantages of the metric system. I recently ordered a pure metric tape measure from Amazon to use in the shop: https://www.amazon.com/Fastcap-PMMR...s=hi&sprefix=fastcap+true+32,tools,158&sr=1-1
Another reason I don't use a drill bit for depth is that I core any bowl blanks that are worth saving. Never take that last little bowl though, had way too many of them hanging out around the shop unfinished.....
robo hippy
robo hippy
I use a hand held drill to make a hole, but I stop 1/4-1/2” short of final depth - its so I don’t have to get the very center cut when really gnawing through the waste part of the ID. A piece of rubber hose cut thin or an o- ring makes a great drill stop/depth gage.
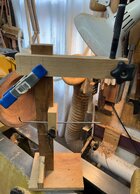
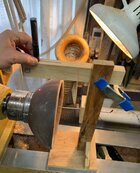
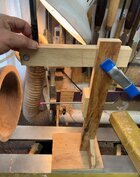
Some methods reference off the front of the HS - doesnt work for me, I have a pivot HS that is turned out, or all the way around, when hollowing a bowl. The one below works pretty well for flat rim bowls and hf’s, and easily made.

This one is my favorite, works on any bowl, flat or NE rim, and hf’s. Used when the work is in the chuck (which is when you need the thing). The lower wood dowel goes to work center depth, the small level bubble is centered in the markings, and the laser shines down on the work OD to show exactly where the bottom depth is. The end of the dowel is lined up to the laser before insertion. The metal parts could be replaced with wooden parts.

Some methods reference off the front of the HS - doesnt work for me, I have a pivot HS that is turned out, or all the way around, when hollowing a bowl. The one below works pretty well for flat rim bowls and hf’s, and easily made.
This one is my favorite, works on any bowl, flat or NE rim, and hf’s. Used when the work is in the chuck (which is when you need the thing). The lower wood dowel goes to work center depth, the small level bubble is centered in the markings, and the laser shines down on the work OD to show exactly where the bottom depth is. The end of the dowel is lined up to the laser before insertion. The metal parts could be replaced with wooden parts.
What are some good bowl depth gauges you use? Shop made is just fine.
@Heath Warren: In an AAW Journal article in Oct 2018 Kurt Hertzog describes a nice shop-made dept gauge, similar to others here.

The article:
BTW, I was inspired by his Mortar & Pestle/Muddler so I immediately made one from a block of Olivewood.
Love the smell of Olive, the fine grain, and how it turns, the density - the mortar is nice and heavy/stable, a bit thicker wall than his - thin-walled showpieces may not be as appropriate for these!
It's a wonderfully functional piece for our kitchen: No finish, just a touch of mineral oil such as used on a cutting board.

JKJ
- Joined
- Jul 18, 2018
- Messages
- 1,389
- Likes
- 3,081
- Location
- Baltimore, MD
- Website
- loujacobswoodturning.com
Here’s my “hi-tech” solution. I bring it to the lathe when the rim is irregular and the low-tech solution isn’t accurate enough. The only purchased part is the laser pointer, about $6 on Amazon. The rest is random scraps from around the shop. Height is adjustable for larger or smaller bowls. Probe is made to be at spindle height of the lathe. The laser dot gives an indication on the outside of the bowl of where the deepest part of the bowl is. Same principle as a laser hollowing rig for hollow forms.
Attachments
- Joined
- Jul 18, 2018
- Messages
- 1,389
- Likes
- 3,081
- Location
- Baltimore, MD
- Website
- loujacobswoodturning.com
And here’s my low tech solution. Already described by others above. 
- Joined
- Feb 6, 2010
- Messages
- 3,532
- Likes
- 2,606
- Location
- Brandon, MS
- Website
- threeringswoodshop.square.site
This is my favorite gauge

For deeper forms there was a tip maybe in American Woodturner . Consists of a board as spacer the length from headstock to bottom of chuck jaws. Then a board with upright and bottom with a piece to fit bed ways. Add a long rod to match length of base and having a point on it to the upright. Note the point is directly above the end of base board and centered on chuck. with bowl in chuck and small board against headstock, slide the pointer up to touch the bottom of the bowl. The distance between the boards is the thickness of the bottom. Sorry no pic, not even sure where it is in the new shop.
For deeper forms there was a tip maybe in American Woodturner . Consists of a board as spacer the length from headstock to bottom of chuck jaws. Then a board with upright and bottom with a piece to fit bed ways. Add a long rod to match length of base and having a point on it to the upright. Note the point is directly above the end of base board and centered on chuck. with bowl in chuck and small board against headstock, slide the pointer up to touch the bottom of the bowl. The distance between the boards is the thickness of the bottom. Sorry no pic, not even sure where it is in the new shop.
Odie
Panning for Montana gold, with Betsy, the mule!
My methods are very similar to others shown here.......because they work! ")
=o=


=o=
This is how I learned it also. But I found out it doesn’t work if you don’t use it. 