• July 2025 Turning Challenge: Turn a Multi-axis Weed Pot! (click here for details)
  • Congratulations to James Seyfried for "NE Red Oak II" being selected as Turning of the Week for July 21, 2025 (click here for details)
  • Welcome new registering member. Your username must be your real First and Last name (for example: John Doe). "Screen names" and "handles" are not allowed and your registration will be deleted if you don't use your real name. Also, do not use all caps nor all lower case.

Finishing Tips for Charred Rims

Joined
Nov 22, 2009
Messages
260
Likes
210
Location
Midland, MI
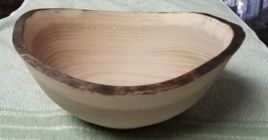
I charred the rim on an unfinished red elm (slippery elm) NE bowl. This is my first time charring a bowl.
1683892013256.png

What's next? Should I sand or wire brush the rim before applying finish? Should I have sealed the inside and outside with shellac before burning to keep ash out of the wood pores? I'm interested to hear from experienced burners...what do you do; are there any pitfalls to watch out for. Thanks.
 
Last edited:
Dave, interested in what some experienced rim burners have to say as well. I just finished one a couple weeks ago and I've done it probably a half dozen times over the years. I did get a tip from a recent Richard Raffan video where he burned a rim. His method was to do a really deep burn, much more than I've done in the past, then brush it down to remove the loose char. It worked well on the one I did recently (an elm very similar to the one in your pic). Still left a good dark rim all around. I burned it dark black all around until I got the cracking and red glow in the little flakes that formed on the rim. I do the burning before sanding. I brushed then wiped the rim down until I quit getting black on my fingers. The finish was walnut oil and I went ahead and put a light coat of it on the rim as well thinking it might help seal it down.
 
Hi Dave, I don’t think that shellac beforehand would have done much for you. That said, if you start wirebrushing now without sealing the wood, you’ll likely get some char stains on the normal wood. Also, be careful with wire rushing in general, as you’ll leave some marks in the charred section. If you’re satisfied with the look as-is, coat the rim in some 1pound cut of shellac. That will bind all of the charred particles to each other and the virgin wood beneath. Once dry, if no black comes off onto your fingers, you’re good to finish the rest how you prefer. If needed, a second cot of shellac will be fine. My two cents.
 
A good question. For me I like a matt finish to all my burnt edges and I burn them gently till black and brush off any of the loose charing. I like the brushes to be a little stiff to gently remove the surface away, so I use a stiff nylon or a soft brass wire brush. Finishing can be tricky as I want it sealed but remain matt and more than one coat will produce some shine. So I use either my own version of Danish Oil or matt polyurethane and dab it on with a small artist type brush ie 1/4 to 3/8th" using a spear type action.
 
I used to do that. I used a satin or matte lacquer and brushed it on. Now days I create faux bark using sponge painting techniques. Not sure I have a photo.on my phone. I'll look. If not it might be tomorrow before I get to the computer.
 

Attachments

  • 20230513_081720.jpg
    20230513_081720.jpg
    569.6 KB · Views: 36
What's next? Should I sand or wire brush the rim before applying finish? Should I have sealed the inside and outside with shellac before burning to keep ash out of the wood pores? I'm interested to hear from experienced burners...what do you do; are there any pitfalls to watch out for. Thanks.

@Dennis Ramos has a lot of success with charred rim accents (see the current Turning of the Week). He might be able to offer some good advice.

Thanks, Michael!

Hi Dave, just to add my few experiences with charring edges, I burn the edges without any oil finishes since it makes the whole burning more smokier because of the oil finish. After burning, I wipe some of the soot before sealing and buffing the the whole piece. I use pyography kit pen for edge burning.
 
I learned that burned surfaces must always be brushed as the next immediate step. A brass bristle brush works well. This removes the ashes and remnants of burning. It will also tend to highlight the grain which is many times useful when coloring or highlighting the burned surface. It helps bring out the grain. I have also removed the ash with synthetic steel wool of varying "grits". It you want the surface to remain smooth, use a very fine grit and just brush the surface lightly until you get rid of most of the ash. After brushing, wiping the surface with a soft cloth or even paper towel will remove the residue from bushing. After that, you can do many different things with the charred surface.

One thing I did that had a very unique effect on an ash bowl was to mix a mineral oil/besswax finish with Bronze Chroma-Gilt and applied that to the whole surface of the bowl which had been light burned. The grain just stands out with a very unusual grayish/bronze color.
 
Thanks everyone for the suggestions. I ended up making a pad out of a paper towel and using it to scrub the rim until (mostly) no more char came off. Then I put a coat of shellac, 1 lb cut, inside and out and on the rim, wiping off excess from the rim. I'll post a picture in a few days after final sanding and finishing.
 
Back
Top