• May 2025 Turning Challenge: Long Neck Hollowform! (click here for details)
  • Congratulations to Phil Hamel winner of the April 2025 Turning Challenge (click here for details)
  • Congratulations to Paul Hedman and Donna Banfield for "Fire and Ice" being selected as Turning of the Week for 5 May, 2025 (click here for details)
  • Welcome new registering member. Your username must be your real First and Last name (for example: John Doe). "Screen names" and "handles" are not allowed and your registration will be deleted if you don't use your real name. Also, do not use all caps nor all lower case.

Hollow Form Templates

Randy Anderson

Beta Tester
Beta Tester
Joined
May 25, 2019
Messages
983
Likes
1,567
Location
Eads, TN
Website
canthony.gallery
I typically don't draw up plans or sketches for pieces I turn. I like the "make it up as you go" style for natural edge bowls, which I turn a lot. There's the basic shape, size, thickness, curve, height and dia that I adjust as I discover what's inside. Fairly easy to do on the fly. I don't turn many traditional style bowls.

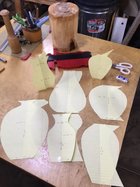
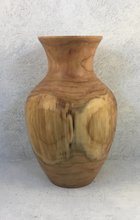
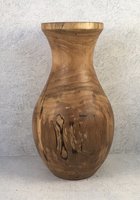
When I turn vases and hollow forms I need a different plan. I have a basic idea in mind and then adapt as I go. The result is that too many of them look the same or I end up with the proportions not quite right. They're selling much better for me and the design options are much more varied and interesting to work with so I need to change my approach. I've looked online and in my own house for various shapes that look interesting but a picture is hard for me to follow and keeping one of my wife's vases in the shop while I take measurements as I turn something is risky. I decided to cut out some basic designs on paper with key measurements that I could scale up or down a bit and still retain the basic proportions. It's a start, thin paper that I can move to thicker stock later as I adjust the shape. The flap on the back of each is a reverse outline template I can hold up to the shape and eyeball how well it matches. I've used a couple of them so far and it's helped me avoid the inevitable typical or not quite right shape I end up with too often.

Interested in other template ideas or if anyone has any online that can be printed out.
 

Attachments

  • IMG_6431.JPG
    IMG_6431.JPG
    56.3 KB · Views: 89
Some good books are:

1. Ceramic Form: Design and Decoration
2. The Woodturner's Workbook: An Inspirational and Practical Guide to Designing and Making
3. The Art of Turned Bowls: Designing Spectacular Bowls with a World-Class Turner
 
My first set using my new templates. Modeled after some glass flower vases my wife keeps around. 9" tall. Any feedback? On the wider one the neck sometimes strikes me as a little too wide in the valley. On the narrower one the top opening sometimes looks a little too wide, then not.
 

Attachments

  • IMG_6461.JPG
    IMG_6461.JPG
    300 KB · Views: 56
  • IMG_6467.JPG
    IMG_6467.JPG
    424.7 KB · Views: 56
I think the neck and opening of both are a little big. And I'd loose the flat edge on the rim of the narrower one. I like the bodies.

Rather than check your form in wood, why not try a full size drawing on paper. You can take an eraser to any section of curve you don't like and put in a new curve. When you get something you like, then make the template.
 
Mark, thanks for the feedback. That's what I did for the most part. My templates are very close to full scale. My gut when I put it up to dry was it was a little big on both of them. I plan to adjust my templates and be ready for next time.....
 
For me designed use and intended methods start the design process. Shape then follows.

For vases, are they to be functional? In what way? Meaning an insert to hold water, dry/plastic flowers only, use the top ID to hold foam, or just the vase.

Designed use drives neck dia, which then dictates the rest of the design. Next access for hollowing drives design - if cut hollow from below and plug different things can be done.
 
Doug, none of mine are functional re water but are for dried arrangements or standalone. I've only plugged the bottom a couple of times when after hollowing I misjudged the bottom thickness and had to repair with a plug. It seems that unless very well done with grain match, a decorative groove to hide, etc that a bottom plug sorta diminishes the impact of the piece. I have a few designs in mind where hollowing from the bottom will be required so plan to give it a shot.
 
Just very much a layman’s opinion. The thinner one is more appealing to me with the exception of the top. I’d like the line continued as in the fat one.
 
Adding to Rich's recommendations is

What I like about this book is that all the shapes are in a graphic format ready to turn.
Here is a vase design from the book that I decided to make in 2 sizes so I photoed the book, then calculated the parting depth. Like @Mark Jundanian , I draw out exact scale replicas. If the curves are off just a fraction the piece usually is not what i wanted.
 

Attachments

Last edited:
This is probably something I should do, plan my design on paper. However I have always just turned to what the wood will allow. Maybe not the greatest on design.
Regarding your pieces the larger one the opening is not too big, but too much neck. I agree with others the flat on the opening doesn’t go well. However if it were angled it might look better. These are just my opinion and others may have a different view.

I make all my vases to include a glass insert. So by default the opening is wide. Design wise this may not be the greatest “freehand” design, but it is what this piece of wood would allow me.


CFD92A7B-8D30-48C3-A05D-70EDECC8945C_1_201_a.jpeg
 
So far I've made use of them most of the time. I get my cylinder roughed out, make a call if it's going to be short and fat, tall and narrow, where are there features that will get in the way or add character, which end is best suited for the neck, etc. I then get a template and clip it to my dust hood above the workpiece. If I glance at it then my piece as I go it keeps me close to on track for the shape and most importantly the proportions. Doesn't end up a duplicate but darn similar in shape and proportion that adds to my variety.

William, can you share a bit on your glass inserts? I get asked about them a lot and I see folks using test tubes but sounds like you do more than that.
 
I know Craft Supply sells some glass inserts. But given Odie's recent concerns with their security, it might be wise to wait a couple of weeks till they have things sorted out. You could see if Packard has something similar.
 
I never use any templates for vase forms since in the end the form is best judged by eye, so if you get it wrong "dang it" you will just have to try again. The form I like best is to have the large diameter near the base with a long gradual curve to the lip.
5097Vase.JPG
This is a white oak burl vase that is about 12" high X 4" diameter near the base X about 2 3/4" at the top. If I were to make another one using this as a model (it would have to be some other wood since I don't have any more of that burl) I would make the bottom a little more curved in to at the base and the top lip sharper.
21071VaseD.JPG
This is a solution to the water proof cup in a large bottomed vase. The top edge of the cup (tupper Ware) fits snugly into the neck when the screw plug is screwed all the way in. This also is a convenient method of closing the bottom in a segmented piece.
 
I generally have a pretty fair idea where I'm going before I start as this effects the choosing of the blank . The only restraint or idea I have when turning is that all curves be continuous and flowing.
 
Back
Top