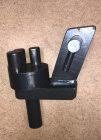
So I found one, but I'm unsure about how the turret is supposed to function and no one in the videos talks about it, to me it makes sense that the fingers\slots should remain stationary and the saddle or the support that makes it a captured system should remain mobile, however the turret is designed that either both are free or both are locked.
I've pulled the turret apart several times and taken measurements and the shaft is definitely machined to lock both pins and support arm, as the center of the groove is at .54" but the set screw is in at .37" from the top
Anyone have any material for me or advice?
I've pulled the turret apart several times and taken measurements and the shaft is definitely machined to lock both pins and support arm, as the center of the groove is at .54" but the set screw is in at .37" from the top
Anyone have any material for me or advice?