• Congratulations to John K. Jordan winner of the June 2025 Turning Challenge (click here for details)
  • Congratulations to Bobby McCarly for "Hemostatmorphodon" being selected as Turning of the Week for July 7, 2025 (click here for details)
  • Welcome new registering member. Your username must be your real First and Last name (for example: John Doe). "Screen names" and "handles" are not allowed and your registration will be deleted if you don't use your real name. Also, do not use all caps nor all lower case.

My Osmo experiments

Joined
Jul 5, 2015
Messages
383
Likes
3,567
Location
Strongsville, Ohio
Well, I have been using the Osmo Polyx for about a month now and really like it. I bought the gloss version, which I think is relatively new. In my tunings, I generally produce three levels: 1. Matte/satin: pure oil only, (walnut or tung), not buffed. 2. Semi-gloss: pure oil plus Beall buffing. 3. Glossy: either oil/varnish blends like danish oil, or oil base poly, or sometimes lacquer, or sometimes water base poly, all with multiple coats, sanding between some coats, followed up with Beall buffing. I find glossy coatings sell the best on my artistic pieces. Osmo is similarly glossy, perhaps not quite as glossy as the varnishes or lacquers, but what I like is that it produces high gloss without the large build-up of layers like with poly or lacquer.
1. First of all, a little goes a long way. I bought the 750 ml can, but the smaller 125 ml can is plenty to fully explore the finish at a more modest price. The small can will cover dozens of bowls.
2. I used a flat "story stick" with each side sanded to different grits, plus other options like wet sanding and the use of sanding sealer. This was only partially useful. You really have to use it on bowls to make sure. With my story stick, I could not see appreciable differences with Osmo on top of sanding grits between 320 and 800 grit. On bowls, I think finer is better, at least go to 400 grit.
3. Although most people say that Osmo is supposed to be applied to bare wood, I have had no problems in putting Osmo on top of other finishes. I have done one piece with sanding sealer and a couple with walnut oil. No issues so far. This is big for me because I like to wet sand with walnut oil.
4. I am still experimenting with application method. I use the white scotchbrite pads, those are good. I haven't decided on how long you wait ( 5 minutes vs 20 vs both 5 and 20) before wiping off the excess. Some guys say to wipe off with another scotchbrite pad, others say cloth, I prefer cloth at this time. Also, do I just wipe the piece dry or do I really scrub it dry? I tend to not scrub. I am amazed at how thinly you can apply the Osmo. I can just use the scotchbrite pad to wipe off the chopstick I am using to stir the can, and that is enough to coat 1-2 bowls.
5. Two coats is usually enough. End grain and/or porous woods might need 3-5 coats. I have this one walnut crotch platter that has given me fits, as some areas suck up the finish more than others. Over the last two years, I have added countless coats of oil base poly, danish oil, different application strategies, steel wool, scrubbing, you name it I finally decided to remove the poly and try Osmo on it. Two coats of Osmo everywhere and 4 coats in the problem areas worked like a charm.
5. A few days after the second coat, the surface still shows some evidence of streaking (wiping marks). My best results are to do a total wipe down at this point with steel wool for a satin sheen, or proceeding to Beall buffing. I skip the coarser tripoli wheel and just do the white diamond wheel (actually I prefer Vonax over white diamond) This is equivalent to my best gallery quality pieces with multiple coats of oil base poly or lacquer. But Osmo is so much easier to apply.
6. Repairing the finish is a great feature. I have had more than a few examples where I thought I was done sanding, only to apply some coats of varnish and then discover some scratches that were not removed properly by finer sanding. This is difficult to repair with conventional poly without complete removal of the varnish and starting over. Osmo is quite easy to just do a spot repair.
7. I have noticed that inlays may end up with a different sheen than the rest of the wood. I had one piece with some voids, I filled them with CA glue and sawdust/coffee grounds. After sanding to 600 grit, 2 coats of Osmo, then steel wool, then Beall buffing, the piece looks great. But if you hold it up to natural light, and shift it around to get different angles, you can see that the sheen of the bare wood is not quite as shiny as the CA glued areas.
 
I have been using Osmo top oil on a bunch of bowls recently and have really liked the finish. I also wipe on with a white non woven pad, let sit for 5 to 10 minutes and wipe off. I tend to wipe it off until no longer “sticky” which takes off all the streaks so it doesn’t need any “sanding” back between coats. I don’t know how different the top oil is than the Polyx but I am really pleased. I got the satin since I don’t really like the shine on my bowls. (My other hobby is guitar building where a glass smooth surface is expected so I don’t want that stress in this hobby.
 
I have used it on maple and my opinion is that it results in a little amber hue, but less than with oil based polyurethane. I have not compared it to water based PU.
 
Well, I have been using the Osmo Polyx for about a month now and really like it. I bought the gloss version, which I think is relatively new. In my tunings, I generally produce three levels: 1. Matte/satin: pure oil only, (walnut or tung), not buffed. 2. Semi-gloss: pure oil plus Beall buffing. 3. Glossy: either oil/varnish blends like danish oil, or oil base poly, or sometimes lacquer, or sometimes water base poly, all with multiple coats, sanding between some coats, followed up with Beall buffing. I find glossy coatings sell the best on my artistic pieces. Osmo is similarly glossy, perhaps not quite as glossy as the varnishes or lacquers, but what I like is that it produces high gloss without the large build-up of layers like with poly or lacquer.
1. First of all, a little goes a long way. I bought the 750 ml can, but the smaller 125 ml can is plenty to fully explore the finish at a more modest price. The small can will cover dozens of bowls.
2. I used a flat "story stick" with each side sanded to different grits, plus other options like wet sanding and the use of sanding sealer. This was only partially useful. You really have to use it on bowls to make sure. With my story stick, I could not see appreciable differences with Osmo on top of sanding grits between 320 and 800 grit. On bowls, I think finer is better, at least go to 400 grit.
3. Although most people say that Osmo is supposed to be applied to bare wood, I have had no problems in putting Osmo on top of other finishes. I have done one piece with sanding sealer and a couple with walnut oil. No issues so far. This is big for me because I like to wet sand with walnut oil.
4. I am still experimenting with application method. I use the white scotchbrite pads, those are good. I haven't decided on how long you wait ( 5 minutes vs 20 vs both 5 and 20) before wiping off the excess. Some guys say to wipe off with another scotchbrite pad, others say cloth, I prefer cloth at this time. Also, do I just wipe the piece dry or do I really scrub it dry? I tend to not scrub. I am amazed at how thinly you can apply the Osmo. I can just use the scotchbrite pad to wipe off the chopstick I am using to stir the can, and that is enough to coat 1-2 bowls.
5. Two coats is usually enough. End grain and/or porous woods might need 3-5 coats. I have this one walnut crotch platter that has given me fits, as some areas suck up the finish more than others. Over the last two years, I have added countless coats of oil base poly, danish oil, different application strategies, steel wool, scrubbing, you name it I finally decided to remove the poly and try Osmo on it. Two coats of Osmo everywhere and 4 coats in the problem areas worked like a charm.
5. A few days after the second coat, the surface still shows some evidence of streaking (wiping marks). My best results are to do a total wipe down at this point with steel wool for a satin sheen, or proceeding to Beall buffing. I skip the coarser tripoli wheel and just do the white diamond wheel (actually I prefer Vonax over white diamond) This is equivalent to my best gallery quality pieces with multiple coats of oil base poly or lacquer. But Osmo is so much easier to apply.
6. Repairing the finish is a great feature. I have had more than a few examples where I thought I was done sanding, only to apply some coats of varnish and then discover some scratches that were not removed properly by finer sanding. This is difficult to repair with conventional poly without complete removal of the varnish and starting over. Osmo is quite easy to just do a spot repair.
7. I have noticed that inlays may end up with a different sheen than the rest of the wood. I had one piece with some voids, I filled them with CA glue and sawdust/coffee grounds. After sanding to 600 grit, 2 coats of Osmo, then steel wool, then Beall buffing, the piece looks great. But if you hold it up to natural light, and shift it around to get different angles, you can see that the sheen of the bare wood is not quite as shiny as the CA glued areas.
Osmo oils came out 40 years ago in Europe. They are just now catching on in the USA.
 
I saw your question about the color and was getting ready to put some on a couple small platters I just finished. It adds a little color, but not nearly as much as walnut oil, danish oil or oil based poly. Maybe a little more than some “water white” finished, but I like a little color to bring out the figure in maple. This is Osmo Top Oil (matte) so Polyx may be a little different
1st picture has he first coat of Osmo TopOil applied9925BCAF-EF4E-444B-85D8-3EE66295941C.jpeg
The second picture is the dry sanded piece before any finish42CA02A2-C54E-4B7A-83CA-16D834B7C99A.jpeg
The last picture is with the wood “wetted” with some naphtha/paint thinner which is water white but pops the grain.0E6A1BA1-5D8F-45D1-91B8-DEC2E3EB3F85.jpeg
Hope this helps a little, and if not at least I now know how to upload pictures.
 
5 YEAR UPDATE
I bought a 750 ml can of Osmo Polyx in Dec 2020 for $60 and am finally nearing the end of the can. I removed a thick skin of hardened finish twice in the first year then transferred the rest to a Stop Loss bag. I have used this on perhaps 200 bowls, platters, and hollow forms. I still have about 1/4 cup left, enough to get me through the rest of 2025. So given the longevity of the oil and the amount of wood it covers, the cost of the finish is really not a big factor.
 
I did try it, but I was not really impressed. I do like the Rubio Monocote better, and like every one else, I give it 2 coats.... Still looking for the ceramic top cote from the auto industry.... Too many things going on right now.

robo hippy
 
5 YEAR UPDATE
I bought a 750 ml can of Osmo Polyx in Dec 2020 for $60 and am finally nearing the end of the can. I removed a thick skin of hardened finish twice in the first year then transferred the rest to a Stop Loss bag. I have used this on perhaps 200 bowls, platters, and hollow forms. I still have about 1/4 cup left, enough to get me through the rest of 2025. So given the longevity of the oil and the amount of wood it covers, the cost of the finish is really not a big factor.
Wow. That's a testament to the viability of Stop Loss bags! :O
 
I started using Osmo 3032 (Satin) about 20 years ago, the last 10 almost exclusively. I want a satin sheen that shows the beauty of the wood. I really dislike glossy finishes, that makes the wood look like plastic to me.

I store the oil in a Stop-loss bag. That way I never have to worry of it skinning or thickening.

My usual procedure for bowls:
  • Power sanding 120 to remove any visual tool marks, tear out etc.
  • Power sanding 180 to remove marks from 120
  • Power sanding 240 to remove marks from 180
  • Manual quick sanding 320. If I still can see sanding marks e.g. on very hard, dense wood, I go for 400 but never higher. I don´t want to burnish the wood, which makes it more difficult for the oil to saturate the surface.
  • Apply liberal amount of Osmo, let sit for 5-10 minutes, if it soaks in, I apply some more.
  • Wipe off surplus, leaving a very thin film.
  • Let dry overnight.
  • Light sanding with 320 paper/360 Mirka Mirlon.
  • Apply further 3-4 thin layers of Osmo, drying overnight. If visible marks light sanding between coats.
  • Sanding with 360 Mirka Mirlon, finishing off with fine steel wool.
  • That´s it!
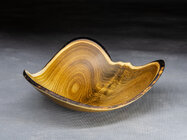
This procedure let´s the oil penetrate the surface, bringing out the chatoyance of the wood and leaving a satin film protecting the wood. Example of laburnum bowl.
K3_07728LRs.jpg
 
+1 for a StopLossBag with Osmo.
There are (now) application instructions on Osmo web site for the application of Osmo PolyX-Oil:


Here is one of the instruction sets, for non-woven pads.

"By Hand with Scotchbrite Pads

Apply two thin coats with non-abrasive white scotchbrite pads

  1. Stir the Polyx®-Oil well and pour into tray
  2. Work the product into the wood thinly and evenly in figure 8 or circular motions using a white pad
  3. Be sure to thinly and evenly coat the surface and leave on the surface for approx. 5 minutes
  4. With a clean white pad, polish the surface ensuring no swirl marks, rings, or wipe marks
  5. Ensure all excess product is removed from surface
  6. Allow approx. 8-10 hours drying time. Allow for good ventilation whilst drying
  7. Apply second coat following previous steps"
My approach for applying Osmo Satin is very similar. I use a few drops of Osmo on a white pad. Spread a thin coat. Wait 5 min and re-spread what's on the surface. Wait 5 min and wipe off excess with a cotton rag, then a little hand buffing with a cotton rag.
 
I'm not a bowl turner, but as a cabinet/furnituremaker I just did my first big project (four-poster bed in cherry) with Osmo Polyx satin. I'm in love. I'm forty years in, I have used all the old-school oil-type finishes, and have my own recipe book of concoctions. For interior work, it will just be Osmo now. I did 4-5 coats, and couldn't be happier. Fine Woodworking did an article recently on all the new hard-wax finishes and Polyx came out on top. On turnings, I have only used it on tool handles so far, but it is fantastic for everything. I may get an Osmo tattoo. (I don't currently have any tats).
 
So, what exactly is the Osmo Polyx? I used some many years ago, before I really knew exactly what I was doing. I think the can got stashed away and I'm not sure if its still good (it was probably close to five years ago now.)

I'm curious what makes it such a good finish. I read that it was an excellent choice way back when...but I knew nothing about finishes and what made any particular one particularly good.


I did try it, but I was not really impressed. I do like the Rubio Monocote better, and like every one else, I give it 2 coats.... Still looking for the ceramic top cote from the auto industry.... Too many things going on right now.

robo hippy

You ever see this?


Someone shared it with me the other day... Its expensive, but apparently its a water proof ceramic based finish. I don't think its an automotive finish, they say it comes from japan, although I think its made domestically.
 
Osmo Polyx SDS states two general dangerous ingredients as being aliphatic hydrocarbons (solvents, 25-50%) and, depending on color, titanium dioxide (0-5%). Safe handling practices and personal protective equipment are also outlined here.

For the casual reader, the SDS still does not answer the question of what is it/what is in it? The SDS does warn of spontanious combustion, so a curing oil must is part of the mix.

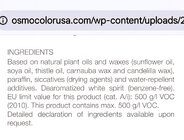
Here is a product sale sheet with some plain English info. Nutshell, it is plant oils and oil curing chemicals, with 3 waxes and water resistance additives. Might be great stuff, but food-safety conscious folk may want to reconsider its use for kitchenware, in my opinion. It does not state that any of the usual, naturally curing oils we are familiar with, such as tung or linseed, are part of the mix. The plant oils listed, I am not aware that any of them are oils that cure naturally, or at least cure on their own fast enough to make them commerially viable as a curing oil suitable for the paint and coating industry, hence the use of curing chemicals.

I did a screen shot from the above document:
Screenshot_20250525_070742_Chrome.jpg
 
Last edited:
food-safety conscious folk may want to reconsider its use for kitchenware,
A few years ago I spoke on the phone with Osmo's USA customer service. In addition to Osmo PolyX-Oil they also sell a product called Top Oil, and I asked about the difference. I was told that Top Oil And Polyx-Oil are essentially the same, but Top Oil contains a higher proportion of solvents.

The other difference is that Top Oil has been tested and is food safe. The testing was done in the European Union, of course (the USA does not do such testing). I asked why Polyx-Oil had not been tested. The rep explained that in th EU testing is quite expensive and every variation of a product (e.g. sheen, color and even container size) must be tested separately. And Top Oil comes in fewer variations.
Yes, TopOil is food safe, made for countertops and chapping blocks, and so is their chopping block oil.

TopOil https://osmo.ca/product/topoil-high-solid/
Chopping block oil https://osmo.ca/product/chopping-board-oil/
 
Well, I have been using the Osmo Polyx for about a month now and really like it. I bought the gloss version, which I think is relatively new. In my tunings, I generally produce three levels: 1. Matte/satin: pure oil only, (walnut or tung), not buffed. 2. Semi-gloss: pure oil plus Beall buffing. 3. Glossy: either oil/varnish blends like danish oil, or oil base poly, or sometimes lacquer, or sometimes water base poly, all with multiple coats, sanding between some coats, followed up with Beall buffing. I find glossy coatings sell the best on my artistic pieces. Osmo is similarly glossy, perhaps not quite as glossy as the varnishes or lacquers, but what I like is that it produces high gloss without the large build-up of layers like with poly or lacquer.
1. First of all, a little goes a long way. I bought the 750 ml can, but the smaller 125 ml can is plenty to fully explore the finish at a more modest price. The small can will cover dozens of bowls.
2. I used a flat "story stick" with each side sanded to different grits, plus other options like wet sanding and the use of sanding sealer. This was only partially useful. You really have to use it on bowls to make sure. With my story stick, I could not see appreciable differences with Osmo on top of sanding grits between 320 and 800 grit. On bowls, I think finer is better, at least go to 400 grit.
3. Although most people say that Osmo is supposed to be applied to bare wood, I have had no problems in putting Osmo on top of other finishes. I have done one piece with sanding sealer and a couple with walnut oil. No issues so far. This is big for me because I like to wet sand with walnut oil.
4. I am still experimenting with application method. I use the white scotchbrite pads, those are good. I haven't decided on how long you wait ( 5 minutes vs 20 vs both 5 and 20) before wiping off the excess. Some guys say to wipe off with another scotchbrite pad, others say cloth, I prefer cloth at this time. Also, do I just wipe the piece dry or do I really scrub it dry? I tend to not scrub. I am amazed at how thinly you can apply the Osmo. I can just use the scotchbrite pad to wipe off the chopstick I am using to stir the can, and that is enough to coat 1-2 bowls.
5. Two coats is usually enough. End grain and/or porous woods might need 3-5 coats. I have this one walnut crotch platter that has given me fits, as some areas suck up the finish more than others. Over the last two years, I have added countless coats of oil base poly, danish oil, different application strategies, steel wool, scrubbing, you name it I finally decided to remove the poly and try Osmo on it. Two coats of Osmo everywhere and 4 coats in the problem areas worked like a charm.
5. A few days after the second coat, the surface still shows some evidence of streaking (wiping marks). My best results are to do a total wipe down at this point with steel wool for a satin sheen, or proceeding to Beall buffing. I skip the coarser tripoli wheel and just do the white diamond wheel (actually I prefer Vonax over white diamond) This is equivalent to my best gallery quality pieces with multiple coats of oil base poly or lacquer. But Osmo is so much easier to apply.
6. Repairing the finish is a great feature. I have had more than a few examples where I thought I was done sanding, only to apply some coats of varnish and then discover some scratches that were not removed properly by finer sanding. This is difficult to repair with conventional poly without complete removal of the varnish and starting over. Osmo is quite easy to just do a spot repair.
7. I have noticed that inlays may end up with a different sheen than the rest of the wood. I had one piece with some voids, I filled them with CA glue and sawdust/coffee grounds. After sanding to 600 grit, 2 coats of Osmo, then steel wool, then Beall buffing, the piece looks great. But if you hold it up to natural light, and shift it around to get different angles, you can see that the sheen of the bare wood is not quite as shiny as the CA glued areas.


Michael, Thank you for the details of your experimenting. I too am a fan of OSMO. You mentioned that you like wet sanding with walnut oil. Try wet sanding the Osmo when you first put it on. I'm a fan of that. Use 320 or 400 wet or dry. For me it works really well.
 
Michael, Thank you for the details of your experimenting. I too am a fan of OSMO. You mentioned that you like wet sanding with walnut oil. Try wet sanding the Osmo when you first put it on. I'm a fan of that. Use 320 or 400 wet or dry. For me it works really well.
So what is your sequence? (number of coats, wiping excess, drying times, buffing, etc)
 
Osmo Polyx SDS states two general dangerous ingredients as being aliphatic hydrocarbons (solvents, 25-50%) and, depending on color, titanium dioxide (0-5%). Safe handling practices and personal protective equipment are also outlined here.

For the casual reader, the SDS still does not answer the question of what is it/what is in it? The SDS does warn of spontanious combustion, so a curing oil must is part of the mix.

Here is a product sale sheet with some plain English info. Nutshell, it is plant oils and oil curing chemicals, with 3 waxes and water resistance additives. Might be great stuff, but food-safety conscious folk may want to reconsider its use for kitchenware, in my opinion. It does not state that any of the usual, naturally curing oils we are familiar with, such as tung or linseed, are part of the mix. The plant oils listed, I am not aware that any of them are oils that cure naturally, or at least cure on their own fast enough to make them commerially viable as a curing oil suitable for the paint and coating industry, hence the use of curing chemicals.

I did a screen shot from the above document:

Thank you for finding the ingredients! It is interesting how the natural plant oils are used. I once asked a Minwax rep what oils were in their WOP, and he mentioned soya and safflower, IIRC. I think these are clearer, less-yellow oils than your "traditional" linseed or even tung, which is nice.

I suspect that the spontaneous combusion, would be due to the siccatives? Those are what accelerate the drying process, which is where polymerization occurs (which involves oxidation, right?) and that's where the heat is generated?
 
Well, I can't speak to the combustibility issue with those other oils and additives, but my guess on why they use those oils is $, $$, and $$$. As in less cost for those agricultural oils (soybean and sunflower in particular), and sprinkling in a little of the same ol' magic fu-fu powder to make them cure like the more traditional tung and linseed (commercially more linseed than tung), and bingo, greater profit. But, these are guesses and I could be completely wrong. But hey, if the result is a product users are satisfied with, then, winner-winner.
 
I suspect that the spontaneous combusion, would be due to the siccatives? Those are what accelerate the drying process, which is where polymerization occurs (which involves oxidation, right?) and that's where the heat is generated?
Spontaneous combustion is caused by the heat generated as the oils cure. Which is why recommendations are if not disposing of used rags in a metal can with a sealed lid , or a bucket of water, then lay out the rags FLAT to fully cure before disposal. The heat of curing when it gets concentrated enough in a wadded up rag can easily start the materials on fire. Not only have I watched numerous videos proving it in real world (I.E. Mythbusters style), but I have experienced the high heat temperatures firsthand... so any rags that I've used for oiling (any kind of finish actually) I am in the habit of laying them out flat or draped over something - when they lay flat the heat of curing doesn't concentrate (though the rags CAN get noticeably warm - checked them with my Raytek infrared thermometer a couple times just out of curiosity and temps were a couple degrees warmer than surrounding material they were laid out on - and that was just my pure linseed oil tried & True original finish, no added driers in that stuff.) A bonus to doing that is I can wait until the rags become stiff as a board (almost as tough as a sheet of plastic) and then I know the finish has probably fully cured on the project, too!
 
Spontaneous combustion is caused by the heat generated as the oils cure. Which is why recommendations are if not disposing of used rags in a metal can with a sealed lid , or a bucket of water, then lay out the rags FLAT to fully cure before disposal. The heat of curing when it gets concentrated enough in a wadded up rag can easily start the materials on fire. Not only have I watched numerous videos proving it in real world (I.E. Mythbusters style), but I have experienced the high heat temperatures firsthand... so any rags that I've used for oiling (any kind of finish actually) I am in the habit of laying them out flat or draped over something - when they lay flat the heat of curing doesn't concentrate (though the rags CAN get noticeably warm - checked them with my Raytek infrared thermometer a couple times just out of curiosity and temps were a couple degrees warmer than surrounding material they were laid out on - and that was just my pure linseed oil tried & True original finish, no added driers in that stuff.) A bonus to doing that is I can wait until the rags become stiff as a board (almost as tough as a sheet of plastic) and then I know the finish has probably fully cured on the project, too!

Yeah, I know that oils themselves generate heat when they cure.

I was thinking with the added siccatives, that might exacerbate the issue, allowing more heat to be generated in less time. I watched a video a few years ago by one of the turners I follow. He wasn't sure about the spontaneous combustion thing, until a friend of his' shop caught fire (started in the trash can) when some oily paper towel were thrown away. So he did an experiment, and at first it did not seem like anything was going to happen, and some of the rags/towels even cooled initially, then some did indeed catch fire. He was doing a controlled experiment, had extinguishers ready, and was out there the whole time, but it did take a while, hours in many cases. The towels that caught fire first, IIRC, were BLO. BLO also contains siccatives and other accelerants...

I thought that was interesting. That those with drying agents caught fire first. It took quite a while longer for any others to catch fire, although some did indeed.

I douse all my rags in water. I actually leave them in it, until the can with them is full, then I restore the lid and toss the whole thing.
 
It doesn’t have to be a finish. RC model fuel will do it. I was coming back from the model airport years ago and my car started to fill with smoke. Pulled over and pulled out the offending rag which burst into flames while I was pulling it out of the car.
 
I'm an oil finish guy. At the end of a finishing session I put the oil contaminated paper towels in a 2-gallon steel bucket and take the can out into my driveway, then drop a match on them. About 3 minutes later, and there's nothing left but a wee bit of ash. If the breeze is blowing, some smoldering ash can get blown/sucked from the can, but I stay right there during the whole process so I can stomp them out if needed. I should pick up a piece of "hardware cloth" screen mesh, about 1/2" mesh size, to cap the can during the burn to control the ash blowout.
 
So my "process" is sand up to ~400 then apply osmo with white non-woven pad. I let it sit, generally anywhere from 10 minutes to till I remember it's still on. Then I take a supposedly lint free rag, which when you cut it throws lint everywhere, and rub/buff it off. When the osmo dries it sort of feels like wax and a good hand buffing warms it enough to smooth and remove. But after reading other peoples process I wonder if I"m doing it right. It sounds like folks are letting it dry on there sort of like a poly(urethane) then sanding (possibly) and recoating. I don't think I"m down for that, as wiping just seems easier, but I'd be curious how other folks do it.
 
I'd be curious how other folks do it.
I apply with a white pad (generic, not Osmo). Time 15 minutes and then wipe off with a cloth. If I lose track of time and wait too long, it becomes difficult to wipe.

Wait until the next day for second coat. Apply with a soft cloth instead of a pad. Wipe off 15 minutes later. Sometimes after the first coat I feel some rough spots (dust settling maybe?). If so, I do a very light high grit sanding before applying the second coat.
 
Thanks for all the details - I bought a small can and I did not like it - but I wasn't wiping the excess off between coats - I'll give it another chance based on the information here - my lack luster results are all operator error.
 
Thanks for all the details - I bought a small can and I did not like it - but I wasn't wiping the excess off between coats - I'll give it another chance based on the information here - my lack luster results are all operator error.

Myself, I think wiping it off is essential. That's what the company tells you to do. First time I used it I had some advice from a friend who had used it quite a bit, he was a museum furniture conservator and I used to work at a museum with him in the conservation lab. Anyway, he said to NOT apply it to a surface you couldn't cover, let sit, and wipe off within about 15-20 minutes, before the oil started to set up. That's no problem on a turning. On my first project, a bed, I did one side of the headboard, then the other, for example, and that worked fine. I use the white pad for the first coat, then fine cotton and linen cloths for the second and subsequent, because I have a steady supply of them. On smaller stuff, a bit of buffing at the end of the wiping (after the first coat) is nice too. I find it needs at least three coats before I am happy.
 
Thanks for all the details - I bought a small can and I did not like it - but I wasn't wiping the excess off between coats - I'll give it another chance based on the information here - my lack luster results are all operator error.
I also had terrible results when I first used osmo top oil without wiping. I was trying to use it like poly or laquer. Now it's one of my favorites for finishing.
 
Let´s see if this link to FB works. An experiment to look at the film of Osmo.

You probably wouldn’t guess that this is Osmo 3032 hard wax oil. I transfer it from the can into a "Stoploss bag" using a small silicone funnel. I don’t clean the funnel; instead, I let the oil that sticks to it harden there. Once it has hardened, I simply peel off the film from the silicone funnel. In this case, the film has hardened for about a week.

I highly recommend the "Stoploss bag"—it allows you to store the oil without exposure to air for years without it solidifying or forming a skin.

 
I'll just pipe in with, yea use a stoploss bag. I have a teeny tiny can and I've been using it for everything ( though I'm not that prolific in) and I have a quarter can left that is skinning over. It just goes so much further than you think it will.
 
For those of you who use Osmo products is the Osmo Top Polyx thicker than the Osmo Top? Otherwise are there any differences other than the Top is food save?
 
Back
Top