
Sometimes wood cracks during the drying and/or turning process. Sometimes pieces of precious wood are plagued with cracks and related. What to do? Well, there are plenty of options, but a popular favorite is to install pewa/butterflies to stabilize the crack. Here is a photo tutorial of the process. Note: Big Island Engraving has a great video of the process. Also, this is the method that I use and like. Like anything else in the wood world, there are plenty of other good methods.
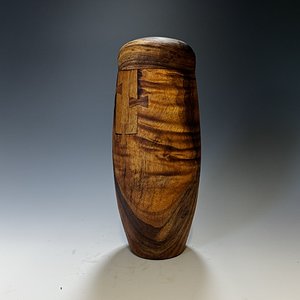
This is a piece of Osage Orange that had a minor, but deep crack. It was a gifted piece of wood, and instead of turning away all of the crack, I wanted to maximize the size and add a couple of pewa. Pewa can be added at many different stages of the process--this example is during the final/second turning after I finished truing the exterior.

Prior to adding the pewa, it is best to apply glue to the crack. You can use wood glue, epoxy, CA glue, or anything else. I'm using CA glue for this example. The first step is to treat the areas adjacent to the crack with shellac. This seals the surface so that the CA glue (or whatever else) won't penetrate the surface and discolor the wood. I use a 1/2 lb cut that I made with flakes and denatured alcohol.

Once the shellac has dried, apply medium CA glue to the crack. Make sure the CA glue penetrates the crack. I like to flex the bowl a bit to encourage absorption, and then add another small bead of glue on top of the crack.

It can be helpful to clamp the bowl while the glue cures. Sometimes this is not possible, but if so, be sure to apply just enough pressure to close the crack. Too much pressure might result in new cracks forming. You can leave the clamp on for the rest of the process if desired/needed, or you can remove.

This is a piece of Osage Orange that had a minor, but deep crack. It was a gifted piece of wood, and instead of turning away all of the crack, I wanted to maximize the size and add a couple of pewa. Pewa can be added at many different stages of the process--this example is during the final/second turning after I finished truing the exterior.
Prior to adding the pewa, it is best to apply glue to the crack. You can use wood glue, epoxy, CA glue, or anything else. I'm using CA glue for this example. The first step is to treat the areas adjacent to the crack with shellac. This seals the surface so that the CA glue (or whatever else) won't penetrate the surface and discolor the wood. I use a 1/2 lb cut that I made with flakes and denatured alcohol.
Once the shellac has dried, apply medium CA glue to the crack. Make sure the CA glue penetrates the crack. I like to flex the bowl a bit to encourage absorption, and then add another small bead of glue on top of the crack.
It can be helpful to clamp the bowl while the glue cures. Sometimes this is not possible, but if so, be sure to apply just enough pressure to close the crack. Too much pressure might result in new cracks forming. You can leave the clamp on for the rest of the process if desired/needed, or you can remove.


") Prior to cutting the recesses, place painters tape (or equivalent) around the areas that will receive the pewa. This will prevent the hotmelt glue we will use from sticking to the wood surface (especially important if using porous wood).
Prior to cutting the recesses, place painters tape (or equivalent) around the areas that will receive the pewa. This will prevent the hotmelt glue we will use from sticking to the wood surface (especially important if using porous wood).


")