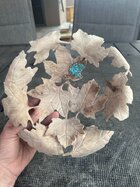
• The forum upgrades have been completed. These were moderate security fixes from our software vendor and it looks like everything is working well. If you see any problems please post in the Forum Technical Support forum or email us at forum_moderator (at) aawforum.org. Thank you
  • It's time to cast your vote in the March 2026 Turning Challenge. (click here for details)
  • Congratulations to Chris Lawrence for "Dragon's Grip" being selected as Turning of the Week for March 30, 2026 (click here for details)
  • Welcome new registering member. Your username must be your real First and Last name (for example: John Doe). "Screen names" and "handles" are not allowed and your registration will be deleted if you don't use your real name. Also, do not use all caps nor all lower case.

Quilted Poplar Maple Leaf Bowl

Joined
Dec 4, 2024
Messages
101
Likes
843
Location
Santa Fe, NM
Website
www.ridethebevelturning.com
Final piece:
Quilted poplar maple leaf bowl front.jpg


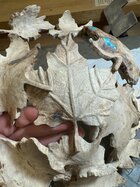
Lesson #1: Do not use a super hardwood like ash! I carved this for a few days before my aching hands gave up in protest and I had to seek out a softer wood...hence the quilted poplar!
IMG_3670.jpg

I used the maple leaf stencils from Power Carving Depot for this piece
8D27C144-DD67-414C-A950-087BF59566FD.jpg

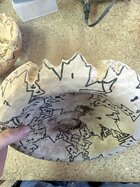
I don't have a photo (only a video) of the roughed out bowl I started with, but this pic shows you that I left it approx 1"-1.5" thick so that I could have room to layer the leaves
 

Attachments

  • IMG_3704.JPG
    IMG_3704.JPG
    530.3 KB · Views: 6
This is the bowl mostly roughed out, with the leaves shaped a bit but still with some thickness to it. I lost one of the leaves because I made the connections too narrow (you can see a leaf along the top left rim with 3 exclamation marks!!! to warn me!). I removed the wood in the negative space using a drill bit and the some of the coarse Dremel burs. I recommend Kutzall - they have several kits that feature multiple burs and I ended up using many of them. For future pieces I'll probably invest in a handheld mini saw or maybe a scroll saw to remove these areas because this was the most time-consuming part of the project.
IMG_3877.JPG

I had a bark inclusion that came out very quickly with the burs so I had to do some inlay on the top and bottom of the bowl. Eventually I got the leaves to the thickness I liked and started drawing the veins on the top and underside of the leaves. I was really worried this would be near impossible but it turned out to be much easier than I thought. One thing I'd definitely do differently next time is to make a shallower vein on the top of the leaf - these were a tad too deep and sharp and I ended up having to use another Kutzall bur to smooth the edges followed by sandpaper to really smooth everything out so that the veins flowed into the leaf better.
 

Attachments

  • IMG_4270.JPG
    IMG_4270.JPG
    512.6 KB · Views: 2
  • IMG_4176.JPG
    IMG_4176.JPG
    616.7 KB · Views: 2
  • IMG_4179.JPG
    IMG_4179.JPG
    612.8 KB · Views: 2
To achieve the lifelike leaves, I thinned them out around the edges. I didn't want to go too thin in the center because a lot of the leaves were wavy and I was worried I'd pierce them...(which I did to one of them but I carved out the holes). I also sanded lightly around the edges so that they weren't so sharp and pointy.
 
Back
Top