• Beware of Counterfeit Woodturning Tools (click here for details)
  • Johnathan Silwones is starting a new AAW chapter, Southern Alleghenies Woodturners, in Johnstown, PA. (click here for details)
  • Congratulations to Paul May for "Checkerboard (ver 3.0)" being selected as Turning of the Week for March 25, 2024 (click here for details)
  • Welcome new registering member. Your username must be your real First and Last name (for example: John Doe). "Screen names" and "handles" are not allowed and your registration will be deleted if you don't use your real name. Also, do not use all caps nor all lower case.

Reverse Chucking Conundrum

Joined
May 8, 2019
Messages
27
Likes
21
Location
Buffalo, WY
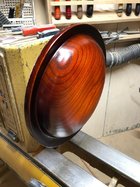
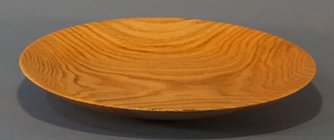
I’m working on a fairly complex project. For descriptive purposes we can call it a shallow bowl, almost platter like. I’ve got the outside nearly finished. It has many coats of nitrocellulose lacquer. There is no foot on the “bowl”. My intention for reverse chucking it, was to hot glue a block with a tenon onto the bottom. Now that it is about time to do that, I’m having second thoughts. I’m concerned that the hot glue will damage the lacquer. I would expect minor damage that I could repair. But I started wondering if it could cause the lacquer to blister or blush. Plus, I’d have to get the block and glue off in the end, probably involving heat. A risky endeavor. Then of course there is the chance that the hot glue wouldn’t hold adequately and the whole thing would come flying off the lathe. The inside turning is going to be a little complicated, with some undercuts, awkward angles, and a consistent 1/8” thickness.

So, I started thinking about other options. I considered some sort of donut chuck attached to my Cole Jaws. But that would obstruct my ability to see the sides and bottom which would be necessary to get uniform thickness.

Next, I started considering my vacuum chuck. That may be the best option, but I think there are going to be some difficulties. First, I haven't used the vacuum chuck much and am not sure how much I trust it. The data says it should hold, but intuitively it seems sketchy to me. Second, I’m a slow turner. I have some health problems that limit my stamina. Oftentimes I can work for 15 minutes, then have to go rest for an hour. What takes many of you guys a couple of hours to turn can take me a couple of weeks. I’m okay with that, it’s not a race. But I can’t keep the vacuum running all that time. Obviously, I can pin things to the chuck with the tail stock while not using it, but I’m just wondering if anyone has any great ideas for keeping things registered on a vacuum chuck when not in use. I’ll leave a little point in the bottom for the live-center to register on. I was also thinking about outlining the outside of the bowl around the chuck with masking tape. I may just rough turn the inside of the bowl until the end, so a little bit of error may not matter. I can tune it up at the end.

So, do any of you folks have any other suggestions for keeping things registered on a vacuum chuck over a couple of weeks?
 
Joined
Jan 3, 2012
Messages
423
Likes
357
Location
New City, NY
I can empathize. I have the same health-related issues. It sounds like you've completed the inside and need to complete and finish turning the outside.
I would not even consider the vacuum chuck. The risk is too high that the piece may move during your variable completion time.

I may use the vacuum chuck as a jam chuck or your cole jaws and support it via a live center. You can apply a small 1" diameter plug in the center to avoid damage by the live center or in either case, turn the damage away. To hold the last 1" of turning near the live center hole, with the live center removed, I wrap the piece with plastic wrap or tape it to whatever I used for a jam chuck. I would sand it ready for finishing during this process and finish the bottom probably off the lathe.
 
Joined
May 8, 2019
Messages
27
Likes
21
Location
Buffalo, WY
I can empathize. I have the same health-related issues. It sounds like you've completed the inside and need to complete and finish turning the outside.
I would not even consider the vacuum chuck. The risk is too high that the piece may move during your variable completion time.

I may use the vacuum chuck as a jam chuck or your cole jaws and support it via a live center. You can apply a small 1" diameter plug in the center to avoid damage by the live center or in either case, turn the damage away. To hold the last 1" of turning near the live center hole, with the live center removed, I wrap the piece with plastic wrap or tape it to whatever I used for a jam chuck. I would sand it ready for finishing during this process and finish the bottom probably off the lathe.
No, just the opposite. Outside is done. Have to do the inside.
 
Joined
Jun 13, 2020
Messages
233
Likes
312
Location
Jackson, NJ
Website
www.blacklabelwoodworks.com
I use vacuum chucks but would never use one with a big piece without tailstock support until the final nub in the center needs to be removed. Leaving the piece jammed between the chuck and tailstock should keep it from moving but even moisture changes in the air could cause it to warp slightly. You might want to wrap a plastic bag around it if your not going to touch it for extended periods of time like overnight.
 
Joined
Jun 13, 2020
Messages
233
Likes
312
Location
Jackson, NJ
Website
www.blacklabelwoodworks.com
Well that changes things a little bit if you need to do the inside how big is the piece? I tried making small end grain bowls in a batch once. Like 3 inch ones by turning the outside and parting them off then using a vacuum chuck to do the inside. I found that i needed to do extremally light cuts or the bowls would move in the chuck.
 
Joined
Mar 27, 2019
Messages
108
Likes
69
Location
Evergreen Park, IlL
Make a plywood faceplate bigger than the OD of the bowl and threaded to fit your live center. 3/4” x 10 tpi is common. Mark some circles on the faceplate so that you can center the bowl. Hot melt glue blocks to the faceplate hold the bowl in proper alignment while you get the vacuum going. You could put some tape on the bowl to mark the alignment with the blocks to improve reproducibility.

Good luck!
 
Joined
Jul 27, 2020
Messages
298
Likes
1,209
Location
Durham, NC
Seems your idea about using the vacuum chuck is good and sound, but mainly as a jam chuck . Since you’ll be working on the inside, you must have material left so you can use tailstock support without ruining the piece. The live center is your best bet for centering and re-centering. That way, you don’t need to run vacuum until finishing up the very center.
Given your short time on and longer rest, I would take the piece off the lathe each day. Pushing against your new.y finished exterior could cause damage if pressure is left. Also, take care with how much pressure you use. Don’t get rowdy.
 
Joined
May 8, 2019
Messages
27
Likes
21
Location
Buffalo, WY
The wood is very dry, and I'm in Wyoming (very low humidity). I was thinking I'd keep tailstock support as long as possible.

The vacuum chuck I was going to use is made from 4" pvc. If my math is correct. and there is a solid chance that it isn't, my vacuum pump should give me in excess of 2000 pounds of holding capacity from that chuck. So mathematically, it should be good, but....
 
Joined
Aug 14, 2007
Messages
5,436
Likes
2,792
Location
Eugene, OR
For me, if I was to do a piece like that, I would glue a waste block on the bottom of the bowl with a grocery bag piece of paper between the block and the bowl. I would also have the tailstock engaged, just to be sure. I would turn the waste block round and flat before reversing and use a face plate, or tenon or recess for final turning of the inside. Important to true it up before reversing.

robo hippy
 
Joined
Jan 3, 2012
Messages
423
Likes
357
Location
New City, NY
No, just the opposite. Outside is done. Have to do the inside.
A donut chuck may work if the rim is crafted to have about 1/16" dado around the edge. If you are careful and lite-handed you can turn your 1/8 thickness. (actually you would measure 1/16" because 1/16" would be invisible via the dado). Perhaps some foam on the bottom of the donut between the chuck and the piece may stop damage to the lacquer.
 

Tom Gall

TOTW Team
Joined
Feb 20, 2013
Messages
956
Likes
1,763
Location
Hillsborough, NJ
Brent, your conundrum is the result of a lack of planning. A photo would help immensely.

Questions: What is the size/diameter of your shallow bowl (this could make a big difference on how you go forward)? How was it mounted to turn and finish the “outside” (bottom, underside)? Do you have a center mark on the interior side? What do you mean by “no foot” on the bowl? Is there a flat area (foot)?

“The inside turning is going to be a little complicated, with some undercuts, awkward angles, and a consistent 1/8” thickness.” Concentricity is a major concern at that thickness. I think it can be done but more information is needed to choose a process.

Vacuum chucking may be a possibility but maybe not with your 4" PVC chuck. BTW. I think your math is wrong on the pressure - the diameter of your bowl is a definite factor here for roughing out the interior.
 
Joined
Jun 6, 2018
Messages
1,948
Likes
996
Location
La Grange, IL
Well, I wouldn't say a lack of planning, but certainly your original plan seems to have gone awry. Fortunately lacquer finishes are more easily repaired, than say polyurethane, but I think you are going to have to accept that the finish on the outside is at risk. From what you've said, I think any work holding technique that engages the rim is going to prevent you from turning the whole inside surface. So that leaves you with attaching a sacrificial foot/block or a vacuum chuck. Either would ideally be augmented with the TS. As you say, the block attached with hot melt glue might not bond well through the layers of lacquer, but the idea can be tested on scrap wood. I do think the finish will be damaged, when it comes time to remove the block. With the vacuum chuck you risk the plate moving and loosing concentricity. You can use/make a larger vacuum chuck for greater hold, but there is only so much pressure the plate can take. By the way, here is how I have the math: 4" vac chuck has an area ( Pi * R^2) of 12.6 sq inches. Standard atmospheric pressure is 14.7 psi., and figure your pump is 80% efficient. .8 * 14.7 * 12.6 = 148 pounds.

So it depends on which risks you'd rather take. For me in my shop, I'd go with my 5" vacuum chuck and moderate the pressure. In between work sessions I would pin the work piece to the vac chuck with a live center in the TS, or I would mount Cole/Longworth to the TS and grasp the rim of the work piece.

A final thought, maybe not so well thought out. With a large vac chuck the piece might "oil can" with the vacuum. A piece of 2" PVC, just the right length, with multiple holes drilled in its sides, could act as a center column keeping the plate from bowing and allowing greater vacuum.
 
Joined
Feb 16, 2021
Messages
1,007
Likes
1,348
Location
Parkersburg, West Virginia
I would use the vacuum Chuck. Once you get it centered bring the tail stock up. That will give you a Mark to be able to re-center the piece every time you work on it. Then just turn the dimple out of the middle at the very end.
 
Joined
May 8, 2019
Messages
27
Likes
21
Location
Buffalo, WY
Brent, your conundrum is the result of a lack of planning. A photo would help immensely.

Questions: What is the size/diameter of your shallow bowl (this could make a big difference on how you go forward)? How was it mounted to turn and finish the “outside” (bottom, underside)? Do you have a center mark on the interior side? What do you mean by “no foot” on the bowl? Is there a flat area (foot)?

“The inside turning is going to be a little complicated, with some undercuts, awkward angles, and a consistent 1/8” thickness.” Concentricity is a major concern at that thickness. I think it can be done but more information is needed to choose a process.

Vacuum chucking may be a possibility but maybe not with your 4" PVC chuck. BTW. I think your math is wrong on the pressure - the diameter of your bowl is a definite factor here for roughing out the interior.
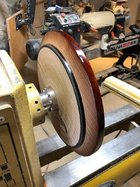
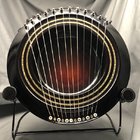
The problem really wasn't lack of planning. I just decided I didn't like the plan. You are right, my math was way off. It should be nearer 250 pounds. Still enough to crack the bowl if not carefully regulated. I'll try to attach photos. My tech skills are limited. We'll see how this works out. There is no foot because this will be displayed vertically on a stand. It is currently mounted on a faceplate. I think, with the help of everyone here, I've concluded that the way to go is to use the vacuum chuck largely as a jam chuck, keeping the tailstock in place as long as possible. I'll probably turn the vacuum on anyway because, why not? The challenge is at the very end once I have to take the tailstock away, keeping enough vacuum on it to hold everything without cracking the bottom.String Bowl 1.jpgString Bowl 2.jpg
 
Joined
May 8, 2019
Messages
27
Likes
21
Location
Buffalo, WY
Well, I wouldn't say a lack of planning, but certainly your original plan seems to have gone awry. Fortunately lacquer finishes are more easily repaired, than say polyurethane, but I think you are going to have to accept that the finish on the outside is at risk. From what you've said, I think any work holding technique that engages the rim is going to prevent you from turning the whole inside surface. So that leaves you with attaching a sacrificial foot/block or a vacuum chuck. Either would ideally be augmented with the TS. As you say, the block attached with hot melt glue might not bond well through the layers of lacquer, but the idea can be tested on scrap wood. I do think the finish will be damaged, when it comes time to remove the block. With the vacuum chuck you risk the plate moving and loosing concentricity. You can use/make a larger vacuum chuck for greater hold, but there is only so much pressure the plate can take. By the way, here is how I have the math: 4" vac chuck has an area ( Pi * R^2) of 12.6 sq inches. Standard atmospheric pressure is 14.7 psi., and figure your pump is 80% efficient. .8 * 14.7 * 12.6 = 148 pounds.

So it depends on which risks you'd rather take. For me in my shop, I'd go with my 5" vacuum chuck and moderate the pressure. In between work sessions I would pin the work piece to the vac chuck with a live center in the TS, or I would mount Cole/Longworth to the TS and grasp the rim of the work piece.

A final thought, maybe not so well thought out. With a large vac chuck the piece might "oil can" with the vacuum. A piece of 2" PVC, just the right length, with multiple holes drilled in its sides, could act as a center column keeping the plate from bowing and allowing greater vacuum.
Thank you for correcting my math. I wasn't considering an efficiency factor, plus I was probably overestimating in of hg.
I think I've got a 6" chuck out there that I made a couple of years ago, if I can find it. There should be plenty of room for that.
 

Dennis J Gooding

Beta Tester
Beta Tester
Joined
Apr 10, 2010
Messages
824
Likes
732
Location
Grants Pass, Oregon
My approach to the problem would be use the technique described in my August 2020 post in the "Tips and Tutorials Forum" and called Poor Man's Reverse Chucking System" The pictures show how it would be applied to reverse turning the Bottom of a bowl. The same method can be used to reverse turn the inside except for near the rim. The rim could be turned by bringing the live center up (with a suitable wood disc attached to avoid scaring the inside of the bowl) and clamping the bowl solidly to the supporting chuck disk. The outside support could then be removed.
 

Attachments

  • Fig2.jpg
    Fig2.jpg
    120.2 KB · Views: 33
  • Fig1.jpg
    Fig1.jpg
    114.4 KB · Views: 35
Joined
May 8, 2019
Messages
27
Likes
21
Location
Buffalo, WY
My approach to the problem would be use the technique described in my August 2020 post in the "Tips and Tutorials Forum" and called Poor Man's Reverse Chucking System" The pictures show how it would be applied to reverse turning the Bottom of a bowl. The same method can be used to reverse turn the inside except for near the rim. The rim could be turned by bringing the live center up (with a suitable wood disc attached to avoid scaring the inside of the bowl) and clamping the bowl solidly to the supporting chuck disk. The outside support could then be removed.
Dennis, that is one idea I was considering, using my large Cole Jaws as a platform. I thought that if I did that, I'd have to make some sort of soft-ish platform for it to sit against. Maybe Funky-Foam or something like that. My concern was that I might limit my ability to measure the thickness as I got near the bottom. However, If the vacuum/jam chuck approach doesn't work, this might be the best way to go.
 

Tom Gall

TOTW Team
Joined
Feb 20, 2013
Messages
956
Likes
1,763
Location
Hillsborough, NJ
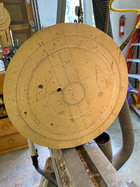
Brent, a vacuum chuck will definitely work with your well sealed lacquer finish ... especially if you can find (or make, or borrow) your larger chuck. You didn't mention the diameter but I assume it to be about 15-16" from the photo - so the larger the chuck the better. Is that black ring(?) on the faceplate side part of the finished piece? Is that where you want to undercut the rim?

A typical sequence should have been: Rough turn the bottom (w/mounting method - tenon?) - Hollow interior - Reverse (vacuum) - Refine & finish bottom.

Mark the center on the faceplate side before removing the faceplate. Do you have one of those drop in center markers for 1¼-8 faceplates? If not, trace around the faceplate with a pencil (or interior if possible) and find/estimate the center. Reverse and bring up the tailstock for support - you may have to make a long pointed rod mounted in a Jacobs chuck in the TS to apply pressure and get the TS out of the way when hollowing your undercut rim. That will be the trickiest part. Leave a little tower of wood with the center mark until the very end. When you have to take a break (nap :) ) - or check your thickness - you can use that to re-mount on the vacuum chuck. You may have to adjust that desired 1/8" thickness. Good luck!
 
Joined
May 8, 2019
Messages
27
Likes
21
Location
Buffalo, WY
The piece is about 14" diameter. The "should have been" was not an option. The total thickness is 2". When you live in Wyoming, you have to work with the wood you can get. I didn't have extra thickness for a waste tenon.

What you describe is pretty much exactly what I'm now planning on doing. I've got a 1¼-8 male threaded thingy on a #2 Morse taper that I can put in the talestock that I'll mount the faceplate on. It'll allow me to put the piece on the vac chuck perfectly centered before I take the faceplate off. Then I can use the live center to make an accurate center mark for remounting.

This will all work out. It just helps to bounce ideas off of other experienced turners to process the thoughts. I built this project in my head for six months prior to picking up a gouge. Then last night I decided I didn't like the hot glue piece of the plan. I don't like adjusting plans at the last minute. Like I said before, this is a complicated project, something I've never seen done before.
 
Joined
Sep 9, 2010
Messages
282
Likes
196
Location
McKinney,Texas
If it were me I would cut a dovetail recess (mortise, rebate, inee) or whatever finish the mortise reverse the piece and turn the other side the mortise only needs to be 1/8” deep. I‘m assuming you have dove tail bowl jaws.
 

hockenbery

Forum MVP
Beta Tester
TOTW Team
Joined
Apr 27, 2004
Messages
8,590
Likes
4,886
Location
Lakeland, Florida
Website
www.hockenberywoodturning.com
What you’ve done looks good even though you sort of turned yourself into a corner. :)
I’d use a vacuum chuck. I like an 8” wood one for this size.
If you leave the bottom 3/8-1/4 thick the vacuum should be ok. Any thinner than 1/4” - the vacuum will pull the wood into chuck making it impossible to follow the outside curve as you hollow because it is distorted. It may crack under the vacuum when thin. If it doesn’t crack and you turn a smoothly curving bottom it will have a bump when the vacuum is released. You may be the only one who can see and feel the bump or it may be more visible.

[Having a QUOTE="Brent Sobotka, post: 210428, member: 39357"]
I didn't have extra thickness for a waste tenon.
[/QUOTE]
For the next one. You can attach a glue block.
However with a 2” thick piece I would start it in a screw center. Turn the bottom with an 1/8” dovetail tenon for the chuck.
Hollow. Turn the bottom off on a vacuum chuck. Giving an 1/8” for a tenon is a small trade off…
 
Last edited:

Tom Gall

TOTW Team
Joined
Feb 20, 2013
Messages
956
Likes
1,763
Location
Hillsborough, NJ
The piece is about 14" diameter. The "should have been" was not an option. The total thickness is 2". When you live in Wyoming, you have to work with the wood you can get. I didn't have extra thickness for a waste tenon.
The vast majority of the things I've turned over the years was from dimensional lumber or purchased bowl blanks. Probably 90% had a glue block with a tenon. There is always a work-around for any situation.
 
Joined
May 4, 2010
Messages
2,432
Likes
1,850
Location
Bozeman, MT
Brent,
I feel your pain. I suspect we all have gotten ourselves into a predicament where we had a really nice piece going but had painted ourselves into a corner. And you've got a really nice piece going.

You've gotten good advice and I have just three little thoughts to add. First, as Mark pointed out, lacquer is a very repairable finish. If you do something that boogers up the finish you have on now, it will be easy to fix later.

Second, this piece looks kinda like the ones that Odie makes. For your next one, you might want to talk to him in advance about his work process. It's extremely well defined and tested, and might work for you, too.

Lastly, if you're necessarily going to take a long time to complete this piece, going thin will be a particularly risky business (cue Tom Cruise and "Keep your old records on the shelf..."). Even dry wood can move during turning, and the longer you take, the more chance it will move. When you turn really thin, you don't have much leeway for movement. If you shoot for 1/8", you may have some areas where it's unexpectedly 1/16". Or lesso_O. Perhaps 3/16" or 1/4" would be thin enough. It would certainly be less likely to become a funnel. (Our Motto: Perfect is the enemy of good)
 
Joined
Nov 24, 2010
Messages
419
Likes
317
Location
Lexington, KY
Lastly, if you're necessarily going to take a long time to complete this piece, going thin will be a particularly risky business (cue Tom Cruise and "Keep your old records on the shelf..."). Even dry wood can move during turning, and the longer you take, the more chance it will move. When you turn really thin, you don't have much leeway for movement. If you shoot for 1/8", you may have some areas where it's unexpectedly 1/16". Or lesso_O. Perhaps 3/16" or 1/4" would be thin enough. It would certainly be less likely to become a funnel. (Our Motto: Perfect is the enemy of good)
This is a crucial point. I've had 1x16 platter, with balanced grain and thoroughly dry, develop a 1/4 wobble at the rim in the course of an hour, with a turned thickness of 3/32-1/4. Wood is going to move, especially if it has extended time available to do its thing. Perfect is indeed the enemy of good (and finished).
 
Joined
May 8, 2019
Messages
27
Likes
21
Location
Buffalo, WY
Brent,
I feel your pain. I suspect we all have gotten ourselves into a predicament where we had a really nice piece going but had painted ourselves into a corner. And you've got a really nice piece going.

You've gotten good advice and I have just three little thoughts to add. First, as Mark pointed out, lacquer is a very repairable finish. If you do something that boogers up the finish you have on now, it will be easy to fix later.

Second, this piece looks kinda like the ones that Odie makes. For your next one, you might want to talk to him in advance about his work process. It's extremely well defined and tested, and might work for you, too.

Lastly, if you're necessarily going to take a long time to complete this piece, going thin will be a particularly risky business (cue Tom Cruise and "Keep your old records on the shelf..."). Even dry wood can move during turning, and the longer you take, the more chance it will move. When you turn really thin, you don't have much leeway for movement. If you shoot for 1/8", you may have some areas where it's unexpectedly 1/16". Or lesso_O. Perhaps 3/16" or 1/4" would be thin enough. It would certainly be less likely to become a funnel. (Our Motto: Perfect is the enemy of good)
Thank you Dean,
After thinking about this overnight (I can't sleep), I think I may be taking advantage of the reparability of lacquer. Hockenbery's point about the bottom deflecting as a result of the vacuum has me rethinking the use of the vacuum chuck. I want to keep the final project under my hat for the time being, but once y'all see it, you will understand why it needs to be thin. There is a good reason for that. 1/8" is my goal, we'll see how that goes. The most critical thing is that it is consistent. 3/16" might be good enough. And believe it or not, I had good reasons using the approach that I did. However, I will concede that if I had thought about it, I may have been able to glue a block onto the bottom to attach a chuck to. But that would have added additional complexities at the end trying to remove it. That process would not be as simple as with a conventional bowl.

It'll be a while before this is done. Probably at least 14 more coats of lacquer once the top is done. Then it's got to sit for a while until I can buff it. Then I'll post pictures and I think you will understand.
 
Joined
Jul 19, 2018
Messages
1,686
Likes
2,077
Location
Ponsford, MN
However with a 2” thick piece I would start it in a screw center. Turn the bottom with an 1/8” dovetail tenon for the chuck.
Hollow. Turn the bottom off on a vacuum chuck. Giving an 1/8” for a tenon is a small trade off…
[/QUOTE]
22070Bowl.JPG This red oak bowl was made from a 2" plank without a tenon using a wood worm screw into what would become the inside of the bowl. The entire bottom of the bowl including a recess was completed on the wood worm. The bowl was then mounted on the recess and the inside finished, simple no muss on fuss.
 
Joined
Nov 19, 2019
Messages
83
Likes
56
Location
Gahanna, OH
Brent, Since you seem to have some time, how about making a small piece with scrap wood, finish it with lacquer, hotmelt glue it, remove the glue and see what happens. If the finish is marred, you could remove the affected area and re-lacquer the center , possibly applying a slight tint feathered to the outer area. I am visualizing a look similar to the tobacco stained Les Paul guitars.
 
Joined
May 8, 2019
Messages
27
Likes
21
Location
Buffalo, WY
Brent, Since you seem to have some time, how about making a small piece with scrap wood, finish it with lacquer, hotmelt glue it, remove the glue and see what happens. If the finish is marred, you could remove the affected area and re-lacquer the center , possibly applying a slight tint feathered to the outer area. I am visualizing a look similar to the tobacco stained Les Paul guitars.
Jim, I am in the process of doing exactly that. I want to let the lacquer cure a little bit before applying the hot glue. You are also very Perseptive on the finish. It is meant to resemble a tobacco sunburst on a guitar.
 
Joined
Feb 19, 2022
Messages
3
Likes
2
Location
Horsham, PA
How about using wine bottle corks? If you drill them through their center axis, you could install them on a Longworth chuck as replacements for the normal gripping parts. Going a step further, turn each cork to cut a " V " into the cork's side corresponding with the height of the bowl/platter's rim for added grip.
 
Joined
May 8, 2019
Messages
27
Likes
21
Location
Buffalo, WY
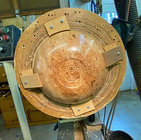
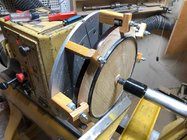
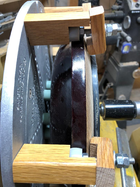
Here is the solution I came up with. I made extension rods for my Cole Jaws. Those rods allowed me to put cams on the top that hold the piece onto the Cole Jaws. The piece is sitting on top of a second set of rubber buttons. It took a little bit of work to get things set up. I had to use a dial indicator to get the piece level on the jaws. The cams allow for tweeking of the levelness, but quickly throw things off. I turned a bit with it today, and it seems to work well. It's going to be slow because I'm not comfortable spinning it much faster than 500 rpm. So I'll just take it slow and steady.
1675652962621.jpeg
 
Joined
Nov 19, 2019
Messages
83
Likes
56
Location
Gahanna, OH
Jim, I am in the process of doing exactly that. I want to let the lacquer cure a little bit before applying the hot glue. You are also very Perseptive on the finish. It is meant to resemble a tobacco sunburst on a guitar.
I will enjoy watching the progress. Your turning rig below scares the s... out of me though Seems like that is a lot of pieces to make a catastrophic fail. Good luck.
 
Joined
May 8, 2019
Messages
27
Likes
21
Location
Buffalo, WY
I will enjoy watching the progress. Your turning rig below scares the s... out of me though Seems like that is a lot of pieces to make a catastrophic fail. Good luck.
Redundancy. Plus, it is very solid, much more so than with a jam chuck or with the Cole Jaws by themselves. It does require serious concentration though. Putting my hand into one of those threaded rods sticking out of the top would definitely leave a mark.
 
Back
Top