• December 2025 Turning Challenge: Single Tree! (click here for details)
  • Congratulations to Bob Henrickson, People's Choice in the November 2025 Turning Challenge (click here for details)
  • Congratulations to John Dillon for "Chinquapin Oak" being selected as Turning of the Week for December 22, 2025 (click here for details)
  • Welcome new registering member. Your username must be your real First and Last name (for example: John Doe). "Screen names" and "handles" are not allowed and your registration will be deleted if you don't use your real name. Also, do not use all caps nor all lower case.

Segmented vase with curved compound miter joints

Joined
Dec 26, 2025
Messages
13
Likes
13
Location
Raleigh, NC
I'm new to the forums, so apologies if I'm in the wrong place. If this belongs in off-topic I'll have to wait a month tp get "established" šŸ˜‚
I spent some time yesterday reading all the threads I could find that mentioned CNC. Most focused on decorating bowls after turning. Some discussed whether using a CNC is "cheating". I freely admit to being a CNC guy who cheats by using a lathe!
I wrote my own software early this year to easily sketch a stave-segmented vase with curved joints. The software create a 3d model for a single stave. I import the model into my CNC software and cut the required number of staves. After the staves are glued together I turn the vase on the lathe.
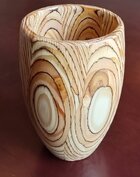
What I'd like to go through is the making of my prototype. Going in I fully expected the process to fail in some way and I'd go back to the drawing board. I needed some thick wood for the staves, and didn't want to sacrifice anything nice. My daughter was having a house built, and I rescued some 2" thick LVL scraps from the dumpster (laminated veneer lumber, used for engineered beams). Crappy stuff for turning, but heck it's just a proof of concept right? Instead it ended up being a really nice keepsake "made from the house".
At this point I'll tease the end result, and if folks are interested I'll add step-by-step posts. My ultimate goal is to share the process and my software with others, though obviously a CNC machine is required. If there are other geeks out there who'd like to collaborate on developing the process further, even better!
 

Attachments

  • finished vase.jpg
    finished vase.jpg
    161.9 KB · Views: 40
  • finished bottom.jpg
    finished bottom.jpg
    277.6 KB · Views: 41
Hi Bob ... great stave/CNC project and with the bonus of the personal connection to the piece !! I've been wanting to explore integrating turning and CNC work for awhile and finally pulled the trigger on a Sienci Altmill 4x4 CNC machine last month. Just got it the other day and still in the setup process. Have been woodworking and turning on/off for most of 50+ years along with a 40+ yr software development career .... but new to the world of CNC.

Would love to see your plans/files/etc. and collaborate on things once I get my feet wet with this new (to me) endeavor.
 
Thanks Steve! I looked up Sienci and your machine looks really awesome. I love the closed-loop motor system, no losing track of position when something stalls! What software will you be using? I have Vectric Aspire.
 
Cool piece! Yes, CNC might seem like cheating, but it does open so many possibilities. I guess if money were not a limiting factor and I could learn the programming part of it, I could see having one, but until then, (neither of which is likely) I'll remain a "purist" woodturner.

As I falling asleep last night, I was pondering what a segmented piece with compound cuts might look like. The curvature of the piece combined with angled cuts might make some interesting curves.
 
OK, step 1 for this project was to sketch the design of the vase in my program. I named the program "Vazier" because:
1. That sounds to me like a guy who makes vases.
2. I use beziers to draw the shape of the vase.

My goal was to make Vazier easy enough for non-technical folks to figure out and use, so it needed a GUI. My artist wife Marie was my beta tester. This screen shot is the design she drew:

vazier.png

The left panel has controls to set the number of segments (staves), overall height, wall thickness, and diameter of the vase, and the resolution of the 3d mesh.
Below that are 3 sliders to control the shape of the curved joint between the staves. The joint is always a sinusoid, but mapped to the surface of the mesh it takes on a nice organic feel. The sliders control the amplitude, frequency and phase of the sinusoid. No need to understand the math, playing with the sliders changes the curve in a way that's intuitive (and fun!)
Next are some stats on the overall dimensions of the vase, and the material dimensions required to machine an individual stave. If you have material you want to use for the staves, you need to make sure the model fits the material dimensions.
The dimensions are updated with every design change.
Finally there are buttons to read and save parameters, so you can get back to where you were. Saving also writes an STL file for the mesh. The STL file will get imported into the CAD/CAM software for the CNC.

The center panel is the sketch itself. You can drag any of the red dots to change the shape. If you've ever used Illustrator, Inkscape, CorelDraw etc. the bezier work the same.

The right panel displays 3d a model of a single stave as a wireframe mesh. All changes made in the control and sketch panes are immediately reflected in the mesh pane. The mesh can be zoomed and rotated in 3 dimensions.

Here's a video screenshot of me playing with the Vazier interface.

This is the vase made from Marie's design. I cut 2 staves from padauk and 2 from ambrosia maple. The final wall thickness is a uniform 5/16". I didn't need to turn the inside at all except for the visible opening at the top. Which is good, because there's now way in heck I could have hollowed that thing! The entire outside was tuned and finished on the lathe. Nice design Marie!
long neck vase.JPG

The actual design for my LVL vase is a lot more boring. Hey, remember I'm an engineer and it was supposed to be just a prototype!
LVL vase.png

In the next post I'll import the 3d model of this stave into Vectric Aspire, and prepare it for machining on the CNC.
 
Thanks Steve! I looked up Sienci and your machine looks really awesome. I love the closed-loop motor system, no losing track of position when something stalls! What software will you be using? I have Vectric Aspire.
Starting out with Vectric Desktop software but see myself upgrading to the Pro version probably sooner than later, Aspire may be a ways off ... at least for now. Opted for their gControl Panel Computer and also went with their 2.2kw, 220V spindle ... the ol' Buy Once Cry One thing kicked in (at least hardware wise).

Up to this point I've mainly thought of doing hybrid CNC/Turning along the lines of "embellishment" ... maybe glue up just a segmented top ring for a bowl, lay it flat to CNC carve a design, words, etc. into that, maybe epoxy fill and then glue that top ring to the rest of the bowl before turning. I've seen vids where people have used a CNC Rotary Axis attachment to turn spindles but wasn't that impressed I guess since that's what a lathe is for IMHO šŸ¤”. Then again some have cut a trap door in the bed of their machine to machine larger pieces vertically and or mount a rotary axis in. Lots of possibilities out there.

Your Mr. "Vazier" app looks pretty cool .. hats off to you and Marie !! Turned out to be very nice vase. One of the things I've done when turning bud vases is to bore a 3/4" hole down the neck with a little recess at the top to accept a glass test tube ... just a thought.
 

Attachments

  • Bud Vase.PNG
    Bud Vase.PNG
    843.4 KB · Views: 4
Oh man, you have me drooling over your spindle!
Biggest limitation of Vcarve desktop is going to be the 24x24" max size. Other than that it should hold you for a while.
We done lots of bud vases that fit 5/8" plastic test tubes from Amazon. With my signature curvy staves of course!
bud vase.jpg
 
My machine is a ShopBot desktop, 24x18", 120v spindle. So you're starting out way ahead of me from a hardware standpoint. I have the rotary adapter, but my Z axis only allows for about 3" diameter, so not super useful. I make these salt and pepper mills on it, mostly because I can make a bunch and they match perfectly. Doing just one is easier on the lathe, and more fun.

pepper mill.JPG
 
OK, time for step 2: Cut the staves on the CNC

This step is less interesting if you don’t either have a CNC or plan to get one. You can skim it to get the idea, but don’t be intimidated, it’s not as hard as it looks.
If you do have a CNC, I’m going to assume you have at least some experience with it; a detailed step-by-step would be way too much for this follow-along. I’ll hit a few milestones specific to this project.
The details are also somewhat specific to my machine (ShopBot Desktop) and CAD/CAM software (Vectric Aspire). The ShopBot is similar enough to most of the hobbyist CNCs you can find at places like Woodcraft and Rockler (Shark etc). They usually come with VCarve Desktop, which I believe should work the same as Aspire for this project.

I already knew I wanted to use scraps of 1-3/4" thick engineered lumber for this project. I had several pieces in widths of 11-3/4ā€ and 14ā€, and lengths up to about 2’. I designed this vase with 6 staves.

lumber.jpg

At the end of step 1, Vazier told us each of the 6 staves would need a piece approximately 8ā€ x 3.426ā€ x 2.126ā€. It’s approximate because it assumes the stave will be cut with the axis of the vase parallel to the machine bed, and the length parallel to the X axis (usually along the gantry). I guessed by looking at the profile in Vazier that the thickness was conservative, because each side ā€œleaned outā€ from the center. That’s oversimplified because the stave is a complex 3D shape, but the actual import later confirmed a stave fits in my 1.75ā€ material.

I decided to cut 3 staves at a time. I could have fit all 6 on a single piece of LVL, but figured the first 3 would let me test the fit of the joints before doing the rest.

I created a new Design in Vectric with the following material setup:

material setup.png

The job is single sided because I'm only going to machine the ā€œinsideā€ surface of the stave. The inside includes the miter joints and the inner surface. The curved miter joints are the whole point of the project, and letting the CNC machine the inner surface means I won't have to hollow on the lathe. I could machine the outside as well, but that's much easier and better on the lathe.
The job size is the dimensions of my scrap of LVL.
The XY Datum Position is the corner I index to on my spoilboard. I like to use PEX pegs for alignment.
I set the modeling resolution to Very High, which is probably overkill. I never really notice much slowdown.

Now we need to import and position the 3d model. Vazier modeled the vase standing up, but we need to cut the staves lying down.

import 1.png

import 2.png
 
Last edited:
We can also tweak the rotation to fit our 2.126ā€ thick model in our 1.75ā€ thick material. To do this I rotate the view to "Front" and turn off perspective, then turn the green ring slightly left.

import 3.png

import 4.png

If the model is too thick to fit the material regardless of rotation, we could import again and scale it down, or go back to Vazier and change the size. I like to keep Vazier consistent with the final piece.
Otherwise we complete the import and go to the 2d View. There we can make copies of the model, and put a vector boundary around them for a cutout profile. I also like to put hold down screw holes in my design, to avoid breaking bits on screws I was SURE were not in the way.

2d 1.png2d 3.png
 
Last edited:
šŸæ ... in my quest of learning CNC with reading and watching countless videos (without having even run one job yet ) and also never having done a stave project🤪, that said ... could the toolpaths for the
inside surface be eliminated and have the carve just cut the curved profile and glue joints ? Say maybe for more of a curved stave bowl shape allowing for traditional hollowing of the inside ?
Then again ... it's already on the CNC so might as well just carve it out (?)
Wondering what the time is for running all toolpaths for one stave.

BTW .. read in your intro that you worked at IBM ... spent my entire 39 yr career with them starting in Endicott NY, then Austin TX for 10 yrs, then 6 yrs from home in AZ before retiring.
 
You could certainly design with an extra thick wall, and do as much hollowing as you like on the lathe. Think of the CNC as doing the "rough turning", leaving the final shape for the lathe.
If I remember right this vase was about 30min per stave. From start (design in Vazier) to finish (laser my logo on the bottom) it was a 2 day project.

I did co-op assignments in Poughkeepsie (grew up in Hyde Park), worked at the chip plant in Essex Junction, VT for 7 years after college, then RTP, NC for another 12. Left IBM and finished my career with Qualcomm.
 
Back
Top