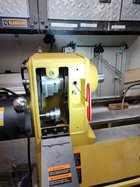
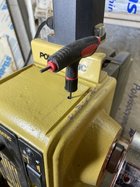
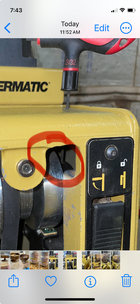
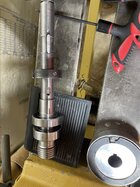
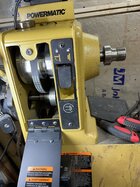
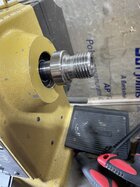
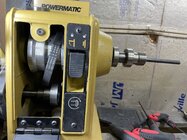
When Ric and I first attacked the problem last fall, we pulled the spindle shaft. You don’t have to remove it, just shift it rearward a few inches. The manual discusses how to do this in the section on replacing the belt.Today I talked to a Powermatic tech person. He tried to help but had no solution to my problem which is now reinstalling the key under the collar. I've removed the black box and the motor. I've thought about enlarging the hole I drilled on the top but haven't reached a decision on that one. There is just no room to get ones fingers in to replace the key.
-
It's time to cast your vote in the December 2025 Turning Challenge. (click here for details) -
Congratulations to Pat White for "Sicilian Mosaic" being selected as Turning of the Week for December 29, 2025 (click here for details) -
Welcome new registering member. Your username must be your real First and Last name (for example: John Doe). "Screen names" and "handles" are not allowed and your registration will be deleted if you don't use your real name. Also, do not use all caps nor all lower case.
You are using an out of date browser. It may not display this or other websites correctly.
You should upgrade or use an alternative browser.
You should upgrade or use an alternative browser.
Spindle noise on PM2014
- Thread starter Michael Edelman
- Start date
And was the key installed at the factory?I wonder how that is installed at the factory?
No doubt the spindle is assembled before being installed into the headstock, or at least assembled as it is being slid in.Today I talked to a Powermatic tech person. He tried to help but had no solution to my problem which is now reinstalling the key under the collar. I've removed the black box and the motor. I've thought about enlarging the hole I drilled on the top but haven't reached a decision on that one. There is just no room to get ones fingers in to replace the key.
I found that if you loosen the big solid Hall effect collar and slide it to the left against the pulleys there is just enough room to slide a finger or 2 in there. You should, with some fiddling, be able to re-install the key on the spindle shaft once the collar is moved. Just be sure to strike an index mark on the collar and spindle shaft so it can be re-indexed when you move it back over.
I have the PM2014 rotational ticking issue and have verified that it is a loose spindle lock collar. This is what they sent me when I called Tech Support. They recommend to remove the spindle lock mechanism to provide a means of getting an allen wrench in there to tighten the spindle lock collar. I tried this method and only succeeded in bunging up the nut and tweaking the lever. I've tried moving the speed sensor collar over and unscrewing the speed sensor black box to move it out of the way but I still couldn't get to it. This really annoys me, especially since I paid the $500 Covid premium for this lathe. I expected better.
[email begins]
to disassembly the device,
First, to pull out the plastic pad.
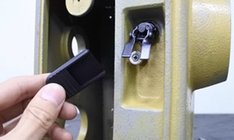
Secondly, using screw driver to loosen the stop seat.
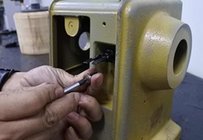
Thirdly, using power grip of universal plier to grip M12 nut. Use another rod to leverage the plier and turn anti clockwise to loosed this device.
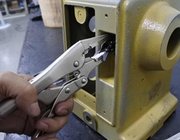
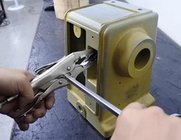
I did operation today, it is a little bit of difficult to do this operation; I asked vender to have extra contact washer and a M12 nut, and secure it from rear side by open end wrench.
It will be more comfortable/ easy to replace it. I will issue this ECR soon.
Please let me know if you have any question, thanks.
[email ends]
[email begins]
to disassembly the device,
First, to pull out the plastic pad.

Secondly, using screw driver to loosen the stop seat.

Thirdly, using power grip of universal plier to grip M12 nut. Use another rod to leverage the plier and turn anti clockwise to loosed this device.


I did operation today, it is a little bit of difficult to do this operation; I asked vender to have extra contact washer and a M12 nut, and secure it from rear side by open end wrench.
It will be more comfortable/ easy to replace it. I will issue this ECR soon.
Please let me know if you have any question, thanks.
[email ends]
Yes. if the tech's fix is doable you're a much better mechanic than I am. I fixed mine using Michael Edelmans method discussed earlier in this thread. A small carefully placed 1/8" hole for access and you'll be good to go. Since this is a known problem Powermatic should have addressed it with an access port long ago.
Curiously, I spoke to Powermatic on two different occasions and sent them an email, and never received the instructions that Scott shared. The second tech I spoke with told me that there are two different spindle lock mechanisms on the 2014. The one Scott describes is the older one, according to what the second tech told me, and the newer one has the locking nut on the inside.
It would be nice if we could get Powermatic to read this thread. Or perhaps they have, or they came up with this fix following calls my myself and others.
It would be nice if we could get Powermatic to read this thread. Or perhaps they have, or they came up with this fix following calls my myself and others.
Last edited:
I felt from my conversation with the Powermatic tech person that he had never come across this problem before. maybe he was new on the job? I wonder how many tech people they have answering the phone at one time?
I had the same impression with both techs I spoke with- one in December and one more recently,I felt from my conversation with the Powermatic tech person that he had never come across this problem before. maybe he was new on the job? I wonder how many tech people they have answering the phone at one time?
Had this same problem with mine. Thanks to Ric and Michael, the drilling of a hole worked perfectly. Once I got some light in there, NO set screw. Parts list calls for a 10-24 x 1/4. Shortest I could find was 5/16. OK, let’s try it. Dipped the Allen wrench in a bit of grease and put on the set screw hoping it doesn’t fall off. In it goes, tightened it and the spindle won’t make a complete revolution because the set screw is hitting the spindle lock. Back out the set screw, grind off a heavy 1/16, back in and the tick is gone! Many thanks!
How did you remove the spindle lock toggle assembly?I had a similar problem and found the collar had gotten loose. This is how I accessed the set screw.
The PM tech people were enormously disappointing. One told me I should google it, he had no idea. I removed the spindle assembly and was then able to access the nut on the inside of the spindle lock. An enormous pain. There is a nut on the inside and a nut on the outside and the lock assembly hole is threaded. I used a vise grip to grab the outside and unthread it. I think the hole in the top is probably easier. If you have an angled wrench that can access the interior nut, it might be possible to accomplish without removing the entire spindle assembly. BTW, the set screw in my case was also missing and the collar had damaged the spindle and the adjacent RPM monitoring collar.
Paul, I thought about doing the spindle lock removal but the nut on the inside gave me concern. Drilling the hole, with layout and all, was about 10 minutes. Luckily, it didn’t seem to have any damage to the collars or spindle.
If I had to do it again, I would take the "hole in the top route"! You made the right decision in my opinion. Im glad it worked out. On a separate note, as typical of many other iconic American machinery companies, PM is a different company than it once was. In fairness, I will say they made good on the warranty.
A good friend bought a 2014 a year after I did. His started with the same ticking. Helped him yesterday with the drill and set screw fix. Apparently, they either didn’t tighten it at the factory or didn’t put one in. Easy fix in about 15 minutes. However, his rpm display is way out of kilter. At around 200 rpm’s, it’s displaying around 1,000. Anybody had this issue? Don’t know if there’s a reset on the controller but that’s not something we want to go in.
The rpm sensor is directly to the left of of the collar. It's possibly just slightly out of position. Try nudging it back into position. The set screw on the sensor should be accessible through the front door. You might need one of those hex keys with a rounded end. Good luck.
Thanks Paul but we already did that. The set screws were loose on it as well. Slid it over to the left and snugged them up. Sensor may be a little too close to the collar but we didn’t have a right angle Phillips screwdriver to try to loosen it and get a touch more clearance. He’s gonna tackle that and see if it helps.
Good luck. I found the collar positioning quite finicky before it worked reasonably. Obviously I don't really know just how accurate it really is!
this is my first post. I have the same problem on a three month old Powermatic 20-14. I have a wobble on that speed collar and ticking sound (loud). I called the manufacturer and the tech was great. He told me to loosen the two screws center the collar over the speed reader and tighten the screw on the key way first then the other. Sounds easy. My collar is positioned so I can reach a hex wrench in right at edge of door opening straight on it. Give it a whirl in the morning and I’ll report back.
Very thankful for this AAW forum!
Very thankful for this AAW forum!
- Joined
- Mar 25, 2008
- Messages
- 313
- Likes
- 302
- Location
- Suwanee, GA
- Website
- www.mikepeacewoodturning.com
Thanks Michael Edelman for your solution! Here is video I did on fixing the stop collar missing set screw.
View: https://www.youtube.com/watch?v=9nDaGUcjk3w&t=2s
I had a similar problem with my 3month old 2014Powermatic. I talked to service at Powermatic and was also told to take it to a service center which for me was an hour and forty five minutes away ,one way. On mine the key was also missing from the key way. I had to remove the entire spindle which they explain in the manual as changing the drive belt. I got a new key way and used a drop of CA glue to hold key in place during assembly then did basically what Mike peace is showing in his video to install set screw. Runs like a champ now! It’s unfortunate someone has to go through this with a brand new lathe!
Attachments
Well this issue is still alive and well. Got mine 2 weeks ago brand new. Great lathe. After about 2 weeks it started making a slight erratic ticking noise. I did some research and this was the first result. Checked and sure enough that collar was slightly loose. Very hesitantly drilled a hole in my brand new lathe and it took about 1/8th of a turn to snug it up and the noise went away completely. I guess I’ll just tighten it up ever week or so. It’s a shame you have to do this to a brand new quite expensive lathe. I figured that would have solved it somehow by now.
Want to thank all of you for your info. I am now having the same problem and will go to the fix. Called Powermatic and they have as of yet to respond. Had the lathe for less than a year, you would think they would address the problem. Thanks again
Just for an update. Powermatic contacted me. This is their response:
This does sound like the bearings.
Bearings belts and blades are consumable items and not covered under warranty.
Sooooo, is this telling me that Powermatic (AKA jpwindustries) can install cheap bearings knowing they do not have to cover them? Bearings are the main cog of the lathe. Wish I knew before purchasing.
I investigated as per suggestions above and found the spindle lock loose.
That is why Robust warrants their bearings for 7 years. I got rid of my 2014 because of how many problems I had. I would really be upset if I had to drill a hole in a brand new lathe!Just for an update. Powermatic contacted me. This is their response:
This does sound like the bearings.
Bearings belts and blades are consumable items and not covered under warranty.
Sooooo, is this telling me that Powermatic (AKA jpwindustries) can install cheap bearings knowing they do not have to cover them? Bearings are the main cog of the lathe. Wish I knew before purchasing.
I investigated as per suggestions above and found the spindle lock loose.
I wrote a response to the Tech Service about the consumable items:
Thank you for your response.
As in hindsight I should have done more research before I purchased the 2014. To me bearings are considered one of the main cogs of the machine. When a main part of the machine gives out with limited operation within a year shows what a manufacture is made of. During my research I noticed there were bearing problems, and I trusted that Powermatic should have solved the problems by now. I now regret the purchase of the 2014. I am glad this machine is not an auto.
Today I received this message from the Tech, surprised me:
Peter,
Please reply with your full shipping address and I will send you all 3 bearings as Goodwill.
Now I need the Tech manual to lead me to install.
So …. A few days ago I noticed another loud ticking on my 2014 and my spindle lock does not engage.
Stay tuned ……..
Stay tuned ……..
Same problem as 9 months ago. The key way was missing again for the spindle lock collar. I didn’t know what else to do but do what I did last time. Take the spindle out ,get a new key way and once again, a little CA glue to hold key way in place and reassemble. This is not fun a fun job! Running like a champ once again. I guess I’ll have to keep a closer eye on the set screw! Shame on Powermatic!!!
Attachments
Same problem as 9 months ago. The key way was missing again for the spindle lock collar. I didn’t know what else to do but do what I did last time. Take the spindle out ,get a new key way and once again, a little CA glue to hold key way in place and reassemble. ...
You mean the "key" was missing, right? (The keyway is generally defined as the straight-sided slot machined in the shaft and often, a gear hub or collar - anything you don't want to rotate on the shaft, the key describes the separate piece that fits into the slot). Regardless, I'm sure everyone knows what you mean. Glad you got it fixed.
When replacing the set screw maybe use a drop of blue threadlocker (Locktite) on the threads (best to clean off any oil first). The blue stuff holds well but can be removed if needed. The red Locktite is considered "permanent" but it can be softened to remove the screw if heated, usually with a torch on a shaft like that - not something I'd want to do inside a lathe headstock!
JKJ
Yes …. The key was missing. Type mistake. Thanks!

